Onecut Origami - A New Pastime for Origami Enthusiasts
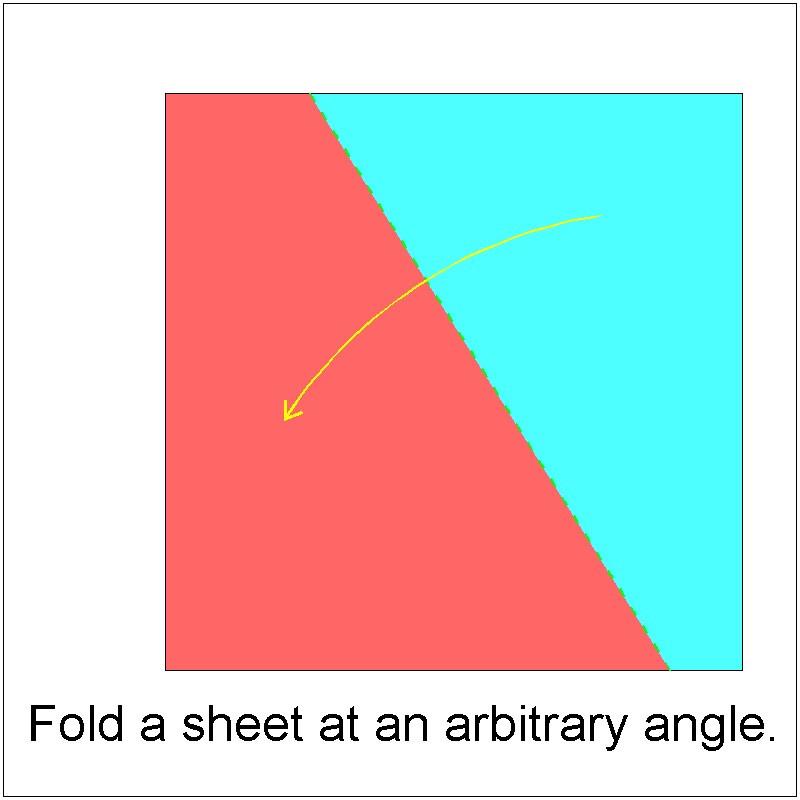
The traditional Origami starts most of the time with a square sheet of paper and after a certain numberof simple folding steps, some object is created. It does not need any scissor cuts.
Or more correctly stated, "any scissor cut is not allowed at all."
Onecut origami introduced here breaks the scissor cut rule, and creates interesting 2-dimensional shapes.
Two differnet approaches
There are two different approaches.
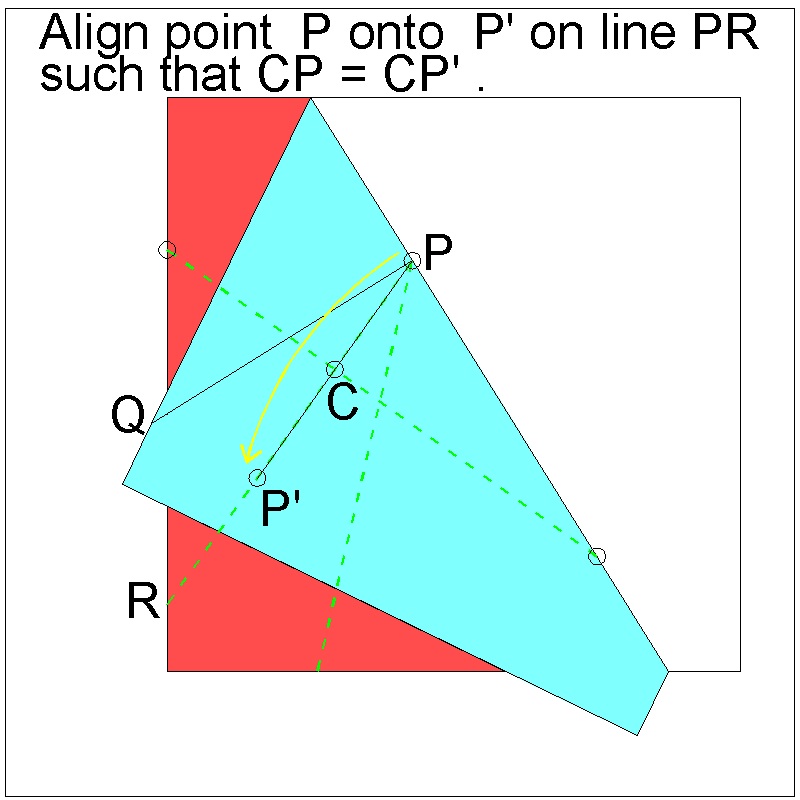
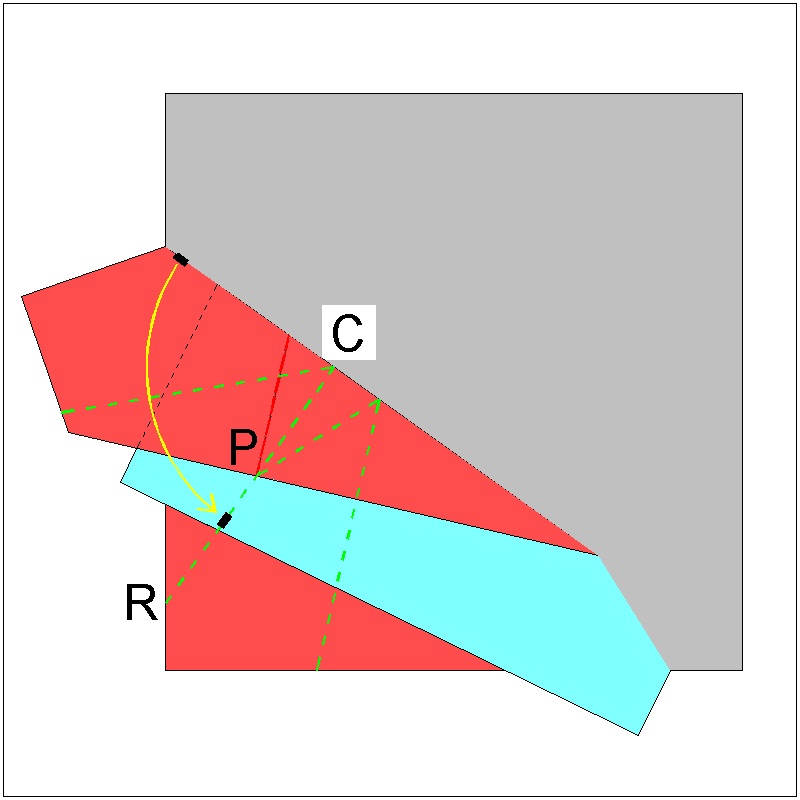
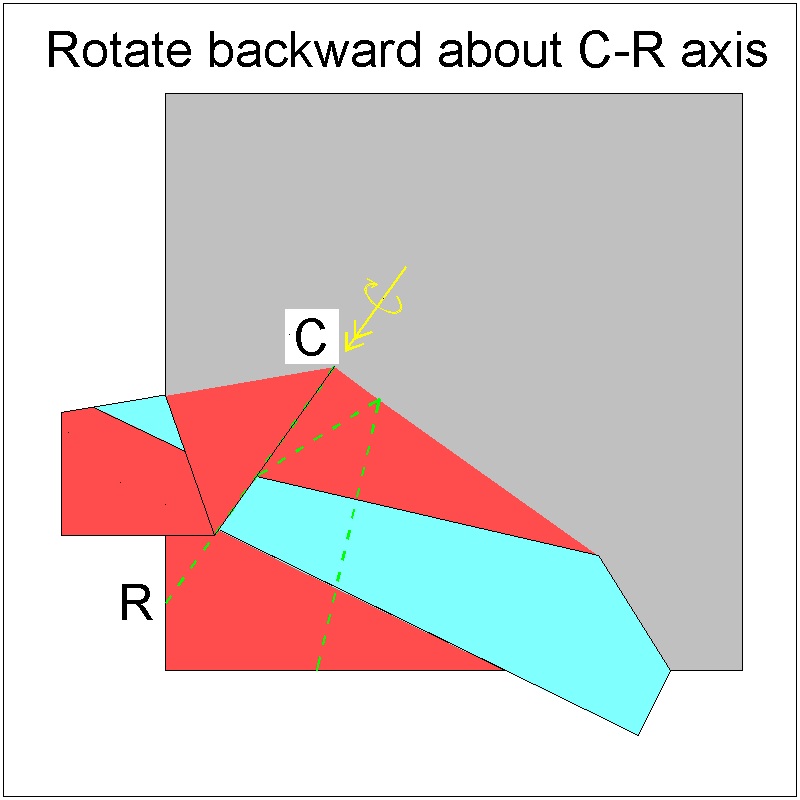
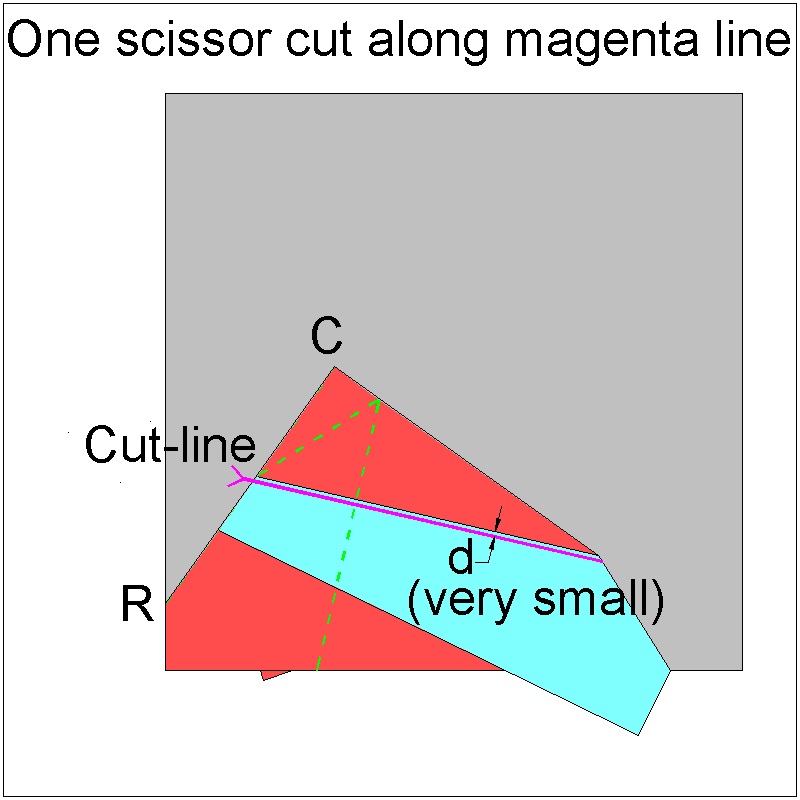
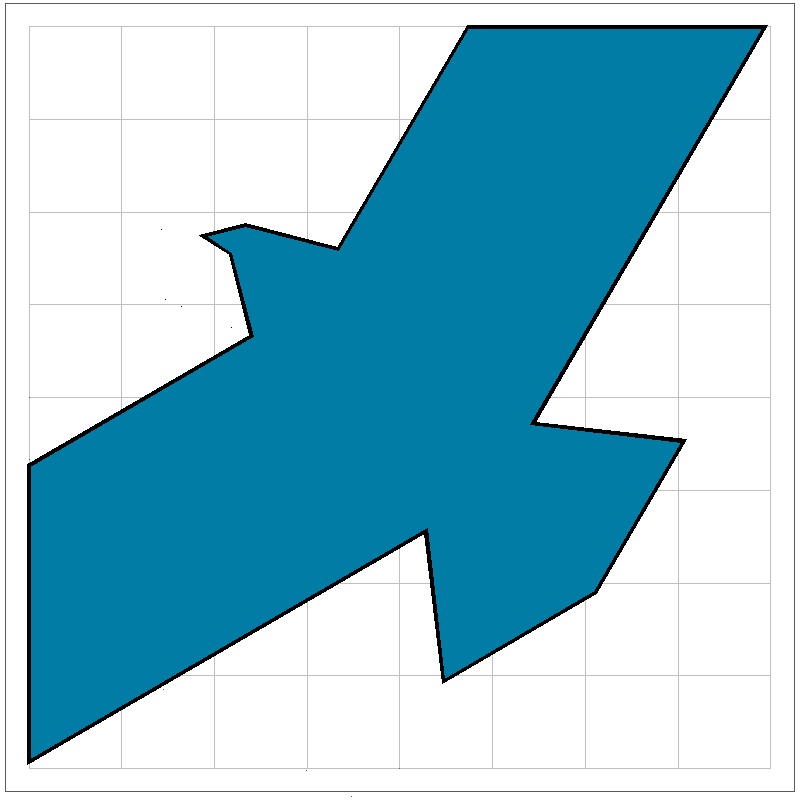
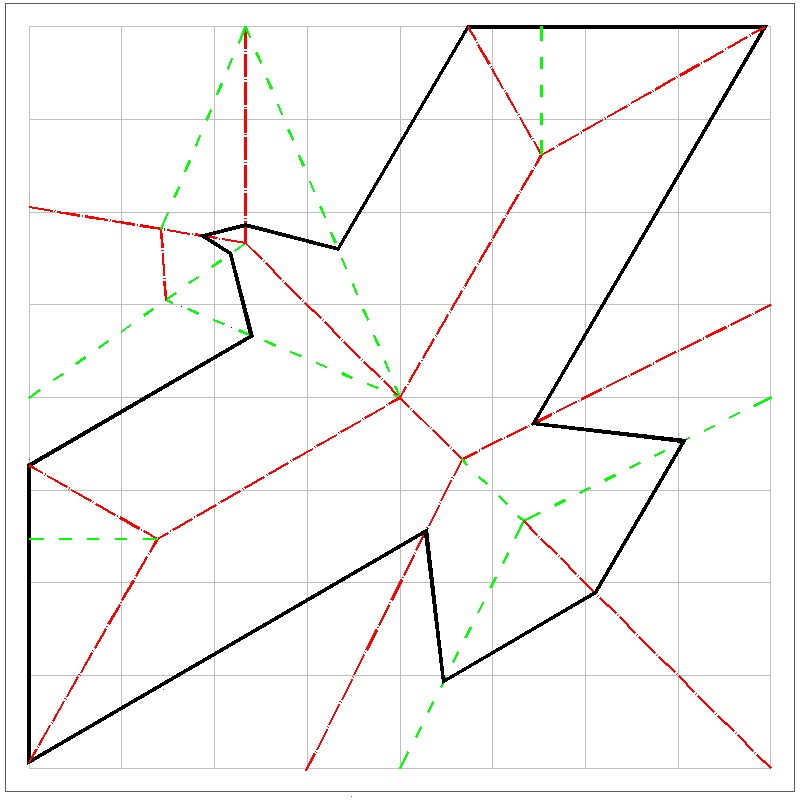
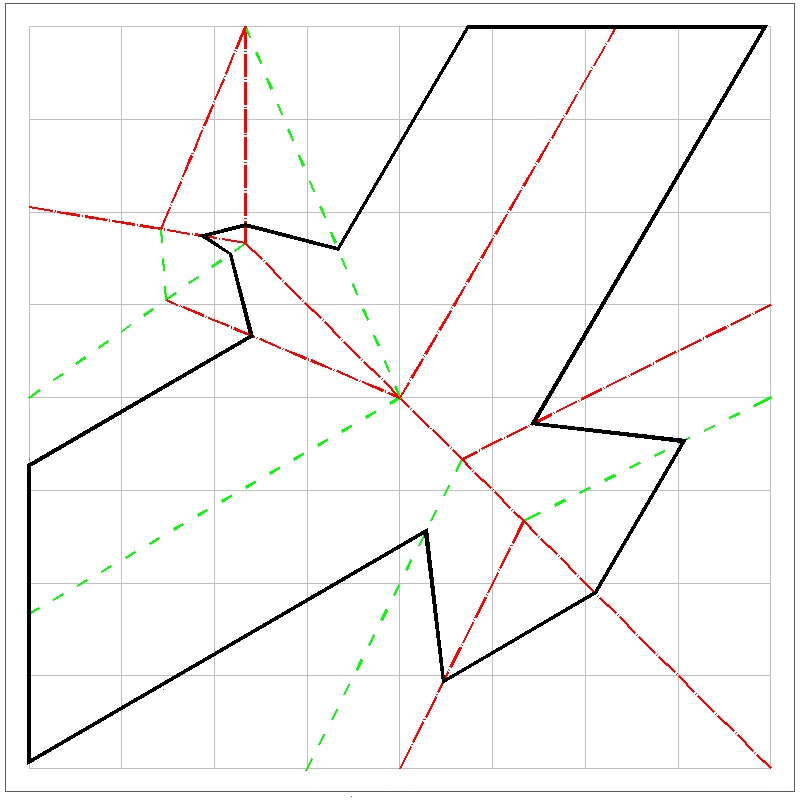
1. Draw a figure made up of straight line segments on a piece of paper. Then the problem is
to figure out how to align all lines to one straight line for a single scissor cut.
Over the last 20 years or so,mathematicians have shown keen interests and some interesting
example figures
are used to demonstrate the algorithms to align multiple line segments.
The best book references to follow the geometrical argument are the following :
There are also many internet references. Ref. 1 through 14 listed at the bottom in reference section.
Example :
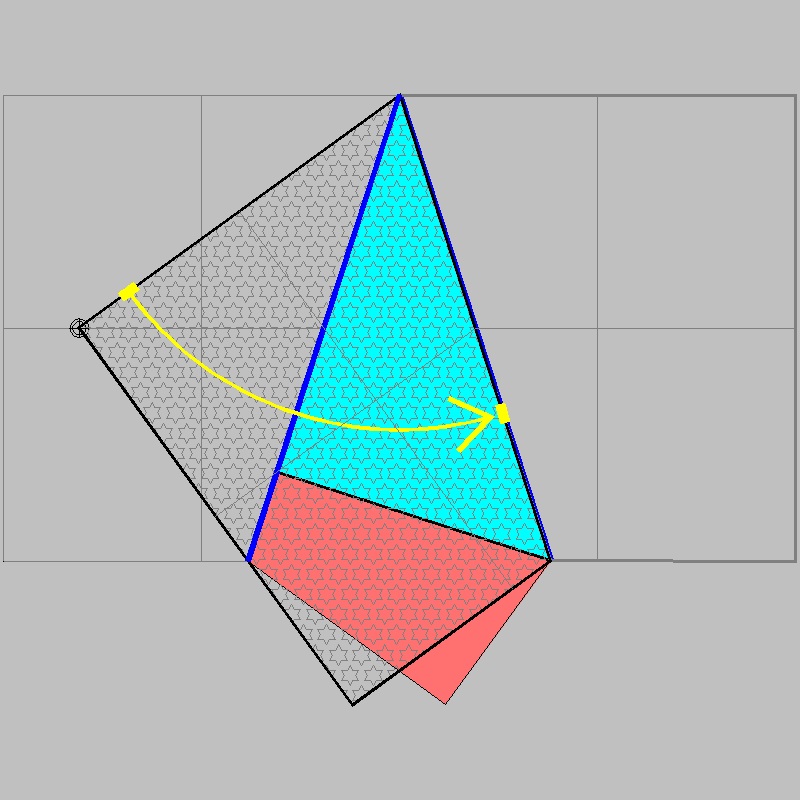
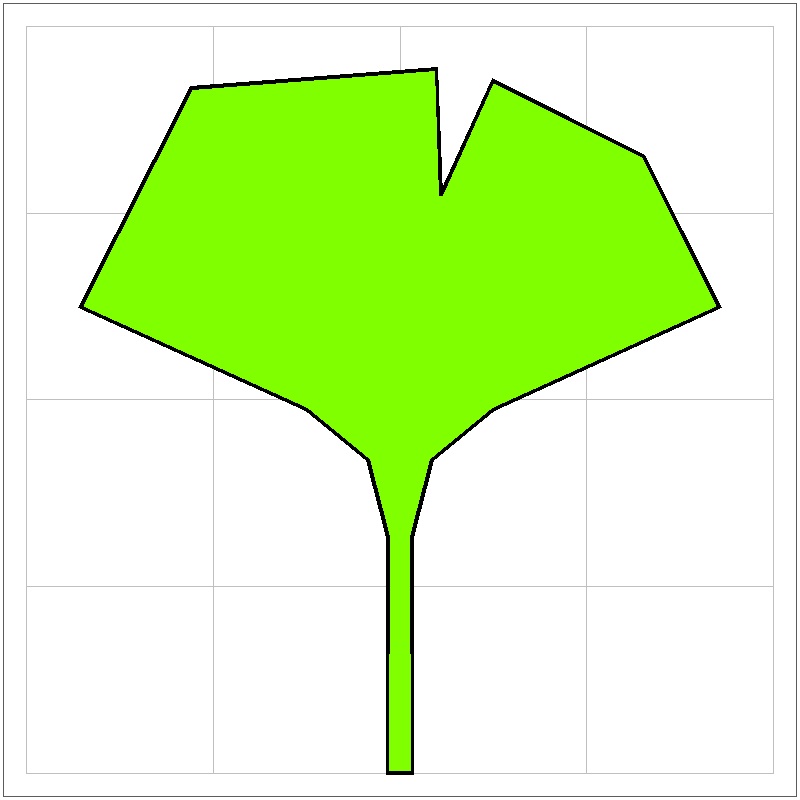
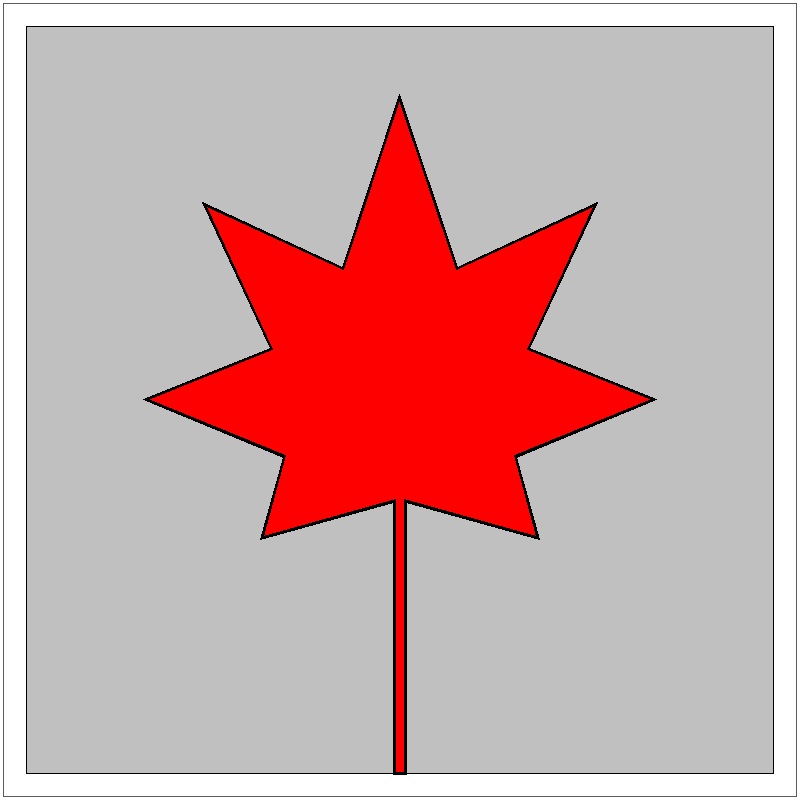
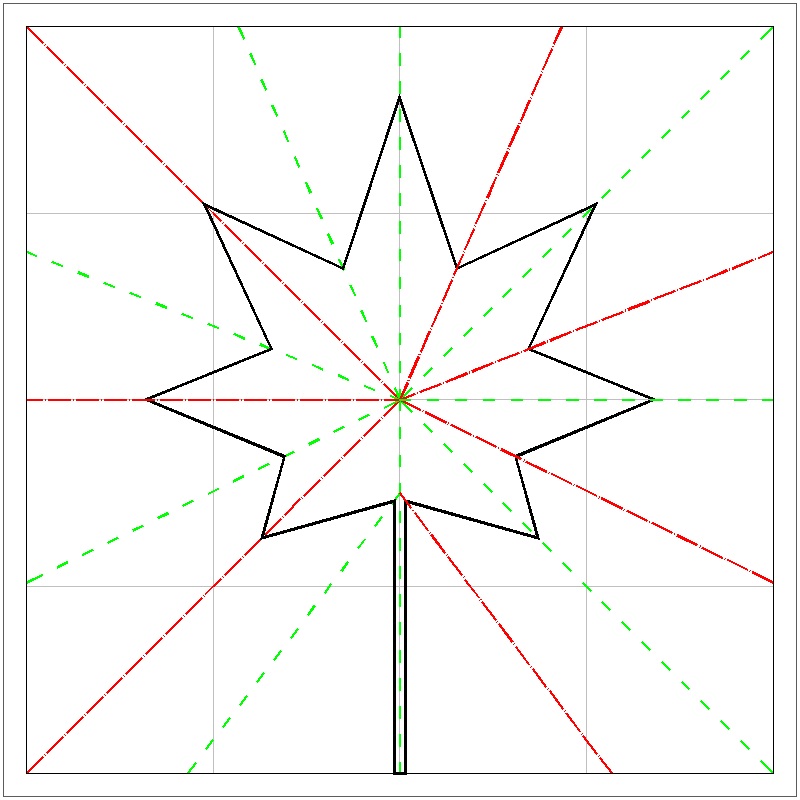
step 1: The author took a photo of one ivy leaf on the roadside.step 2: The picture (JPG file) was imported to CAD software and digitized.
|
(1) Ivy leaf Photo click here to enlarge  |
(2) Ivy leaf digitized click here to enlarge 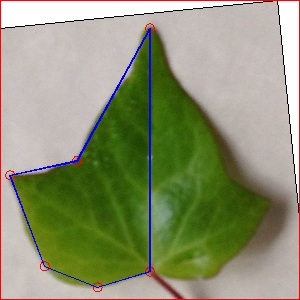 |
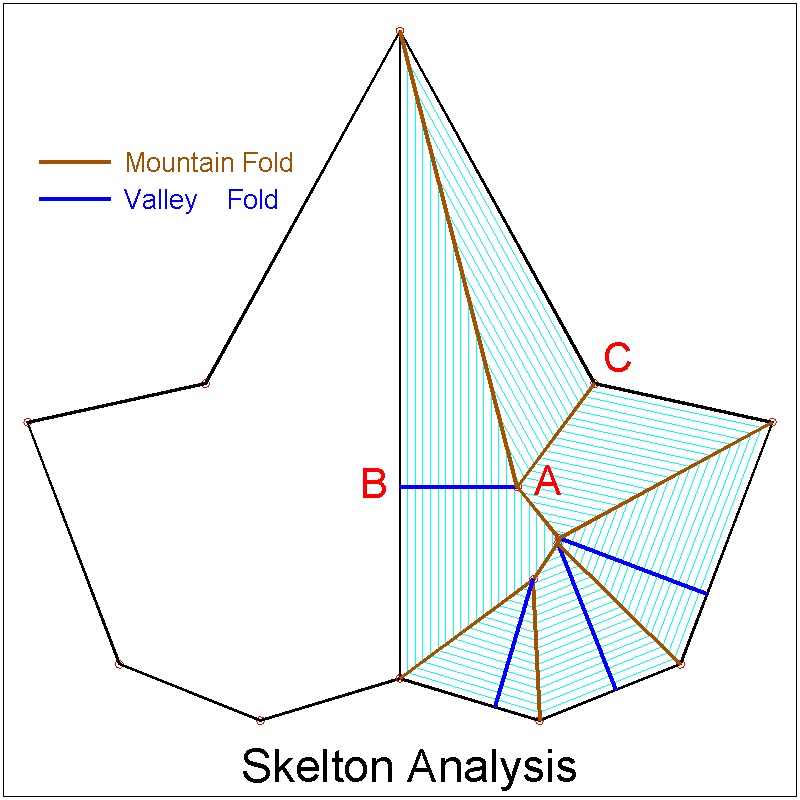
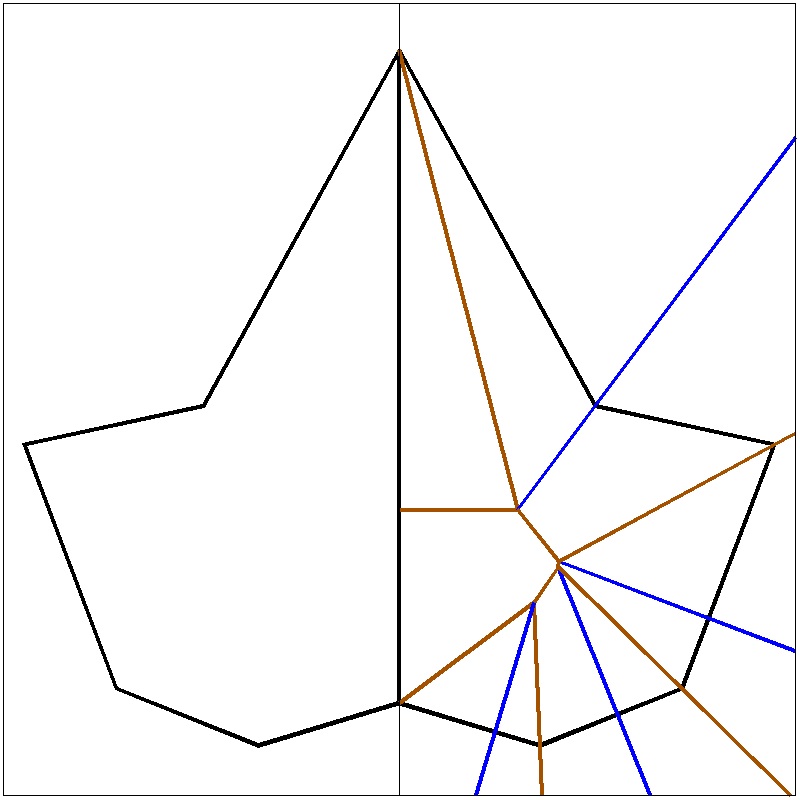
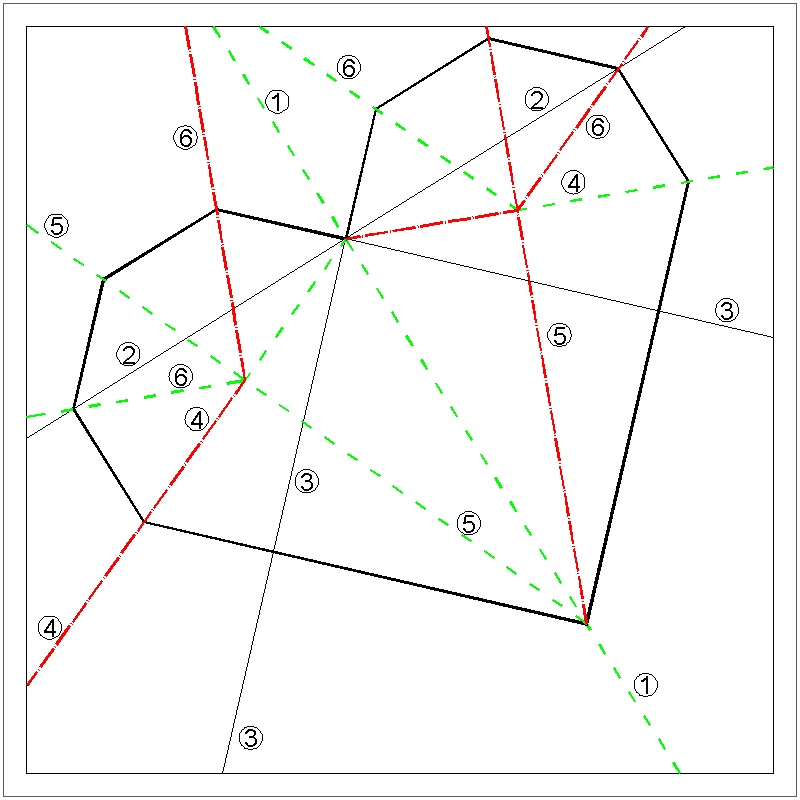
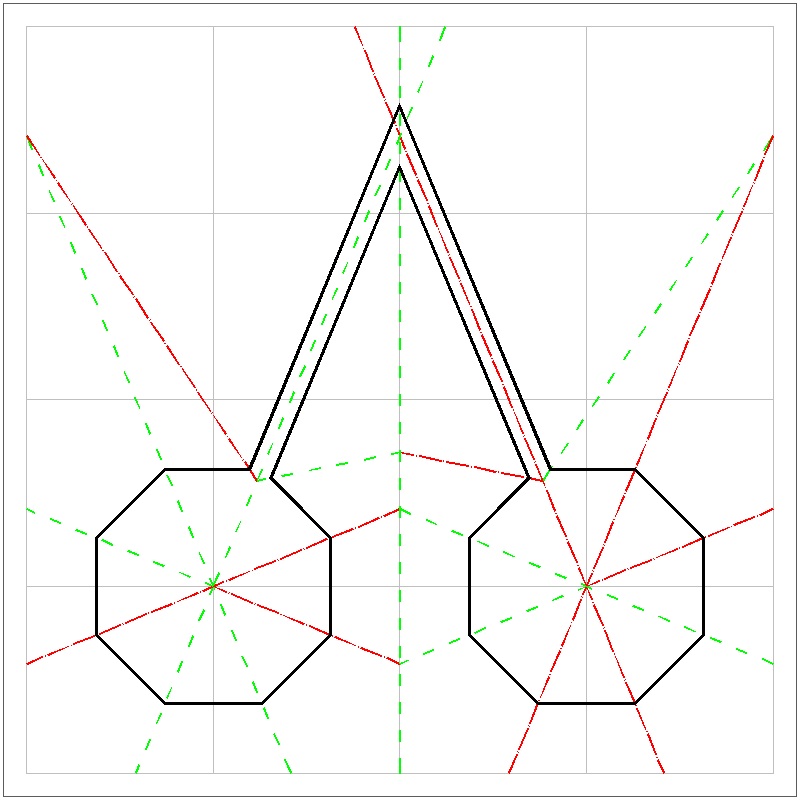
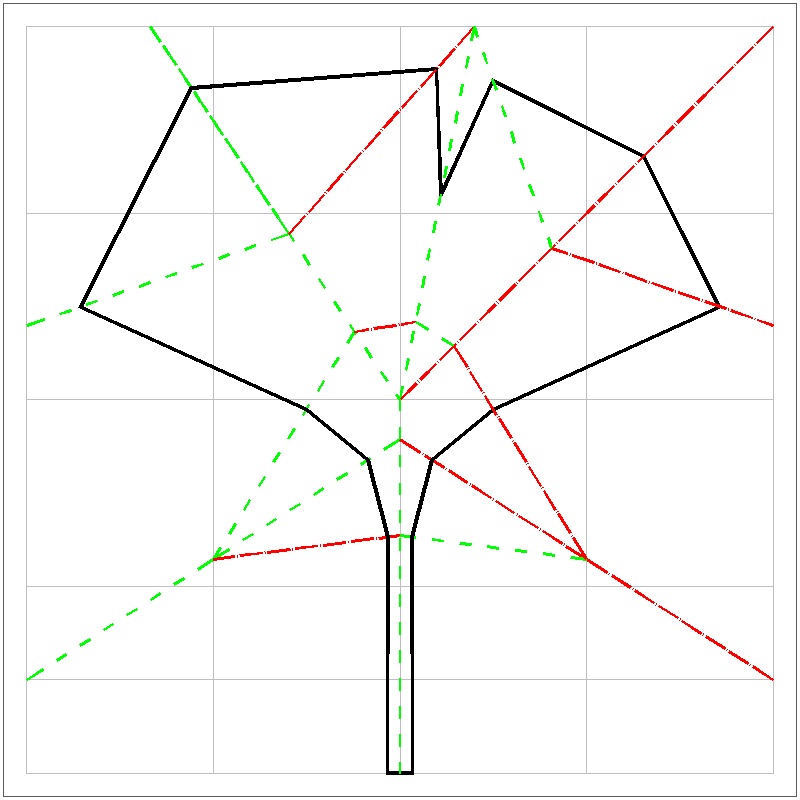
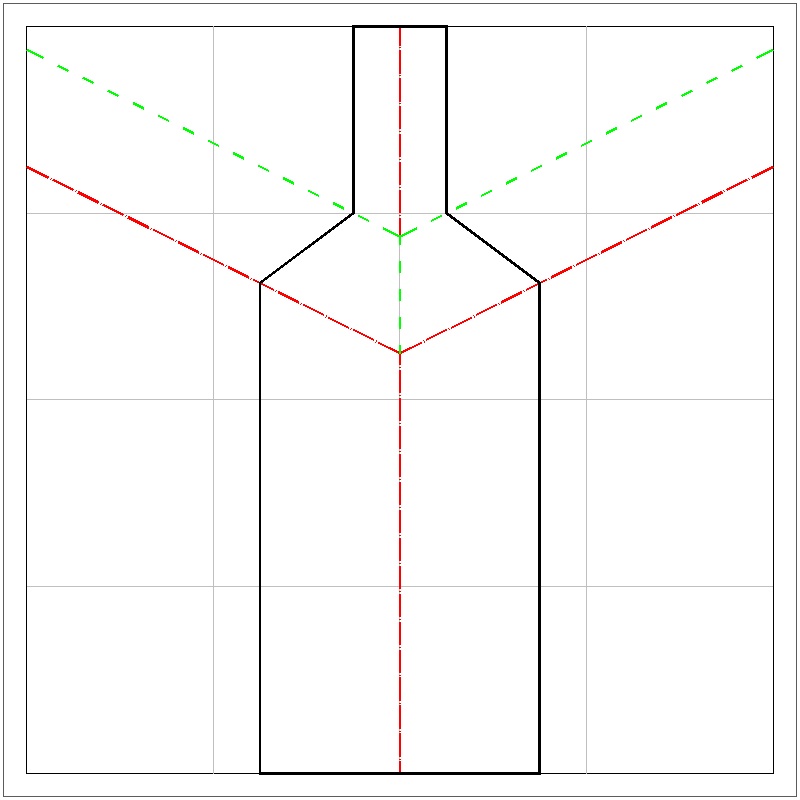
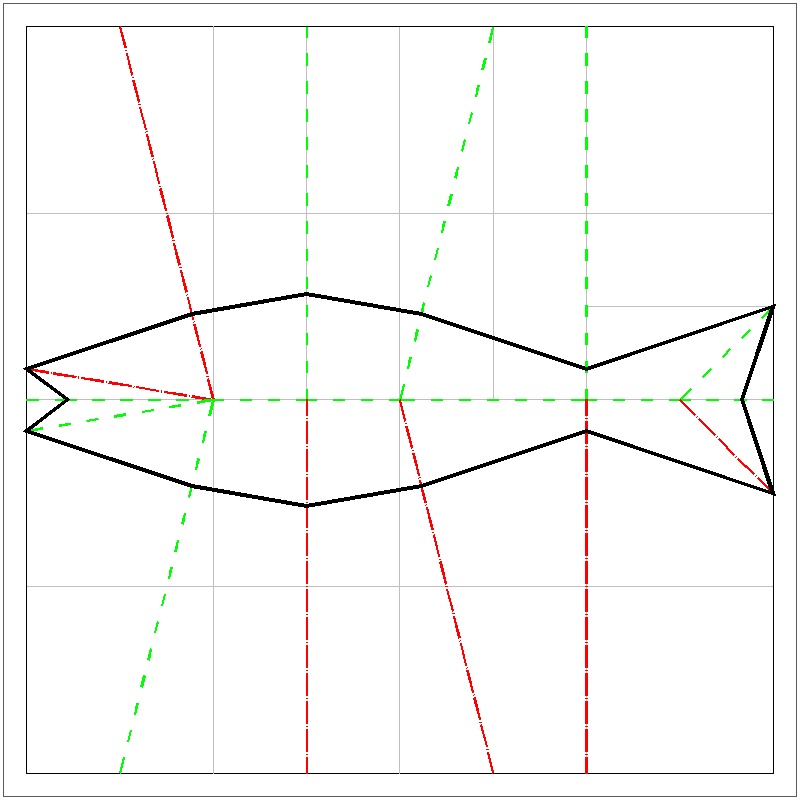
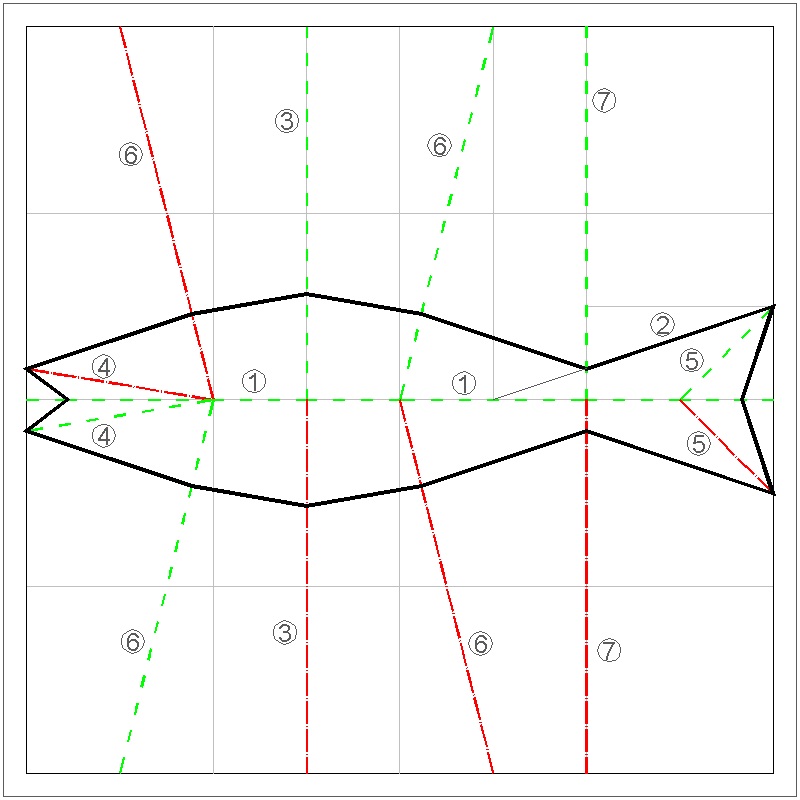
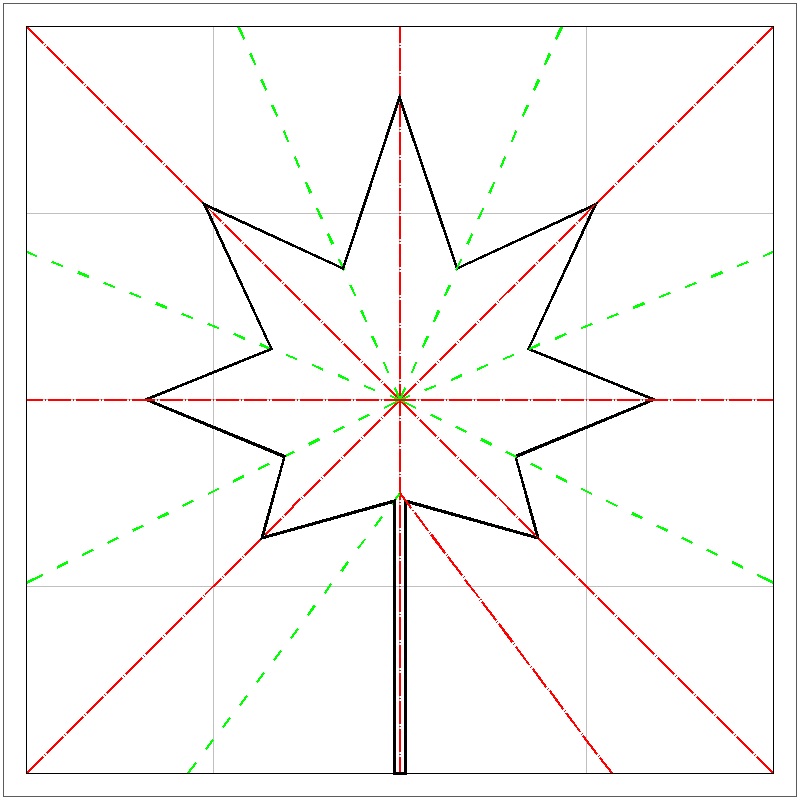
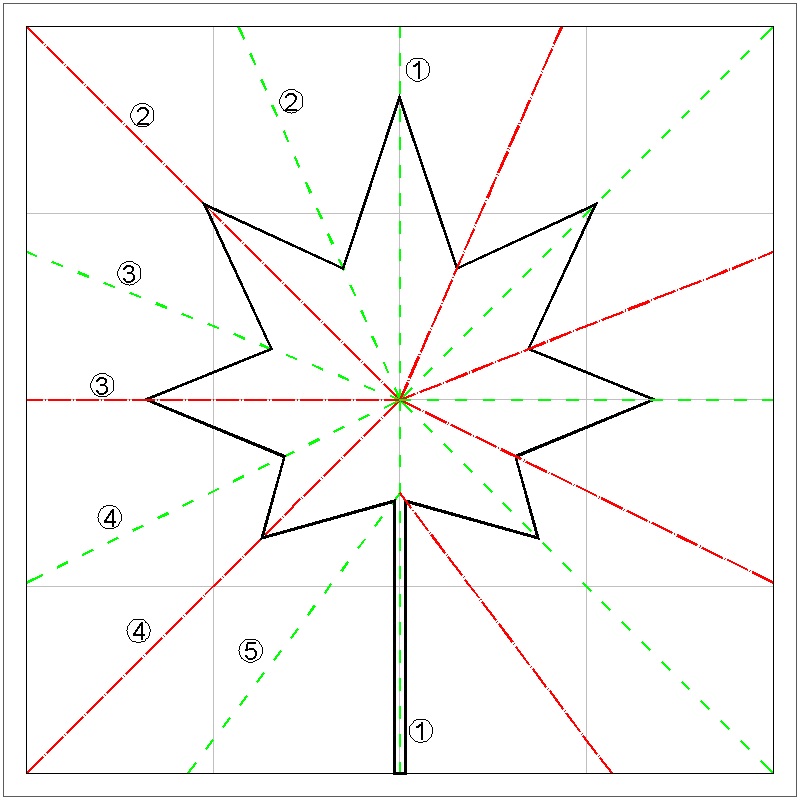
step 3: Skelton Analysis: Angle bisection and contracting lines of the periphery.
step 4: Addition of perpendiculr lines completes folding lines required.
Print this figure(800 x 800 after enlarged), and use the printed figure as a template for the trial folding.
Using a thin tracing paper (or vellum), trace the graph and crease lines.
If your printer can handle tracing paper ,you can print the crease line figure and use it for folding.
The author used 100 % Rag Vellum on Epson Photo 1400 printer, and the result was very good.
|
(3) Skelton Anlysis click here to enlarge 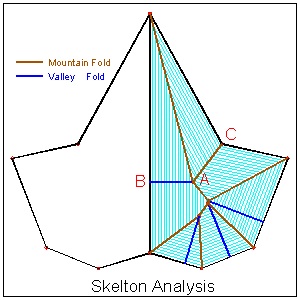 |
(4) Folding Lines click here to enlarge 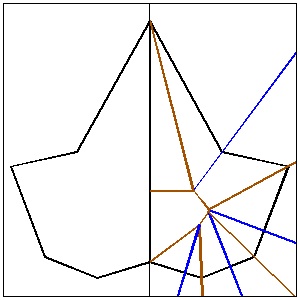 |
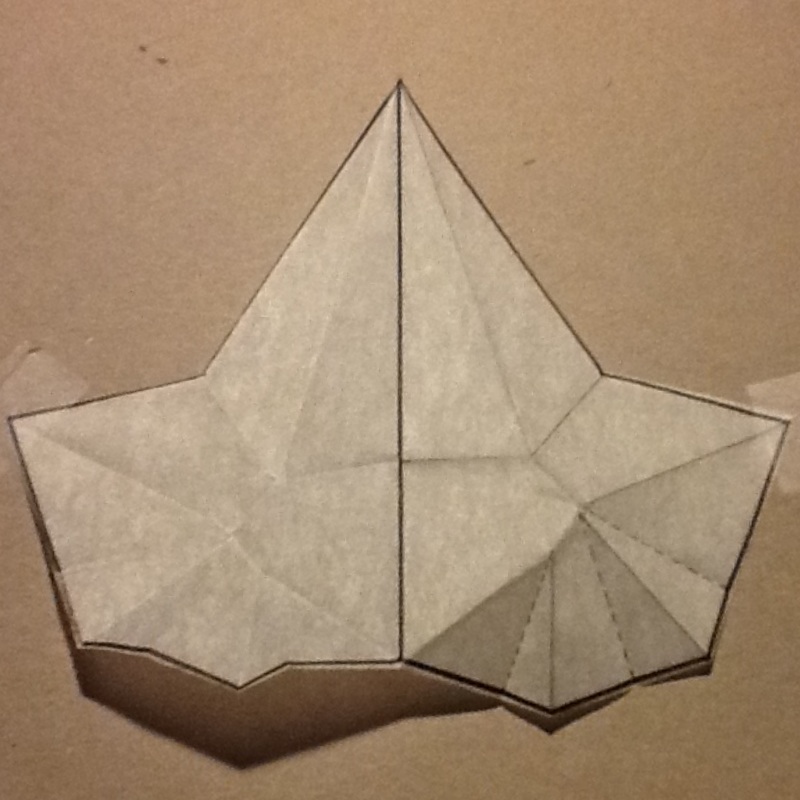
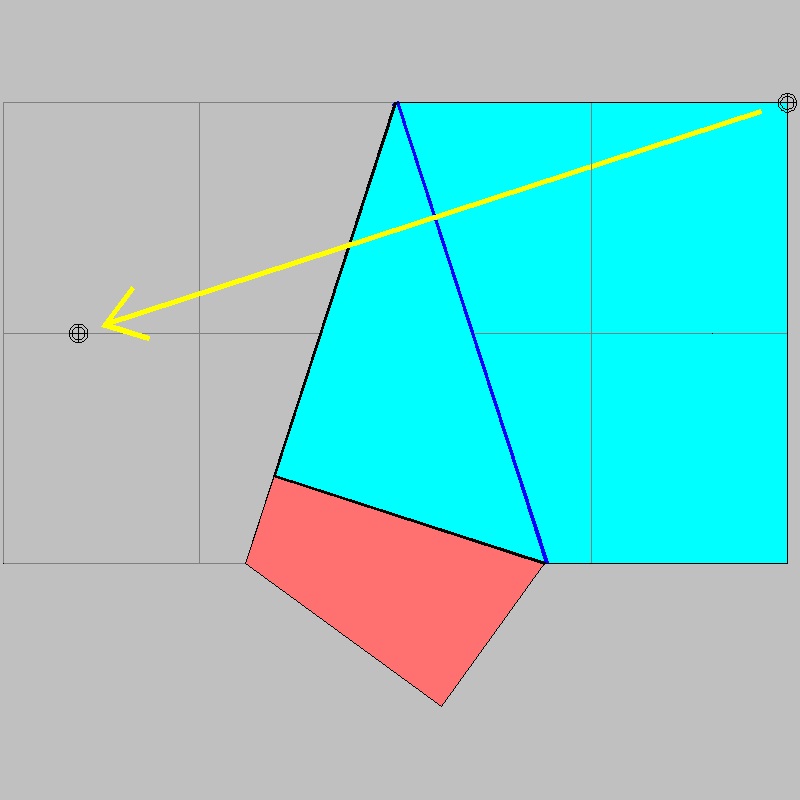
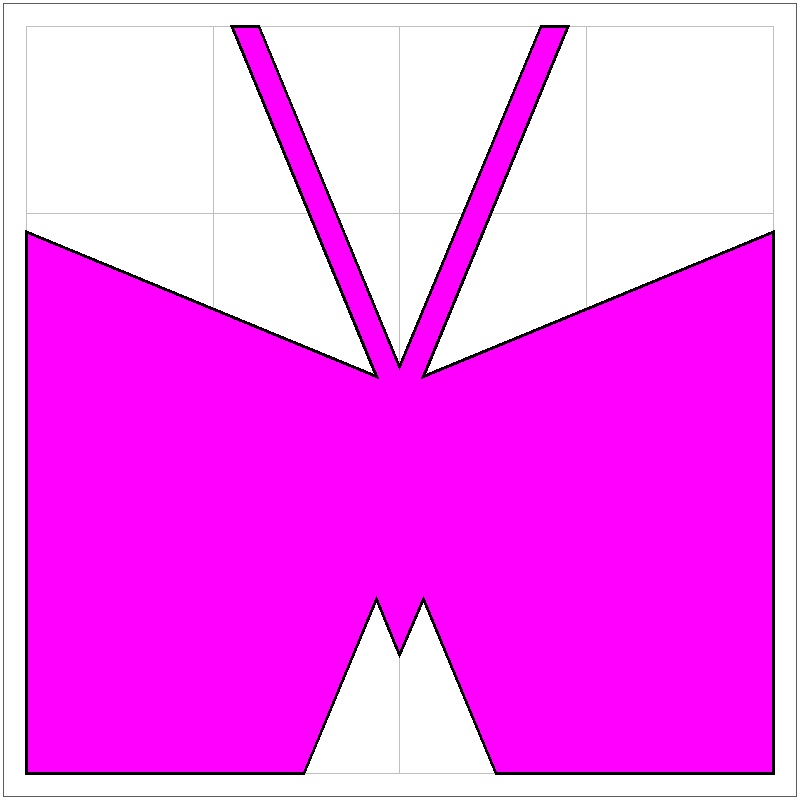
step 5: This is how it looks after the folding process is finished according to step 4 figure.
step 6: The final result looks like this.
|
(5) After Folding is done click here to enlarge 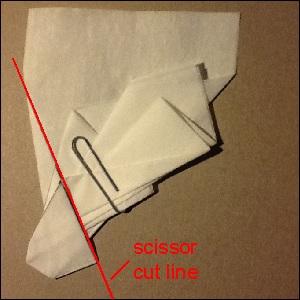 |
(6) Result ater one straight scissor cut click here to enlarge  |
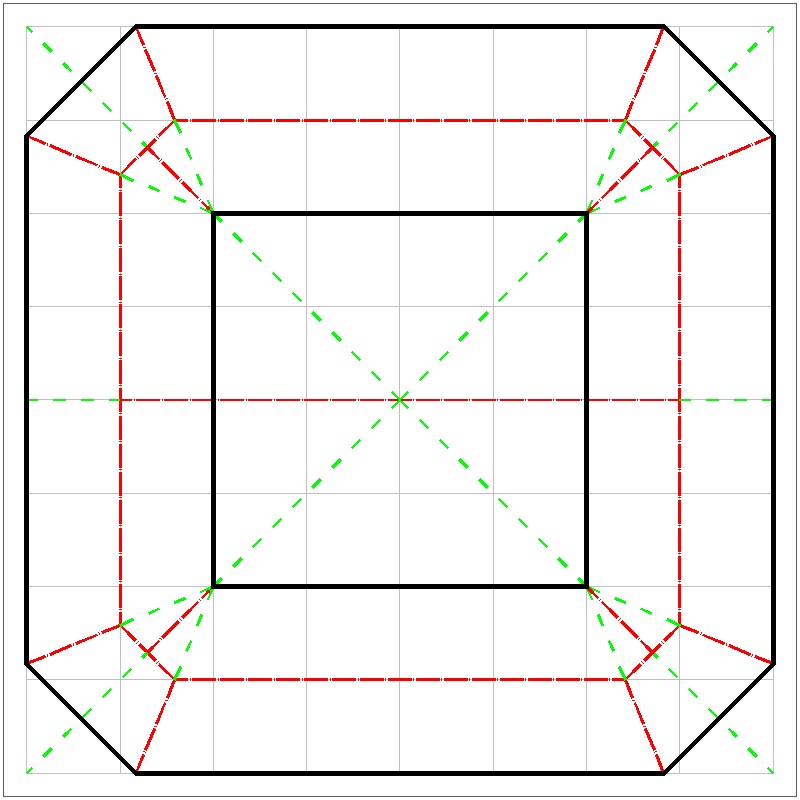
In theory, any planar graph can be folded so that one straight cut will produce the original graph.
2. Start with a piece of paper (most of the time,square, and sometimes , rectangle), then after some number of folding,
make one straight line scissor cut. When it is unfolded, some interesting figure shows up.
Note that there is no figure drawn on the starting piece of paper.
But many average persons woud like to take the second approach. When you play the traditional Origami,
you start with a blank paper.
And moreover that was how Betsy Ross demonstrated how to make a Five pointed star in the presence of
President George Washington (so goes the anecdote ) in the early days of US history.
Following this line of thoughts,
Kousei Yamamoto (Book ref 1,2 ,3,& Internet ref.15) has published a series of book
(vol. III (2012) ,
vol. I (2004) ,
vol. II (2006)
)
on this subject and manages his own blog site .OneCut Origami
Unfortunately for English language audience, since these books are written in Japanese, and published in Japan,
they are hardly known in other countries.
What is "Onecut origami" ?
The name "Hito-Tachi Origami" in Japanese used in Yamamoto's books, is translated by the author as"Onecut Origami", partly because the literal translation of "Hito-Tachi" is "one straight cut".
Historical Background
(1) 多賀谷環中仙 ( Tagaya Kanchu Sen ) c.1727 published "和國智恵較" (Wakoku Chie Kurabe) (Japan Brain Contest)-c.1727. He was a medical doctor practising in Kyoto, and he was also a very good mathematician and magician. He wrote several books on magics and mathematical puzzles. He proposed a few problems for onecut-origami. He called it "一小刀問題 (Ikko Tachi Mondai)"(one knife cut problem). He is now recognized as the first person to publish any book on the "Onecut-Origami".|
Prop. #1: Igeta click here to enlarge  |
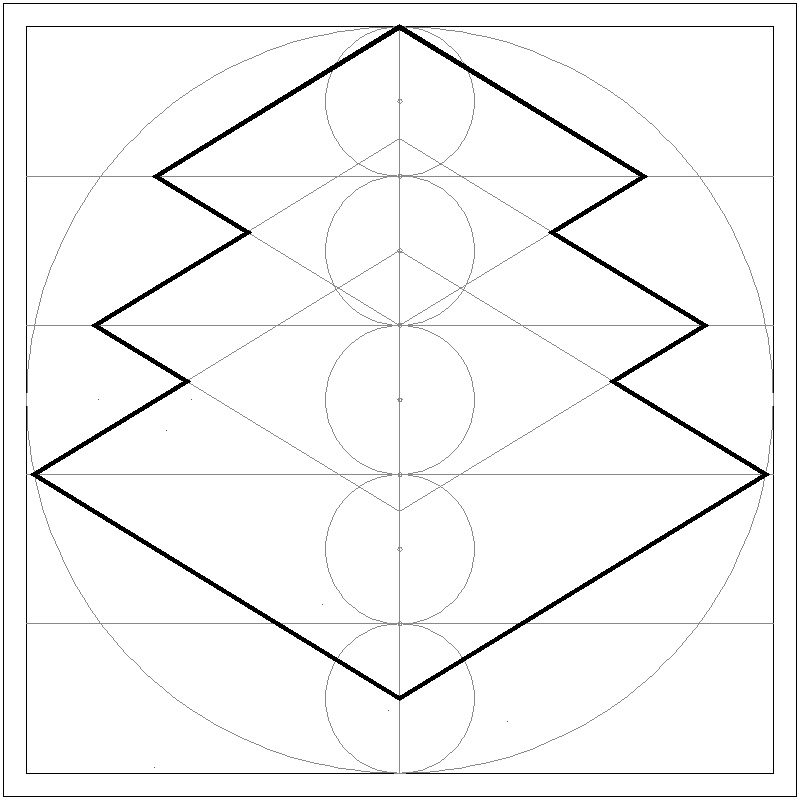
Prop. #2: Sangai Bishi click here to enlarge See how to draw  |
On the folding steps of "Igeta", see "Ikko Tachi" Problem. On how to draw "Sangai bishi", refer to the web site 三階菱(On "Sangai Bishi").
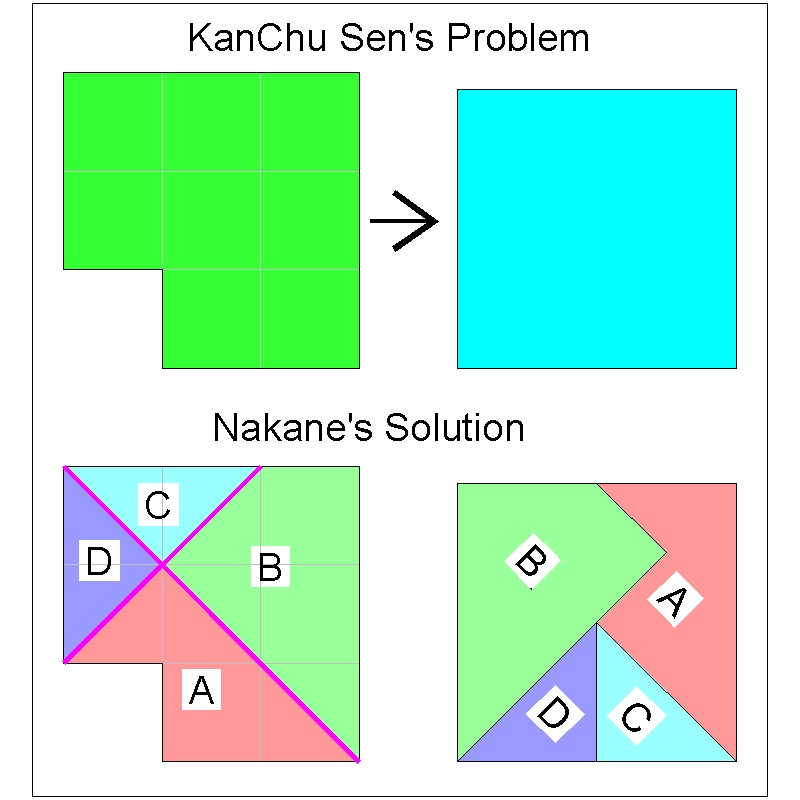
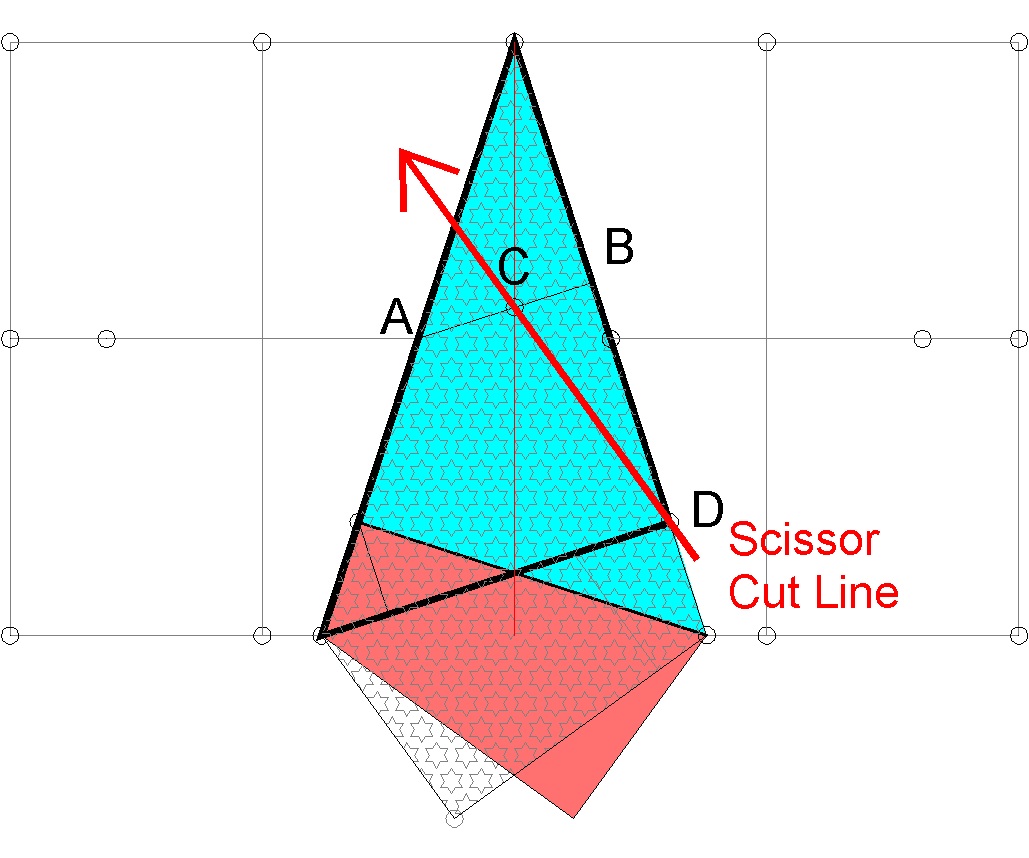
(2) 中根彦循 (Nakane Genjun (1701-1761)) pulished 勘者御伽双紙 "Kanja Otogi soushi" (smart guy's fun book) in 1743. In the book he introduced one dissection puzzle he found in KanChu Sen's ( Chinjutsu Sange Cho )(c.1727).
The puzzle : (Refer to the top of the left picture frames below) Dissect the 3x3 square sheet with one 1x1 square missing at the corner, then reconstruct a smaller square. Nakane added a twist to this puzzle, saying that the disection must be done by folding the paper and then one straight scissor cut.
|
Nakane's Dissection: click here to enlarge 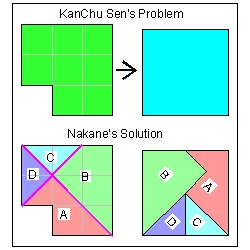 |
Two more solutions click here to enlarge  |
Nakane's solution:
The dissection lines of his solution are shown in thick magenta lines. Once the dissection line is known, it is not that difficult to figure out how to fold the paper for one final scissor cut. That exercise is left to the readers.
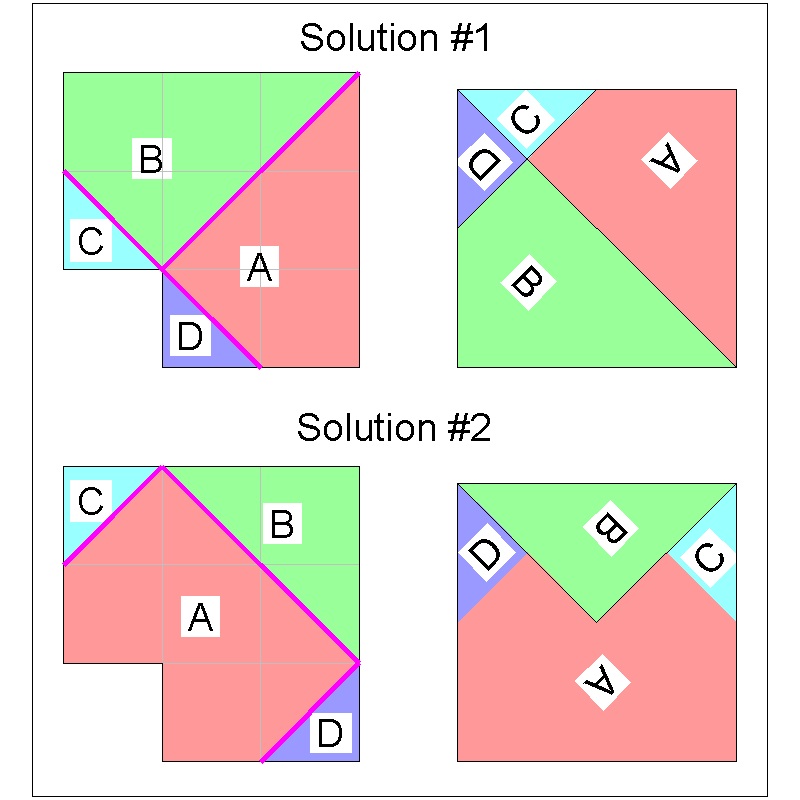
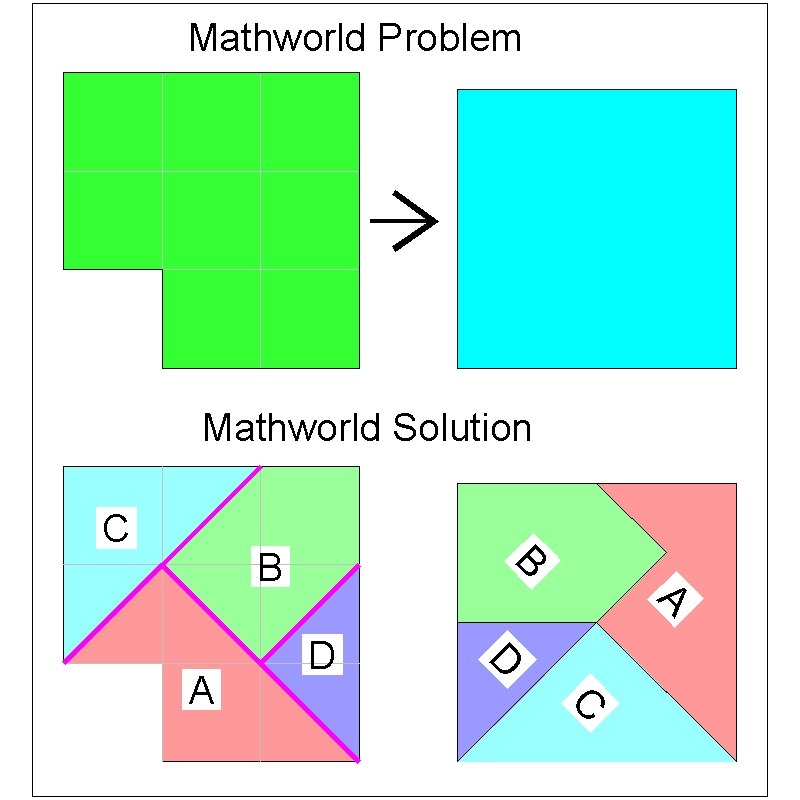
This puzzle was recently presented as a math challenge in the Japanese web site. The challengers presented two more interesting dissection methods. They are shown in the right figures above. Again "onecut folding" is left as readers' excercise. Recently the author found another dissection solution in "Pythagorean Square Pizzle" From MathWorld-A Wolfram Web Resource.
|
Mathworld Dissection: click here to enlarge  |
Author's comment on this solution:
(1) This is basically the same as Nakane's solution (look above at Nakane's solution) and compare.
(2) Part "D" is not necessary. Instead "D" is a part of "B". Look at Nakane's solution.
(3) The Nakane's solution needs "C" and "D" because of "one straight cut " requirement.
(4) In order to make onecut line for "Mathworld solution", the cutline coincides with the collection of
mountain fold and it is very difficult to accomplish.
Refer to the paragraph "Dissection" below.
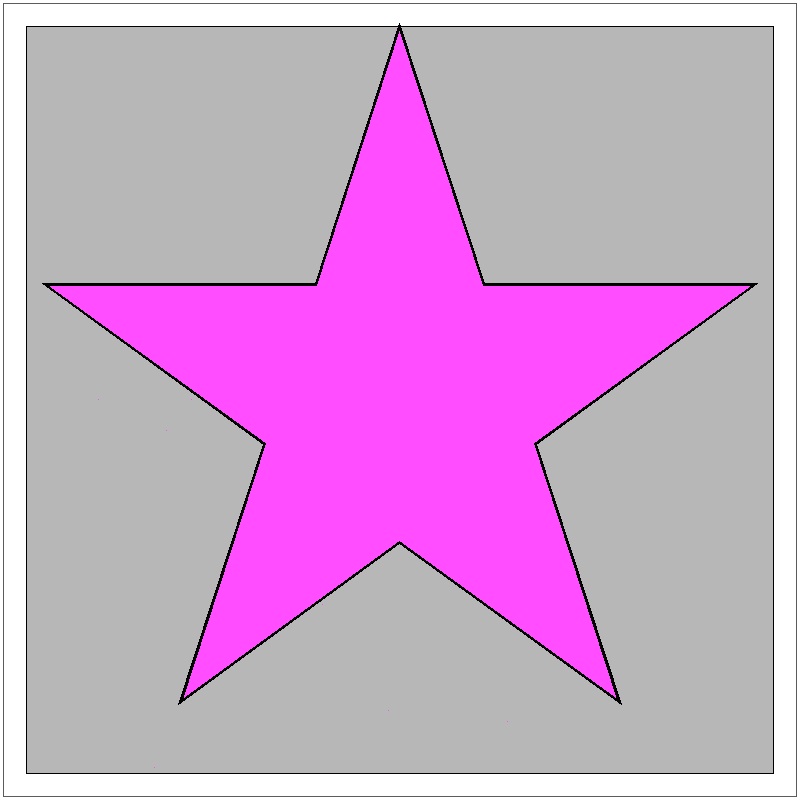
(3) "Betsy Ross" (1752 - 1836), known as a maker of the first American flag
Despite its lack of evidence, this American revolution period's heroine is credited with demonstrating how a shape of
five pointed star can be created from a piece of paper and one scissor cut in the presence of President George Washington.
Probably President of the United States was worried that it may not be easy for a seamstress to draw
a geometrically correct five pointed star, so the anecdote goes.
Reference:: Betsy Ross's Five pointed Star
( 5-Pointed Star in One Snip )
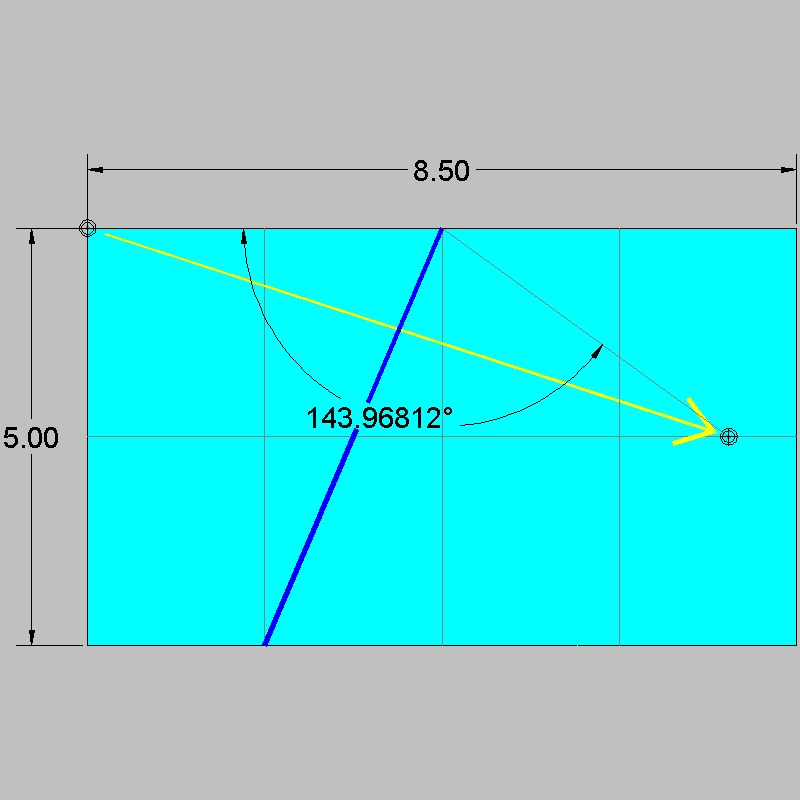
step 1: Prepare 8.5 x 10 paper, by cutting 8.5 x 11 paper. Fold the paper such that the top edge matches the bottom edge.
step 2: The angle must be 144.0 to be exact. But this is a good approximation.
step 3: ∠CAB must be 36.00 if geometrically correct 5 pointed star is desired.
The relation BC/AB = sin(36) will yield the height of the paper which gives the exact 5 pointed star.
That will be 9.9923.... So 10 is a very good approximation.
|
Step (1) click here to enlarge 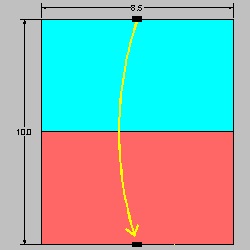 |
Step (2) click here to enlarge 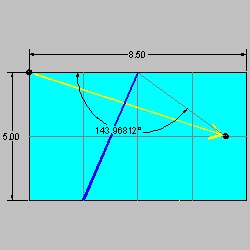 |
Step (3) click here to enlarge 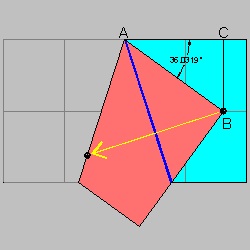 |
step 5: Bisection of the top paper.
step 6: Point C is the intersection of AB and the center line.
Note: The point C must be on the center line.Depending on its location, "fat" or "slim" star is created.
The star used in "the Star Spangled Banner" is the case when C is on the intersection of AB and the center line.
|
Step (4) click here to enlarge 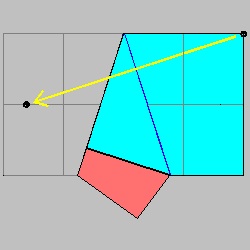 |
Step (5) click here to enlarge 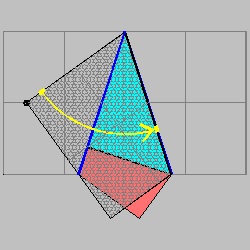 |
Step (6) click here to enlarge 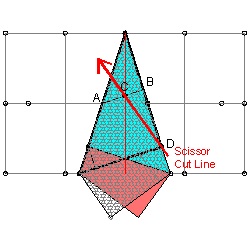 |
(4) "Harry Houdini" (1874 - 1926), known as "Harry Handcuff Houdini" In his book "Paper Magic" published in 1922, he showed how to make five-pointed star shape by folding a square paper.
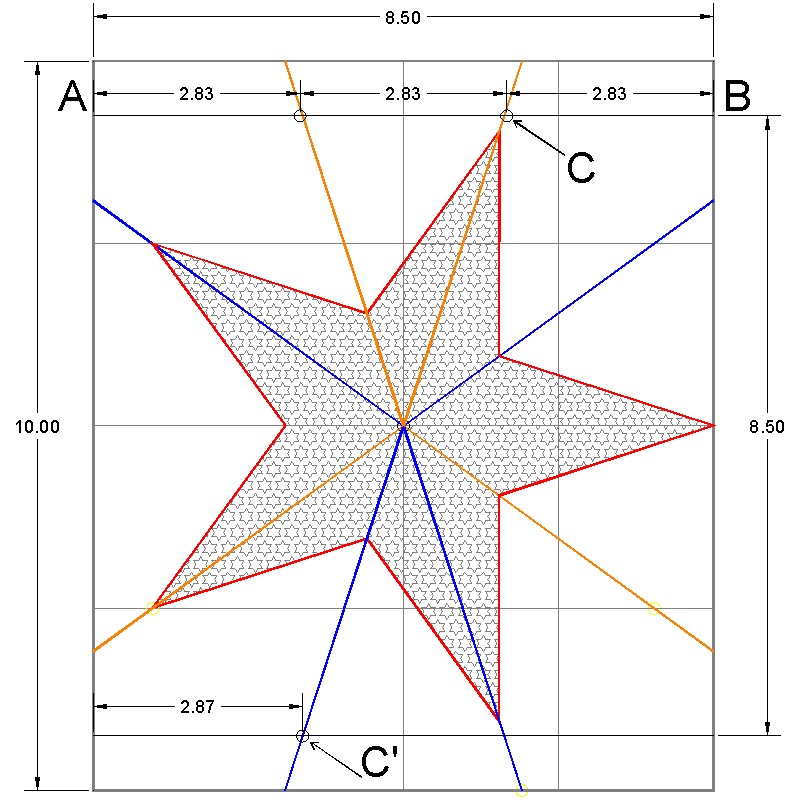
Comparison of Betsy Ross's Star and Houdini's variation :
Crease and cut lines used in Betsy Ross's Star are shown in the left image below.The author thinks that he got his idea from Betsy Ross's construction method
as shown in the right image below.
Crease line CC' intersects upper edge of the square sheet .
The distance from point B to this intersection is approximately 2.87, whereas this point is very close to
the point when line AB is divided into 3 equal parts. Houdini's method starts from this 1/3 point on the upper edge
although he did not mention how to find 1/3 point. Two numbers in question are 8.5/3 = 2.833.. vs. 2.87,
which are very,very close. Hence the shapes of the star by these two methods are practically the same. Author's note regarding "How to find 1/3 point ?": Refer to "Origamics" by Kazuo Haga , 2008 , World Scientific. Or the author's web site Origami Solution
Left picture: Crease and cut lines used in Betsy Ross's Star. 8.5 x 10 paper
Right picture: Houdini's Star using a square sheet of paper. square (8.5 x 8.5) paper
|
Betsy Ross's 5-pointed Star click here to enlarge  |
Houdini's variation of 5-pointed Star click here to enlarge 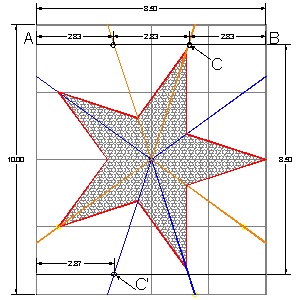 |
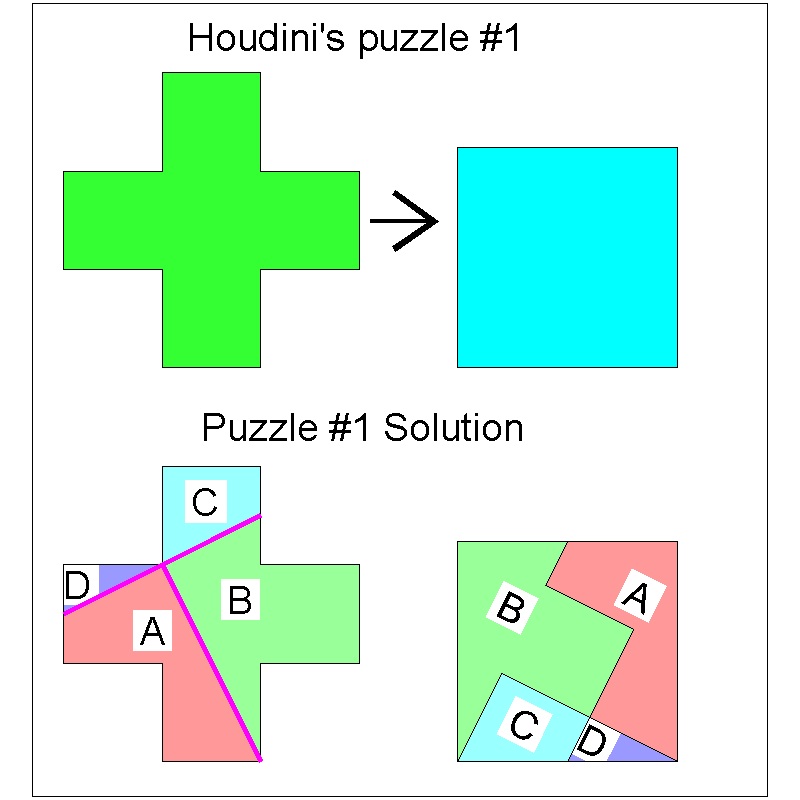
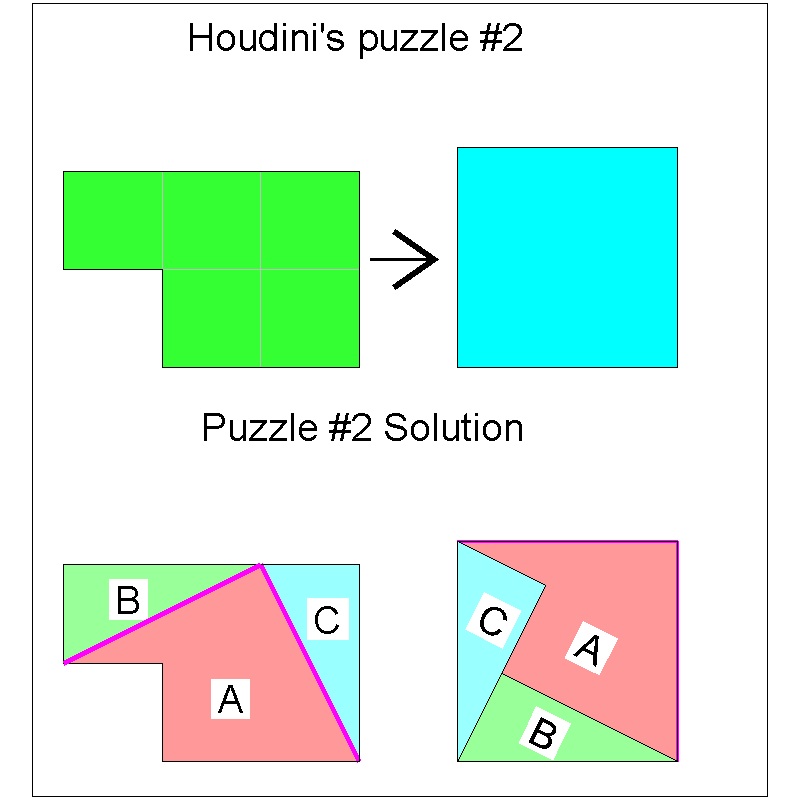
Houdini's 3 paper puzzles (Dissection) The author encourages the readers to try these dissection puzzles as "onecut-origami" puzzle.
|
Puzzle #1 click here to enlarge 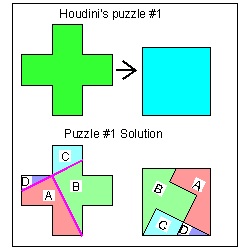 |
Puzzle #2 click here to enlarge 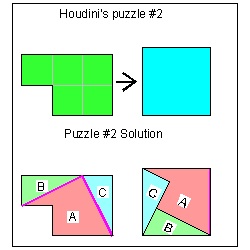 |
Puzzle #3 click here to enlarge 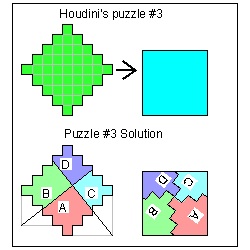 |
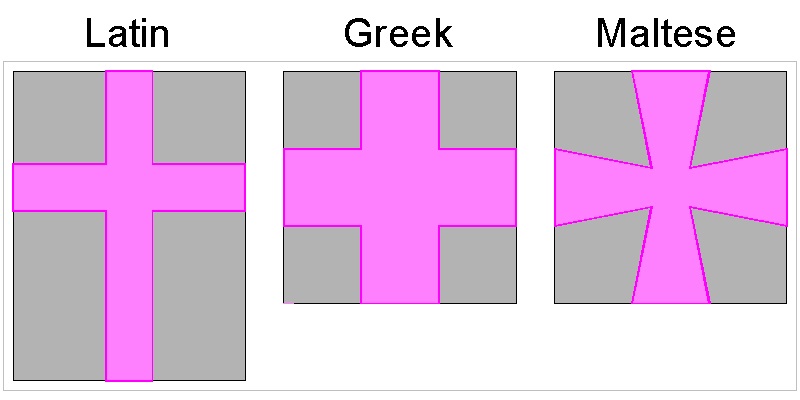
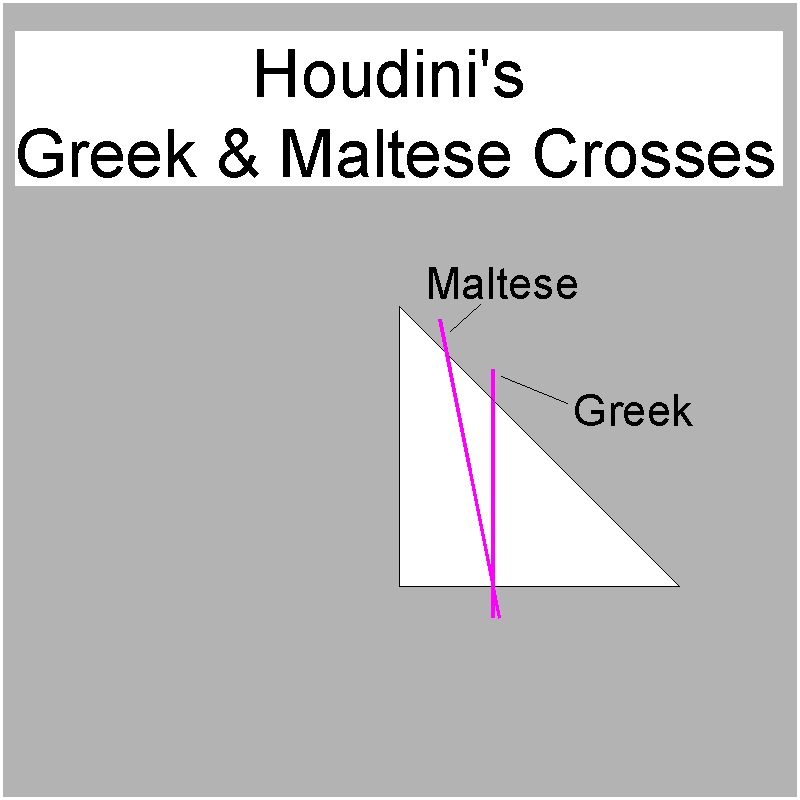
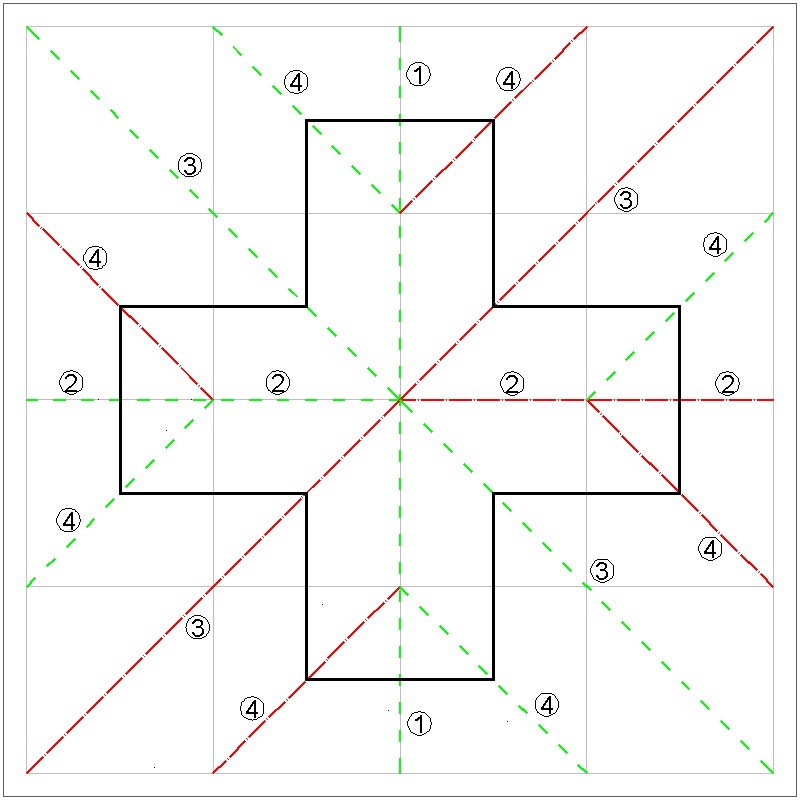
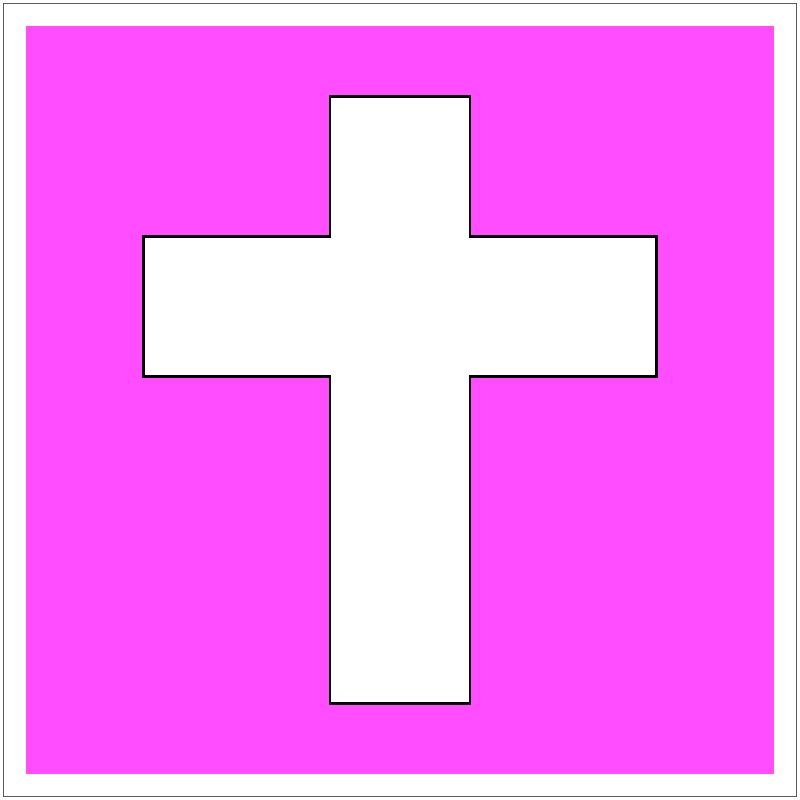
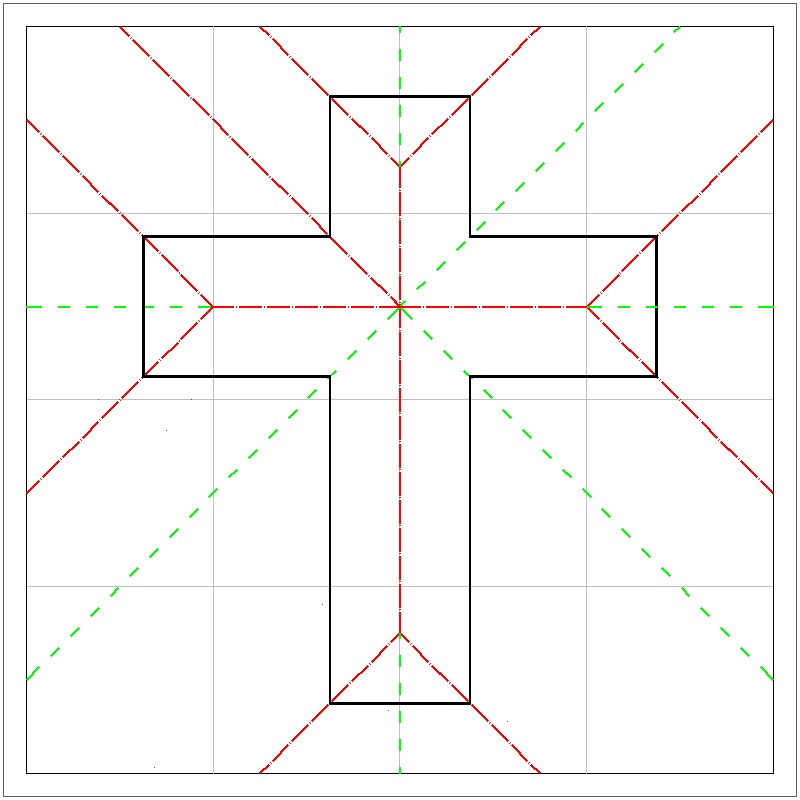
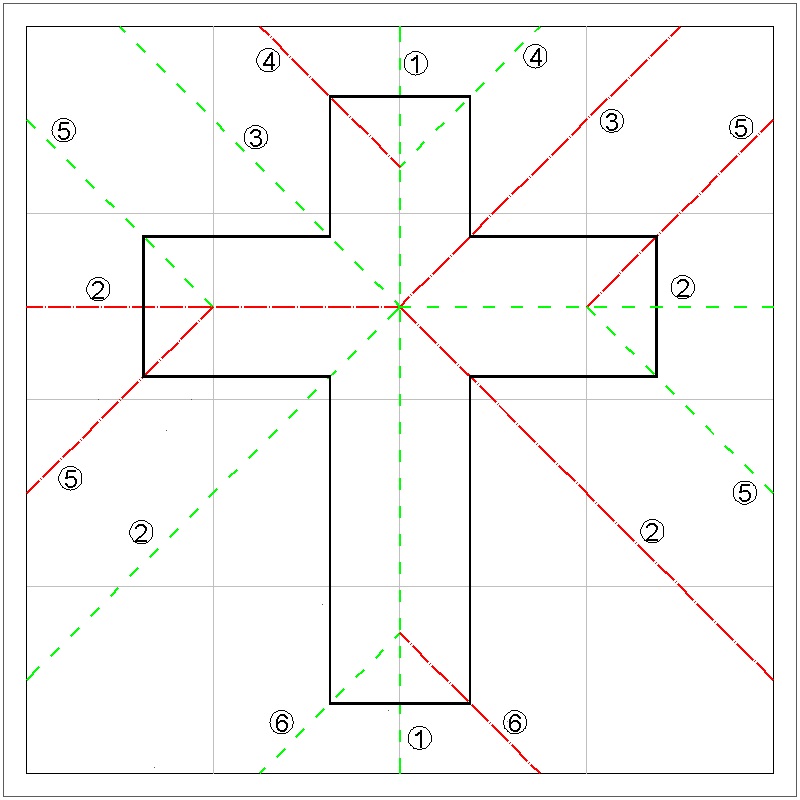
Houdini's Latin, Greek & Maltese Cross making
click here to enlarge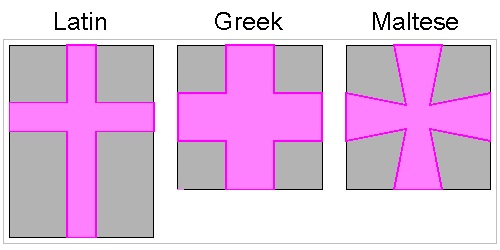 |
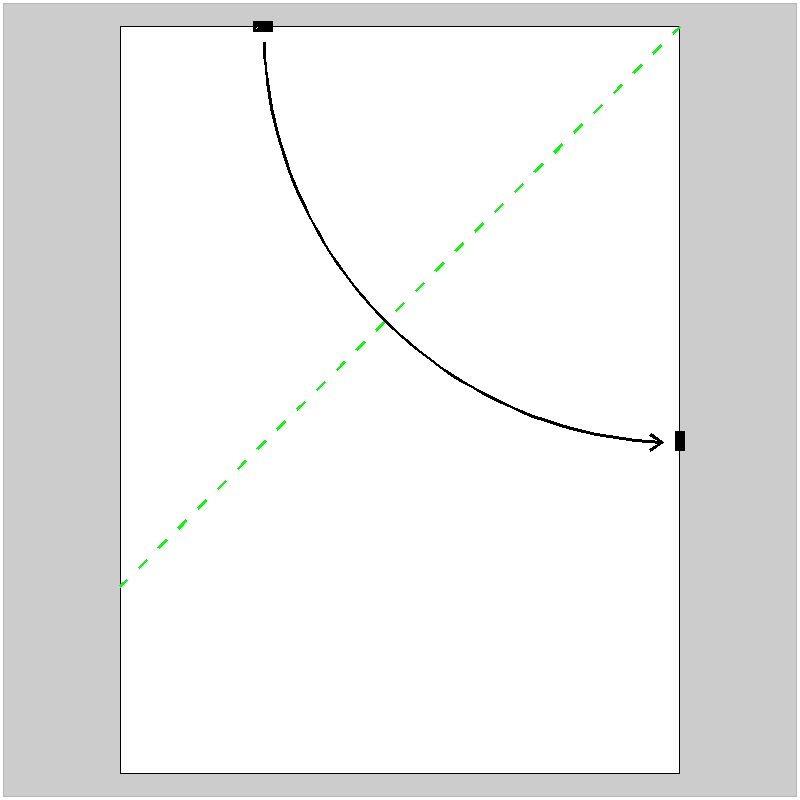
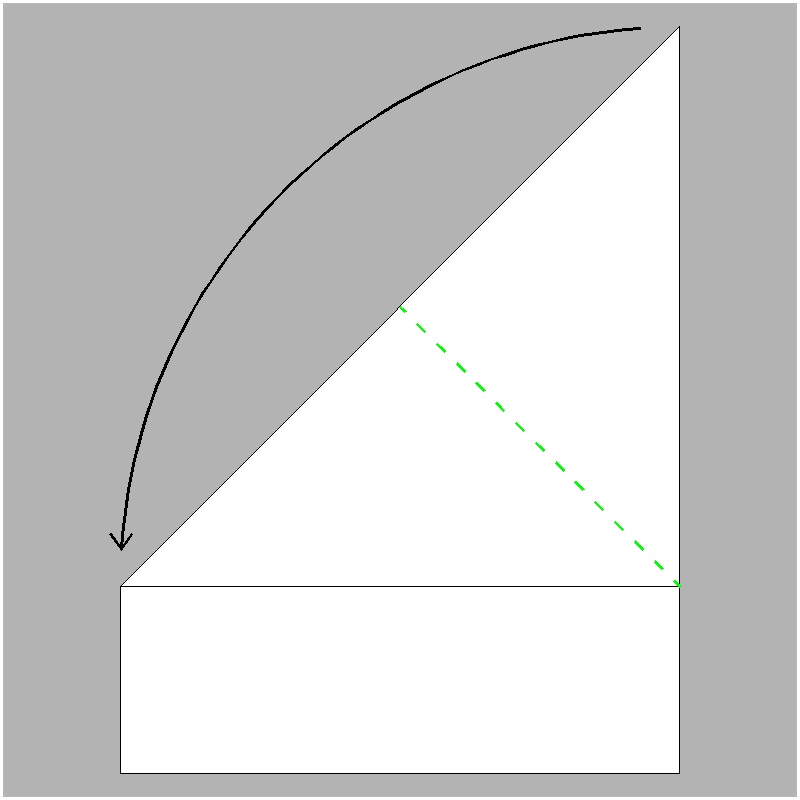
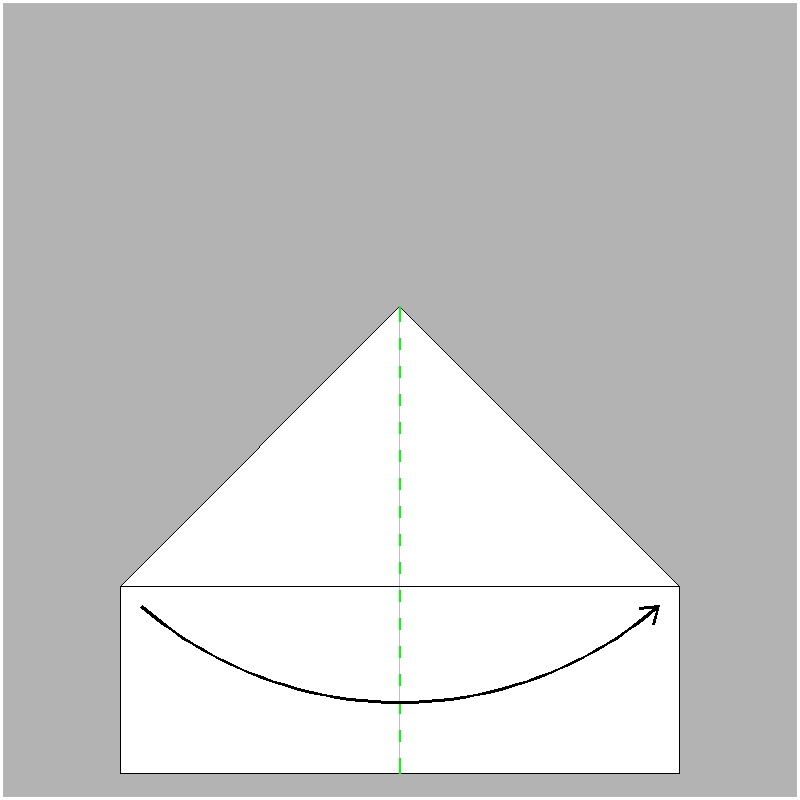
Folding Processes of Houdini's 3 Crosses
|
Step #1 click here to enlarge 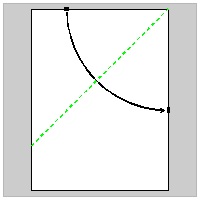 |
Step #2 click here to enlarge 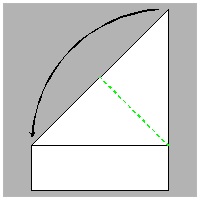 |
Step #3 click here to enlarge 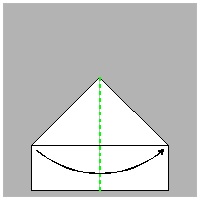 |
|
Step #4 click here to enlarge 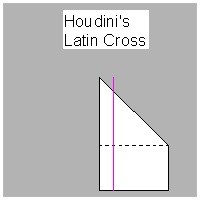 |
Step #4a click here to enlarge 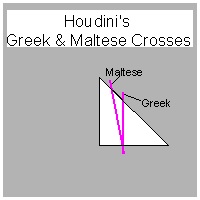 |
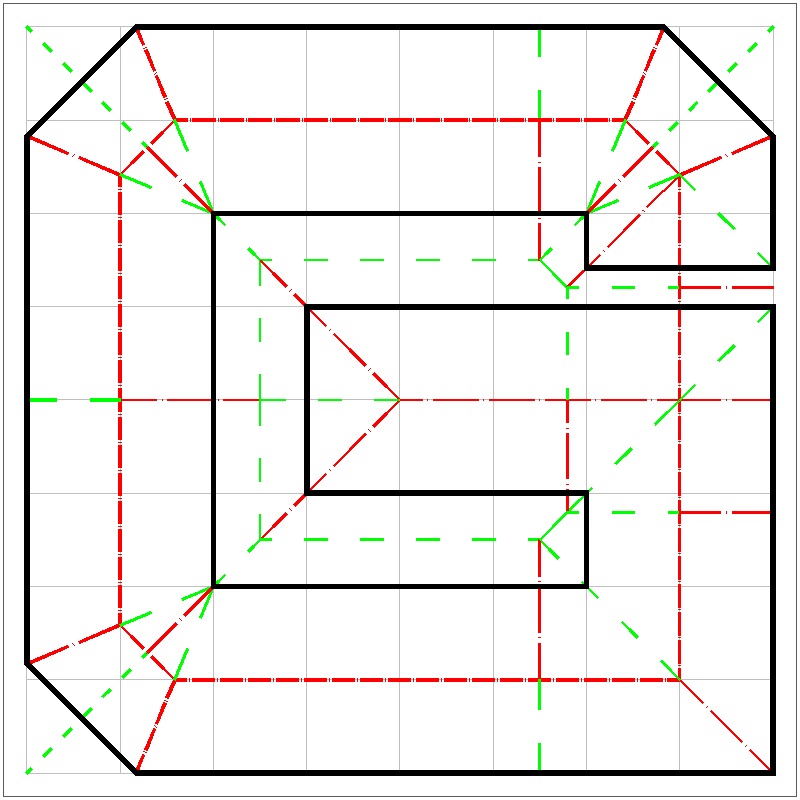
Dissection Puzzle-Onecut applied to the classical dissection problem
In general "one straight scissor cut" is not a requirement in dissection puzzles.
But what happens if that requirement is added to the classical problems.
Square to Triangle
This is one of the most famous dissection by Henry E. Dudeney.
You can see the process in ANIMATION.
For detailed discussion, go to Dissections and Tesselations
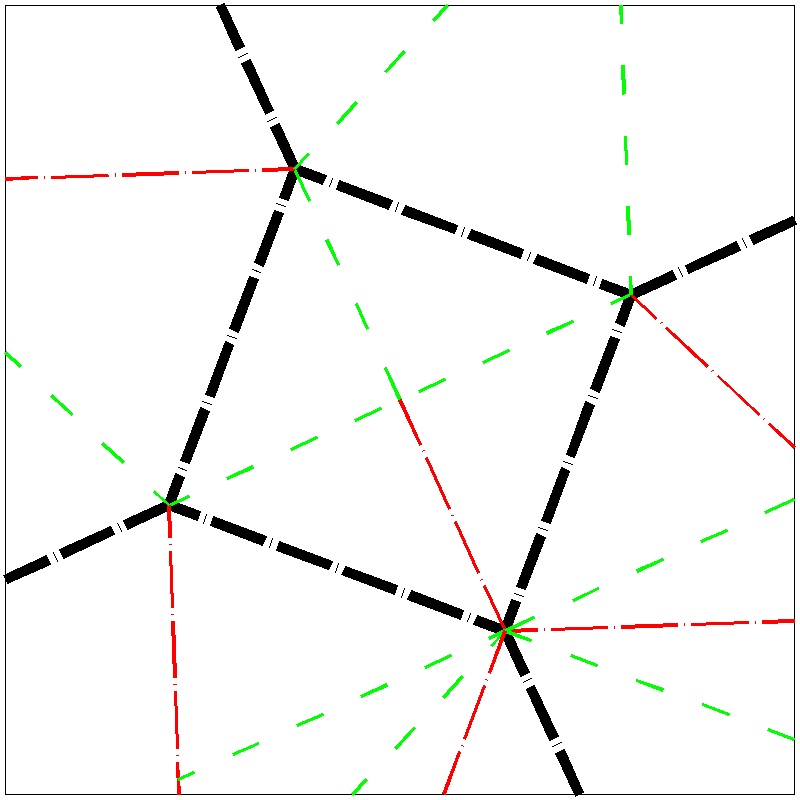
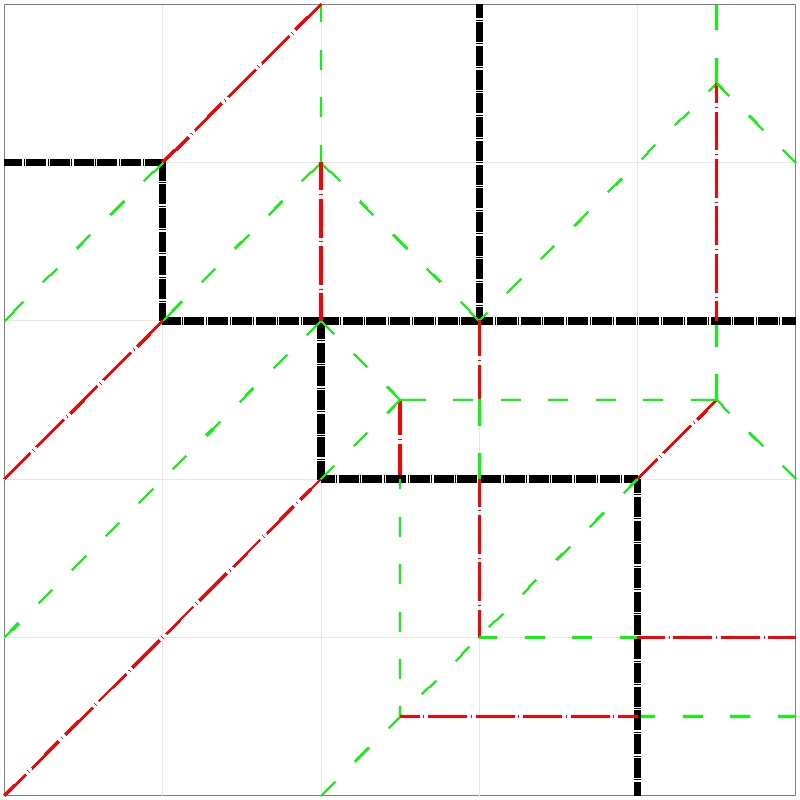
The right image shows how to make crease lines. Both black and red lines are mountain fold,
and green lines , valley fold. The black lines are the dissecting lines, but the condition of "one striaght cut"
will also cut one extra red line.
click here to enlarge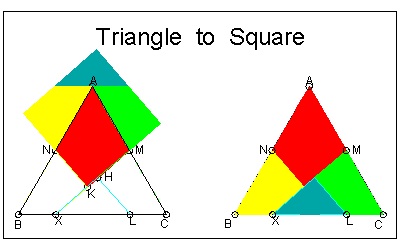 |
click here to enlarge |
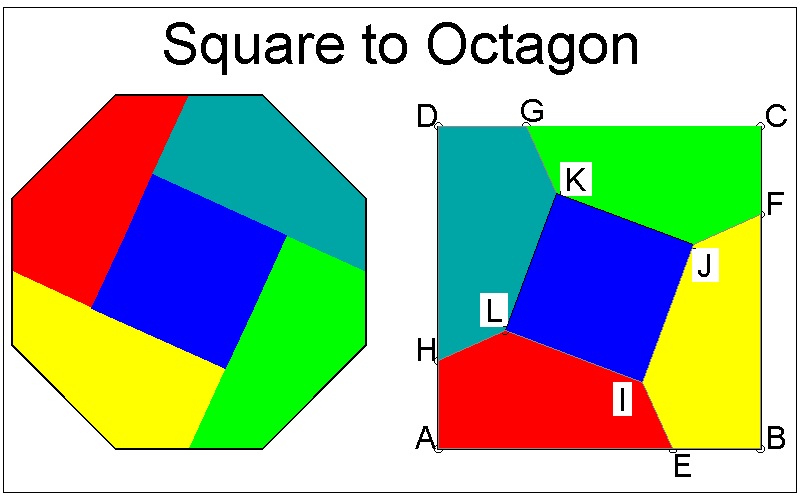
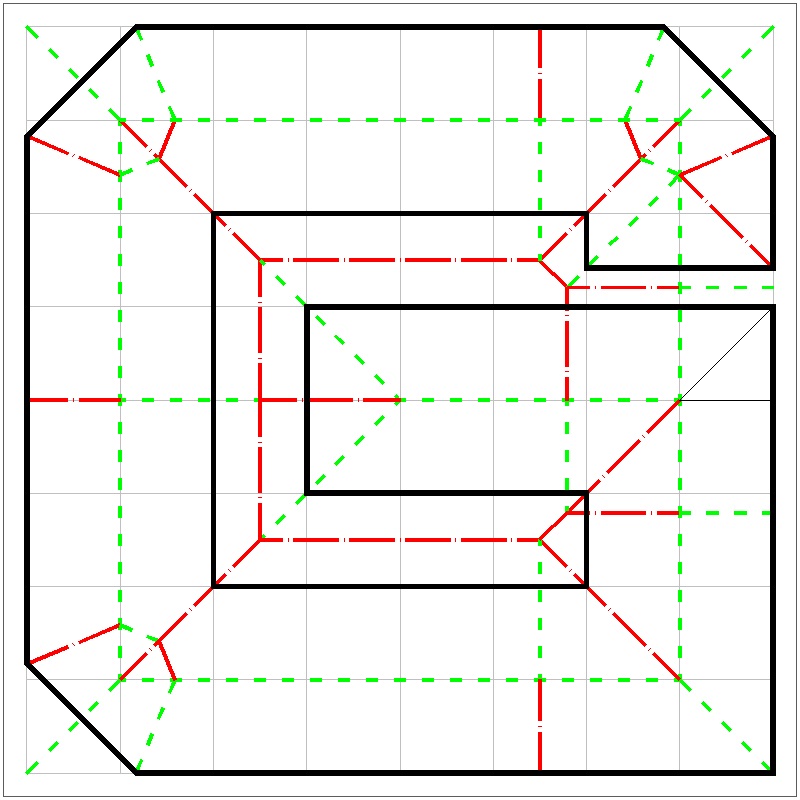
Square to Octagon
This is one of the most famous dissection by Henry E. Dudeney.
You can see the process in ANIMATION.
For detailed discussion, go to Dissections and Tesselations
The right image shows how to make crease lines. Both black and red lines are mountain fold,
and green lines , valley fold. The black lines are the dissecting lines, but the condition of "one striaght cut"
will also cut one extra red line.
click here to enlarge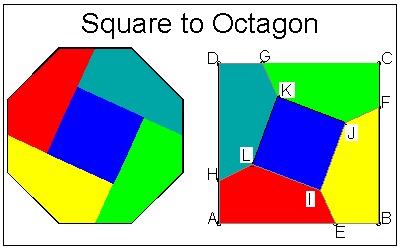 |
click here to enlarge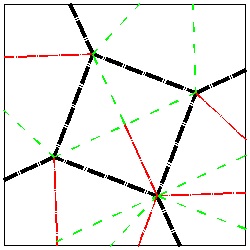 |
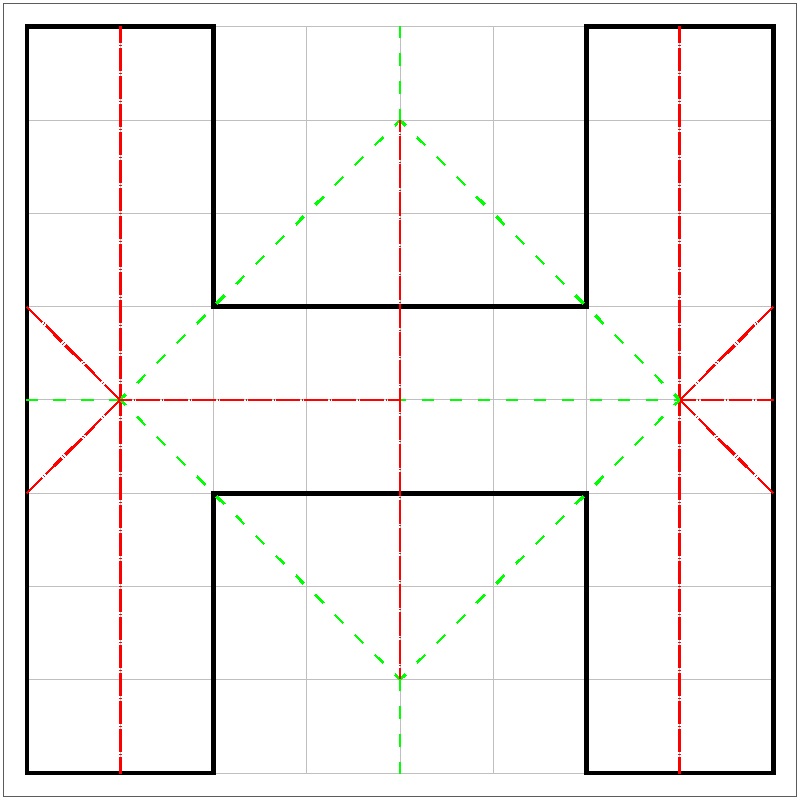
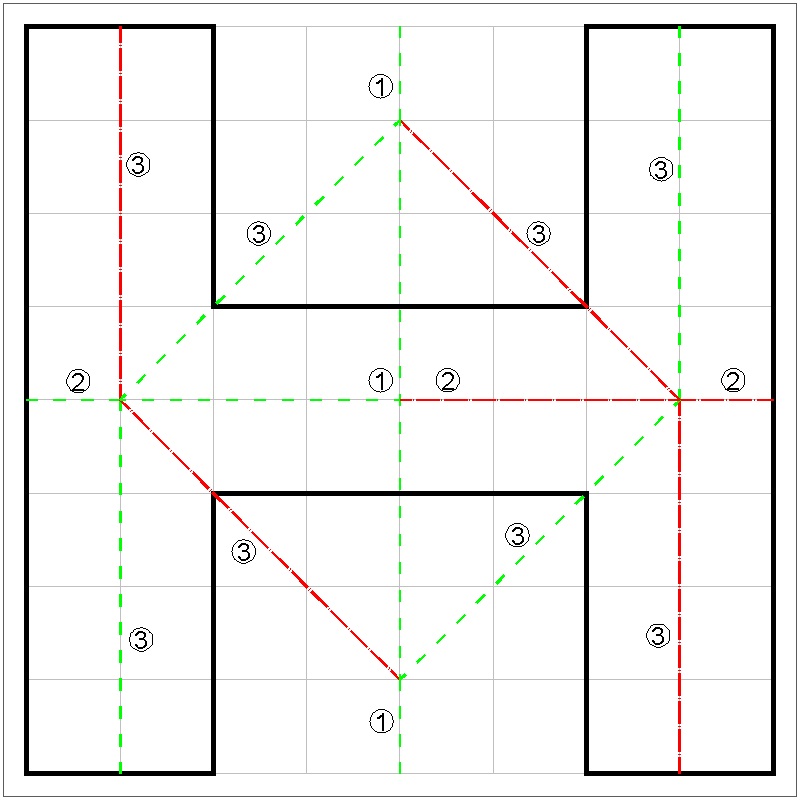
Pythagorean Triplet-- 32+ 42 = 5 2
This is one of the most famous dissection by Henry E. Dudeney.
You can see the process in ANIMATION.
For detailed discussion, go to Dissections and Tesselations
The right image shows how to make crease lines. Both black and red lines are mountain fold,
and green lines , valley fold. The black lines are the dissecting lines, but the condition of "one striaght cut"
will also cut one extra red line.
click here to enlarge |
click here to enlarge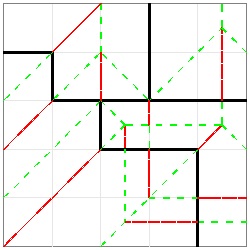 |
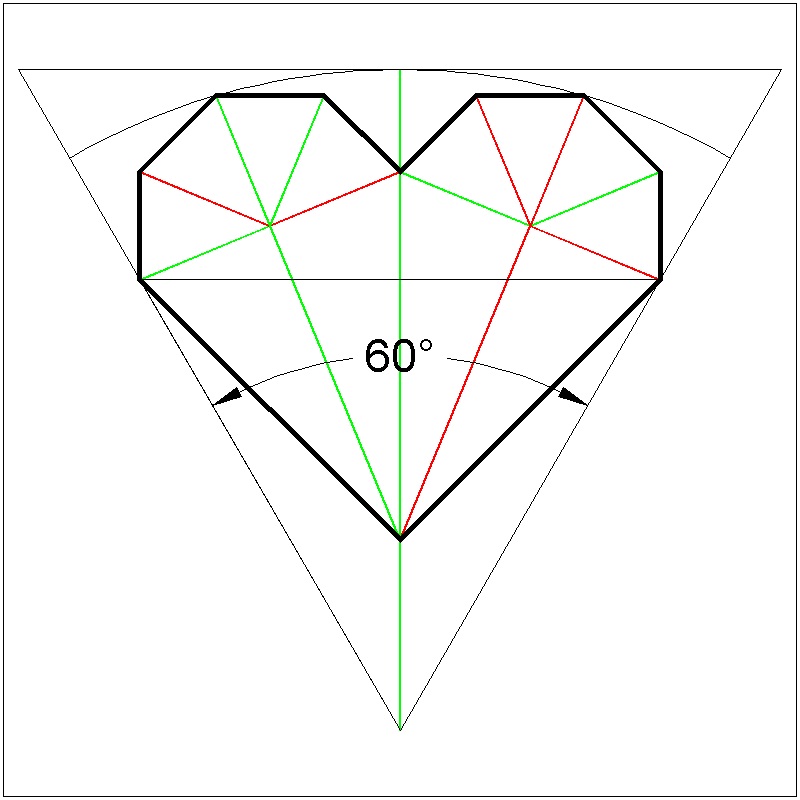
Having introduced 4 persons's contributions to the concept of "Onecut-Origami", the author may safely conclude that this topic has been accepted mostly as " a kind of paper magic", and the shapes created have been limited to some special geometric shapes. (Of course the case of Betsy Ross was a serious business of national flag making). The status has changed since Yamamoto has introduced a new way of creating various interesting objects. He named his method as "ひと裁ち折り" (Hito Tachi Ori)- One scissor-cut Ori .
Since Yamamoto's signature figure is "Heart" , it is appropriate to begin the introduction to his world
with how he creates heart shape by different processes.
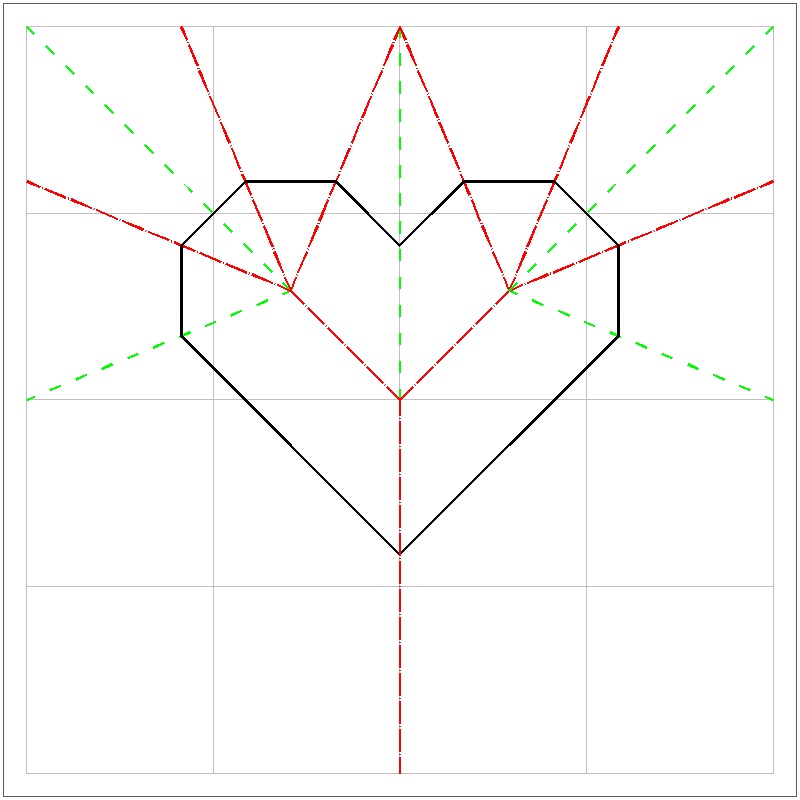
Yamamoto's Heart
The main reason why the author got interested on "Onecut Origami" by Yamamoto is that he is the firstto have publicized this concept combined with the conventional origami technics.
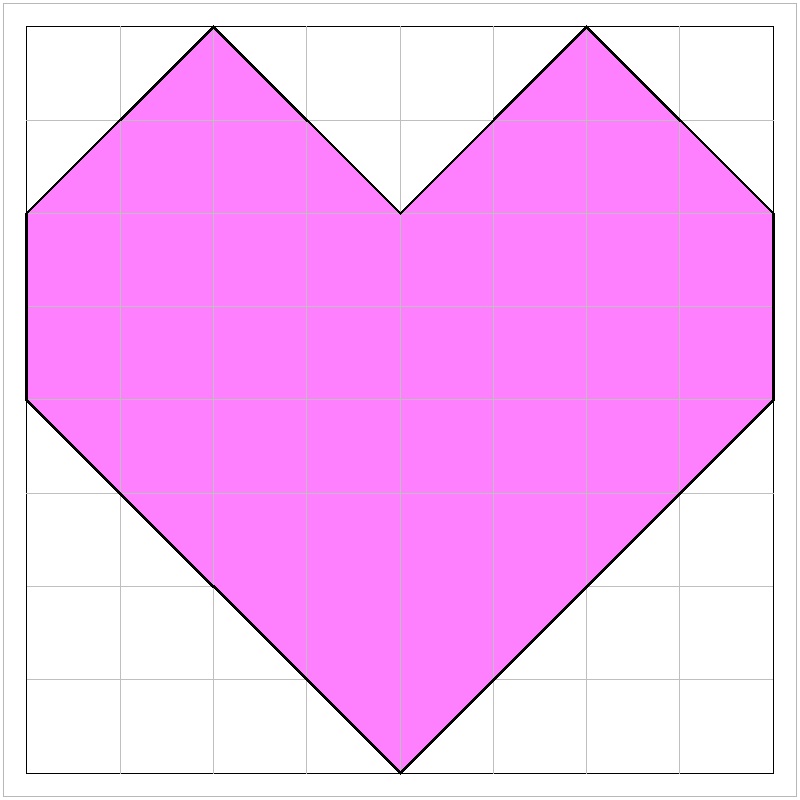
One of the simplest yet most impressive work is the way he creates "Heart Shape".
At first the author will show creation of heart shape by 4 different folding procedures.
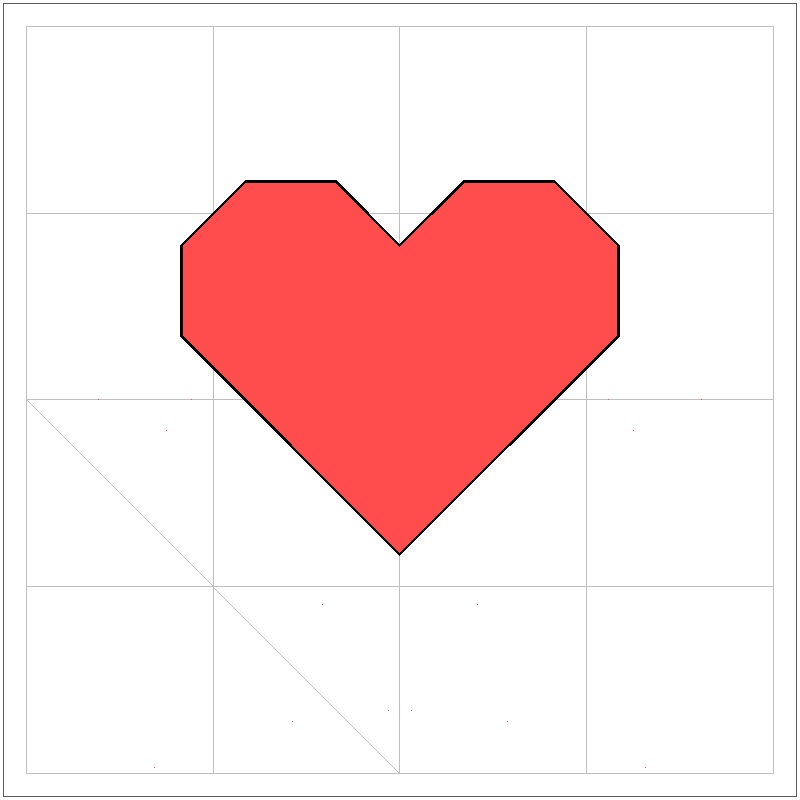
Yamamoto's Heart No.1
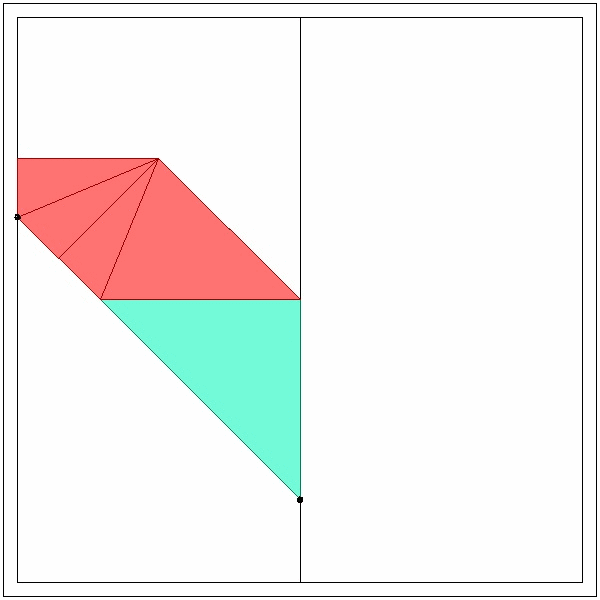
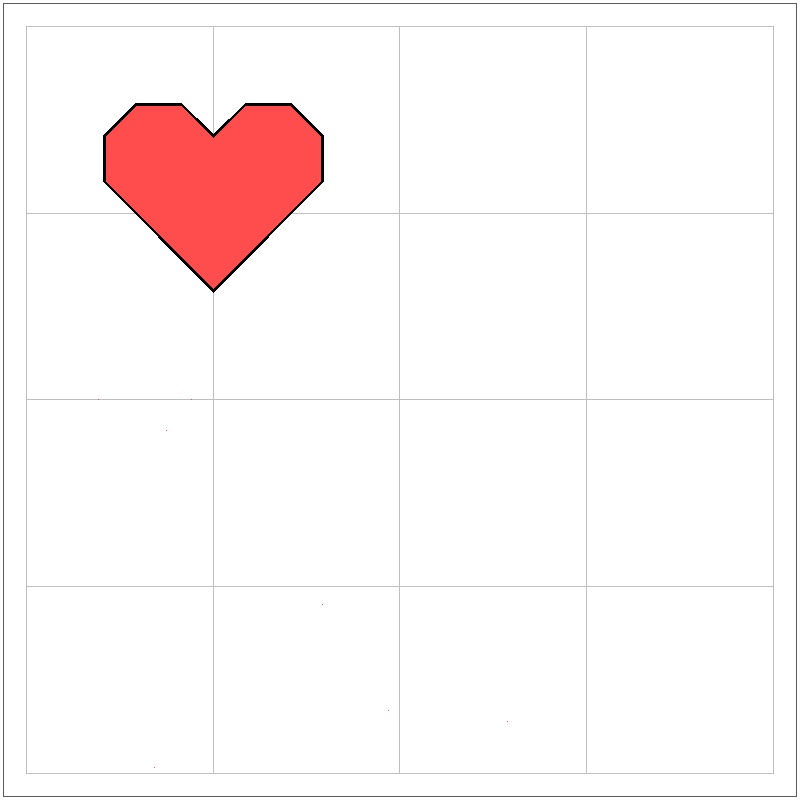
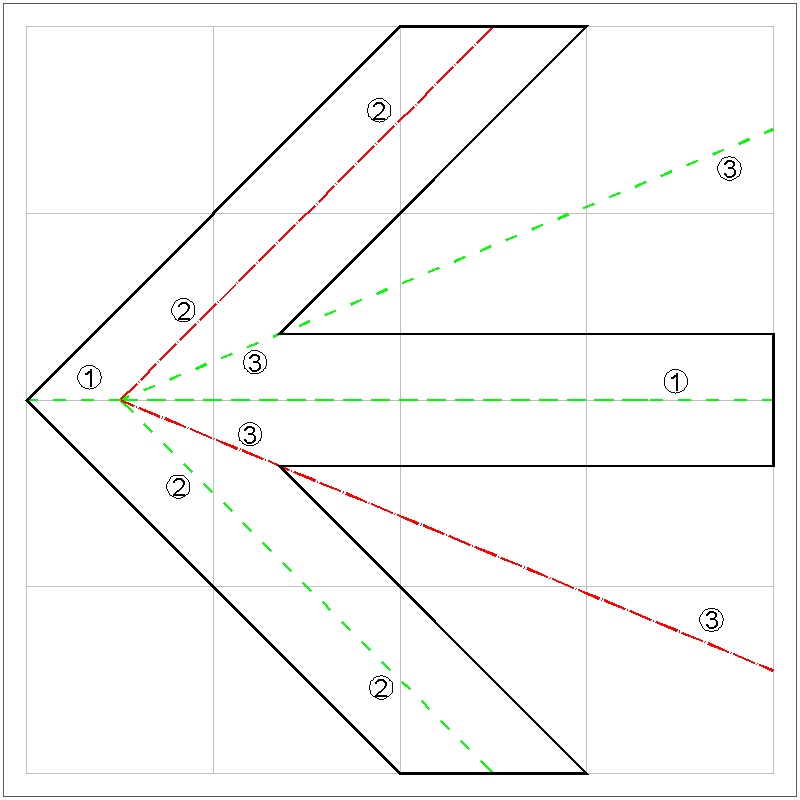
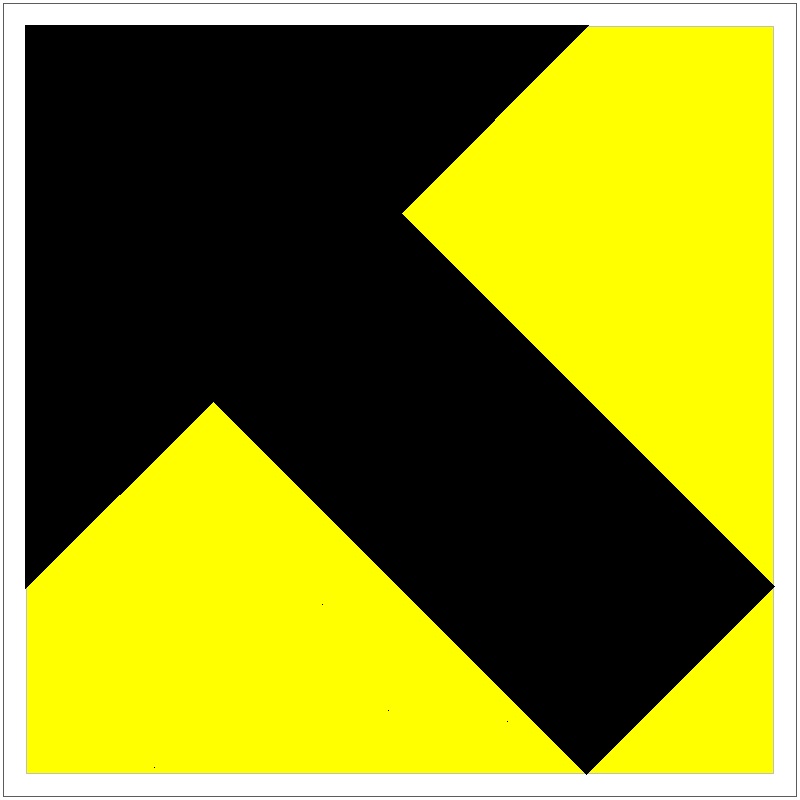
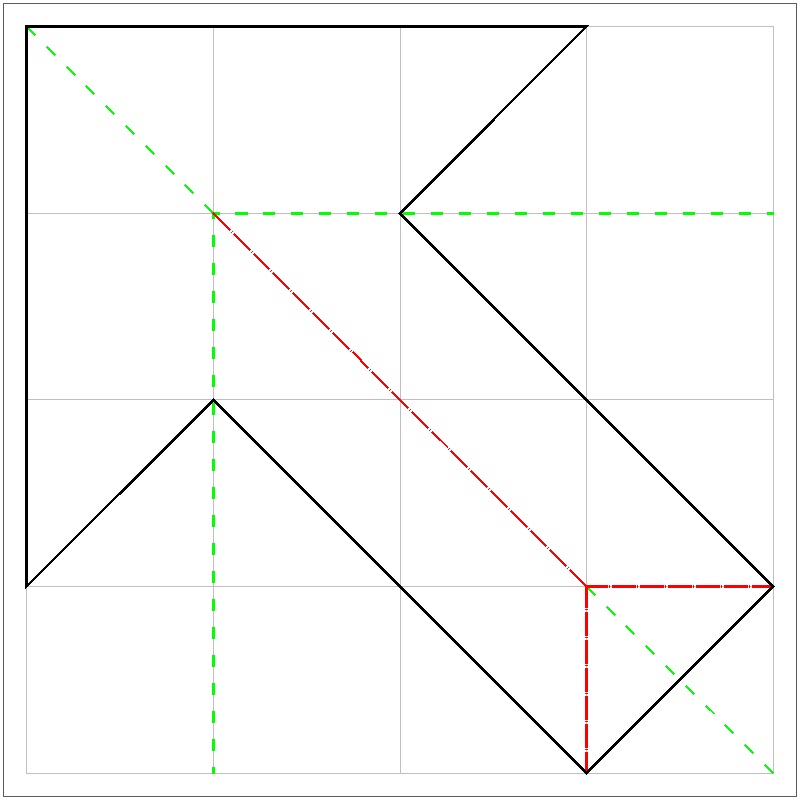
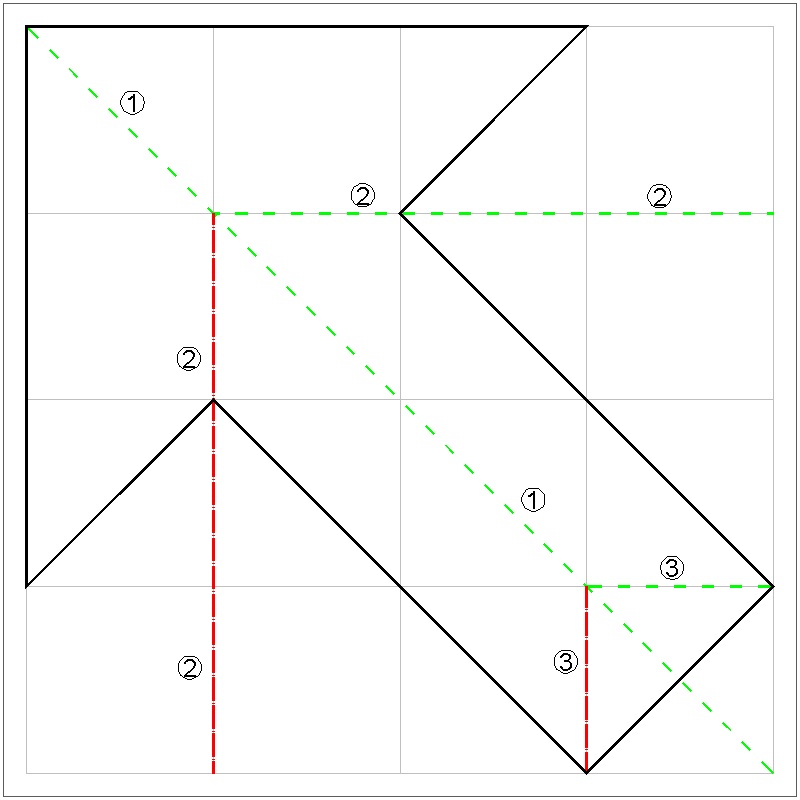
This is the simplest method, and produces the largest heart out of a given square sheet of paper.|
Heart-1 Result click here to enlarge 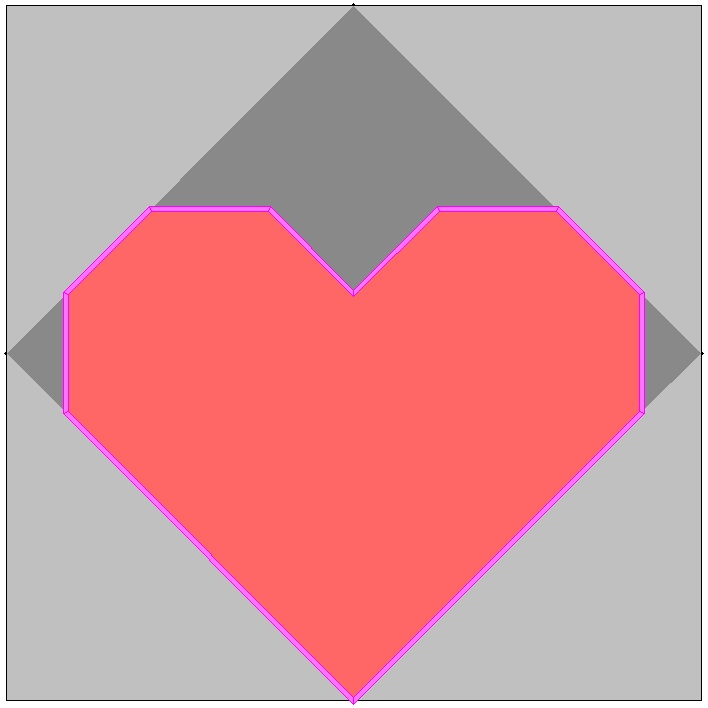 |
Heart-1 Crease Lines click here to enlarge  |
|
Heart-1 Folding Process click here to enlarge click here to see folding animation click here to see unfolding animation 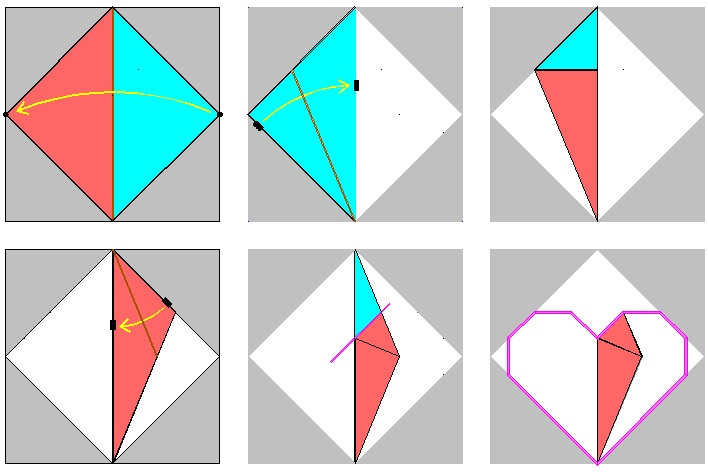 |
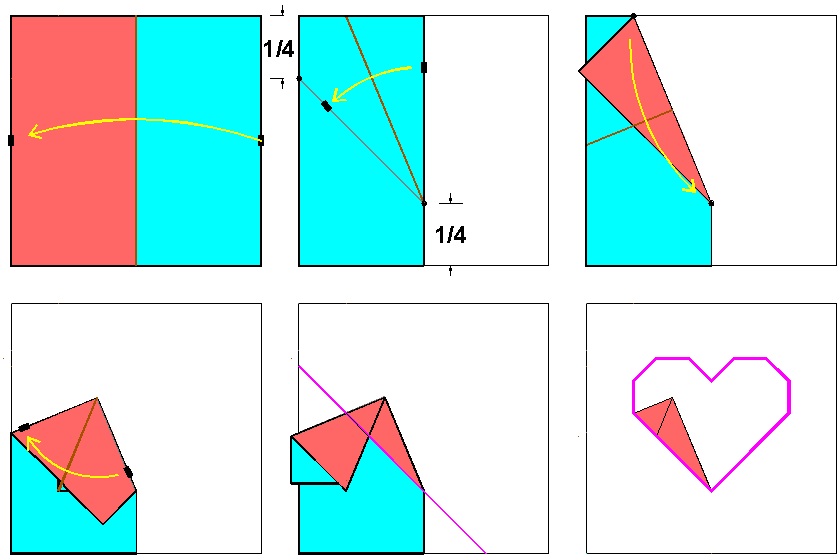
Yamamoto's Heart No.2
This is the "heart", introduced as "Napkin Heart" in How to draw heart shape Section in my web site. Math can be fun with CAD|
Heart-2 Result click here to enlarge  |
Heart-2 Crease Lines click here to enlarge 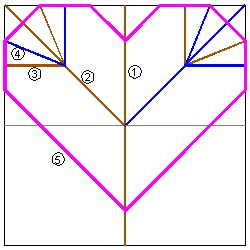 |
|
Heart-2 Folding Process click here to enlarge click to see folding animation click to see unfolding animation 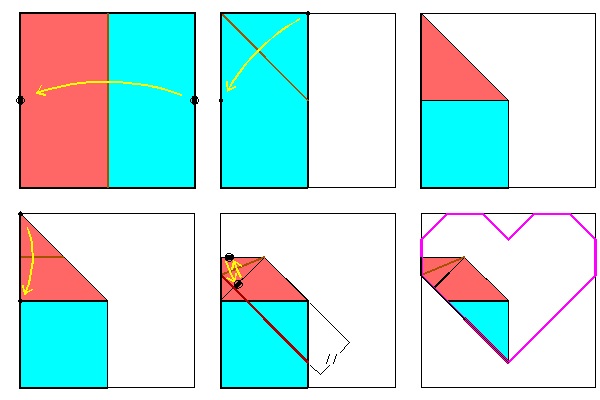 |
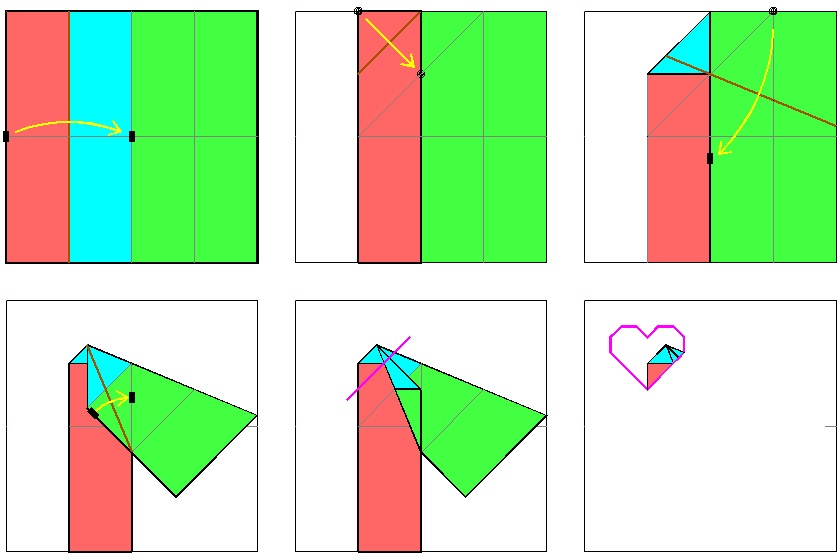
Yamamoto's Heart No.3
|
Heart-3 Result click here to enlarge 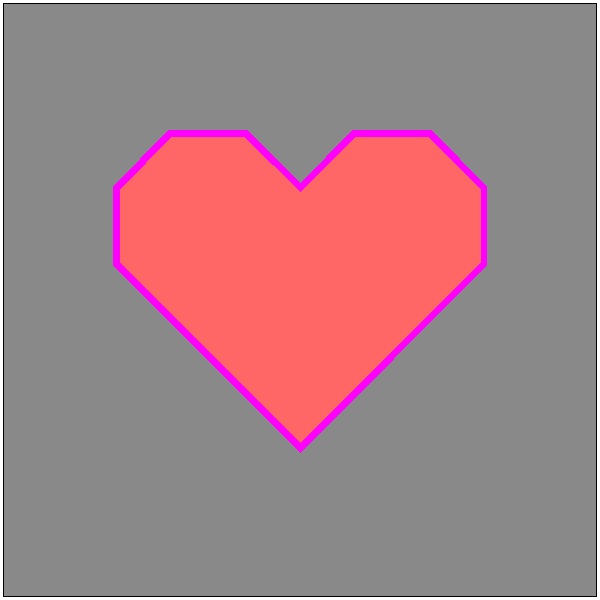 |
Heart-3 Crease Lines click here to enlarge  |
|
Heart-3 Folding Process click here to enlarge click to see folding animation click to see unfolding animation 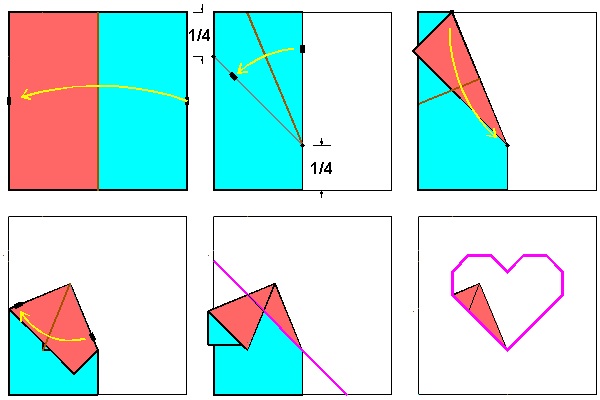 |
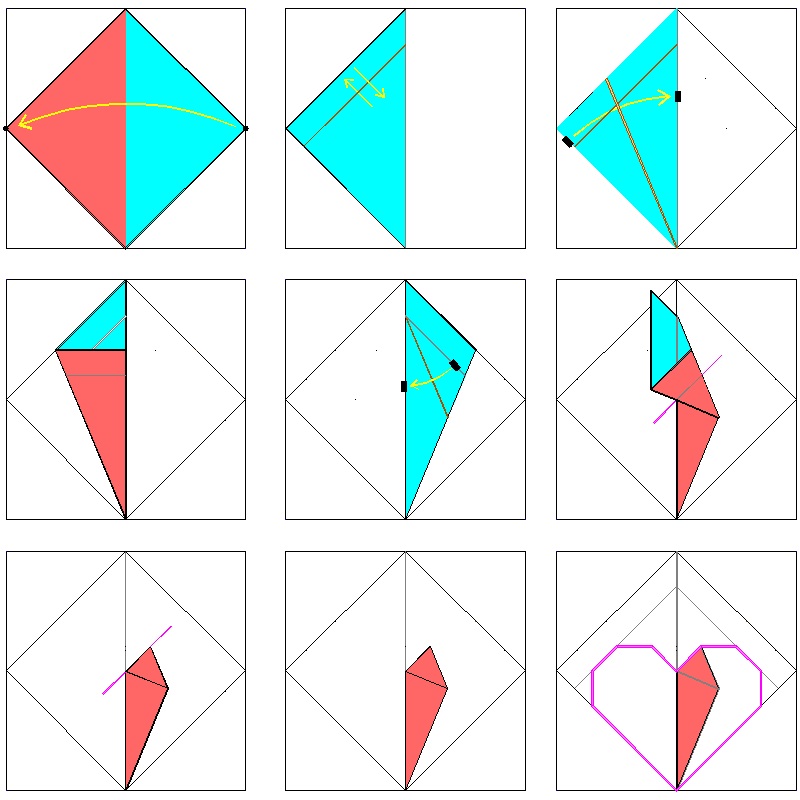
Yamamoto's Heart No.4
|
Heart-4 Result click here to enlarge  |
Heart-4 Crease Lines click to enlarge 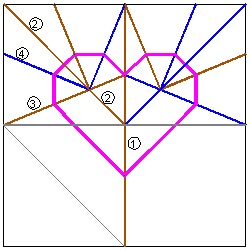 |
|
Heart-4 Folding Process click here to enlarge click to see folding animation click to see unfolding animation 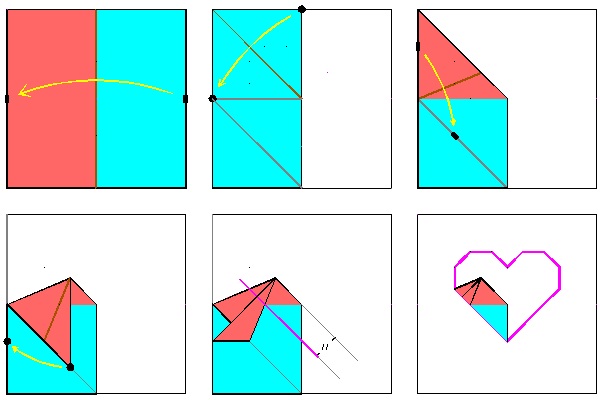 |
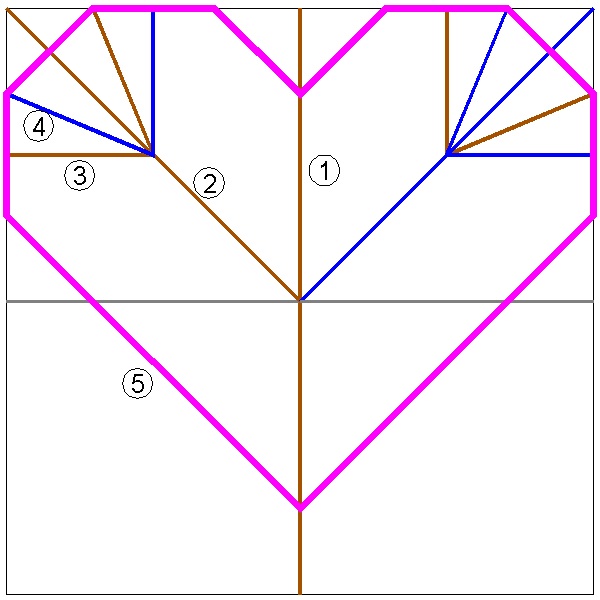
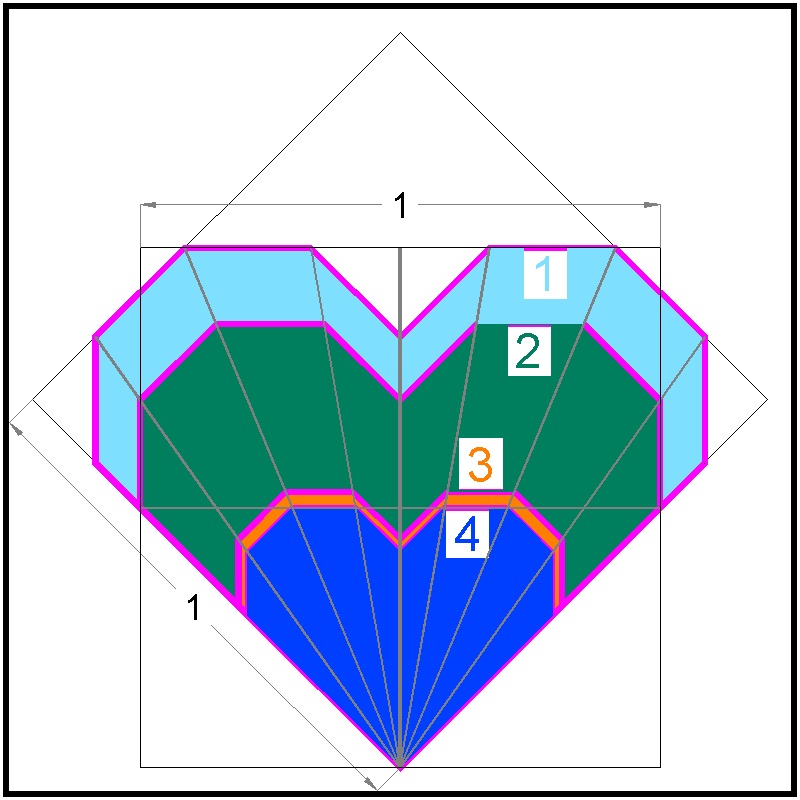
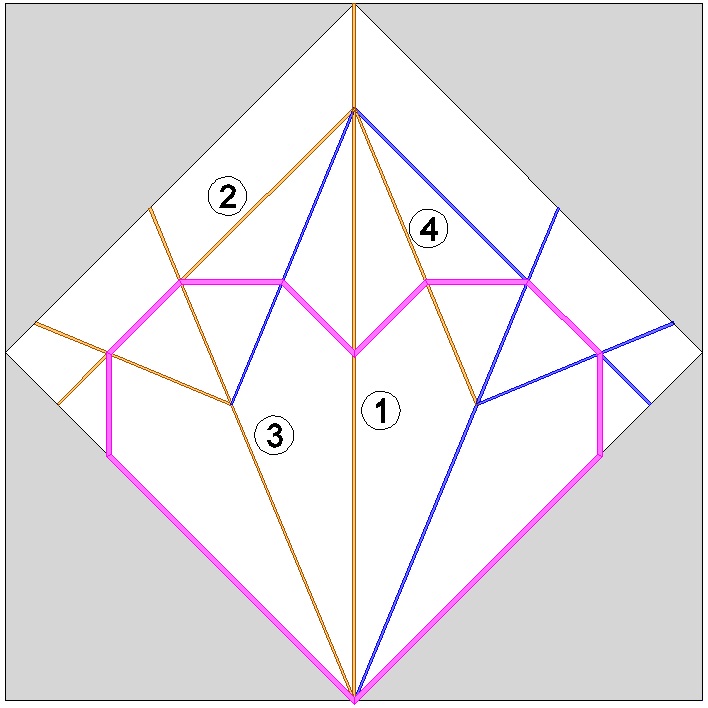
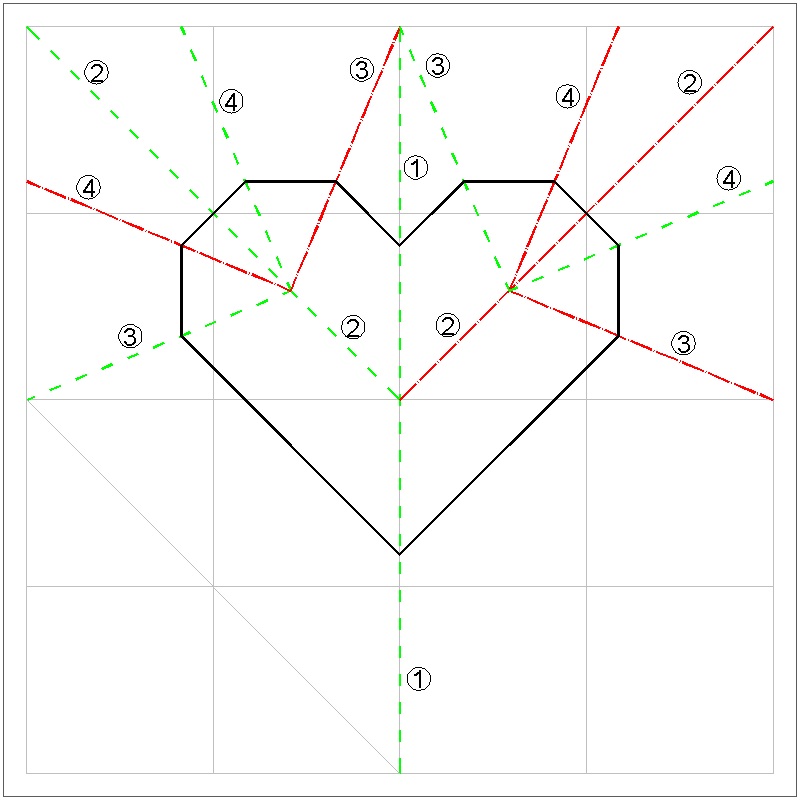
Comparison of Four different hearts
Now let us compare 4 different hearts created above.For comparison purpose, the bottom points of all 4 hearts are moved to the same reference point as shown
in the figures below. The readers will immediately notice from the right figure below that all 4 heart figures are
geometrically similar (i.e. the same shape but with different scale).
|
Size comparion- 4 hearts click here to enlarge 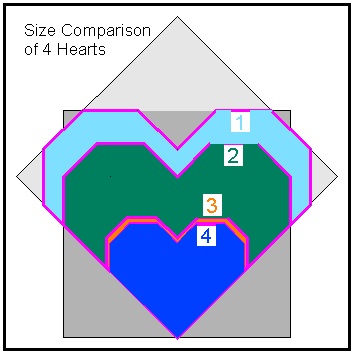 |
Heart-1 Crease Lines click here to enlarge 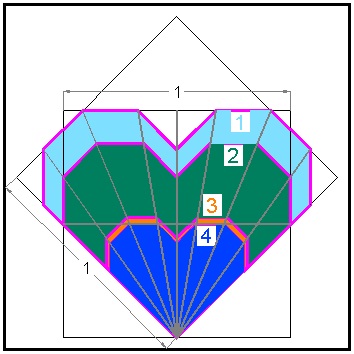 |
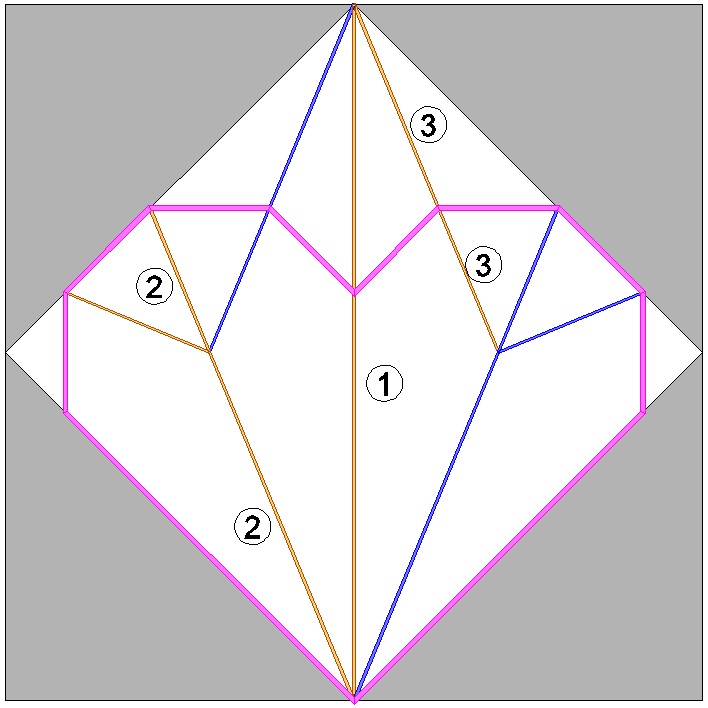
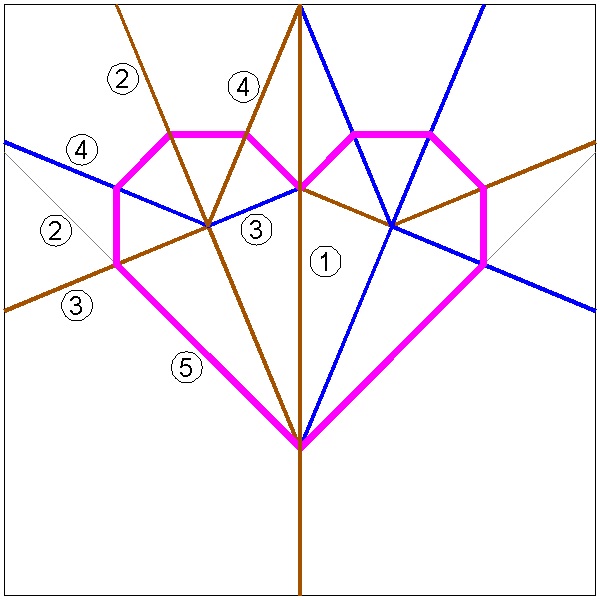
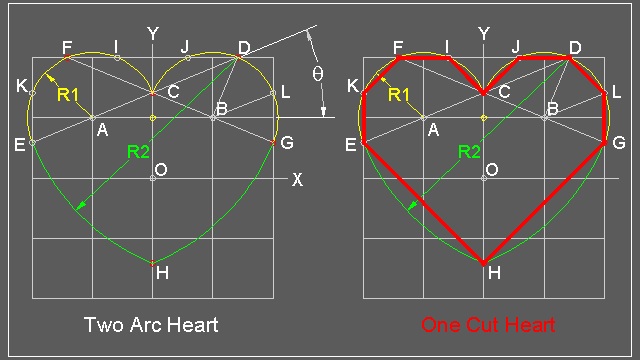
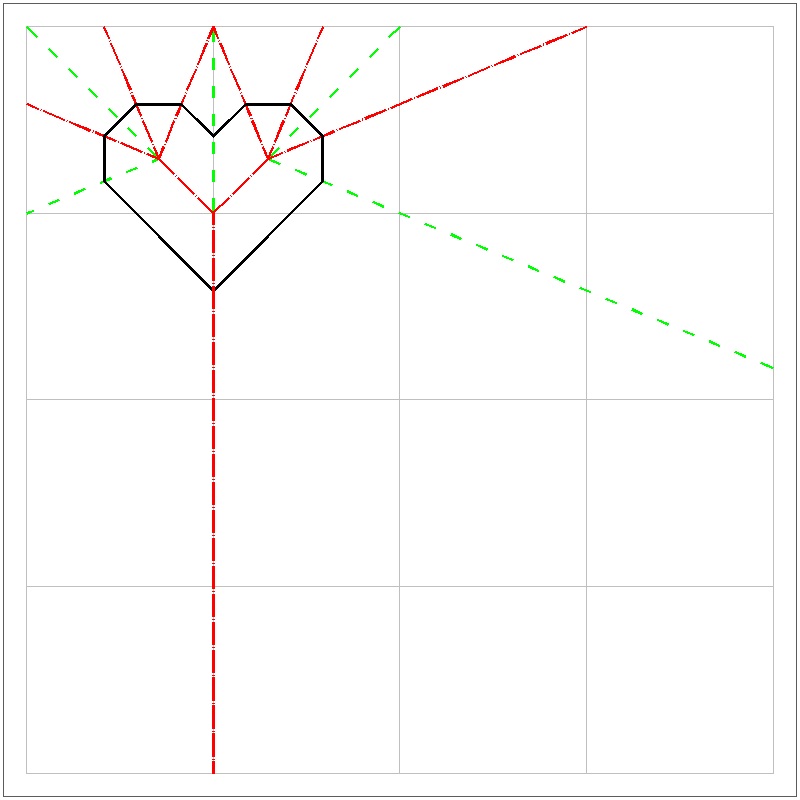
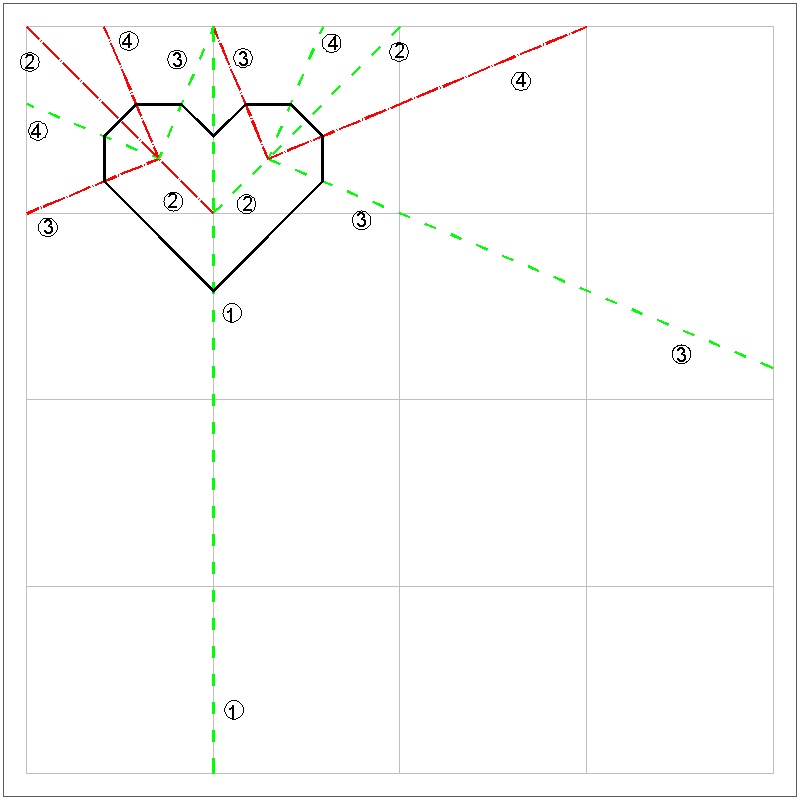
As the author showed in the web site, "Yamamoto's Heart" is derived from "Two Arcs Heart" illustrated in the following figure.
The whole process can be summarized as follows:
1. draw 4 x 4 grid lines with one unit spacing. Identify x & y axis.
2. draw a line from point A with angle theta from X-axis intersecting Y-axis at point "C".
Range of angle theta is from 0 to 45 degrees,
Note: One Cut Heart is a special case of theta = 22.5 degrees.
3. Draw a semi-circle with its center at "A" and radiius AC. Do a silmilar opration for point "B"
4. The intersection of AC extension and a circle with its center at "B" is "D"
5. Begin drawing arc from "C" ,then "F" and "E".
6. When this arc reaches "E" , the center of arc moves from "A" to "D" and continue the arcing process
using Radius R2 until it touches Y-axis("H")
The process (5 ,6) is shown in animation. Click here to see Simple Heart Creation animation
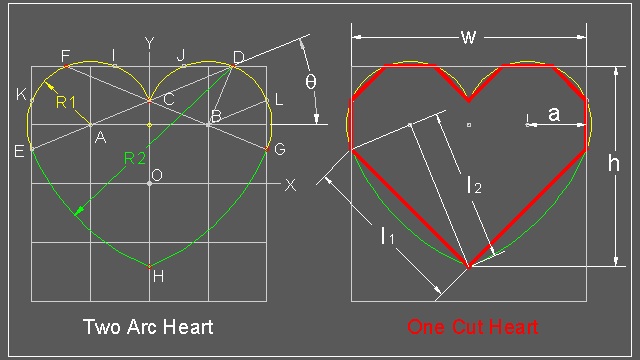
Values of basic line elements and radii:
h = (2 + √2) * a = √2 * l2 ≅ (3.41421) * a
w = 4a
l1 = 2√2 * a ≅ (2.82843) * a
l2 = √2 (√(2 + √2)) * a ≅ (2.61313) * a
R1 = (2-√2) (√(2 + √2)) * a ≅ (1.08239) * a
R2 = 2 (√(2 + √2)) * a ≅ (3.69552) * a
Note: In order to compute these values, refer to your favorite math handbook for the following trigonometry numbers:
sin(π/8) = (√(2 - √2)) / 2 ≅ 0.38268 cos(π/8) = (√(2 + √2)) / 2 ≅ 0.92388
tan(π/8) = √2 - 1 ≅ 0.41421 cot(π/8) = √2 + 1 ≅ 2.41421
Size comparison:Height and Width:
Heart-1The height h is a unit value , and it can be used to compute all other values.
From h = (2 + √2) * a, a = 0.5*(2 - √2) * h = 0.5*(2 - √2) ≅ 0.29289
Once the value of "a" is known, then all other values can be determined.
Heart-2
This is the case a = 1/4.
Heart-3
In this case, l2 = (1/2)(3/4)(1/cos(π/8))=(3/8)(2-√2)(√(2 + √2)) ≅0.40590
Using l2 = √2 (√(2 + √2)) * a, hence a = (3/8)(√2 - 1)
Heart-4
Geometry around the center of R1 arc gives the folowing relation.
a * (cot(π/8) + 1 ) = 1/2, hence a = (1/4)*(2 - √2) ≅ 0.1464466
Here is the summary of height and width of all 4 hearts.
Summary Table
| Heart Type | Height | Width |
|---|---|---|
| exact and approximate values | exact and approximate values | |
| Heart-1 | 1 | 2*(2 - √2) ≅ 1.17157 |
| Heart-2 | (1/4)*(2 + √2) ≅ 0.85355 | 1 |
| Heart-3 | (3/8)*√2 ≅ 0.530330 | (3/2)*(√2 - 1) ≅ 0.621320 |
| Heart-4 | 1/2 | (2 - √2) ≅ 0.585786 |
comparison of heart-1,3,4 vs.Heart_2
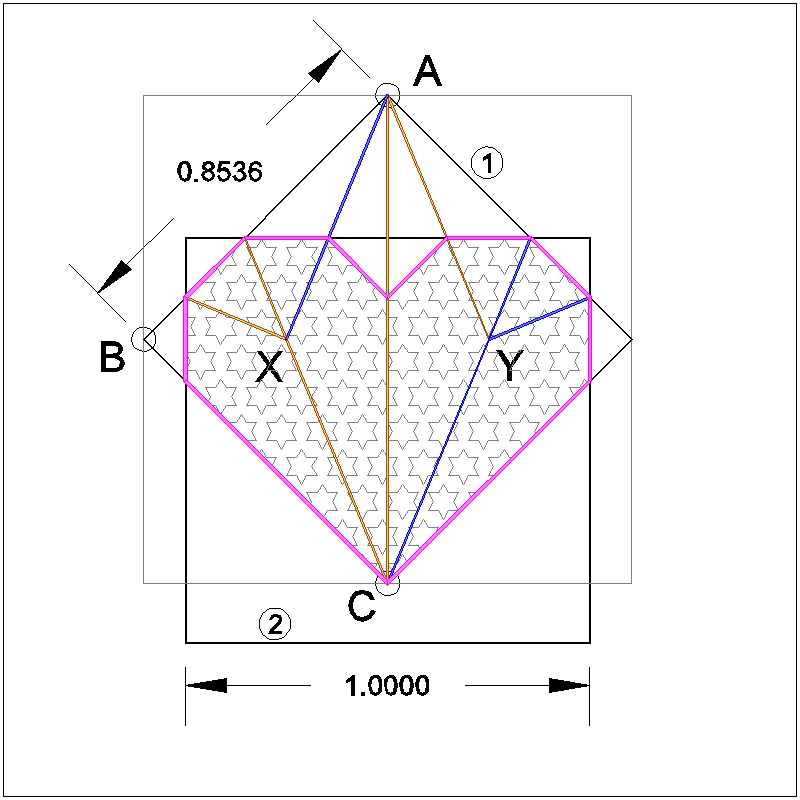
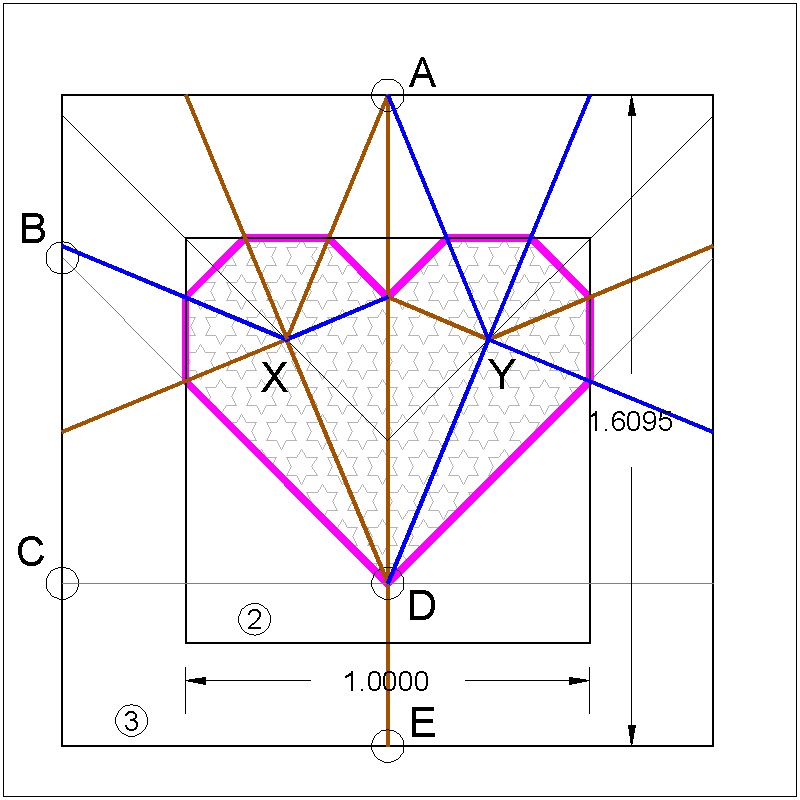
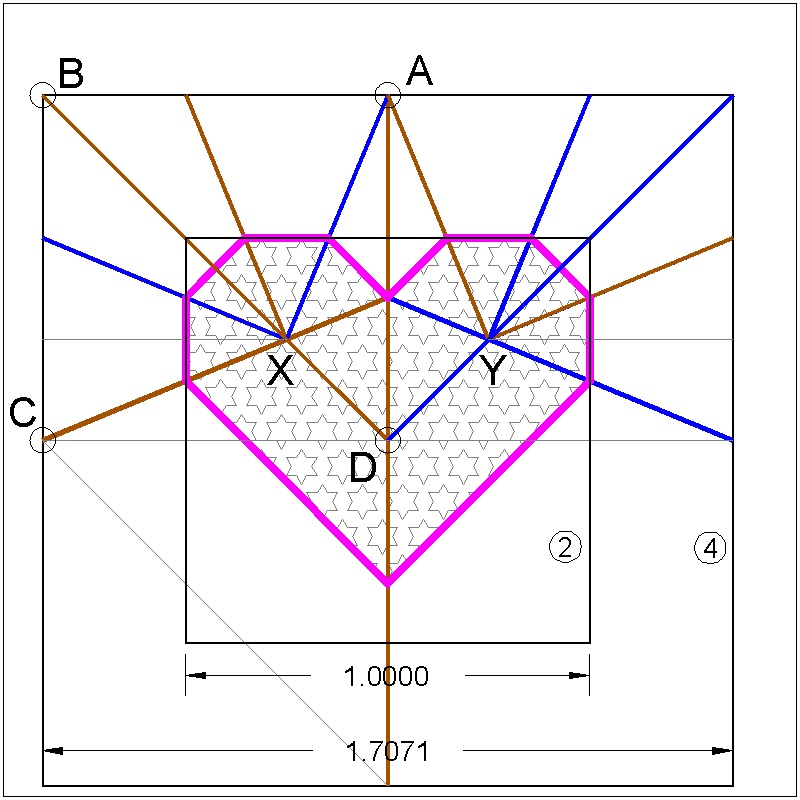
The readers can see now that Heart_2 is derived from 2-arcs-heart,which has 2 semi-circles centered at Cartesian coordinate(-0.25 0.25) and (0.25 0.25) in a unit length square sheet of paper. Let us call these points X, and Y.
This is what we will do now. Take the crease line drawing of heart_1 and move its two semi-circle centers to point X and Y,respectively.
This , in effect, will scale and translate the drawing at the same time.(In CAD term this operation is called "ALIGN").
Next draw a rectangle with lower left corner at (-0.5,-0.5), and upper right corner at (0.5,0.5) ,i.e. a square with a unit edge length.
Do similar operations to Heart_3 & heart_4. The resuling images are shown below.
Note:
important role in the folding process.
|
Heart_2 and Heart_1 click here to enlarge 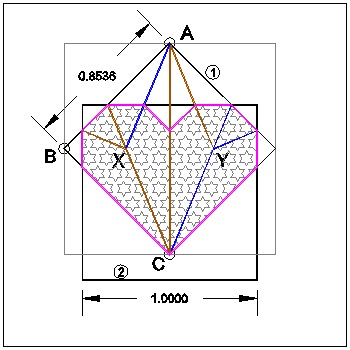 |
heart_2 and Heart_3 click here to enlarge 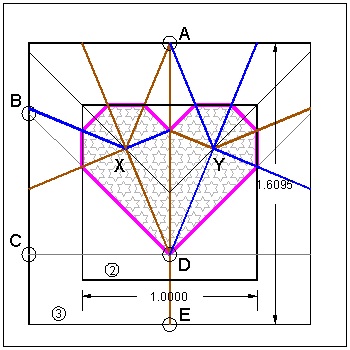 |
|
Heart_2 and Heart_4 click here to enlarge 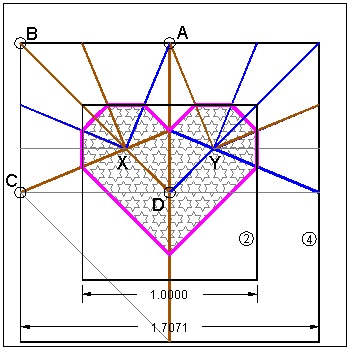 |
Heart_1: 3 points-A,B & C are the key points in heart_1 folding process.
The readers will also see that heart_1 method produce the maximum size of heart_2 using a paper of smaller size (0.8538).
Heart_3: 3 points-B, C & D are all 1/4 distance from edge.
It is easy to see that heart_3 method works by sliding triangle BCD up & down as long as both points B and D are within the square paper.
Heart_4: 3 points-B, C & D are the key points in heart_4 folding process.
Point D is the center of 2 squares, and this property make this heart open to more variations.
Discussion on possible variations of Yamamoto's Hearts(1 - 4)
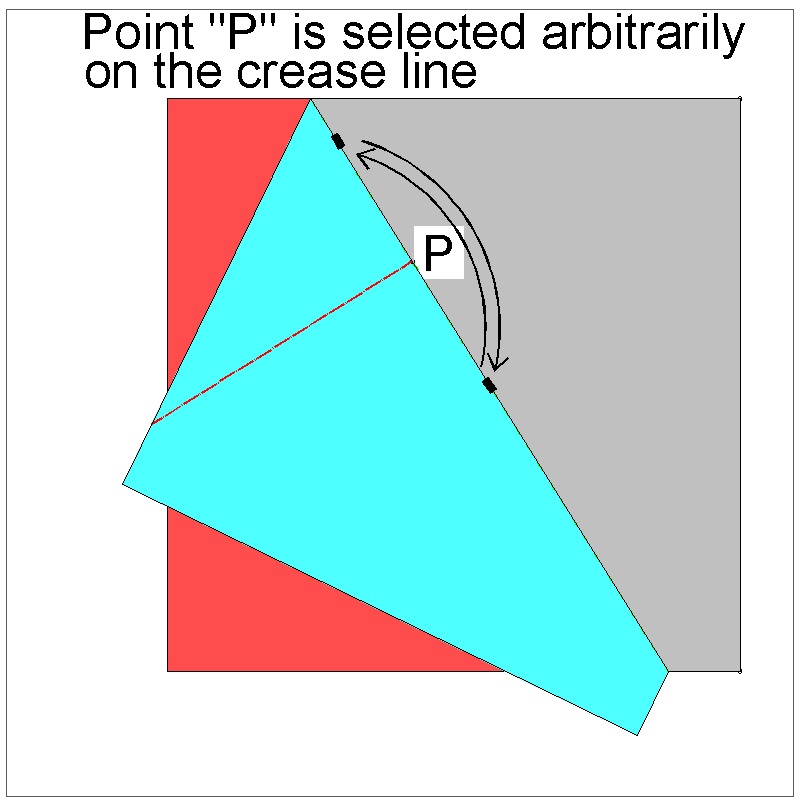
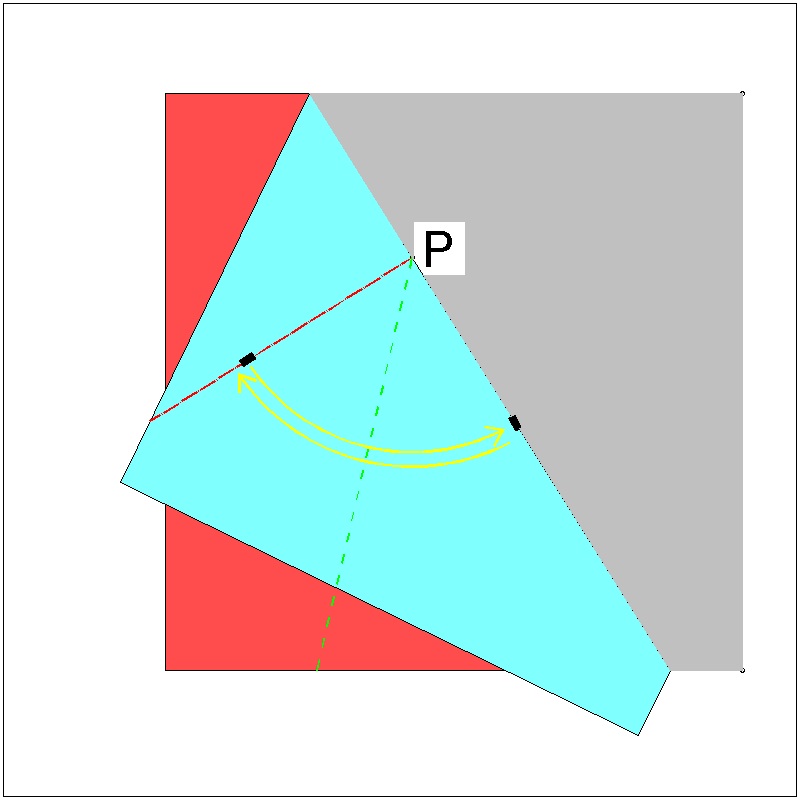
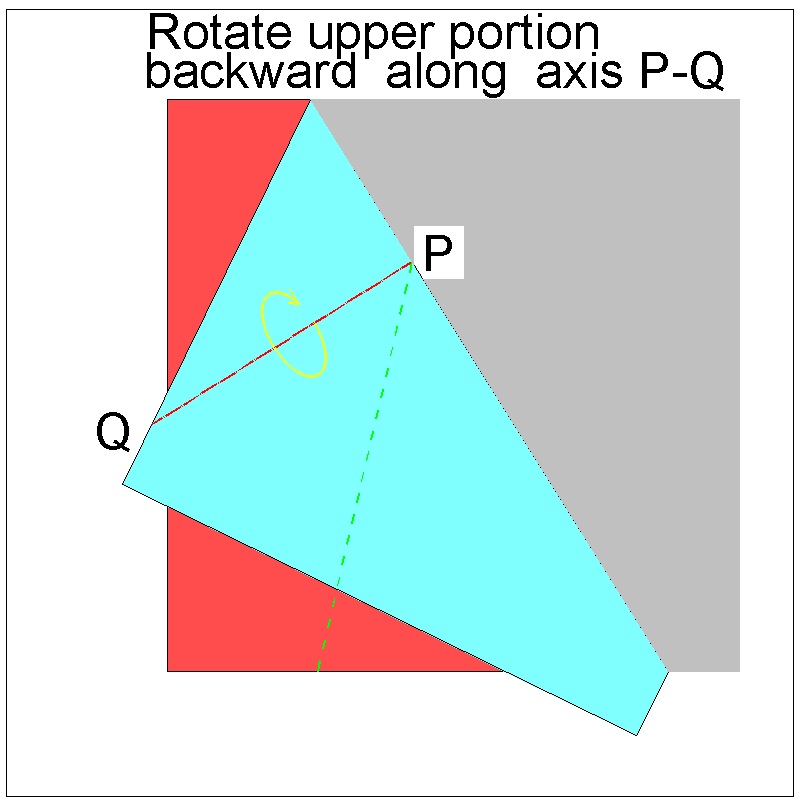
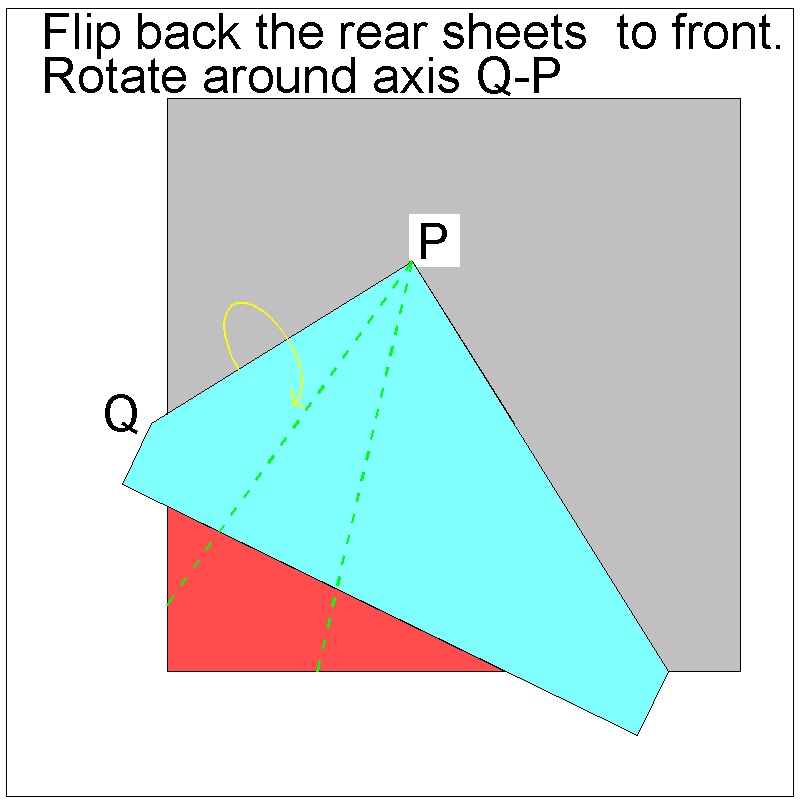
Heart-1In one of the class notes Yamamoto handed out to the participants, the author found what he named "a heart at the corner",
the size of which is one quarter of "Heart-1". This will be generalized so that any size of "heart-1" type shape can be created. This is illustrated graphically below.
Generalization of Heart-1 Creating a heart of any size
|
General Heart Result click here to enlarge 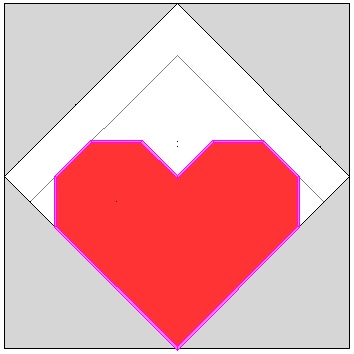 |
General Heart Crease Lines click here to enlarge 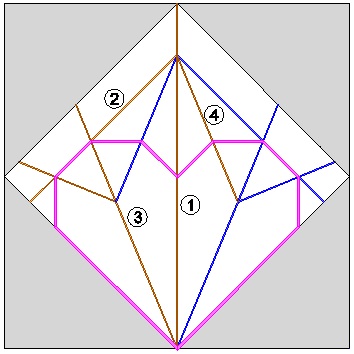 |
|
General Heart Folding Process click here to enlarge foldinganimation to be ddded here unfolding animation to be added 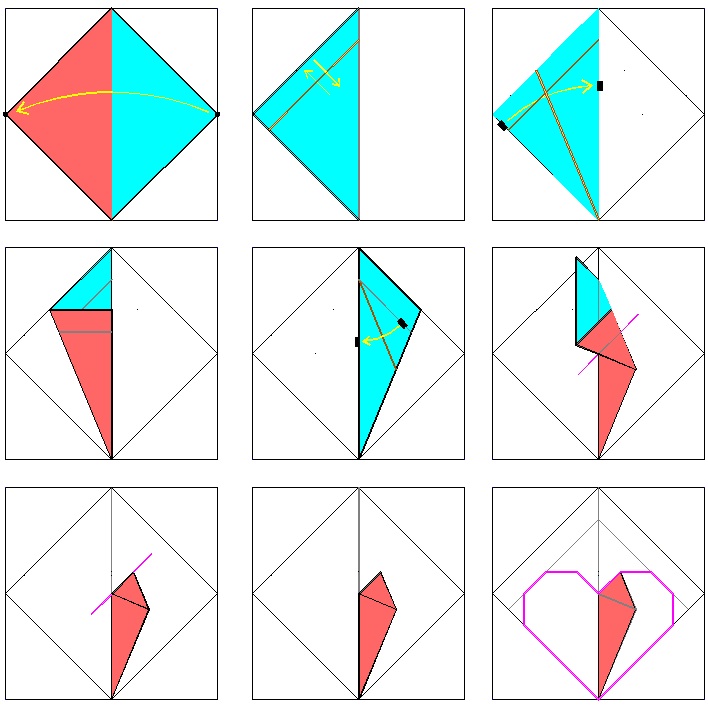 |
Heart-2
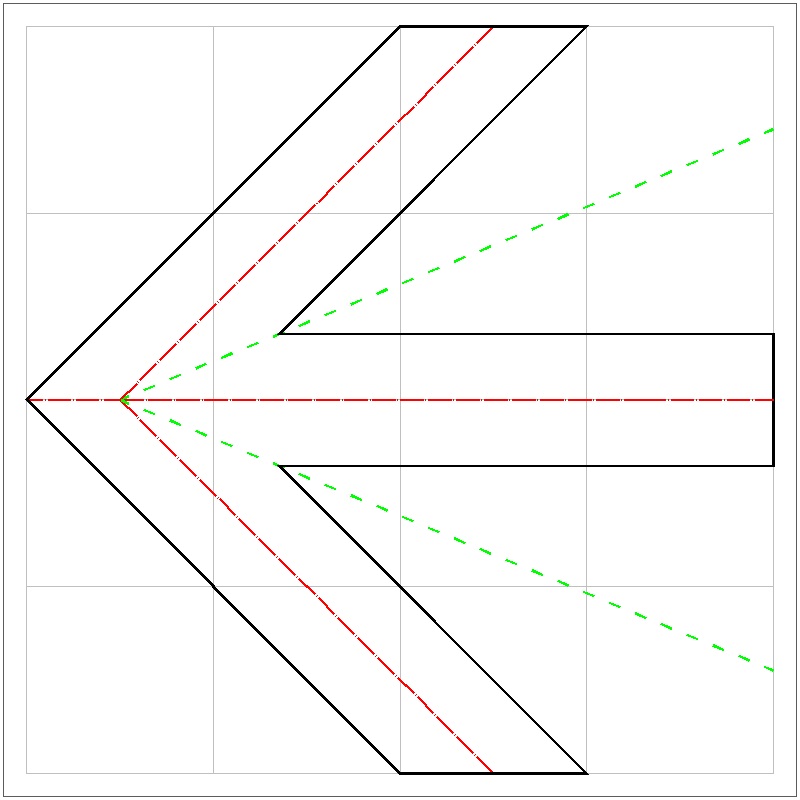
Since this method uses two edges of the unit square (KE & FI), there is no room left for variation.
The only change that can be added is to find the point "H" by folding. This will be left for reader's mental exercise.
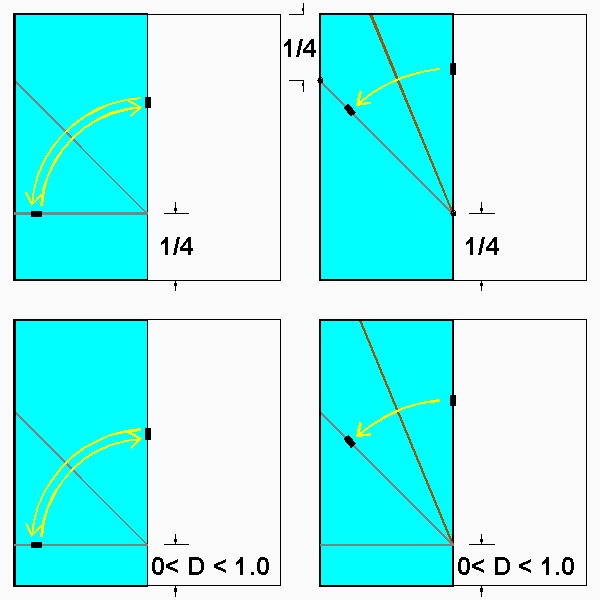
Heart-3
Yamamoto's books and blog does not mention about this possibility.
The author proposes 2 variations for this method, one for different size, and the other, shape modification.
(1) Size variation
In this method ,the reference crease line located 1/4 distance from the bottom is chosen. But the value (1/4) is rather
an arbitrary choice and it can be any value between 0 and 1.0. The case of D=0 is shown in the figure below.
When D = 0, l2 = 1/(√(2 + √2)). Since h/l2 = √(2 +√2)/√2 , h = (1/2) * √2 ≅ 0.707107,
which is much bigger than the regular heart-3 (refer to table above).
As D approaches 1.0, the height will get smaller and smaller, getting zero .
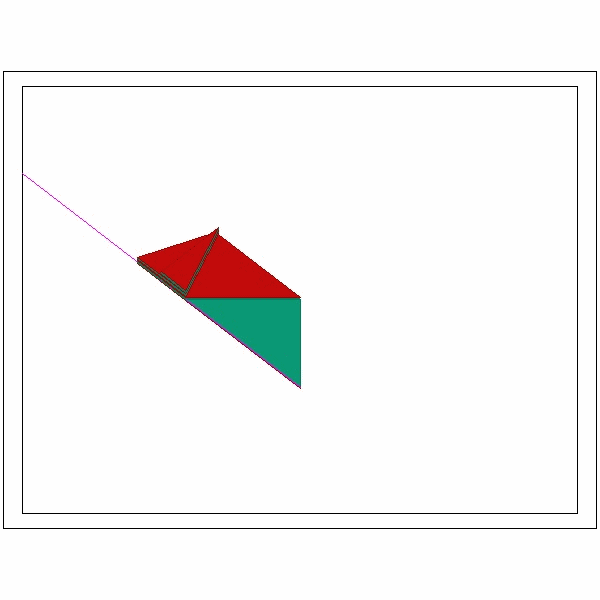
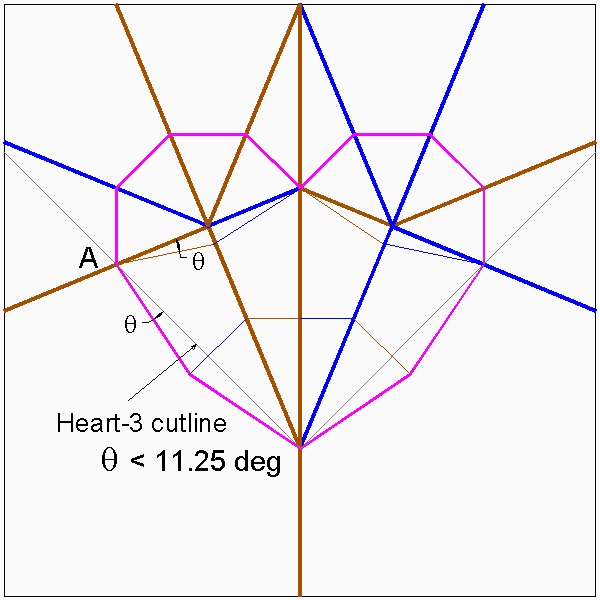
(2) Shape modification
As mentioned a few times so far, Yamamoto's heart shape is based on "2 arc heart" .
The semi-circle with radius R1 is replaced by 4 lines, and the arc with radius R2 is represented
by just one straight line. The author proposes two lines for this arc as shown in the folowing figures.
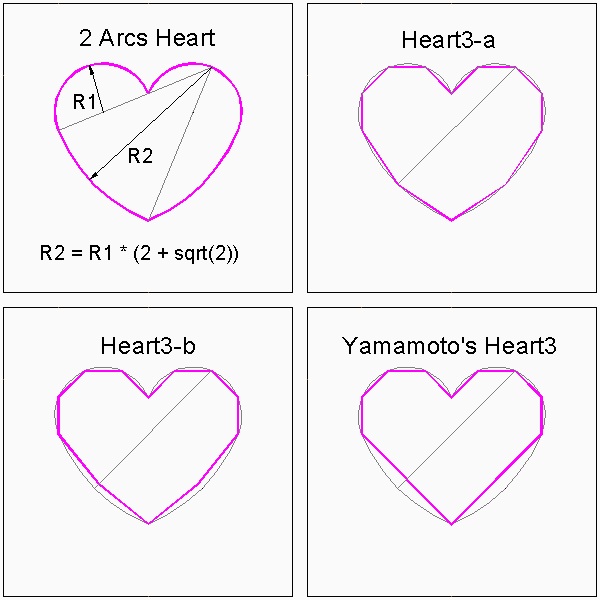
Figure of crease lines
The only added step before the final scissor cut is alignment of cutline of R1 arc, and R2 arc.
This can be accomplished rotating papers containing 8 triangles for semi-circle(R1 radius) around the point "A".
click here to see 600x600 image
Heart-4
This method has very interesting variations as described below. (This is in Yamamoto's book)
Heart making variation #1--Corner Heart (upper left corner)
This is a variation of "Heart-4".|
Corner Heart Result click here to enlarge  |
Corner Heart Crease Lines click here to enlarge 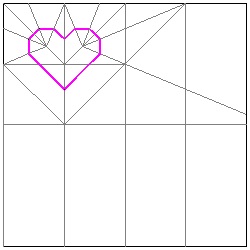 |
|
Corner Heart Folding Process click here to enlarge animation to be added 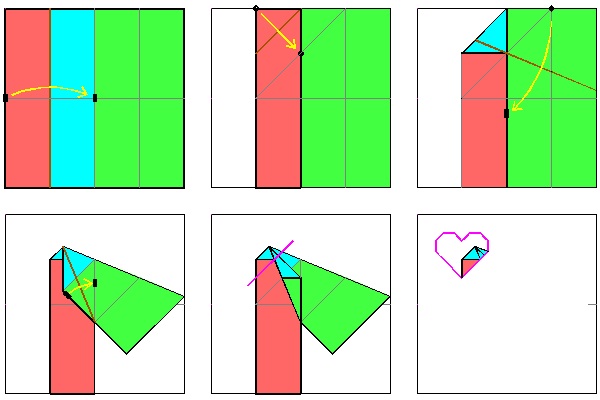 |
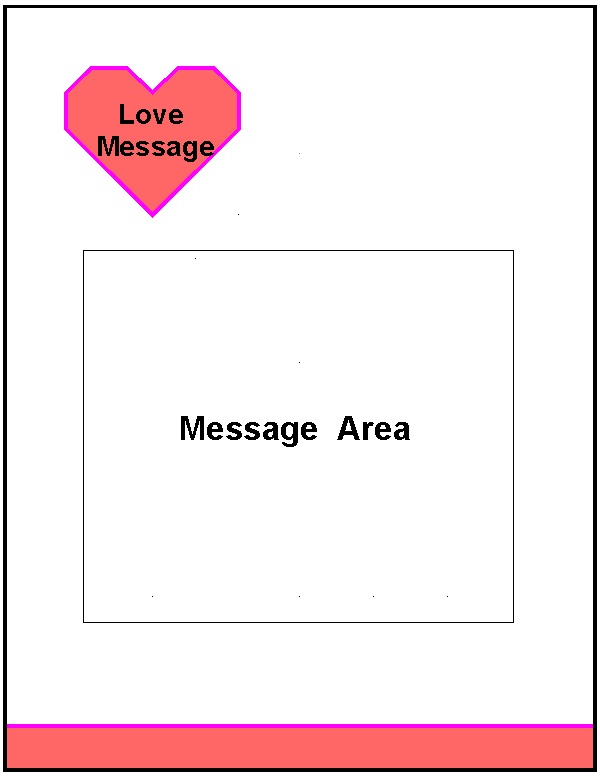
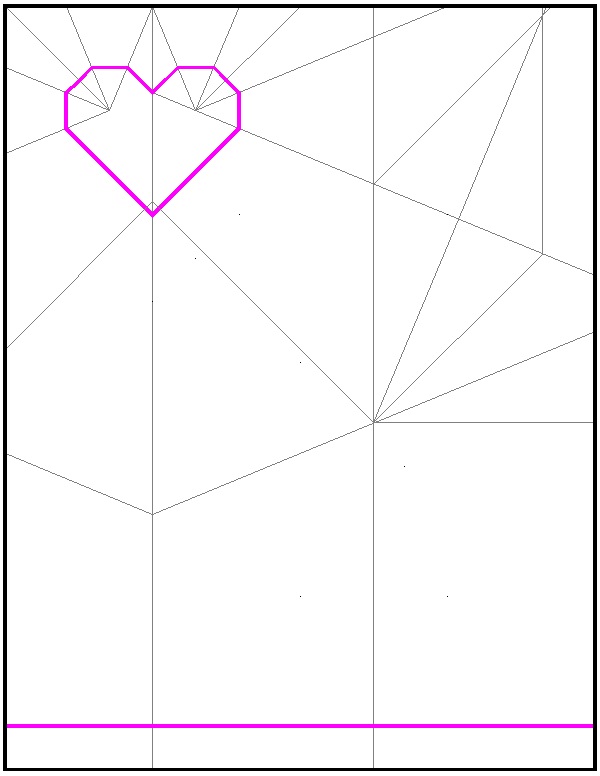
Heart making variation #2--message and envelope with heart
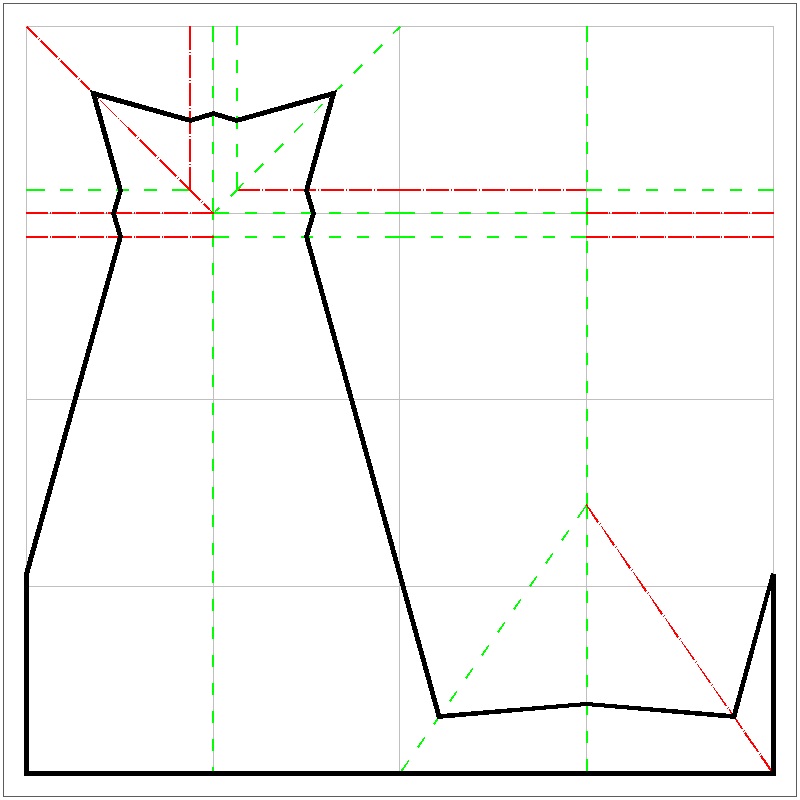
Yamamoto added more flavors to variation #1.Now you can make an integrated letter pad and envelope .
When the recipient opens the envelope by cutting along the specified line,
a small heart with message comes out and the letter pad area has extra messages.
|
Love Message Result click here to enlarge 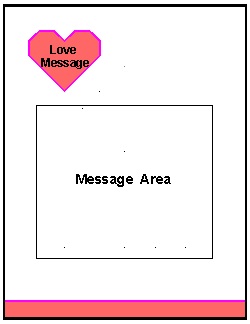 |
Love Message Crease Lines click here to enlarge 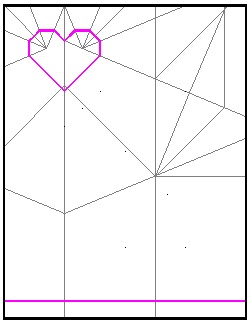 |
|
Love Message Folding Process click here to enlarge animation to be added 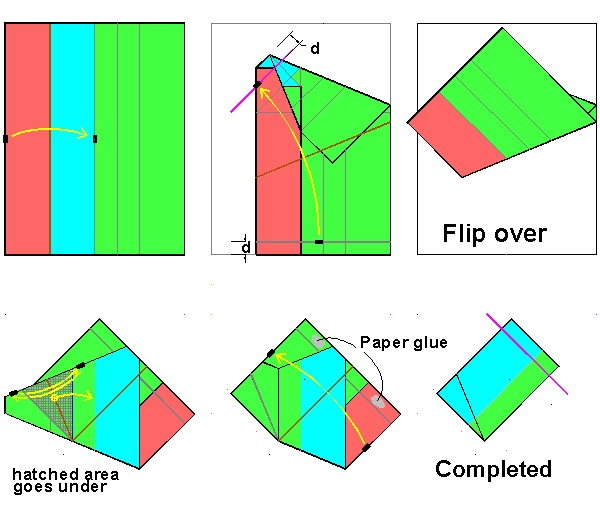 |
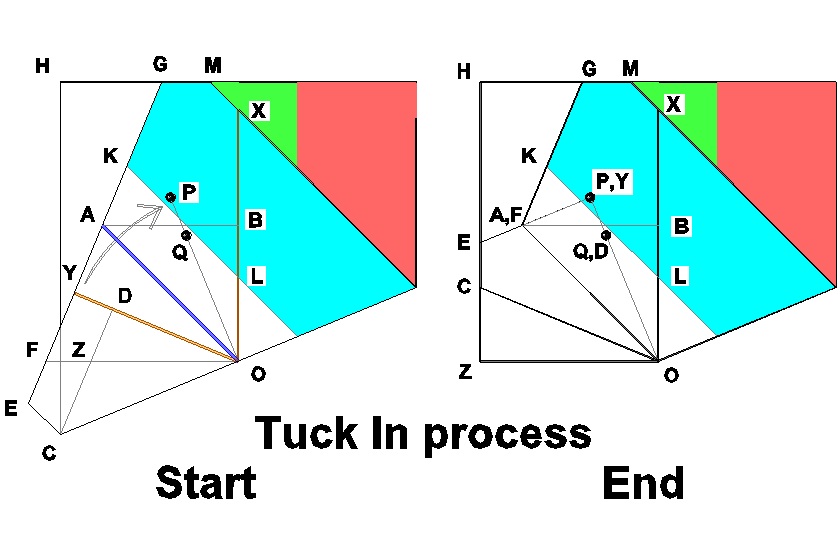
In the figure above, the process of tucking in the cross hatched area needs more detailed description.
Figures below show the views of start and end of the process with point locations marked with symbols.
Points O, X, Y, Z stay all the time on the plane defined by OXHC.
,while OA is peak folding and OY anf OZ , valley folding.
As point Y moves on the OXHC plane clockwise with point O as a pivot (center of a circle with radius OY),
rectangle OXGA rotates around axis OX raising point A above the plane toward the reader.
At the same time rectangle OYEC moves toward line OP rotating around axis OY,
and triangle OZC rotating around axis OZ.
In the end point ,Y reaches point P , and points E & C will lie on the edge line connecting H and Z.
The triangular region OAF will be tucked in under rectangle OXGA.
This is demonstrated by the animation .
|
Love Message Folding Process click here to enlarge click here to see animation  |
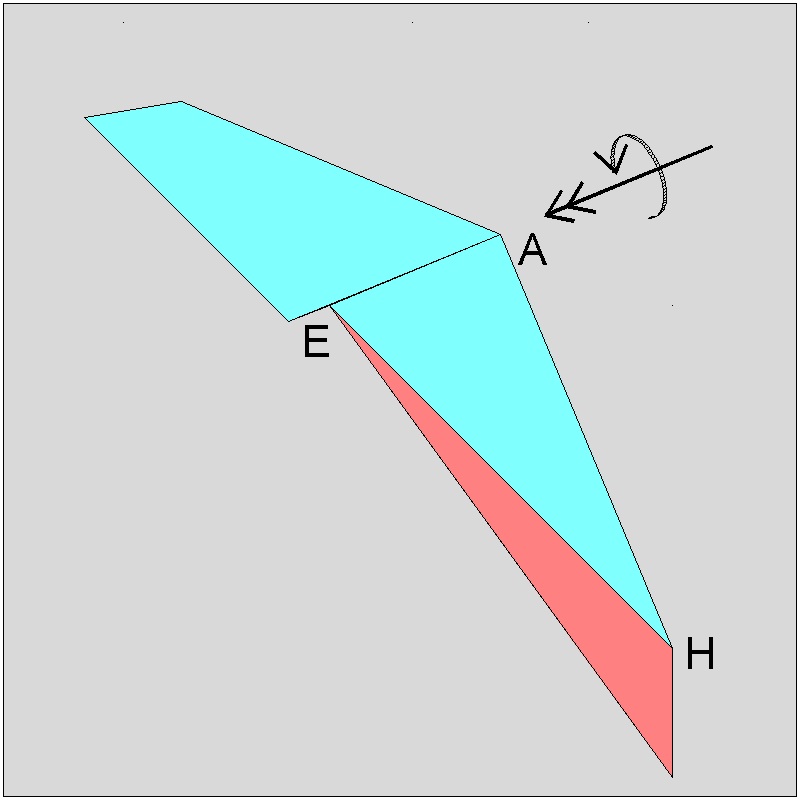
Heart making variation #3--Side-by-side heart(double hearts)
The author received the following idea through communications with the editor of Yamamoto's book.|
"Side-by-side" Heart Result click here to enlarge 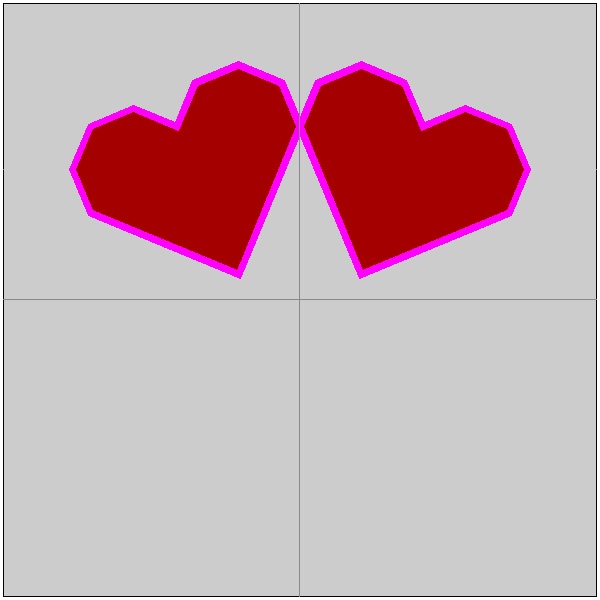 |
"Side-by-side" Heart Crease Lines click here to enlarge 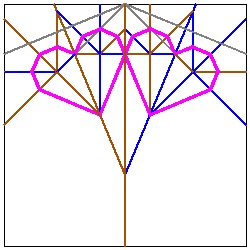 |
|
"Side-by-side" Folding Process click here to enlarge animation to be added 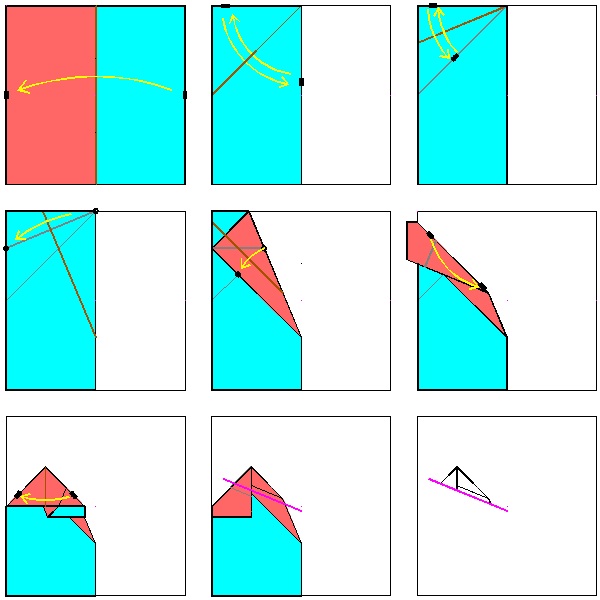 |
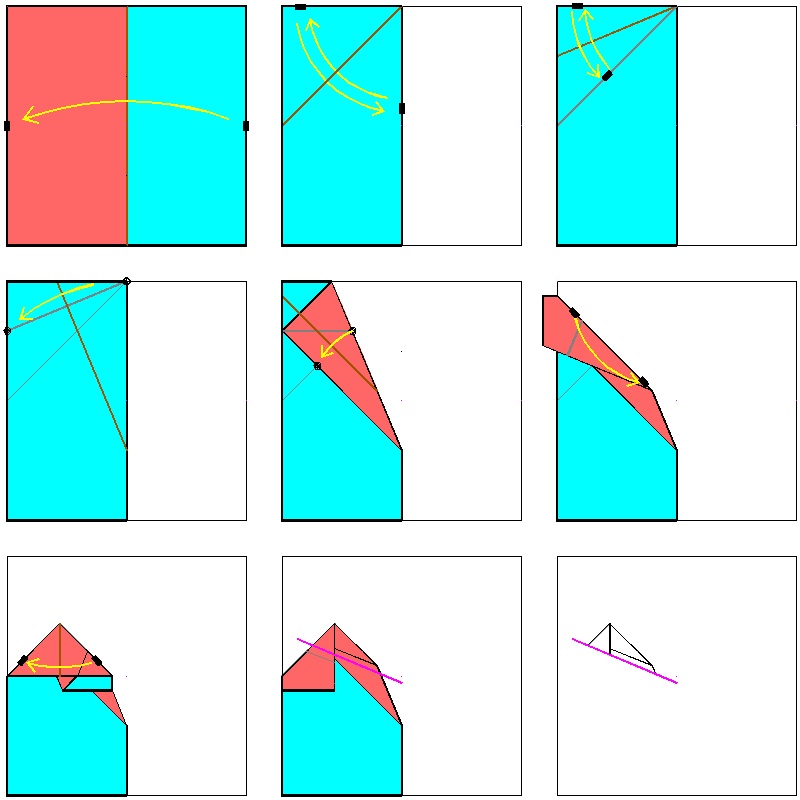
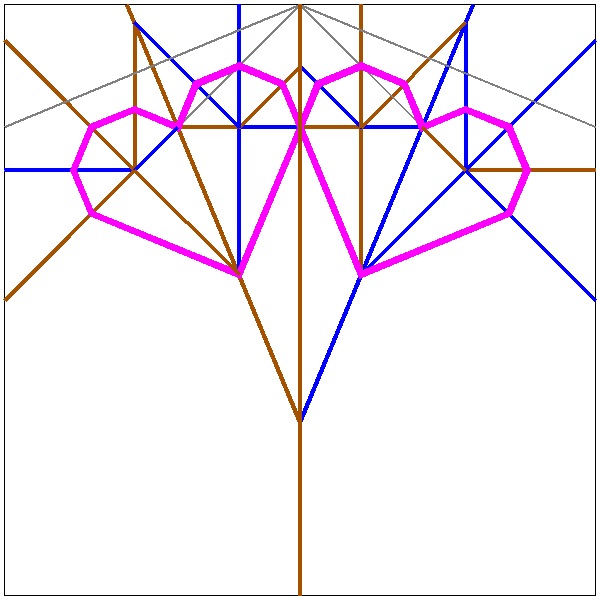
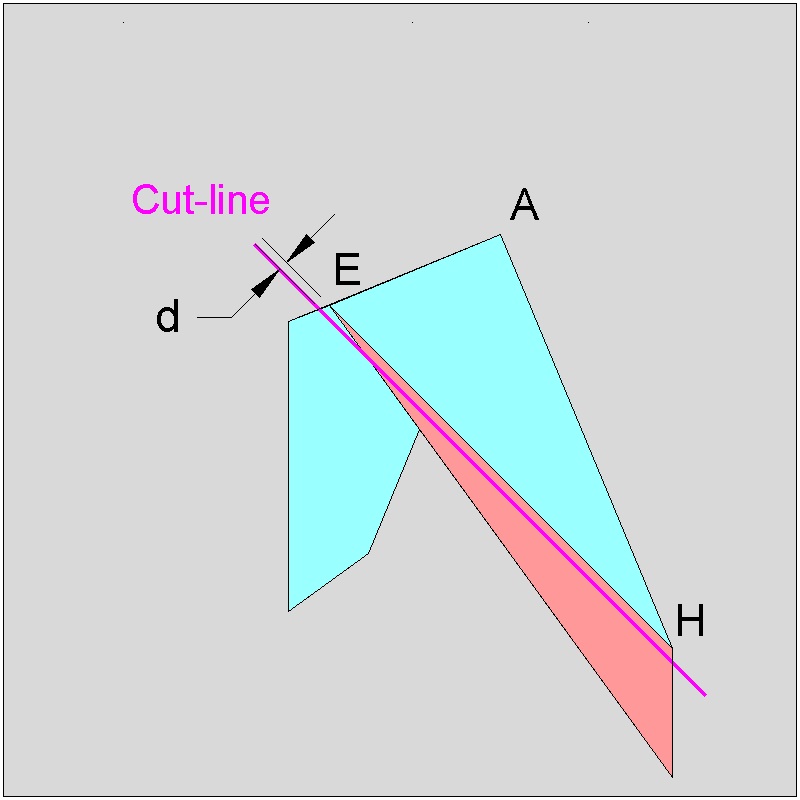
The final scissor cut will decide the overlapping area of "side by side" hearts.
This situation is illustrated by the following figure. The final step above is enlarged.
|
"Side-by-side" Folding Process click here to enlarge 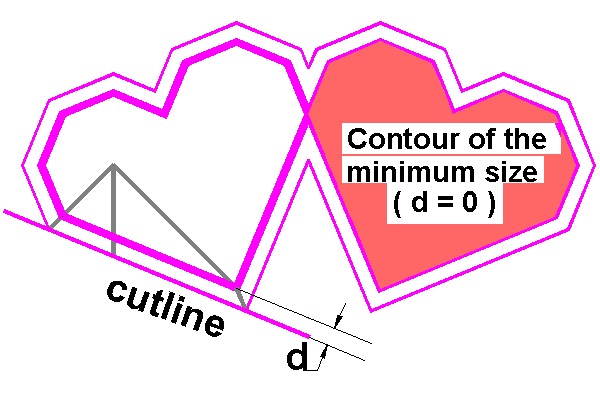 |
As d value approaches zero, the overlapping area also approaches almost to a point
and unless you are carefull, two hearts cannot be connected together anymore.
Heart making variation #4--Free-Heart (Heart shape of any size and inclination)
After a close look at the image of side-by-side heart above, the readers will find out immediately that these two hearts are "Yamamoto's heart-#3" placed side by side. This suggests the possibility to make a heart shape anywhere at any inclination angle.This idea is demonstrated in the following pictures. The example shown is done using a square paper, but papers with any shape can be used.
|
"Free" Heart Result click here to enlarge 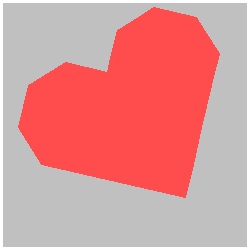 |
"Free" Heart Crease Lines click here to enlarge 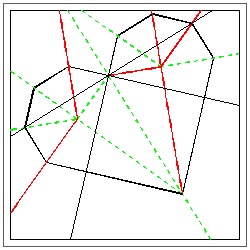 |
Folding steps for "Free Heart" The angle of the heart is chosen at the first step. The size of the heart is decided at step (7). The right and left sides of the square paper are assigned different colors for easier visualization.
|
Step (1) click here to enlarge 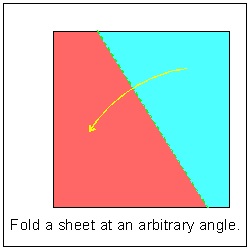 |
Step (2) click here to enlarge  |
Step (3) click here to enlarge 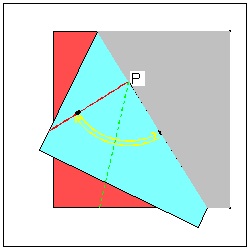 |
|
Step (4) click here to enlarge 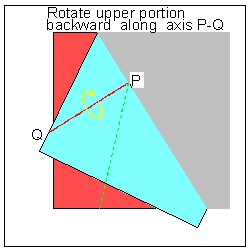 |
Step (5) click here to enlarge 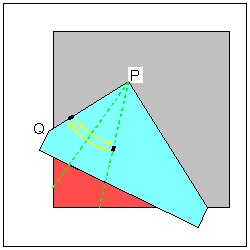 |
Step (6) click here to enlarge 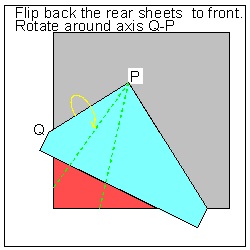 |
|
Step (7) click here to enlarge  |
Step (8) click here to enlarge 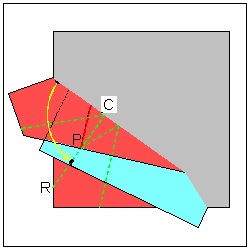 |
Step (9) click here to enlarge 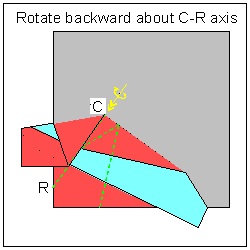 |
|
Step (10) click here to enlarge 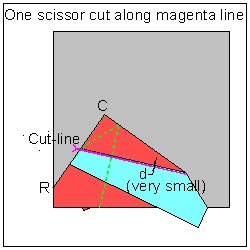 |
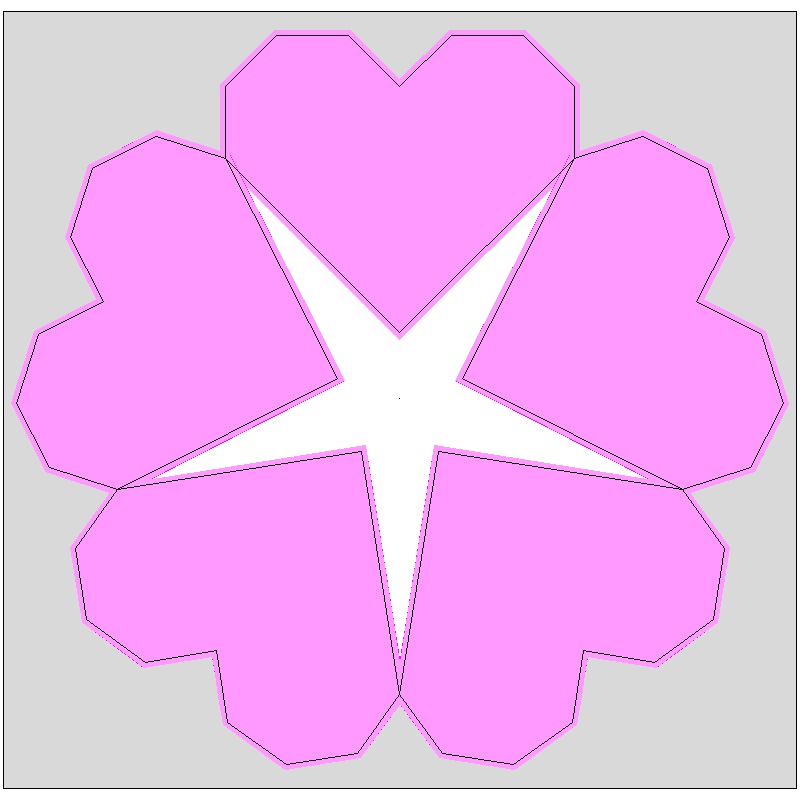
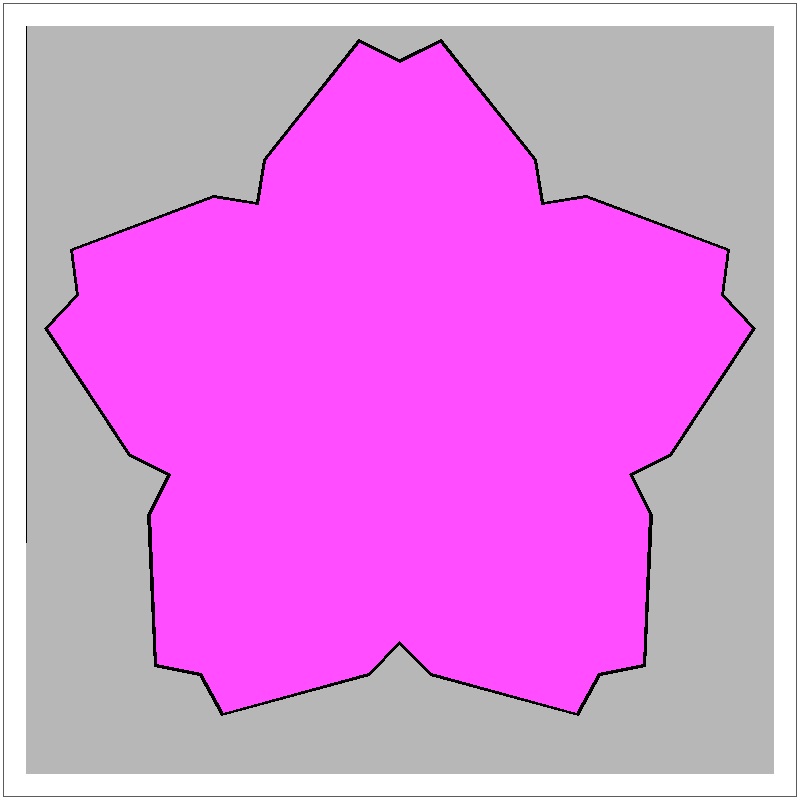
Heart making variation #5--Multiple-Hearts around a circle
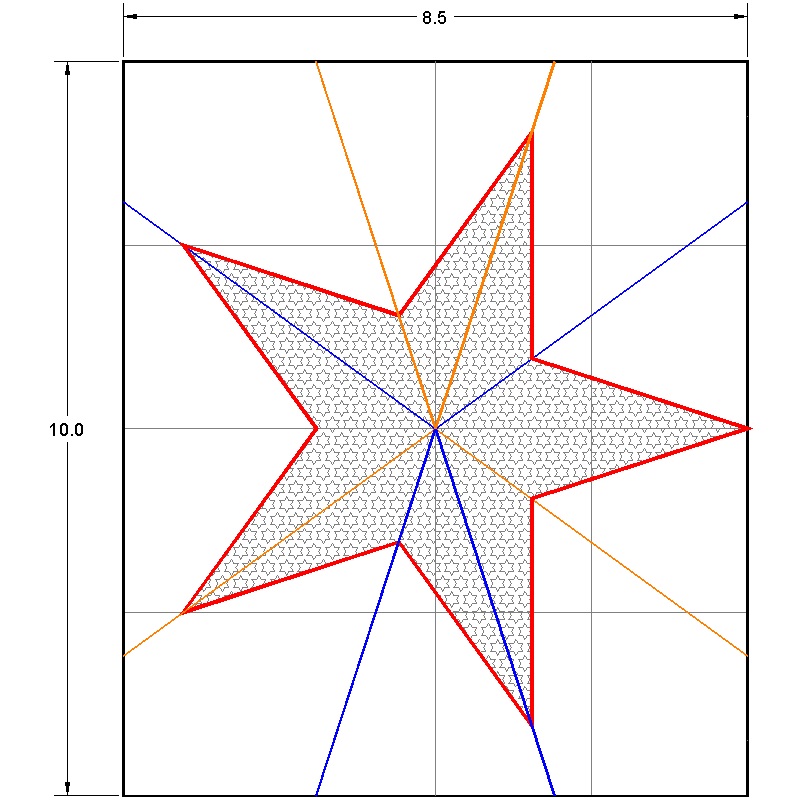
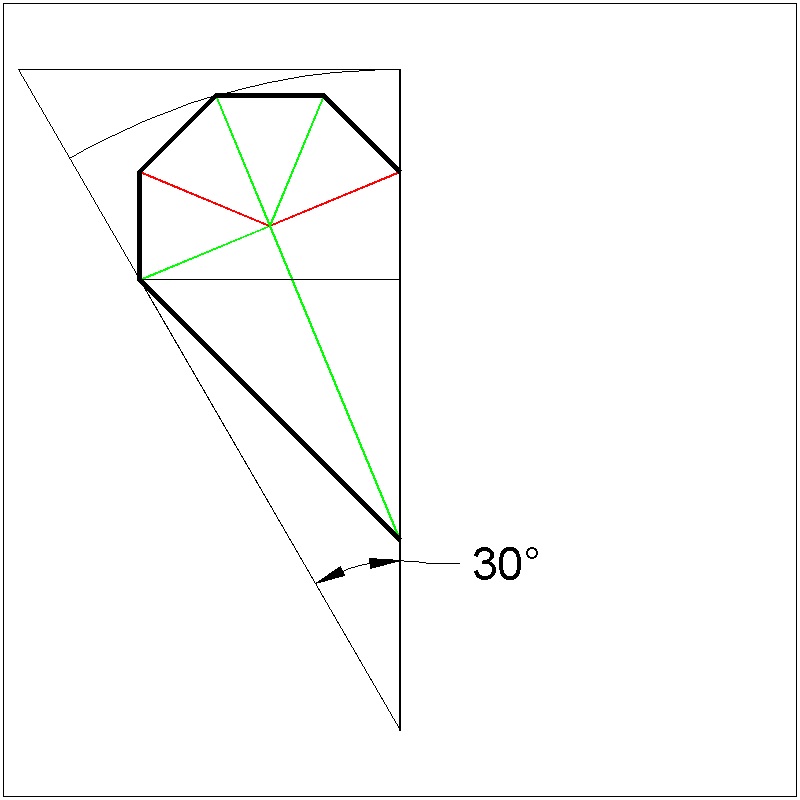
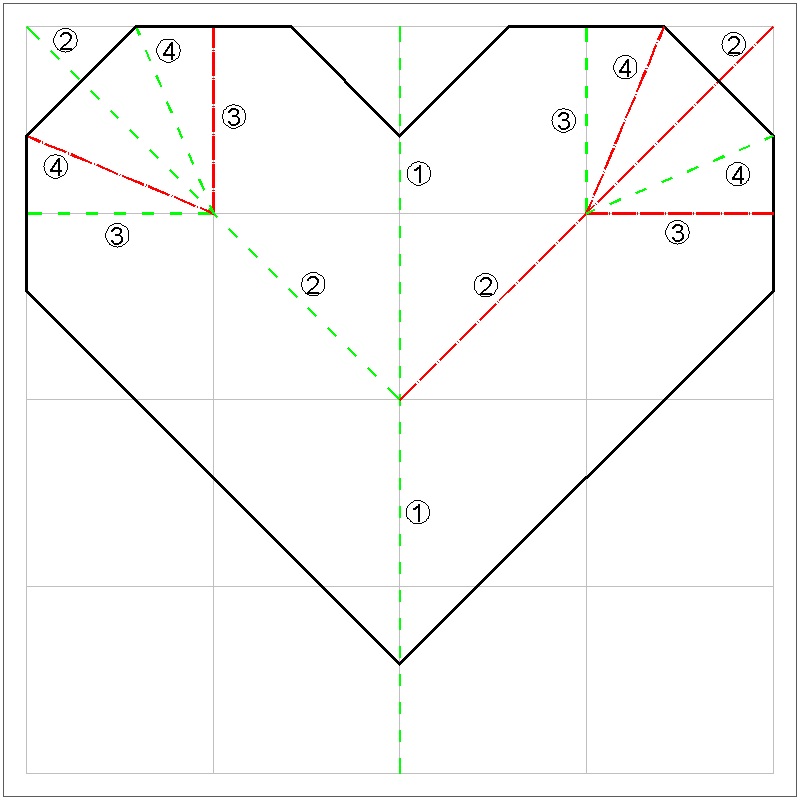
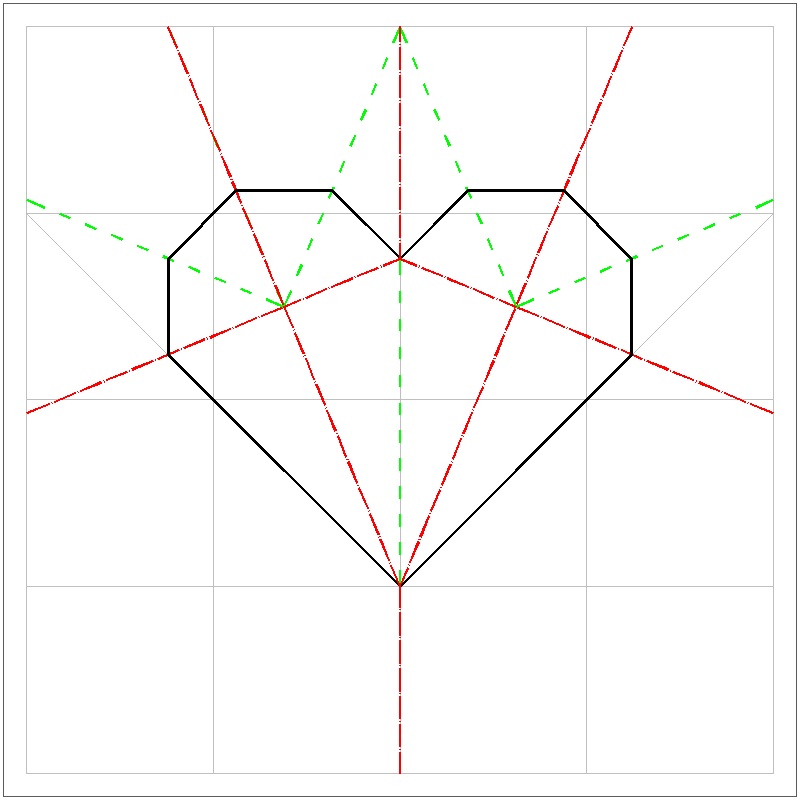
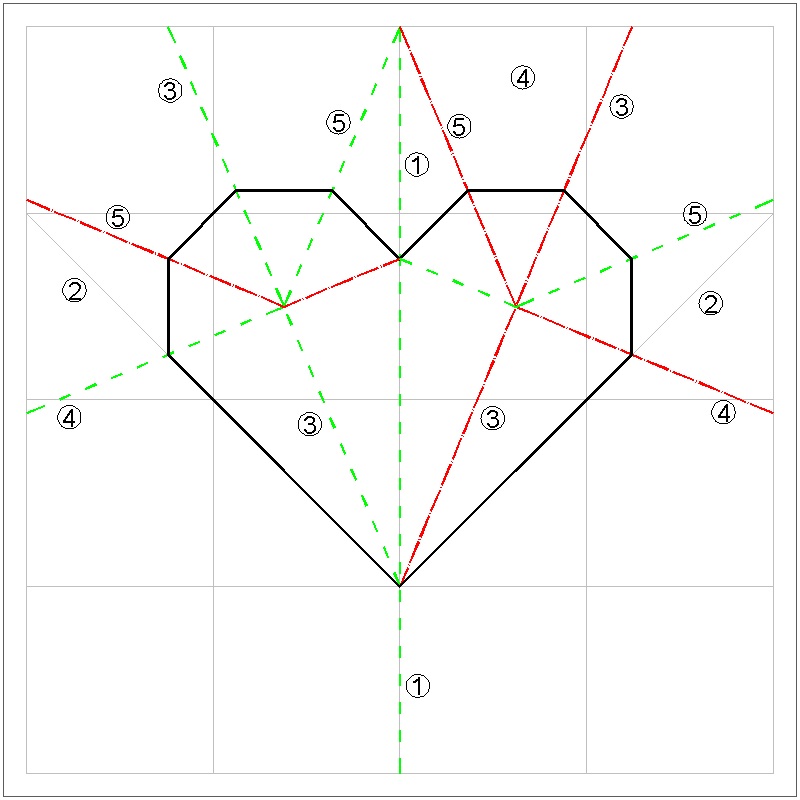
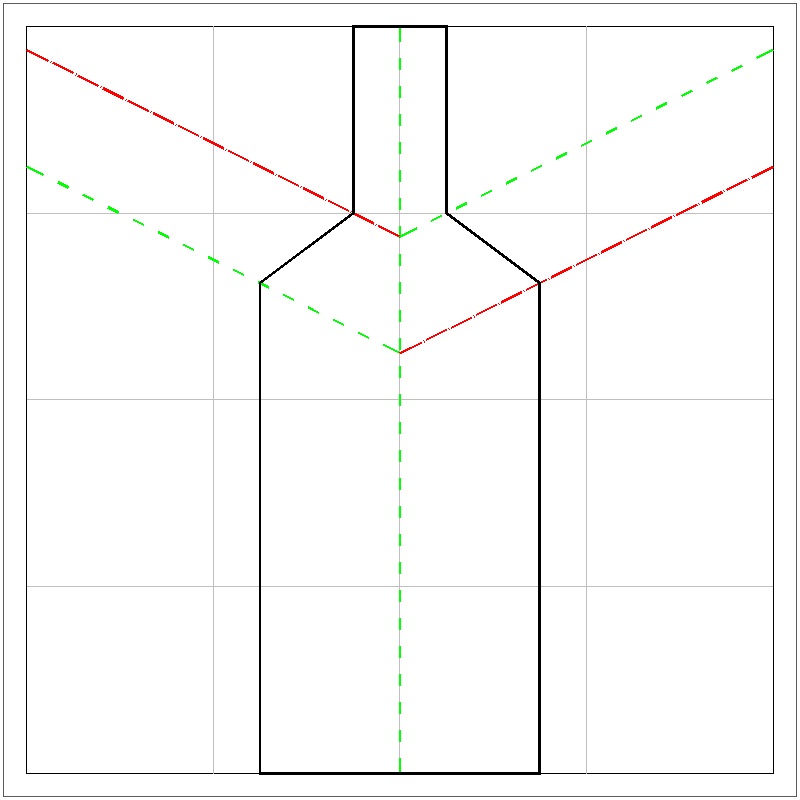
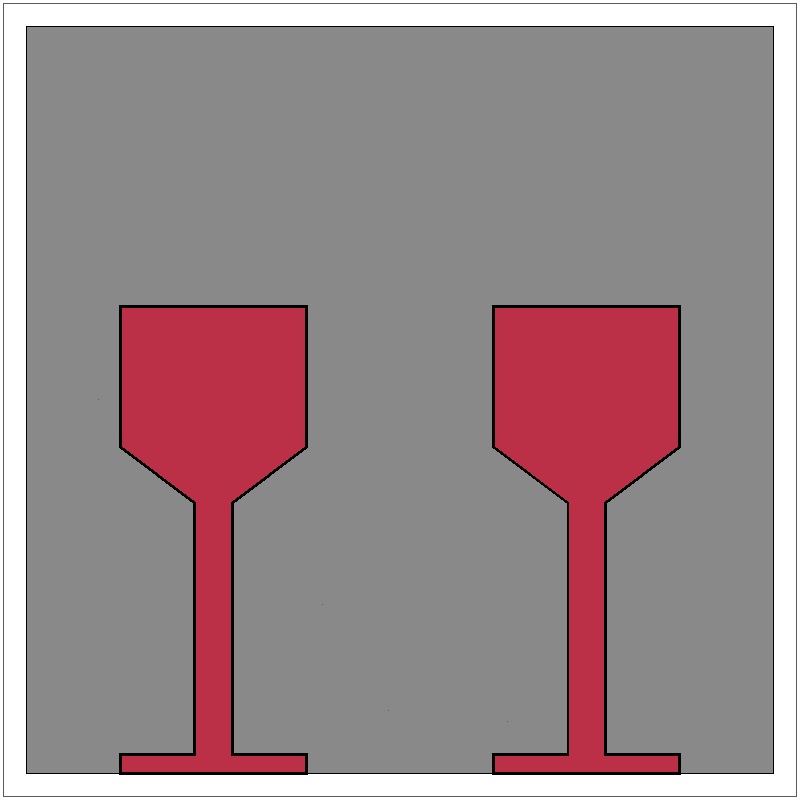
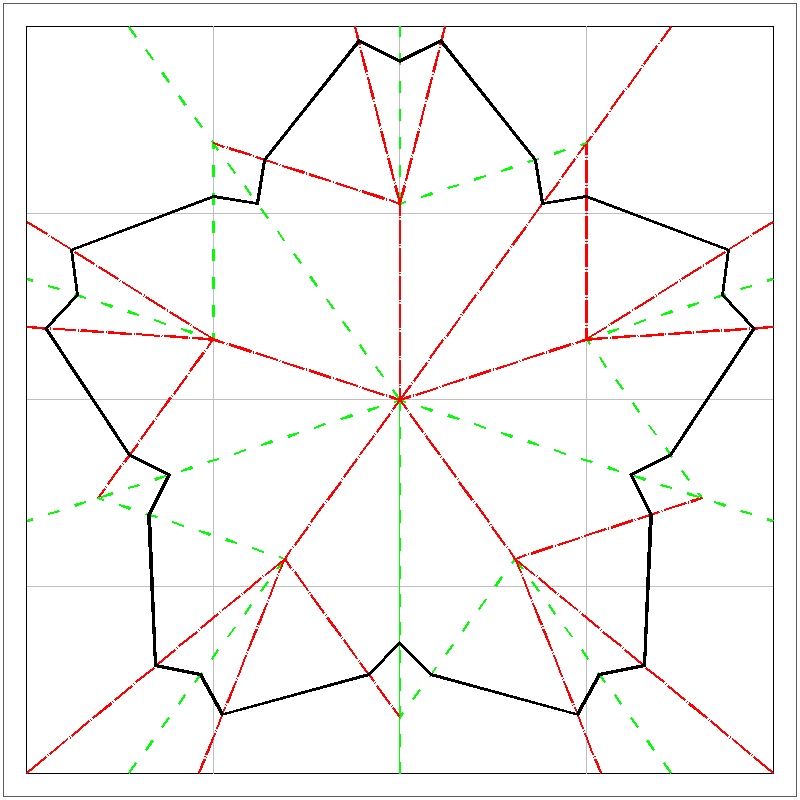
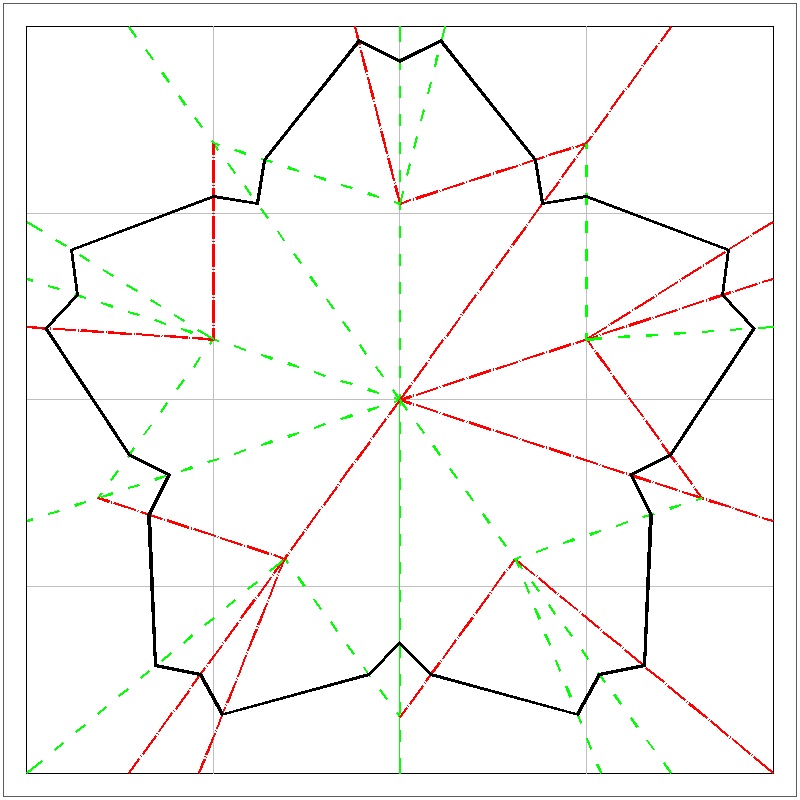
Now we know how to make a heart shape of any size at any angle. Then the next challenge is making multiple hearts arranged in a circular pattern. Since the opening angle of our heart is 90 degrees, the number of hearts around a circle which can be created by folding must be five or more. Let the number of the sides of the polygon is N. First two cases (N = 5, 6) are shown below. Paper size is 8 x 8 .|
Five Hearts Pattern click here to enlarge 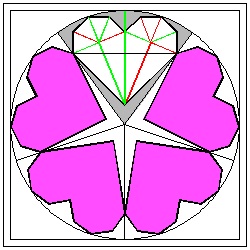 |
Six Hearts Pattern click here to enlarge 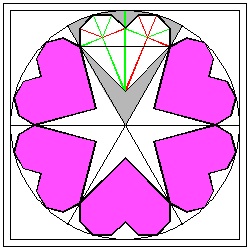 |
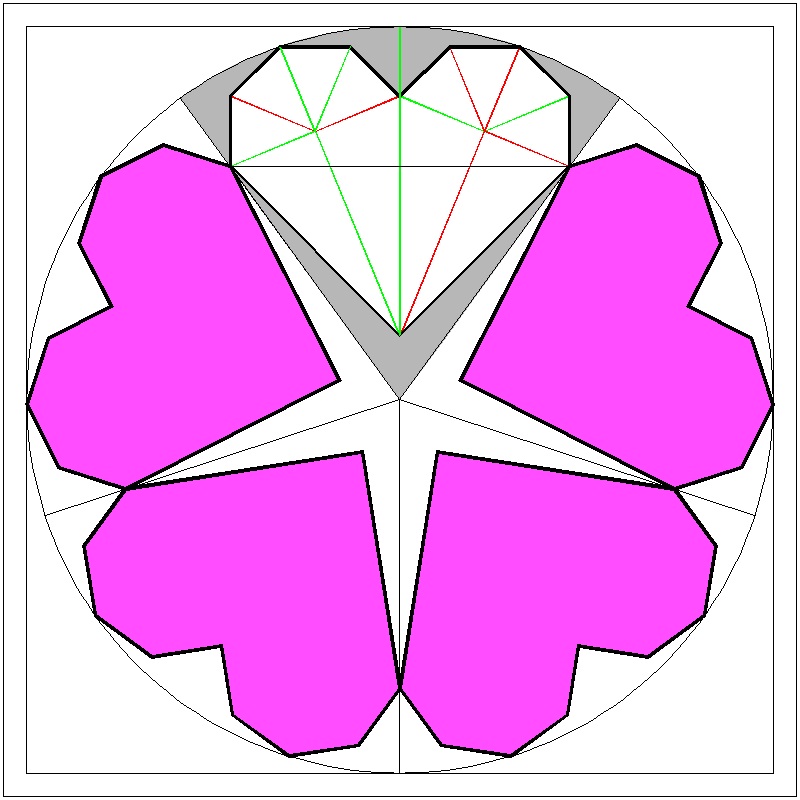
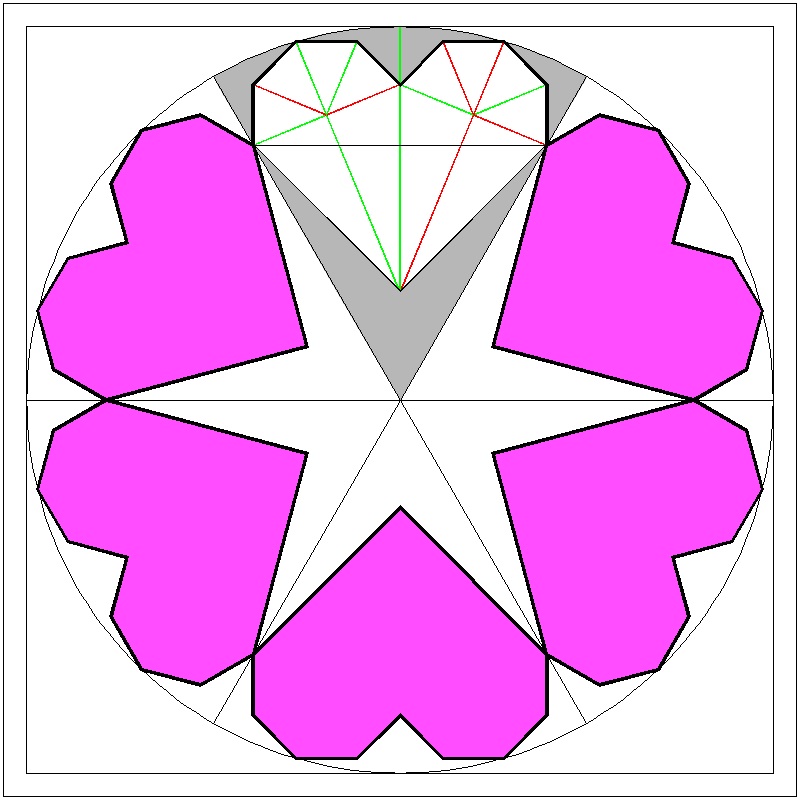
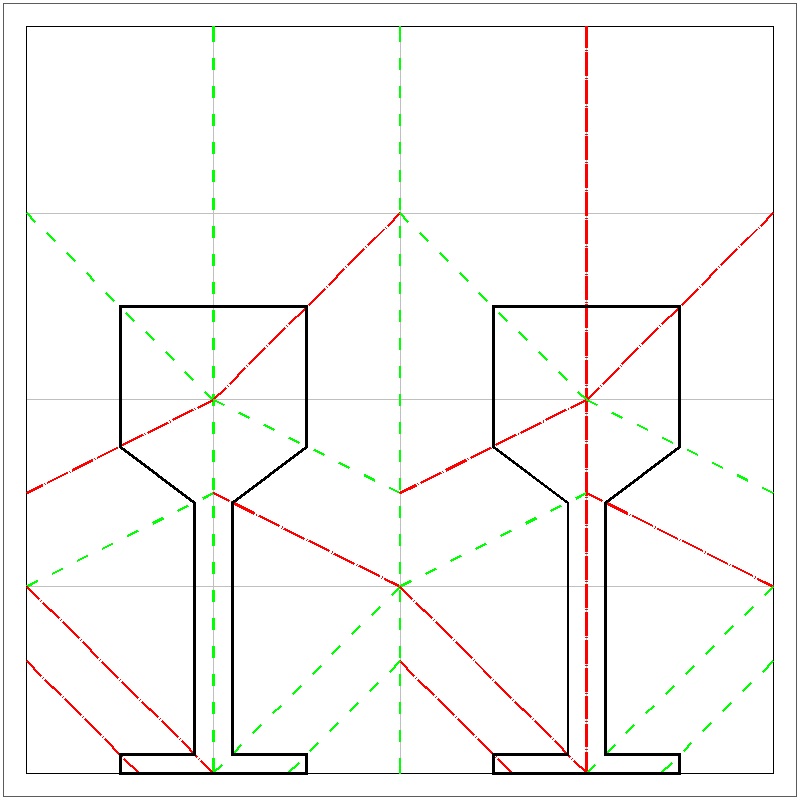
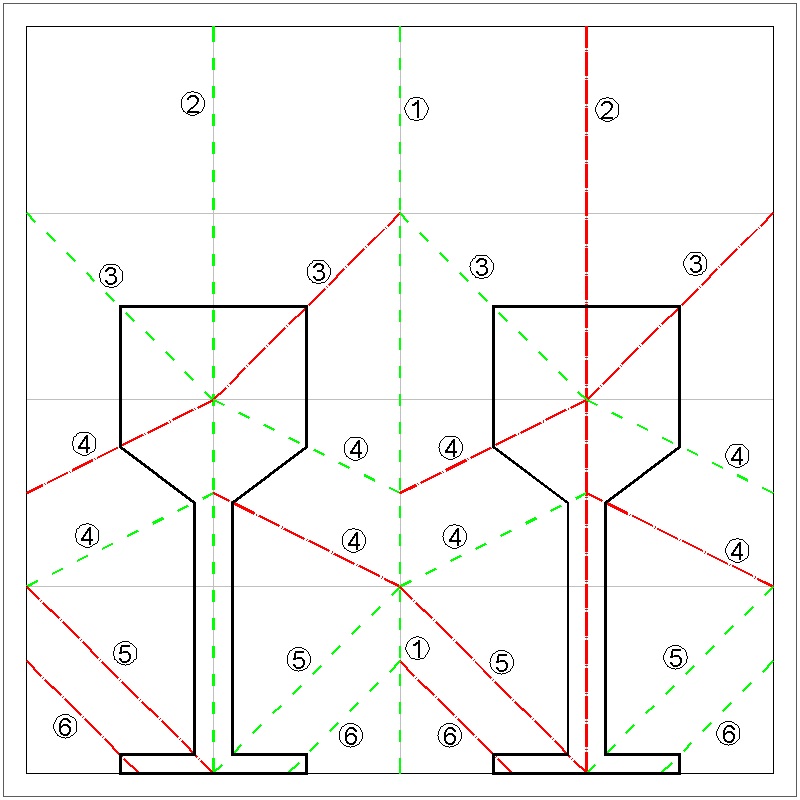
So given a paper, all we have to do is to make a pie-shaped section made up of the exactly the same multi-layered pieces of paper and come up with the scheme of folding and making one-straight cut. But if you try to do this, you will find out that there is a difference between N = 5 and N = 6 cases. For N = 6, it is possible to make a unit with the opening angle of 60 °. But for N = 5, the opening angle must be 36 °,which is the angle corresponding to N = 10 case. Therefore in order to generalize folding sequence both for N = 5 and N = 6 cases, it is necessary to make the opening angle of N = 6 case to its half (30 °). In short the starting pie-shape for a polygon with N sides has the opening angle of (360 / 2N) ° ( Fig. (1) & (3) below ) .
|
(1) Five Hearts Unit Section click here to enlarge 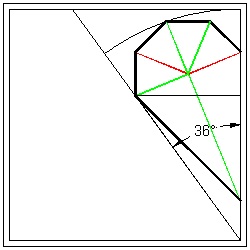 |
(2) Six Hearts Unit Section-Full click here to enlarge 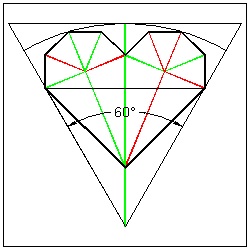 |
;
(3) Six Hearts Unit Section-Half click here to enlarge 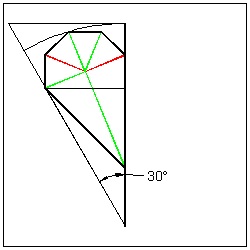 |
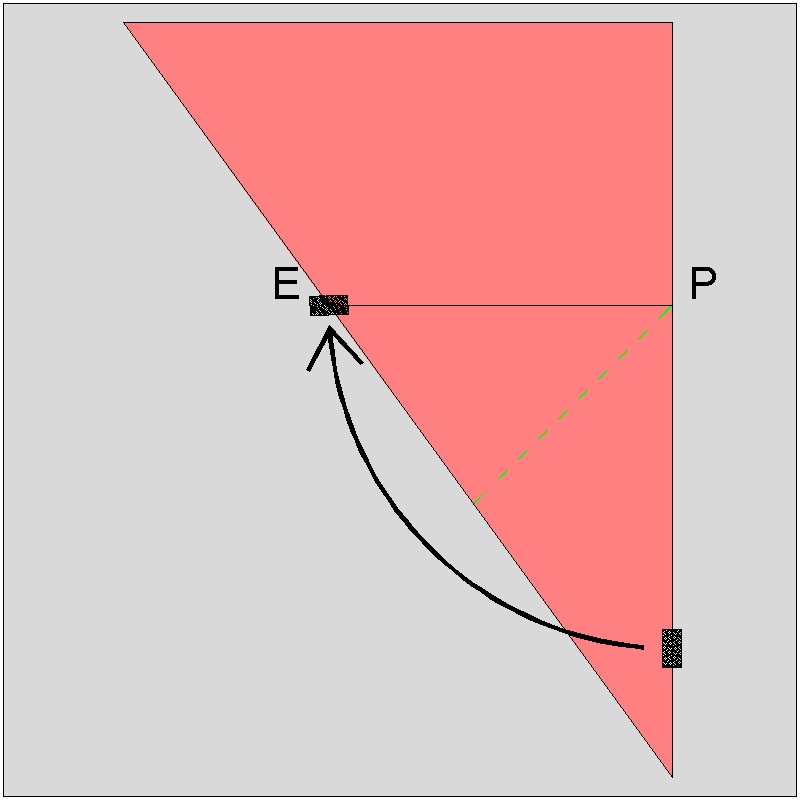
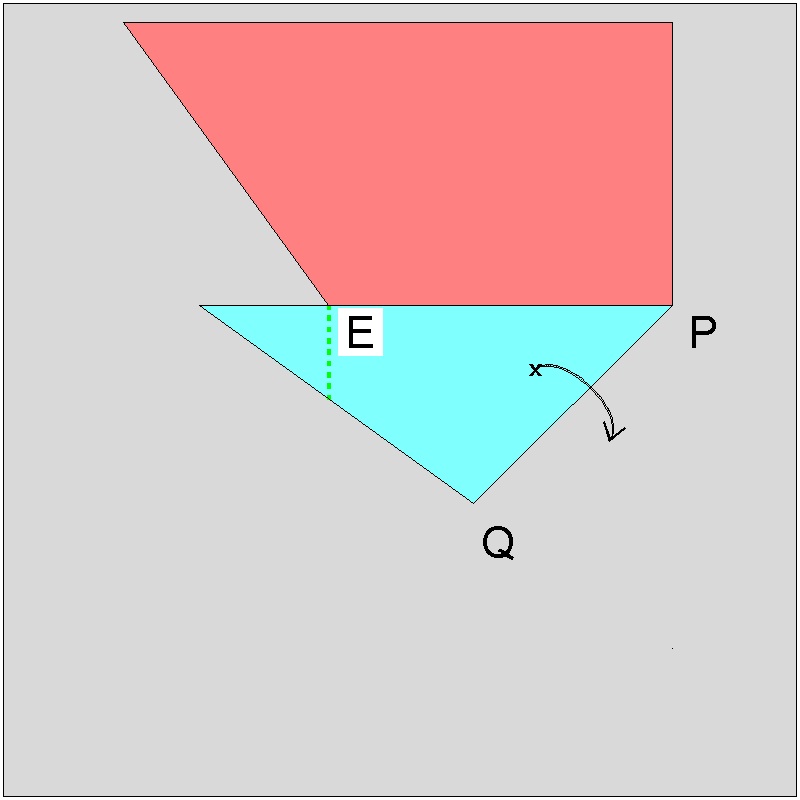
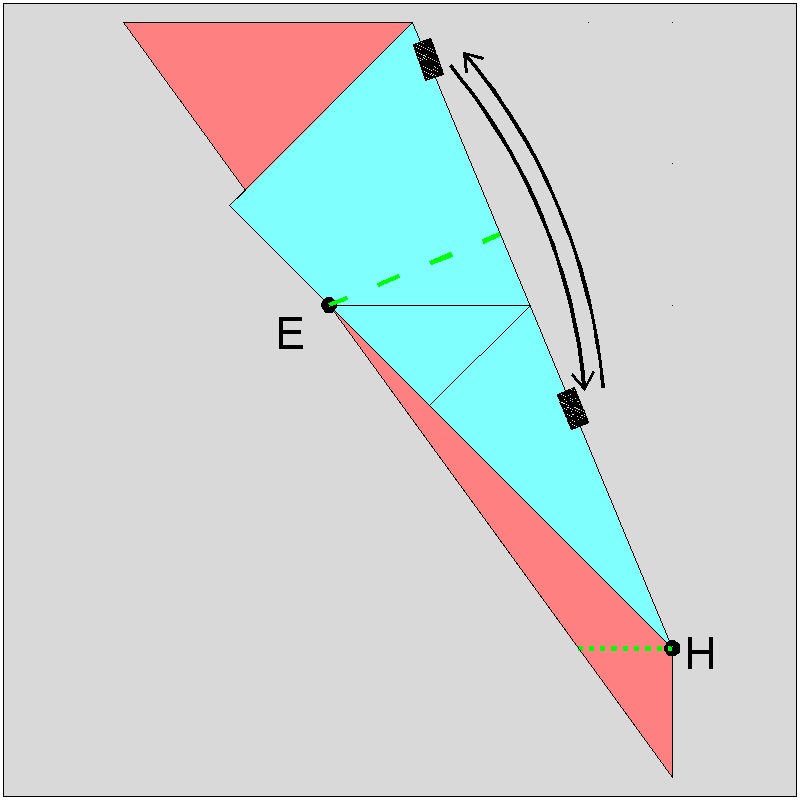
Folding steps for "Multiple Hearts" Now we can discuss about the general folding procedure because the unit pie-shape of any polygon circumscribes exactly the same half-heart pattern. We show N = 5 case, but obviously the process applies to any polygon case.
Note: The starting pie-shape of this example is made up of 10 layers. So folding this is not that easy. A very thin piece of paper is recommended to those who challenge the following process. The author used the so-called "tissue paper" used in wrapping gifts or fragile things. Alternatively when a regular paper is used, the size of the circle must be very large (radius ≥ 10 ~ 15 inches )
At step (1) , the width of the heart (hence the size of the whole heart) is decided when the point "P" is chosen on the center line. At step (3) , the location of the point "H" (see step (5)) is marked such that EP = HP. At step (5) , the valley fold is made through the point "H" such that edge HP falls on the point "E". At step (9) , the final cutting is done. The distance "d" is chosen very small but just large enough to keep the connecting area between the adjacent hearts not to be teared apart during opening the folded layers after cutting is done. For visualization purpose the multi-layered sheets of paper is represented by a single piece of pie-shaped paper. Moreover the front and back faces of the polygon unit are assigned different colors for easier visualization.
|
Step (1) click here to enlarge 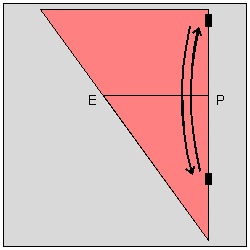 |
Step (2) click here to enlarge 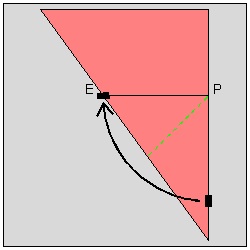 |
Step (3) click here to enlarge 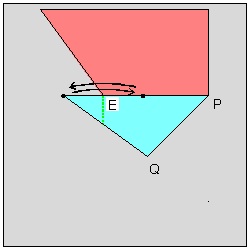 |
|
Step (4) click here to enlarge 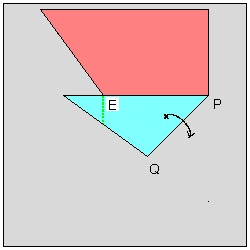 |
Step (5) click here to enlarge 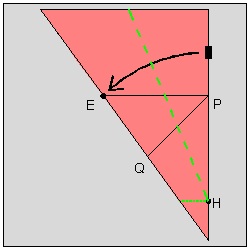 |
Step (6) click here to enlarge 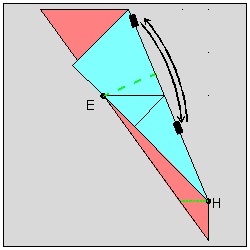 |
|
Step (7) click here to enlarge 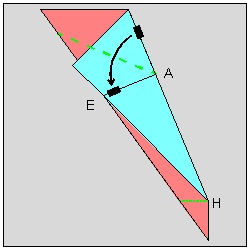 |
Step (8) click here to enlarge 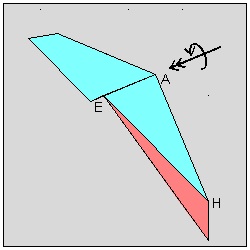 |
Step (9) click here to enlarge 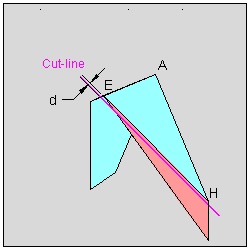 |
|
Resulting Multi-Hearts click here to enlarge 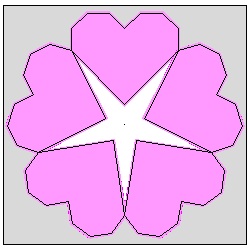 |
5 hearts example click here to enlarge 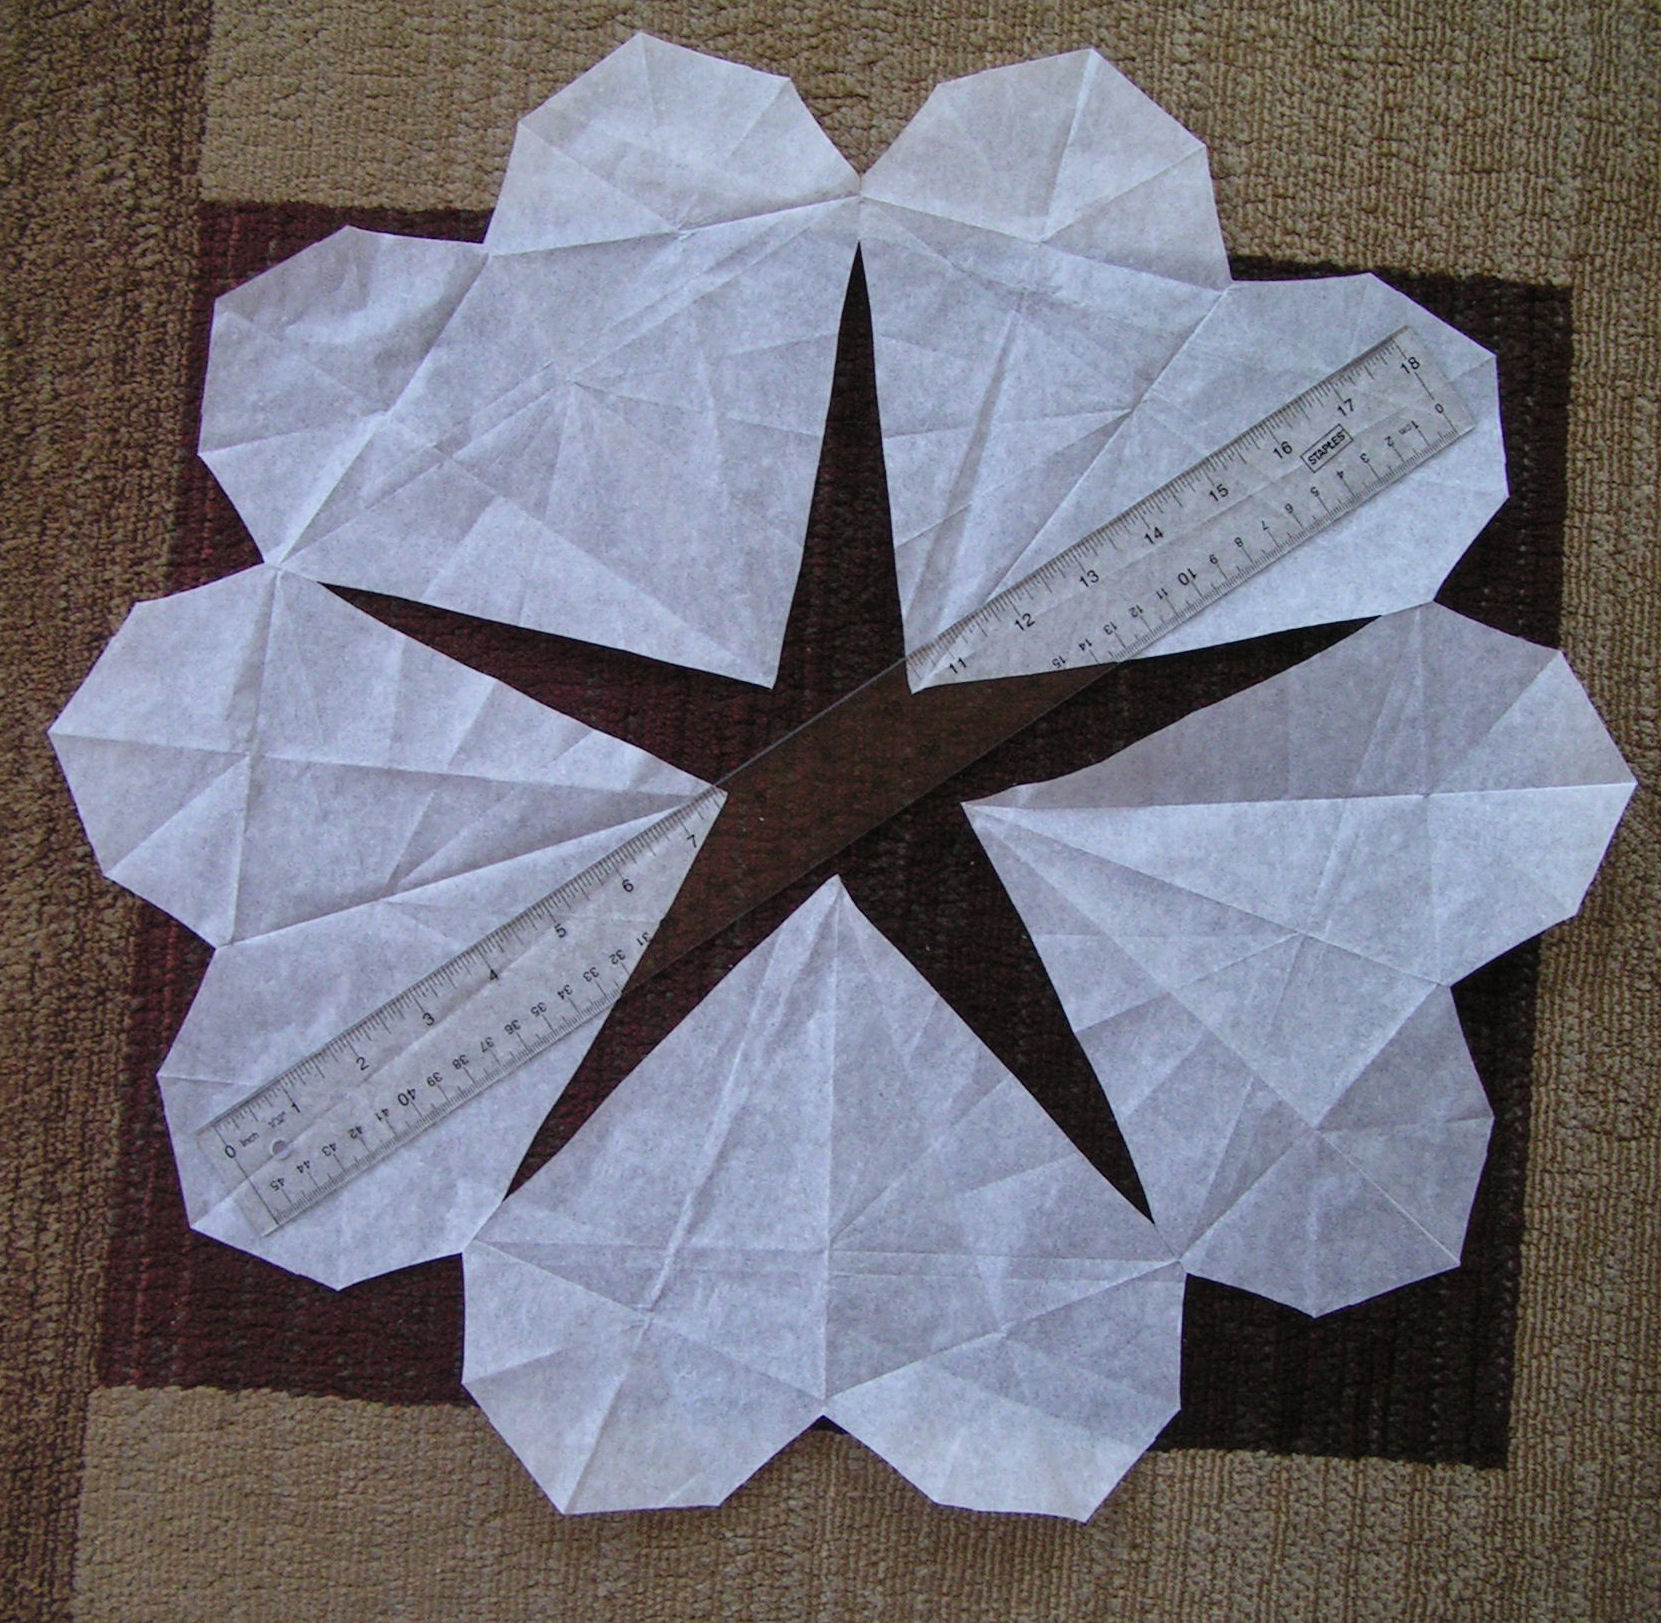 |
6 hearts exmaple click here to enlarge 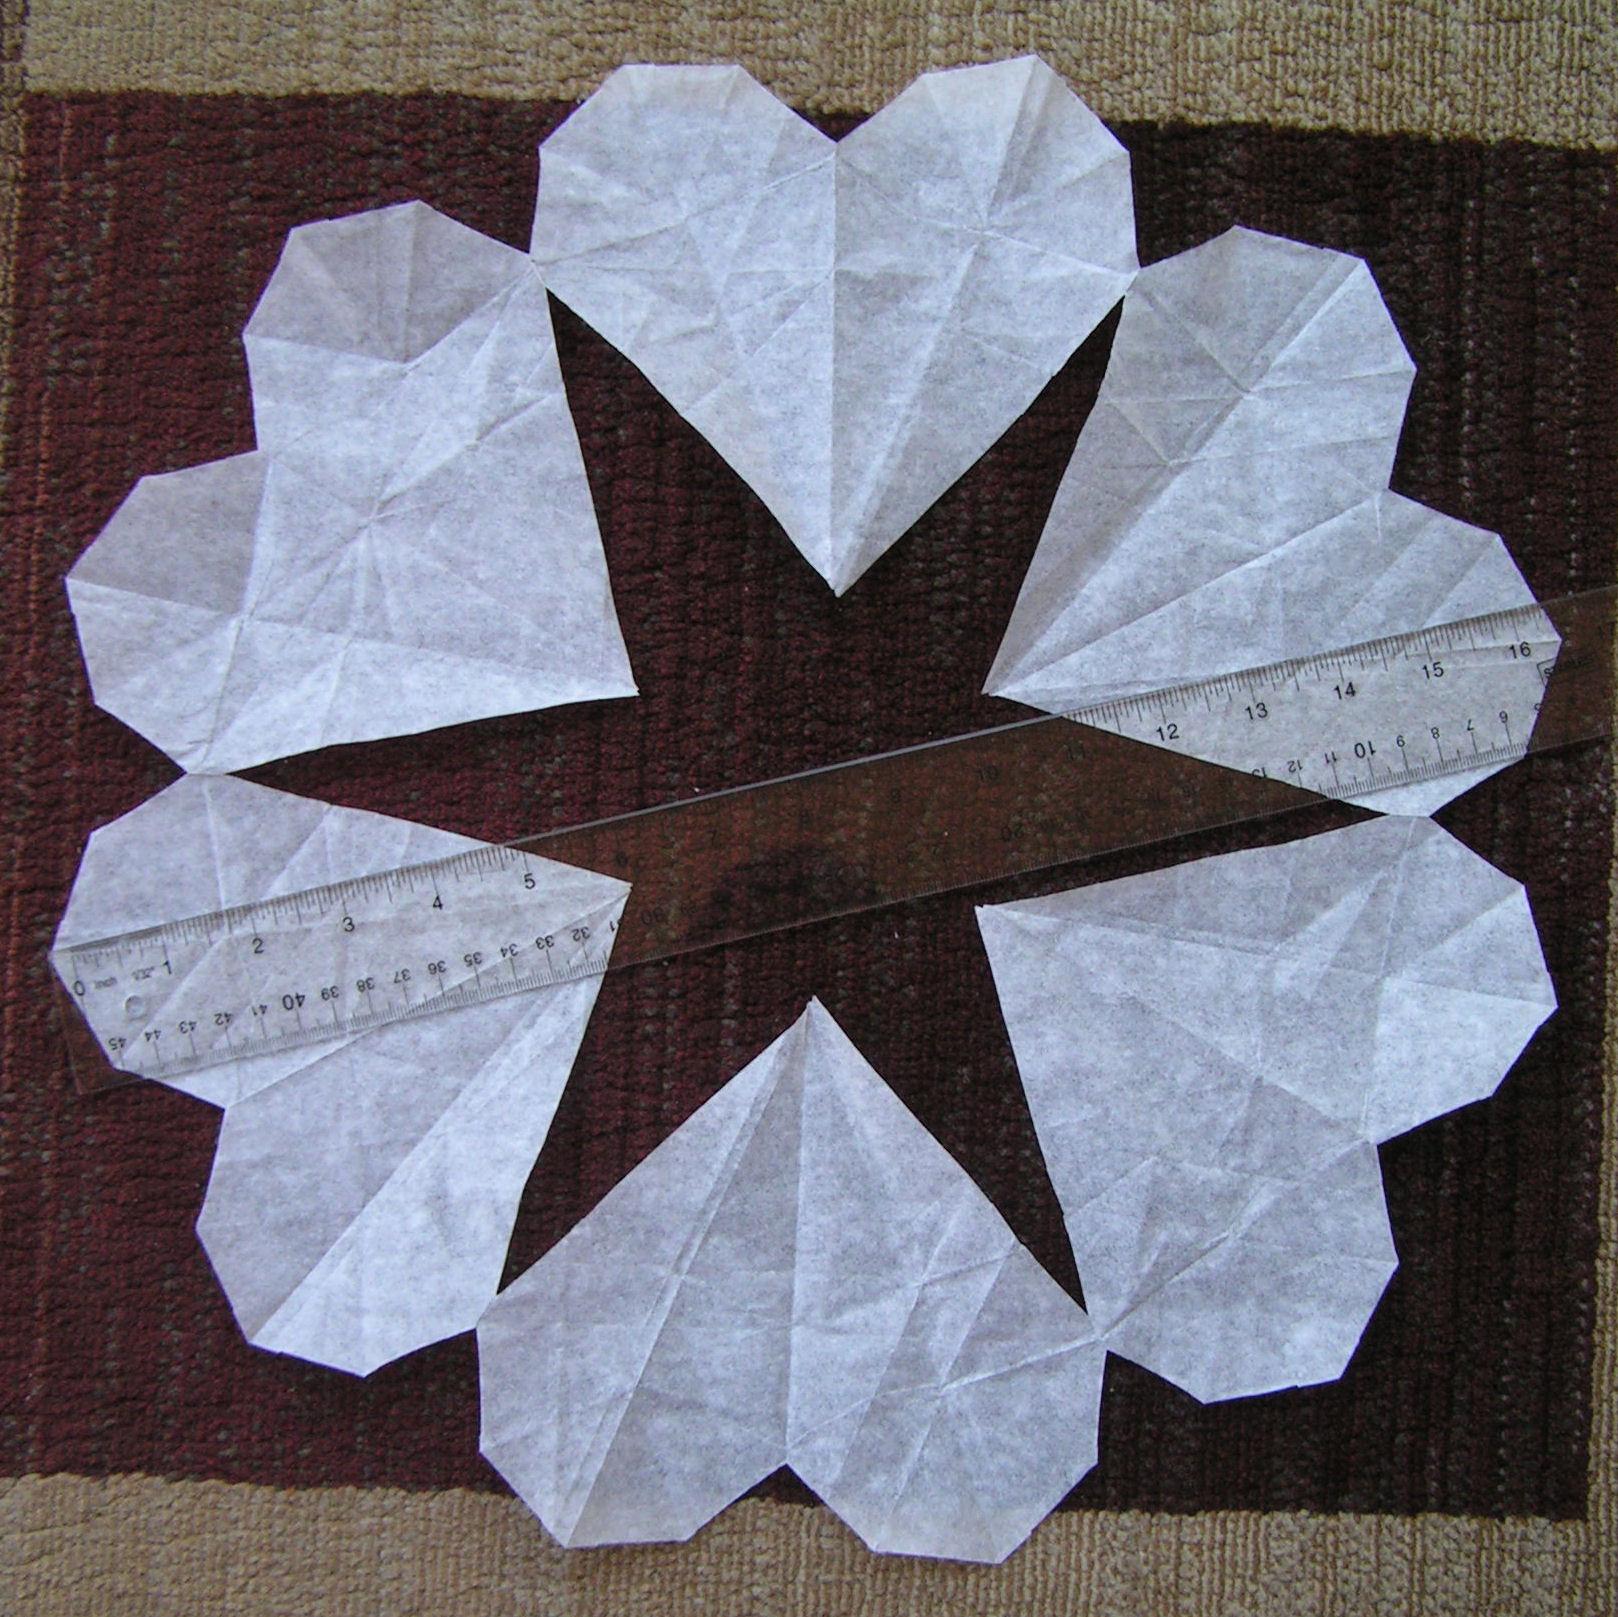 |
Note: 1. The length of the ruler in the picture above is 18 inches and I used tissue papers. 2. Yamamoto is showing 9 hearts in his third book. 3. Yamamoto's book shows how to fold a square piece of paper for pentagon & hexagon cases. 4. For making polygons for N=7 & 9 cases, refer to Robert Dixon's "Mathographics",Dover,New York 1987.
More Hearts
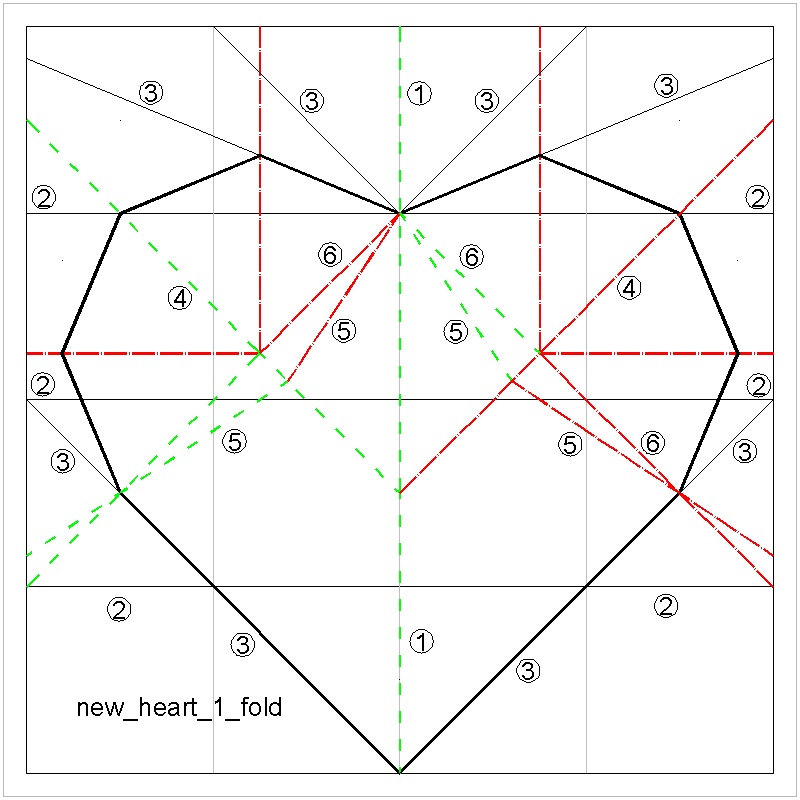
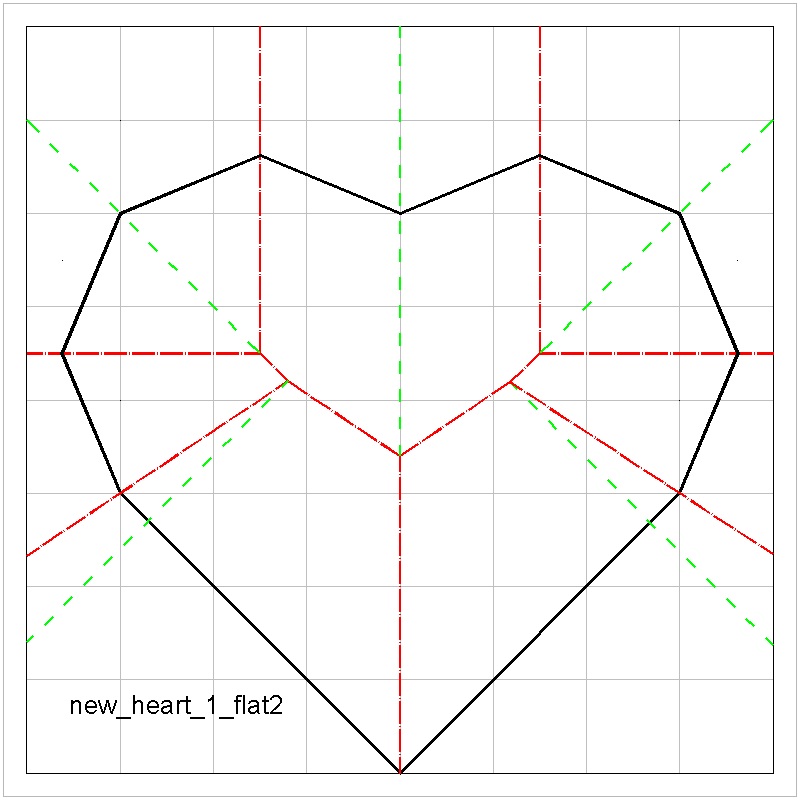
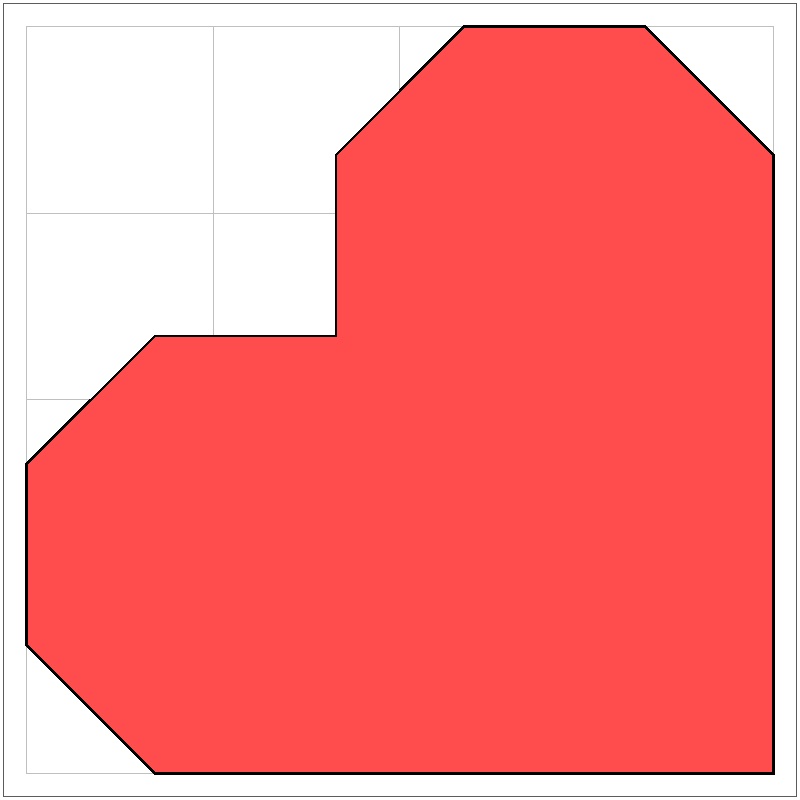
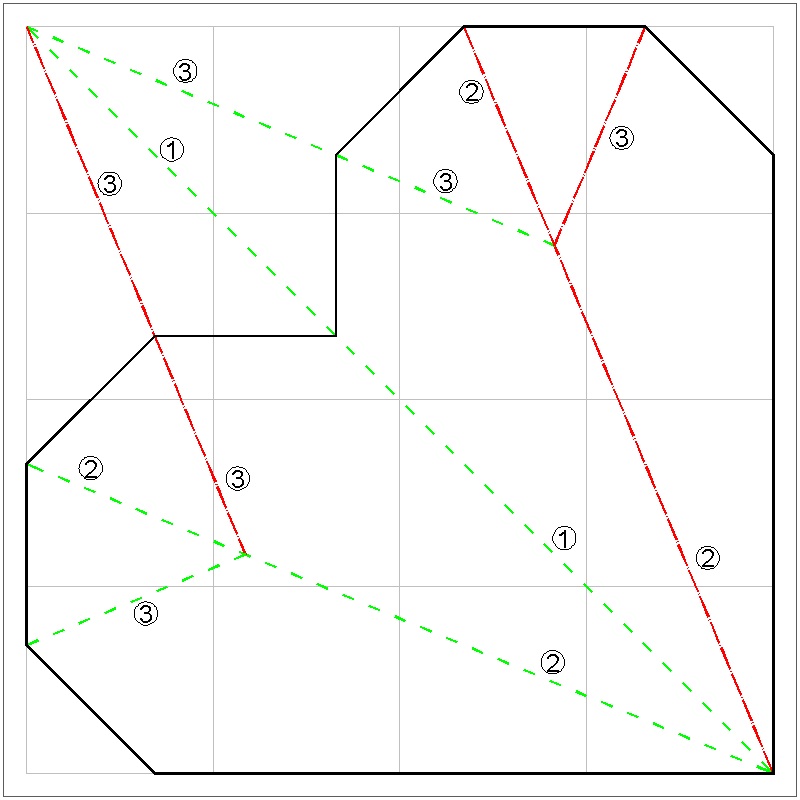
The author came up with more hearts. (name is taken from the file name in my computer.)(1) new_heart_1
|
New Heart 1 click here to enlarge 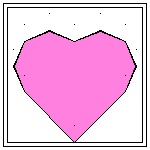 |
Folding Sequence click here to enlarge 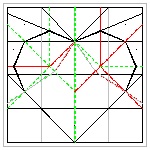 |
Flat Folding #1 click here to enlarge  |
Flat Folding #2 click here to enlarge 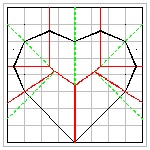 |
|
"New Heart 1" Folding Process click here to enlarge animation to be added 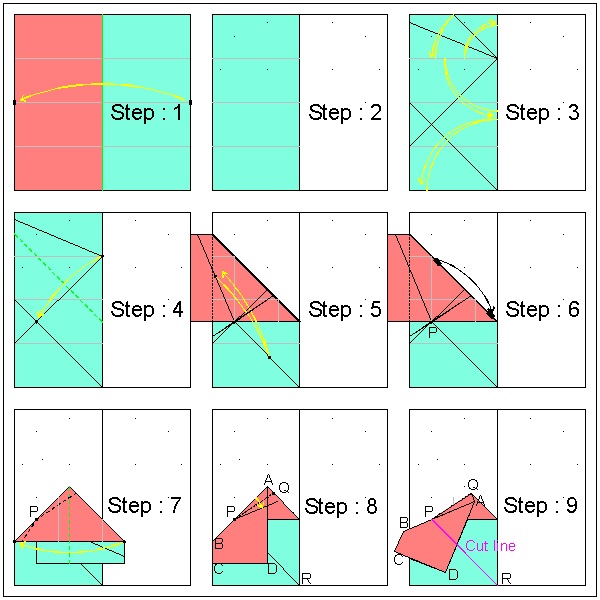 |
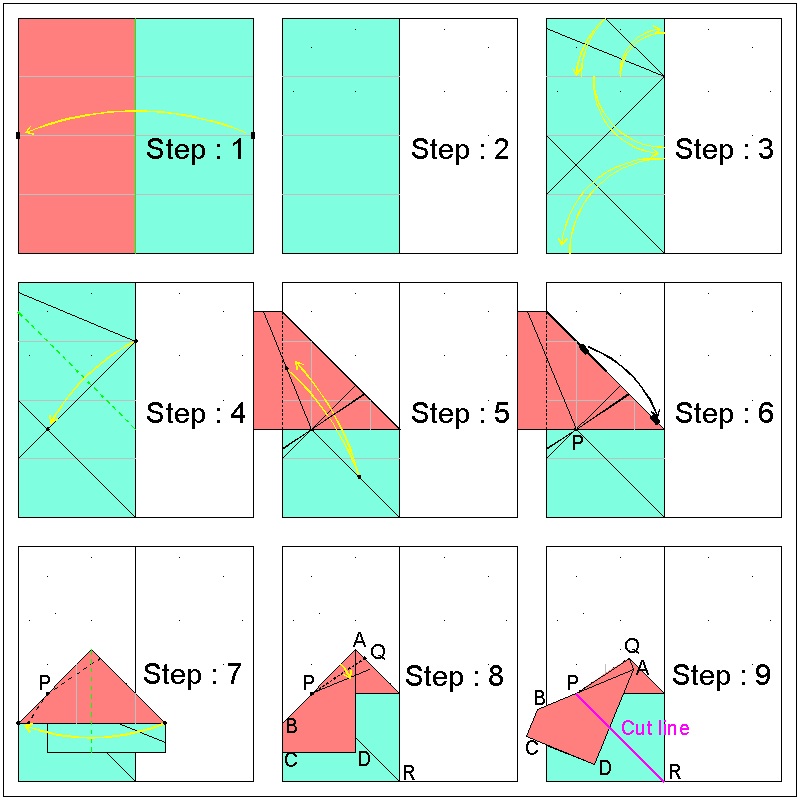
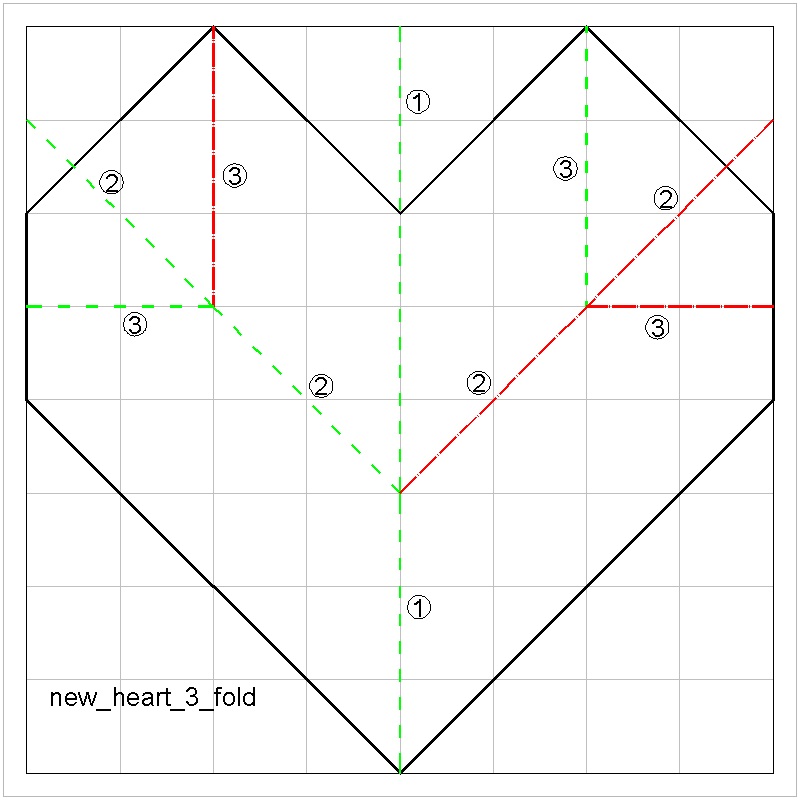
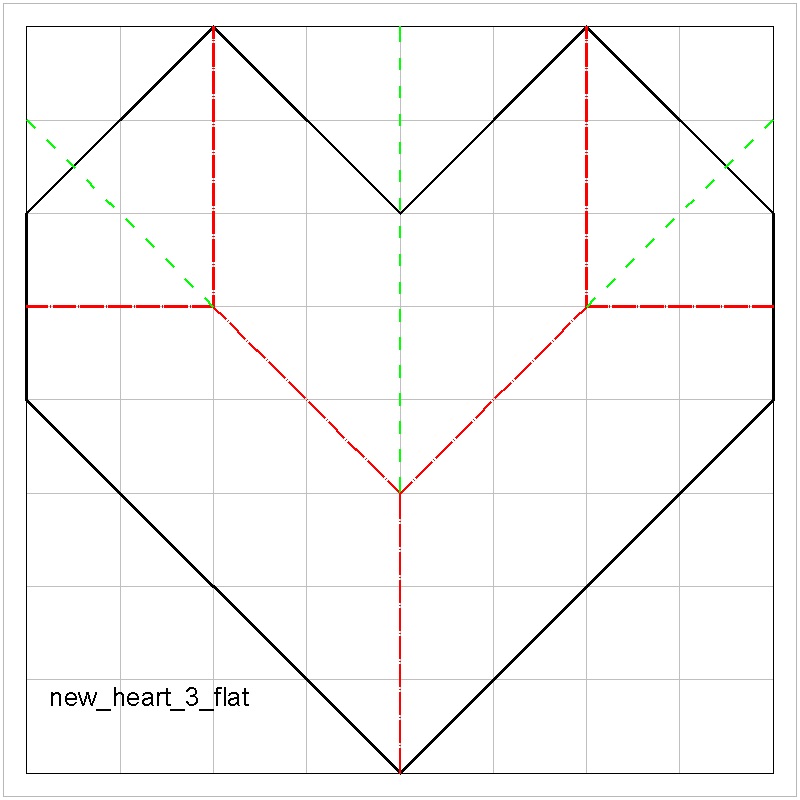
(2) new_heart_3
|
New Heart 3 click here to enlarge 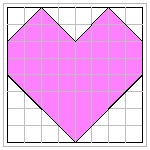 |
Folding Sequence click here to enlarge 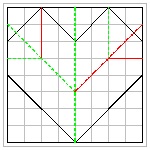 |
Flat Folding #1 click here to enlarge 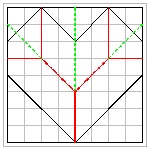 |
Flat Folding #2 click here to enlarge 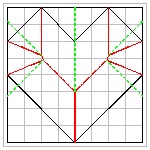 |
Files Download
All the files used to create this section can be downloaded to your computer in ZIPX file format.***** Download all Drawing (DWG format) files ***
***** Download all jpg image (*.jpg) files ***
***** Download all animation gif (*.gif) files ***
***** Download all program (AutoLISP & Acad VBA) files ***
The following images are created by the author based on the models in Yamamoto's 3 books mentioned above and posted by special permission from Mr. Kousei Yamamoto. It has not been completed yet, and will be updated in future.
Test posting of "Hitotachi-Ori" images
Miscellaneous images -Flat Folding & Yamamoto Folding
Imag-----800 x 800 image fileF -----800x800 flat folding pattern
Y -----800x800 Yamamoto folding pattern
YS -----800x800 Yamamoto folding pattern with sequence number
| Imag
F
Y |
Imag
F
Y |
Imag
F
Y |
Imag
F
Y |
Imag
F
Y |
| Imag
F
Y |
Imag
F
Y |
Imag
F
Y |
Imag
F
Y |
Imag
F
Y |
| Imag
F
Y |
Imag
F
Y |
Imag
F
Y |
Imag
F
Y
YS |
Imag
F
Y
YS |
| Imag
F
Y |
Imag
F
Y |
Imag
F
Y |
Imag
F
Y |
Imag
F
Y |
| Imag
F
Y |
Imag
F
Y
YS |
Imag
F
Y
YS |
Imag
F
Y
YS |
Imag
F
Y
YS |
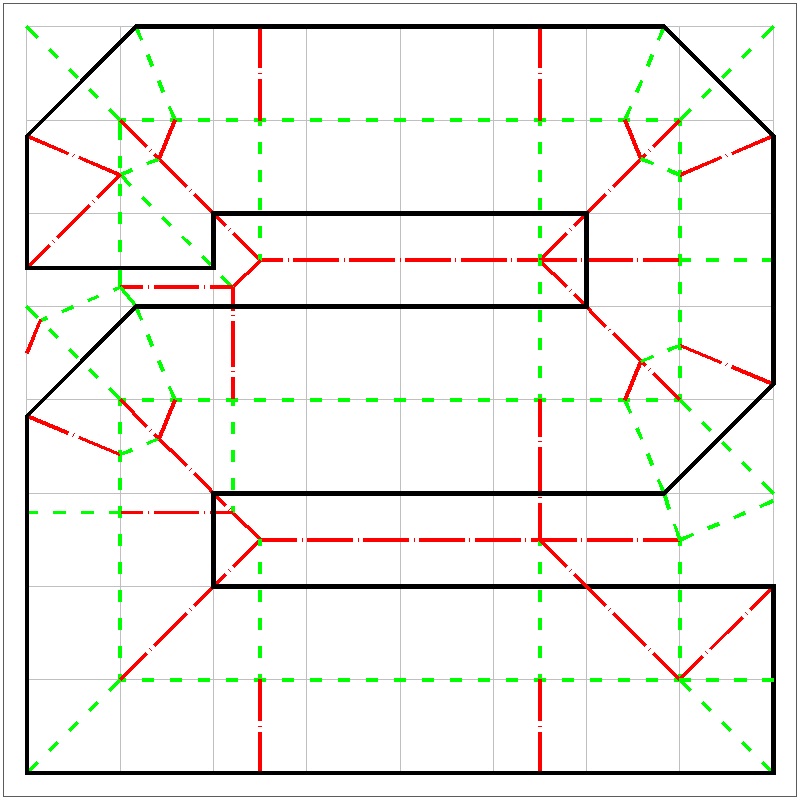
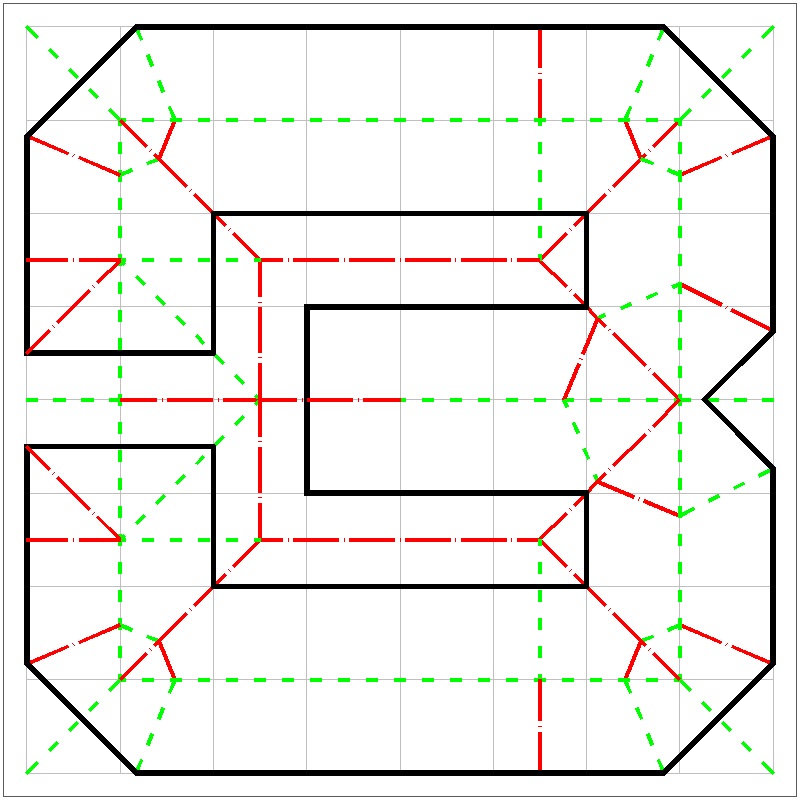
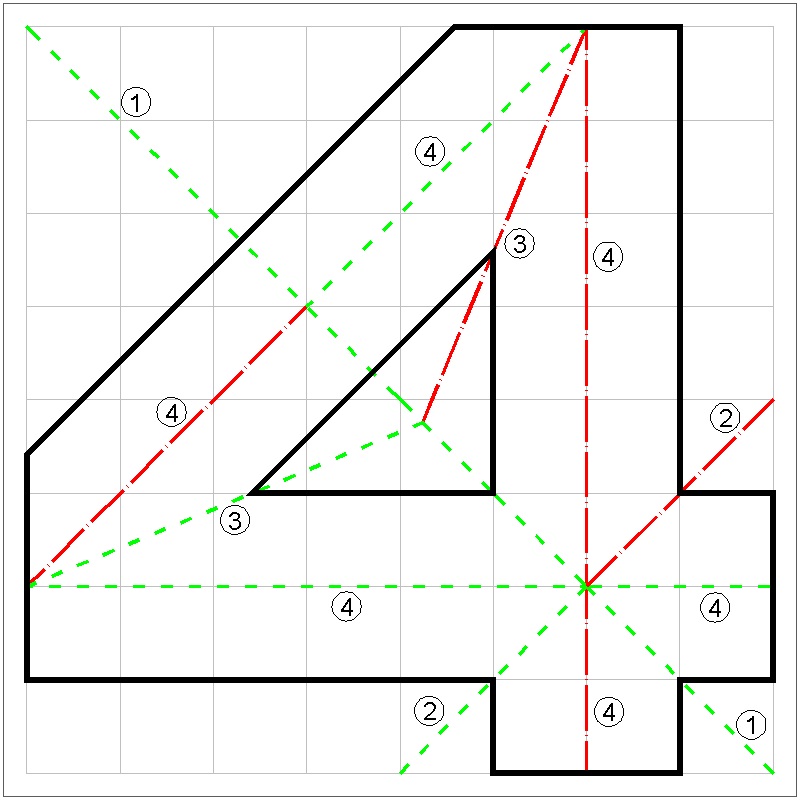
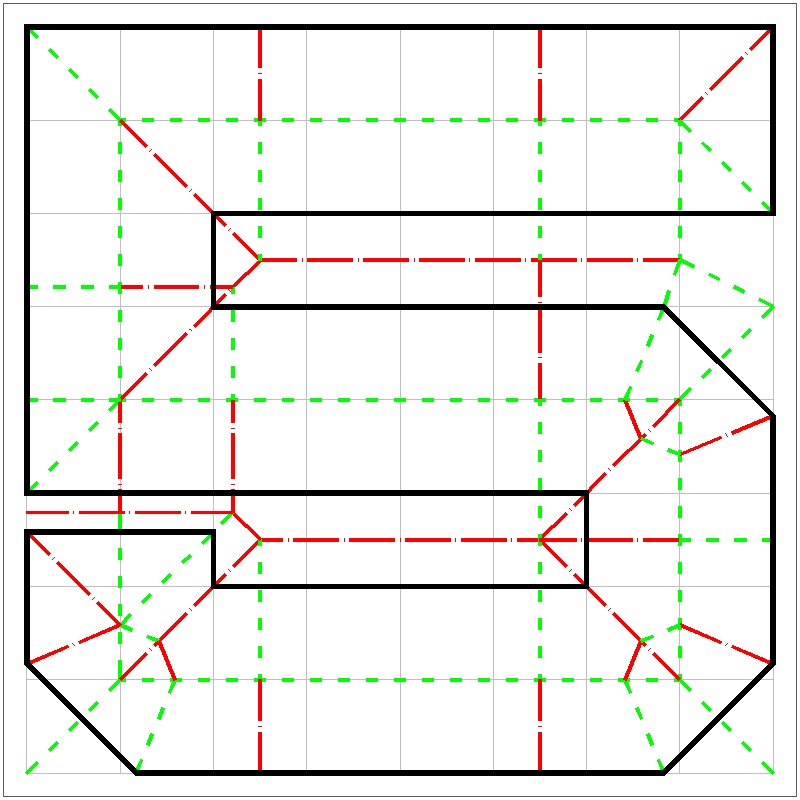
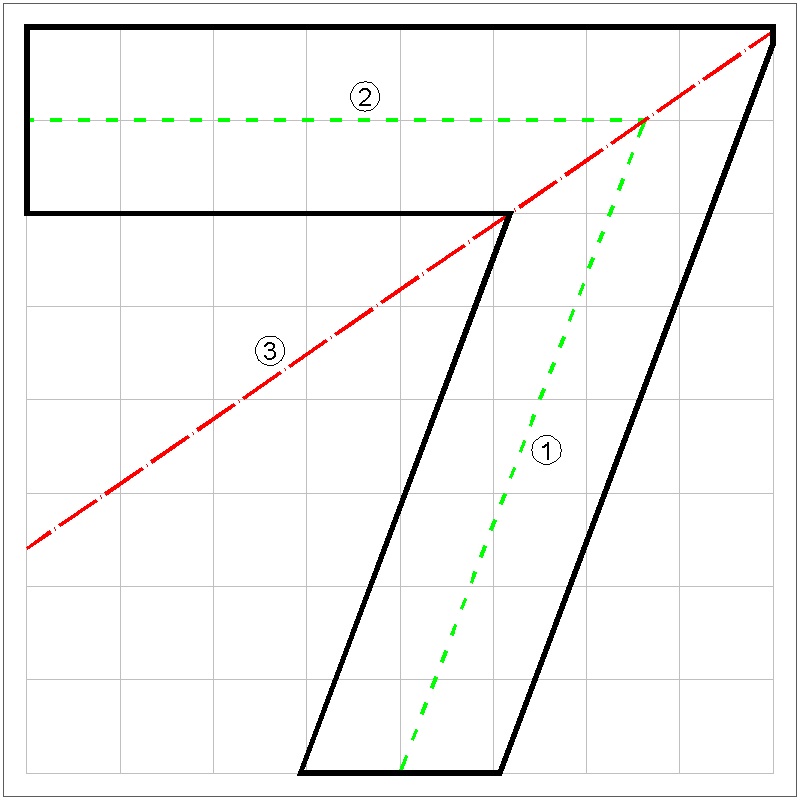
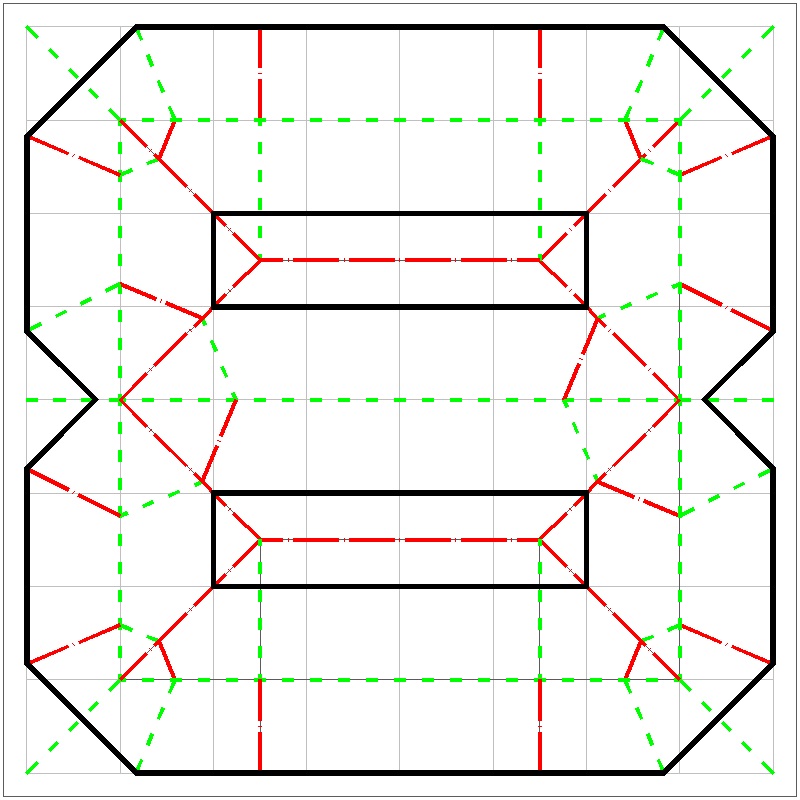
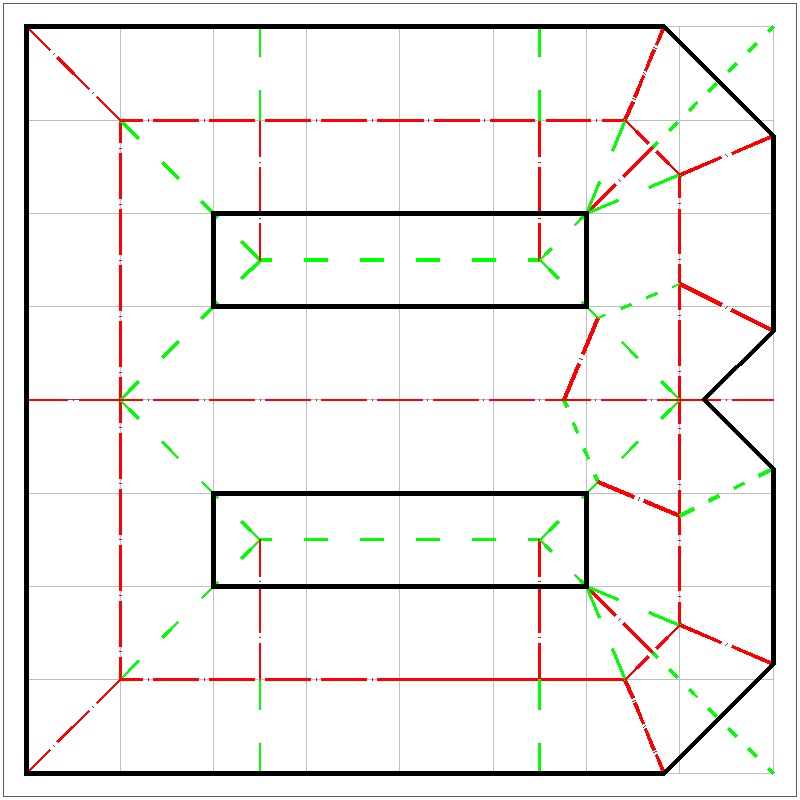
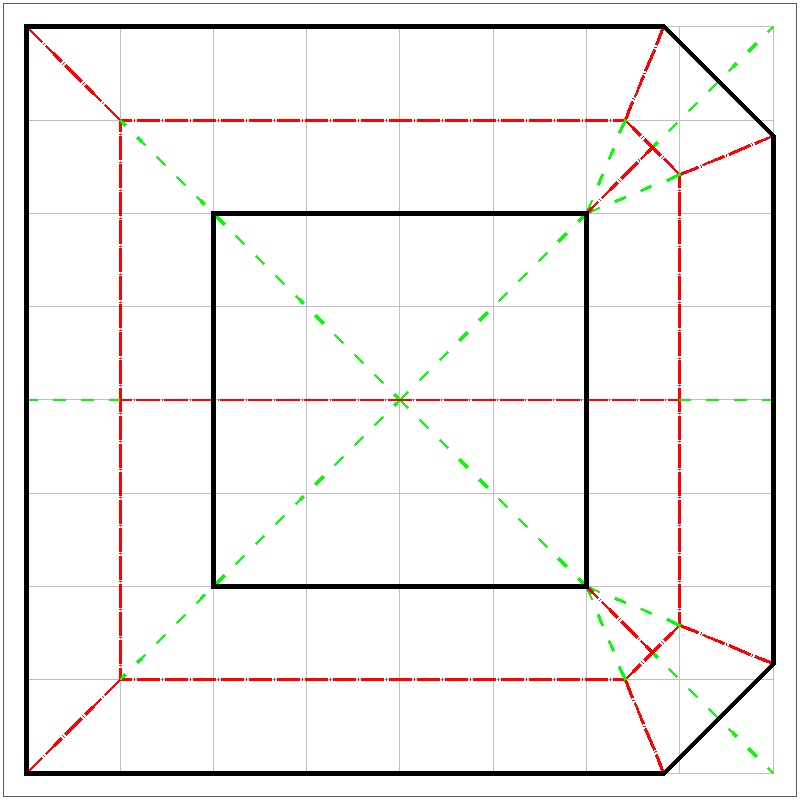
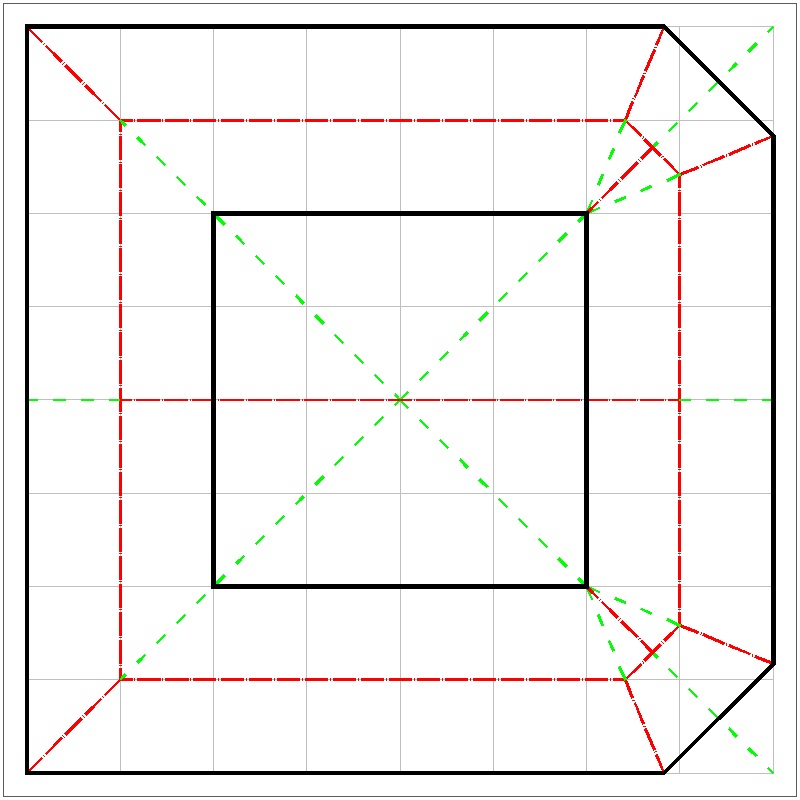
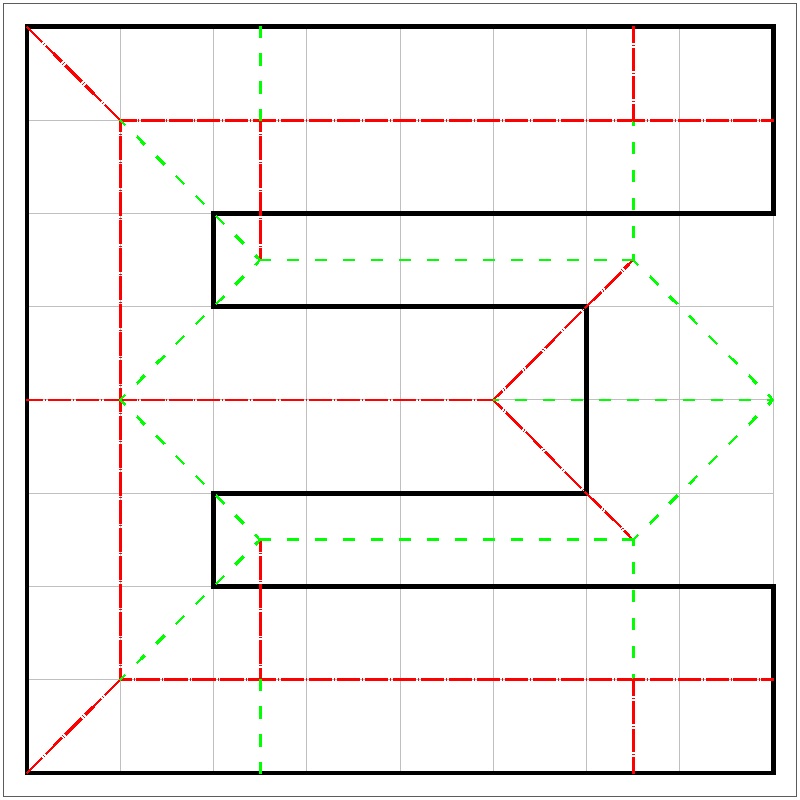
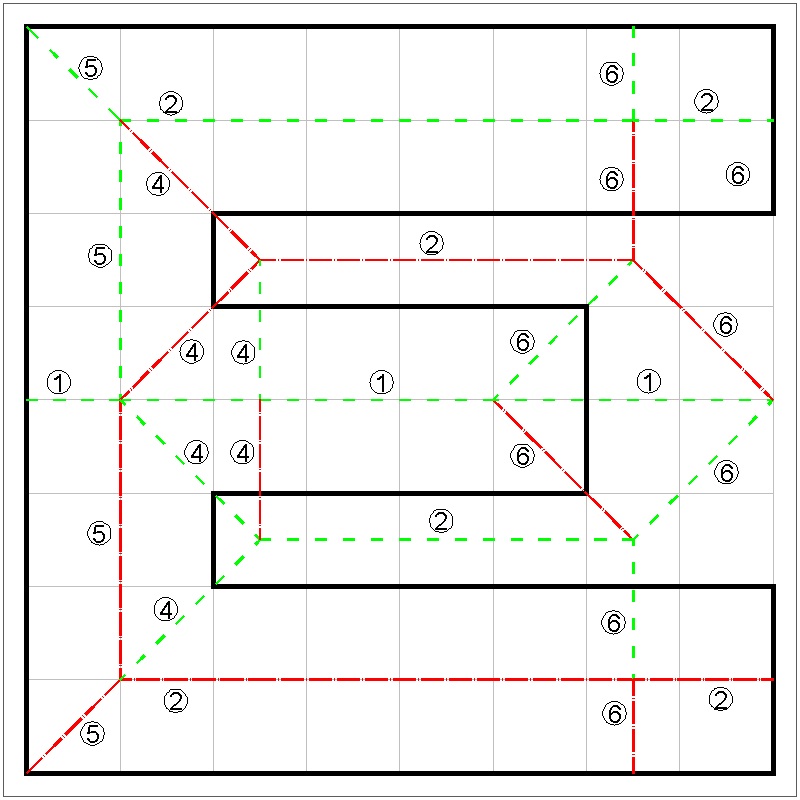
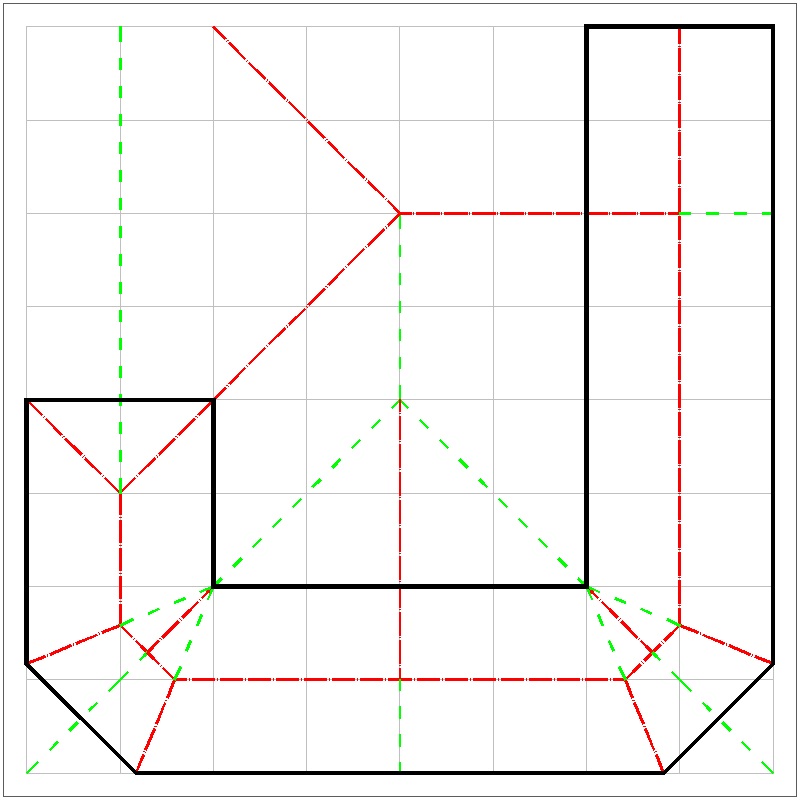
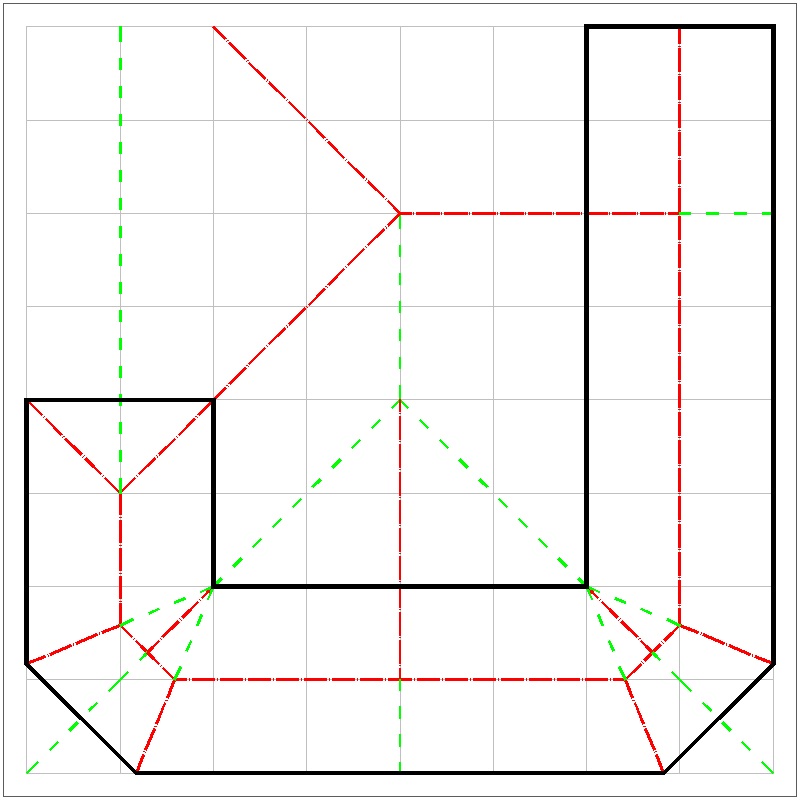
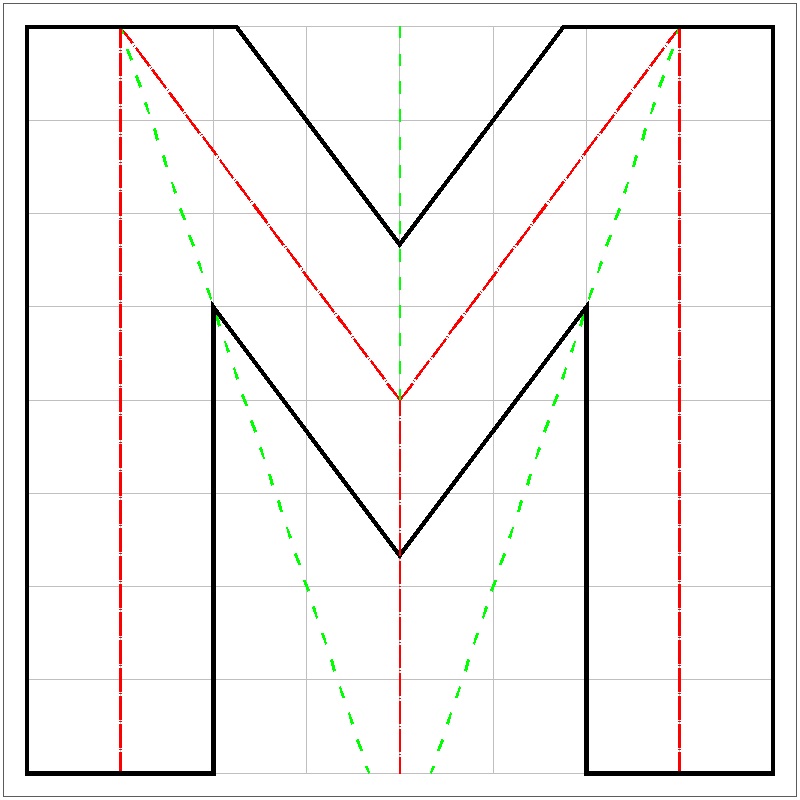
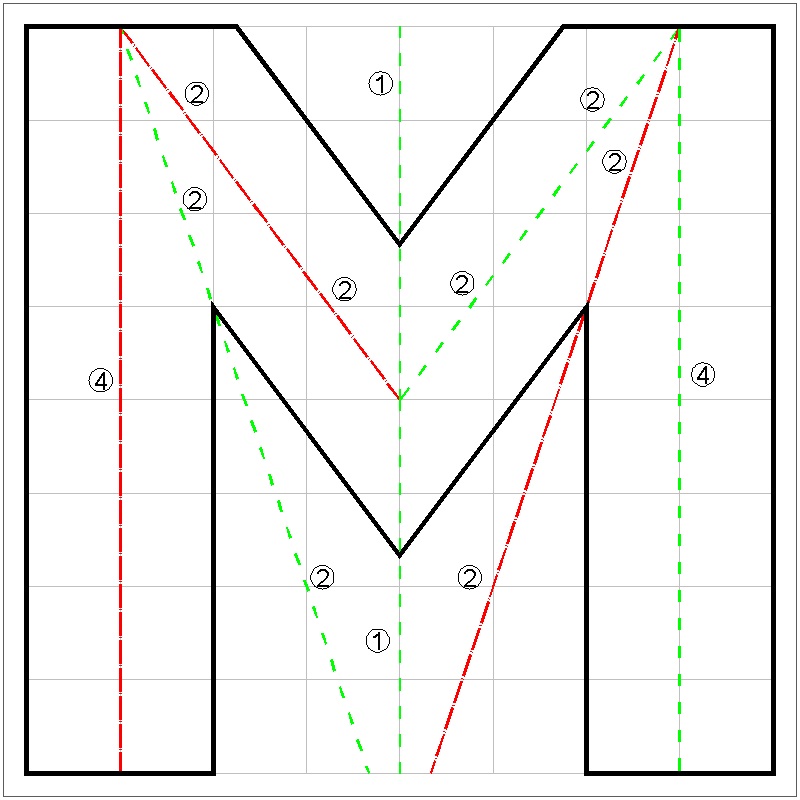
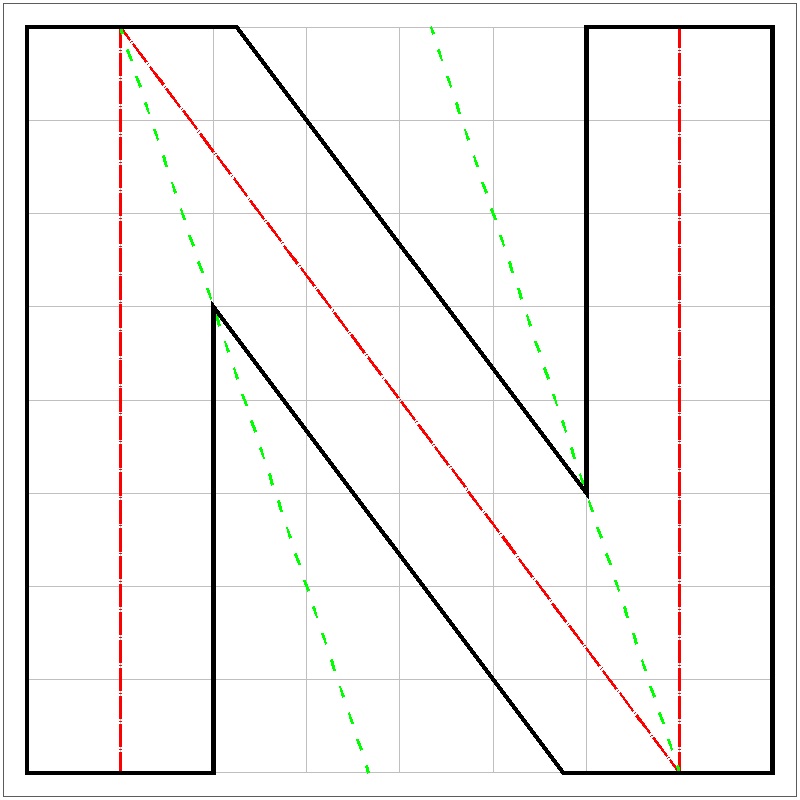
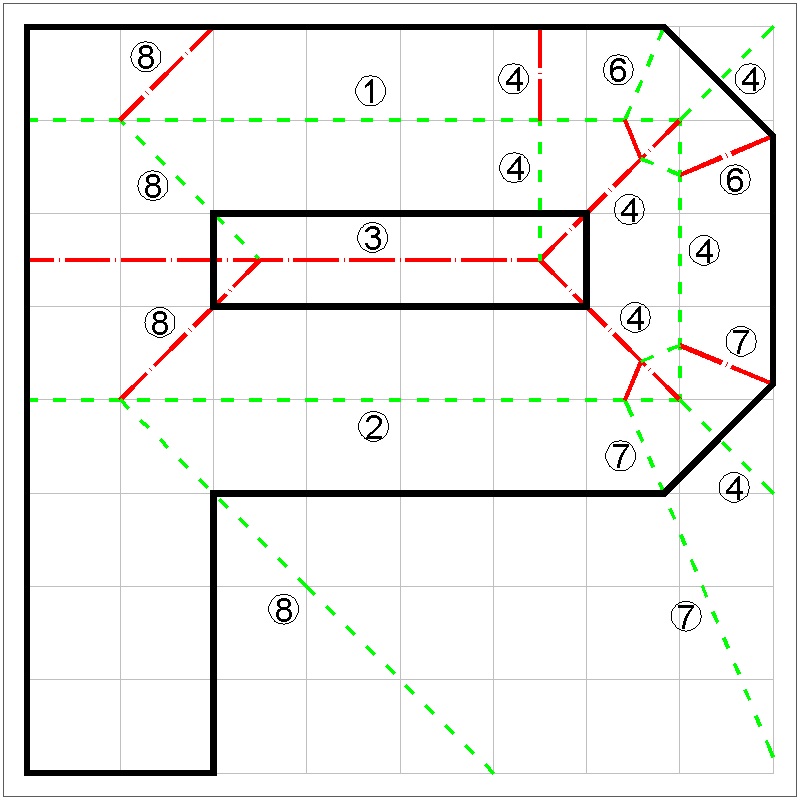
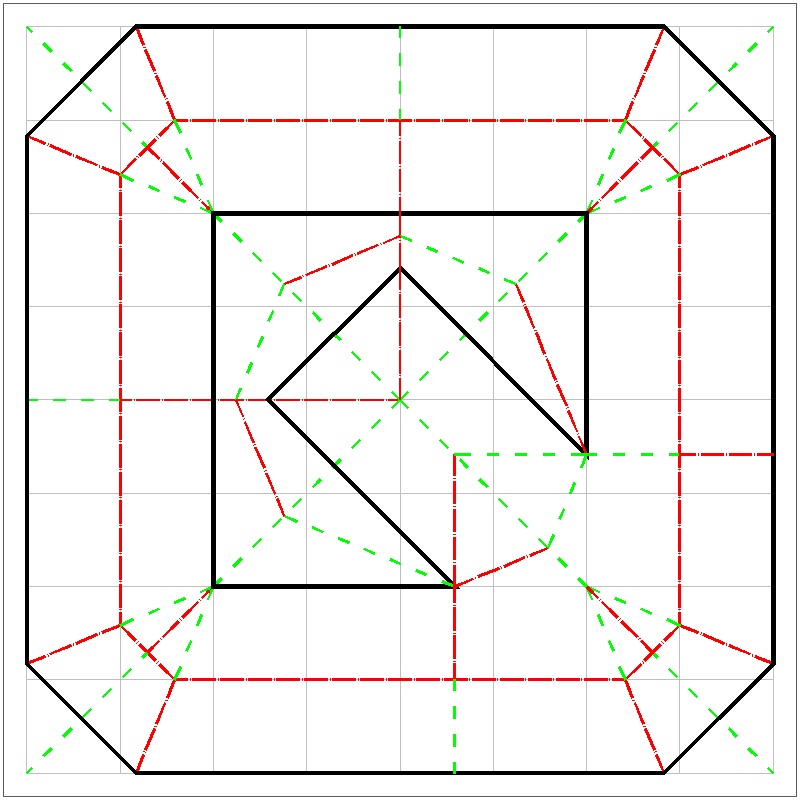
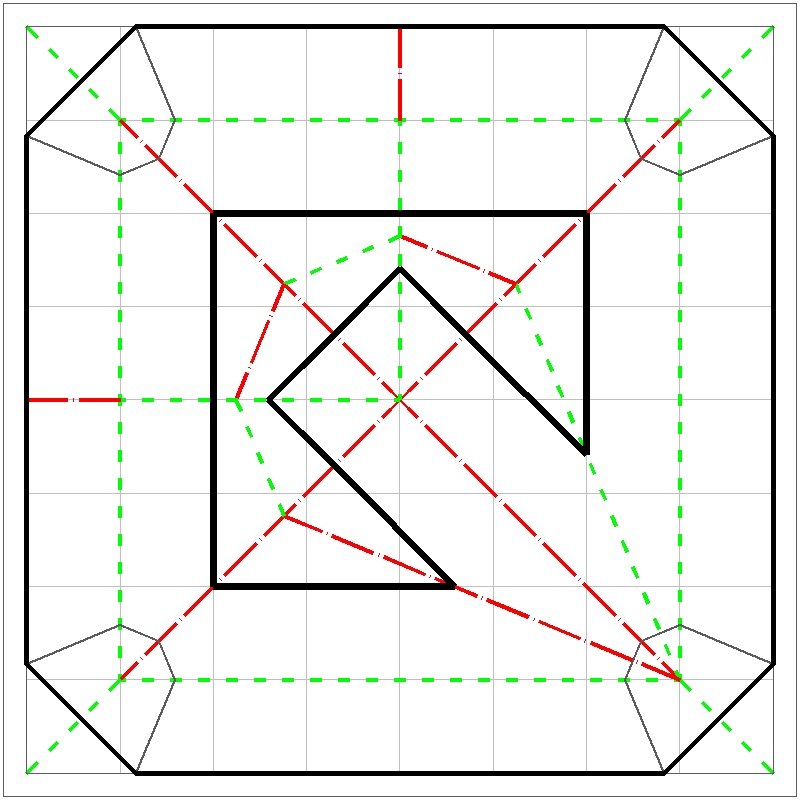
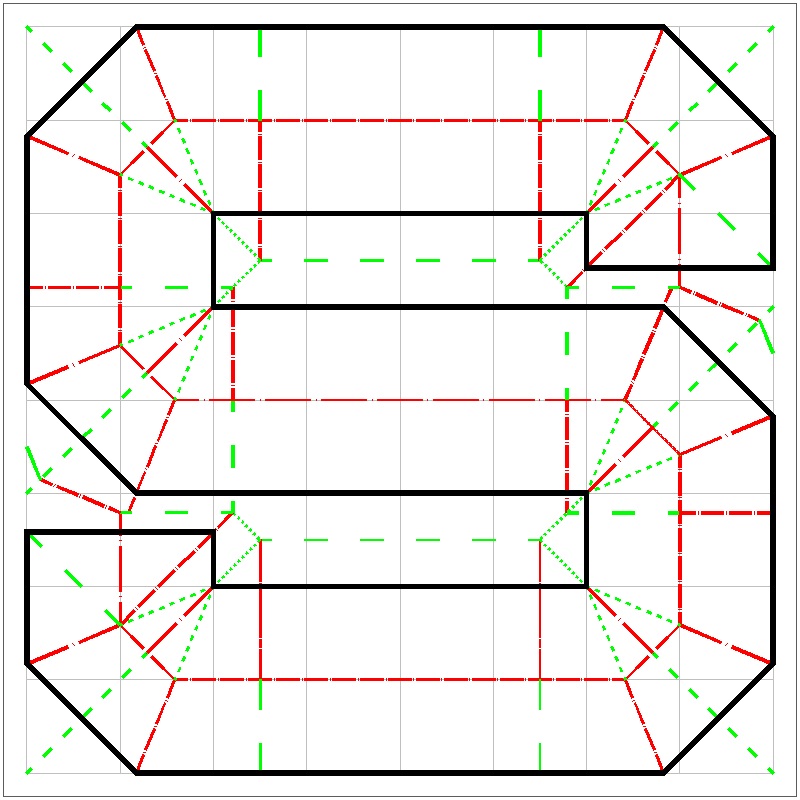
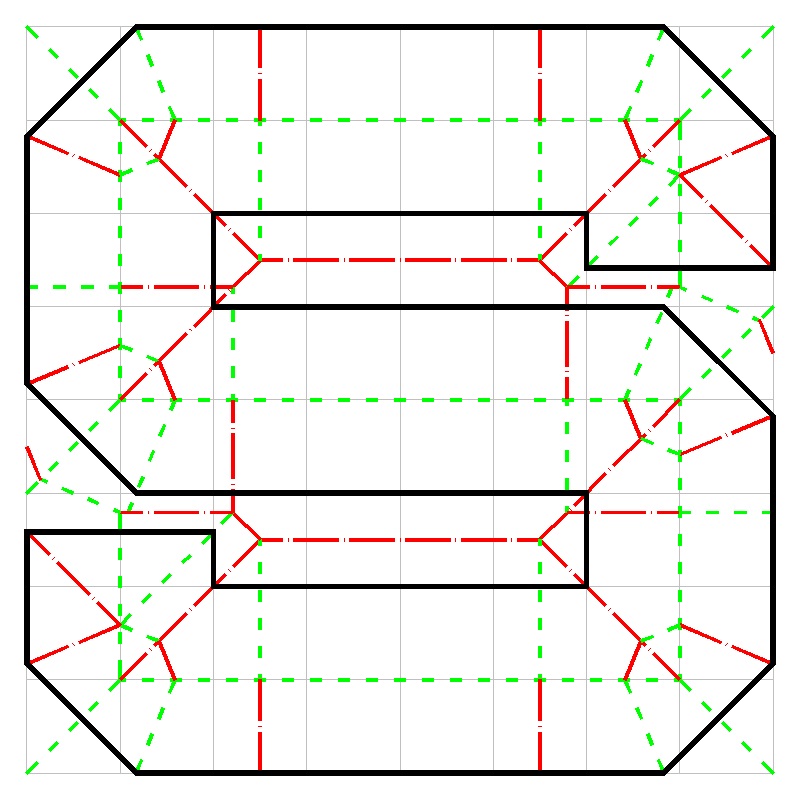
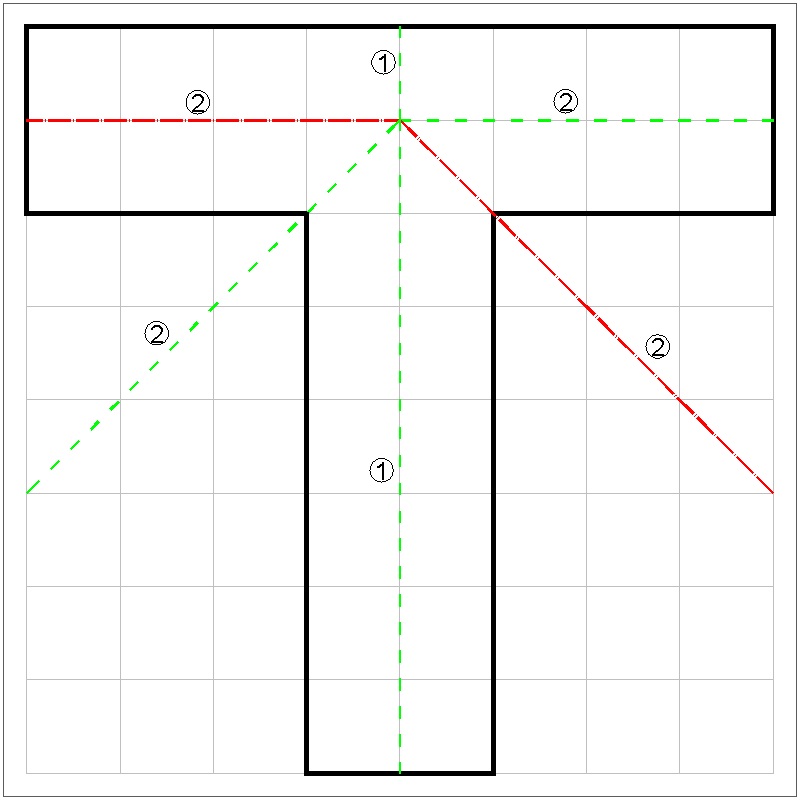
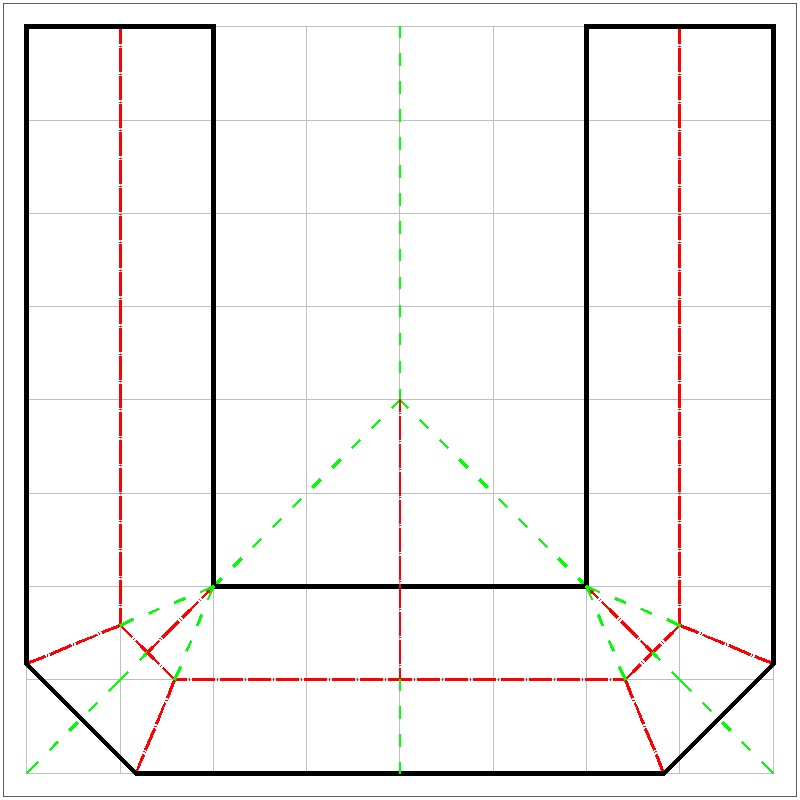
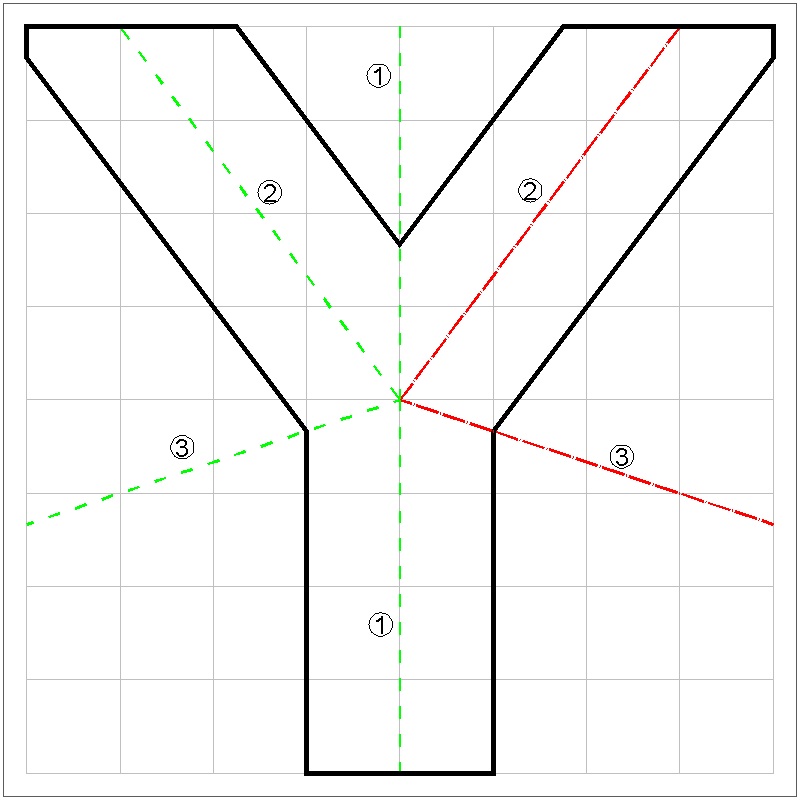
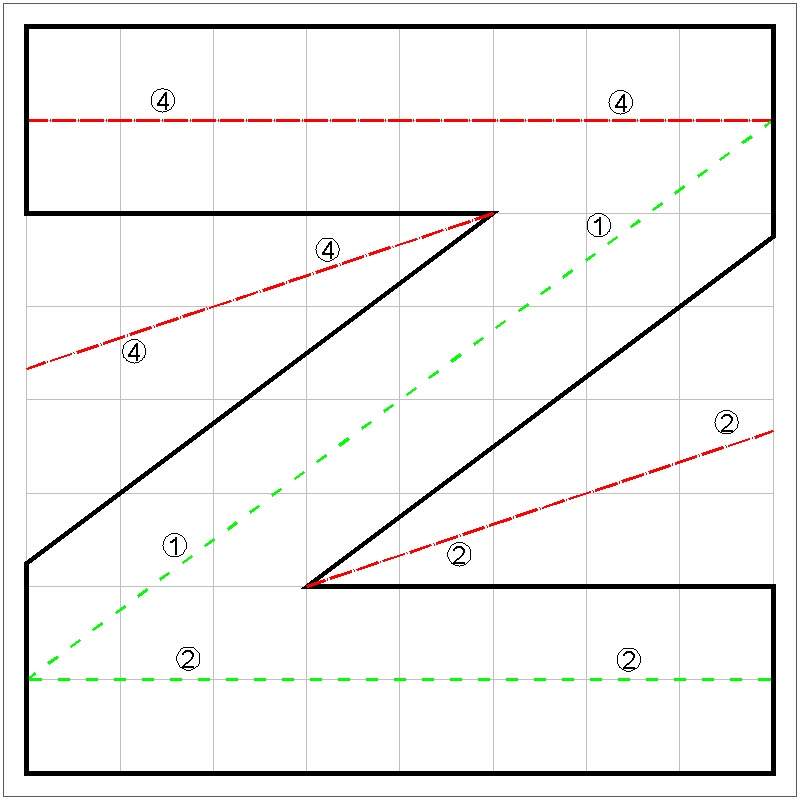
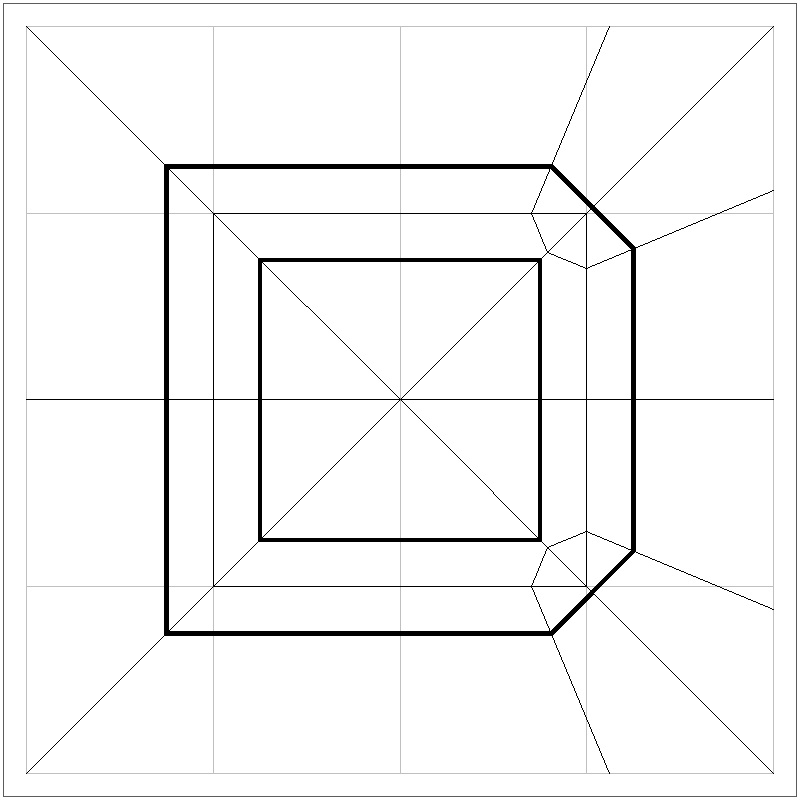
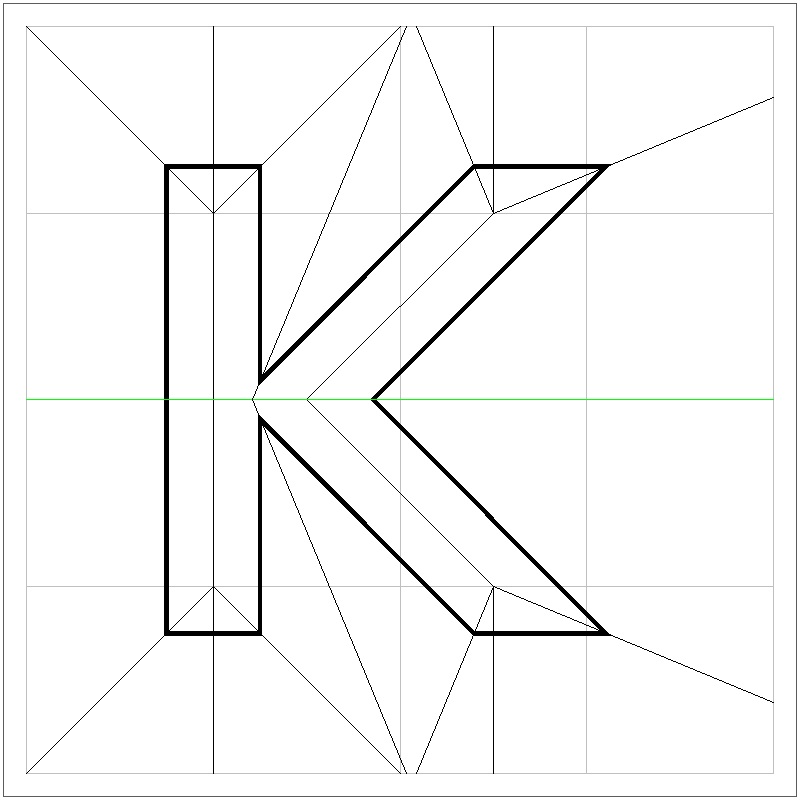
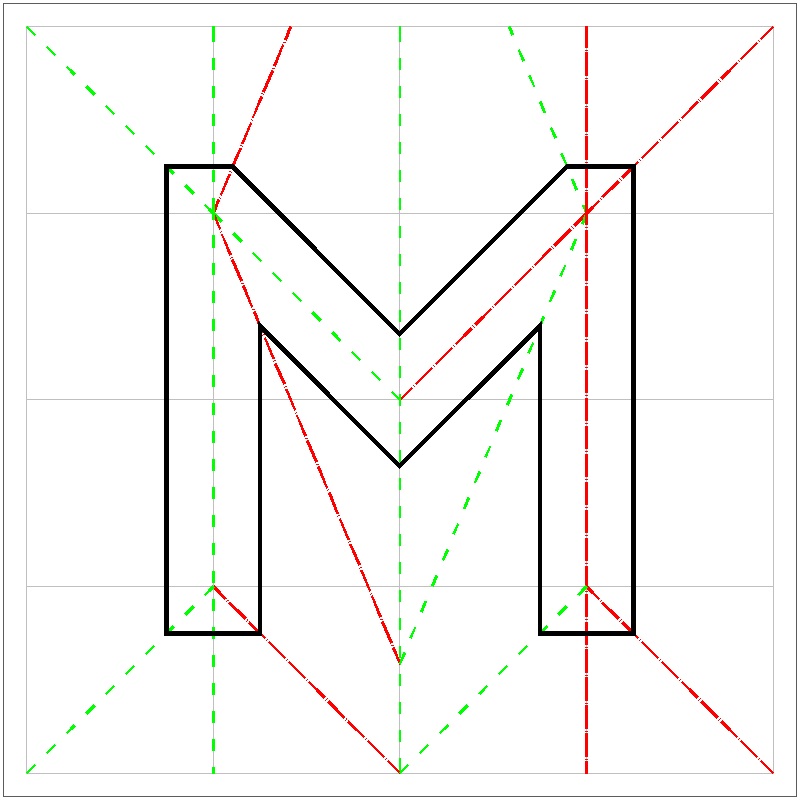
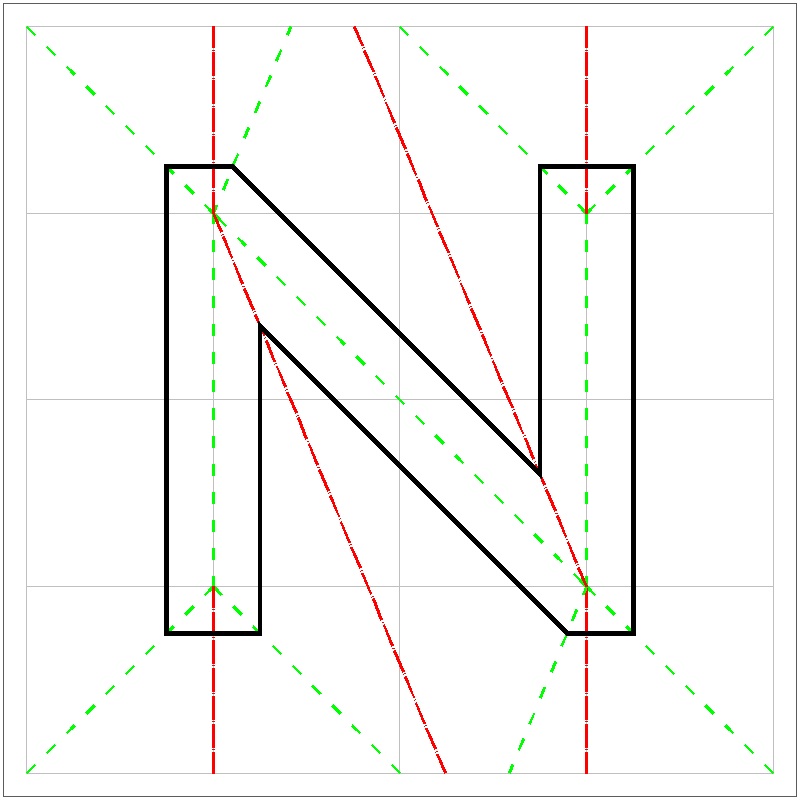
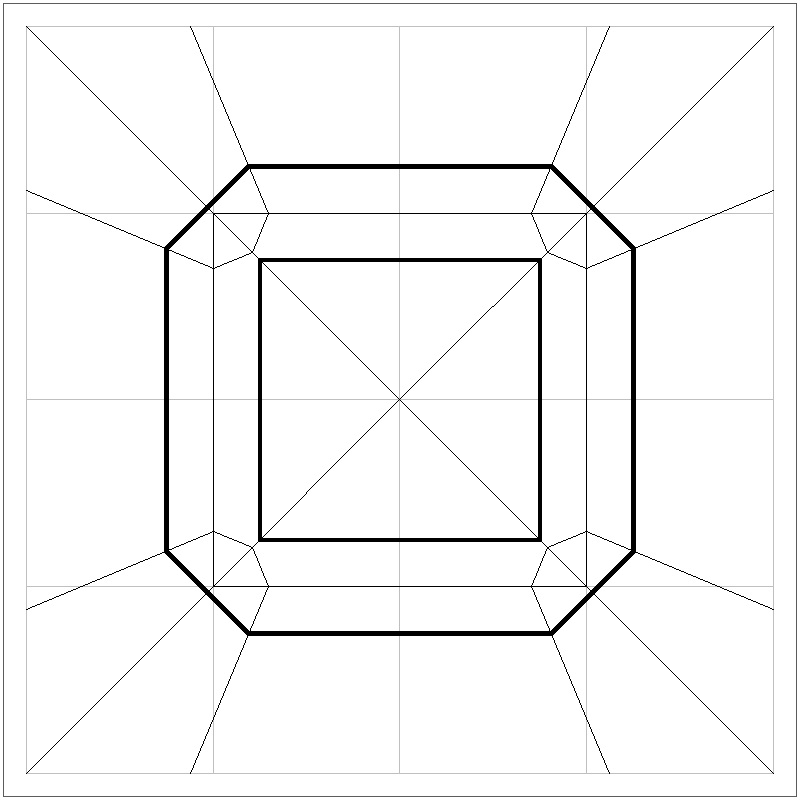
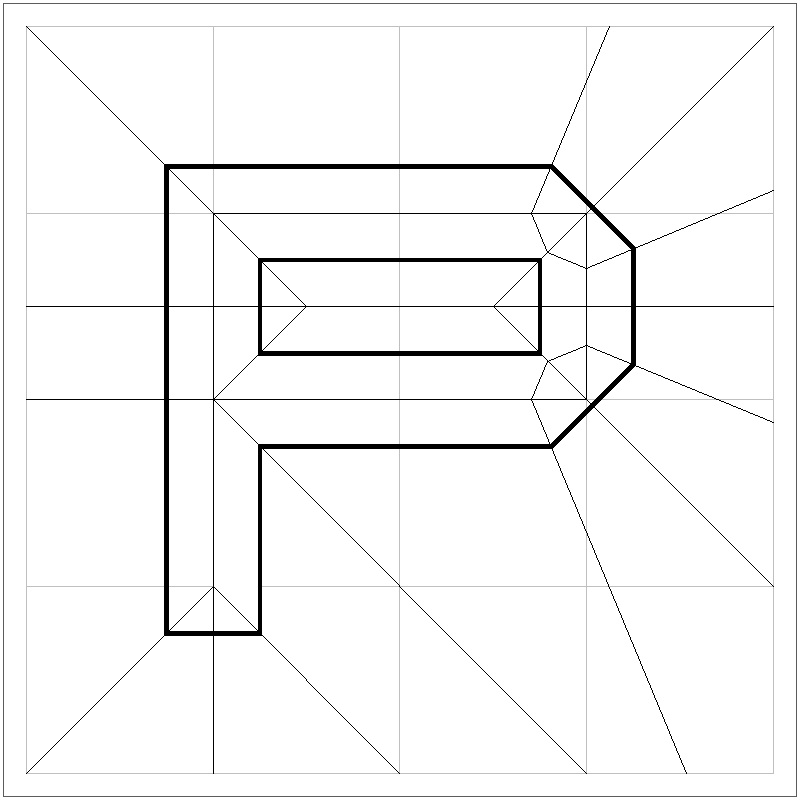
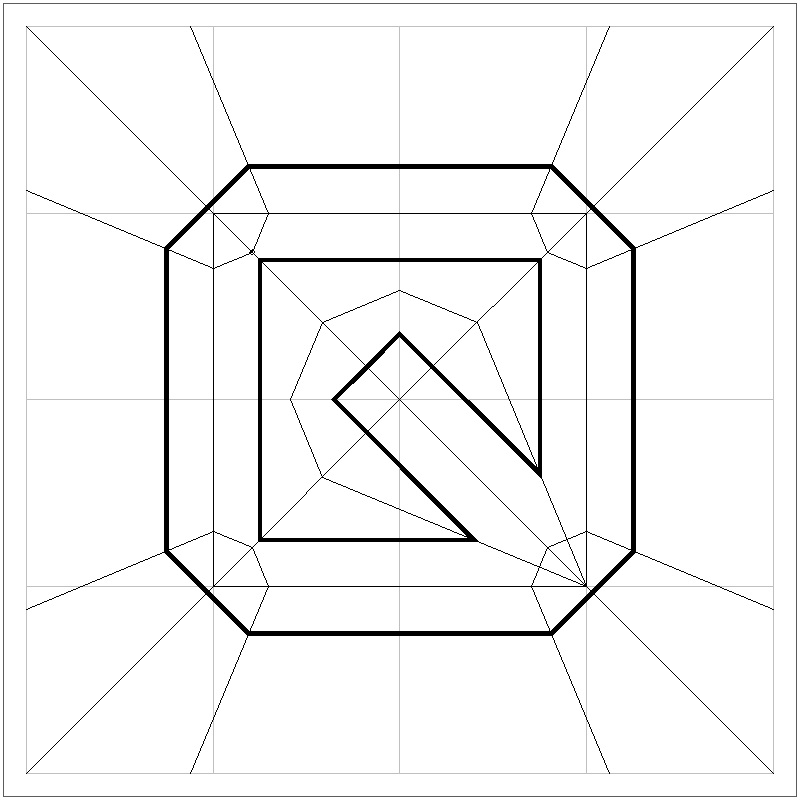
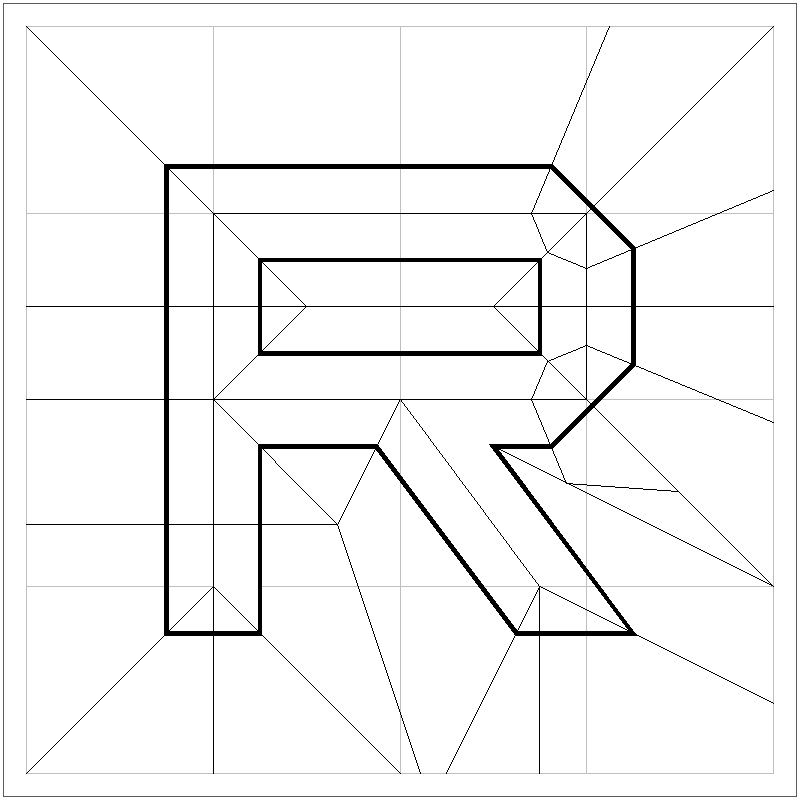
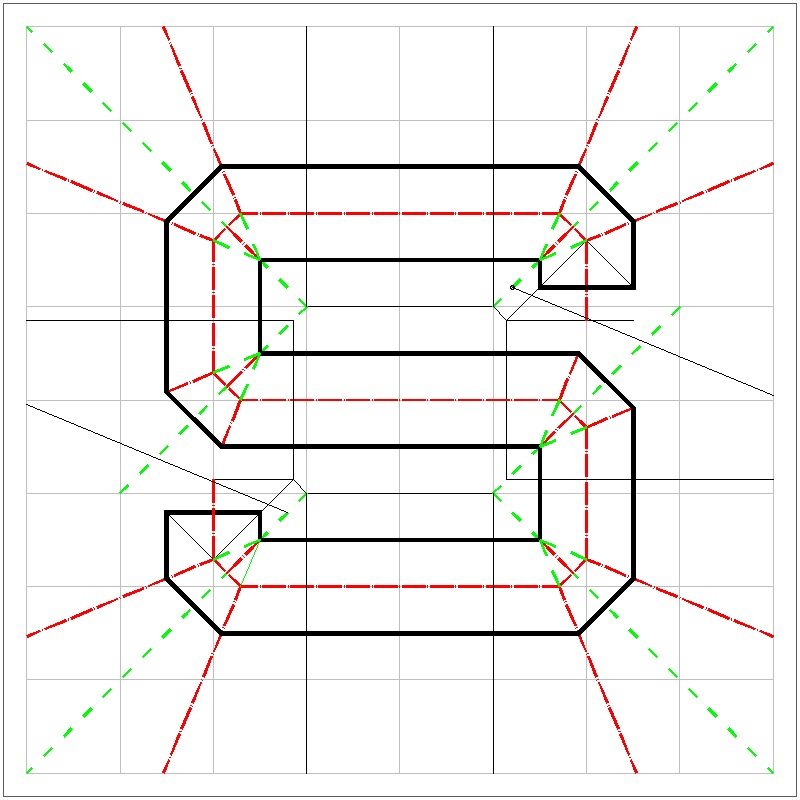
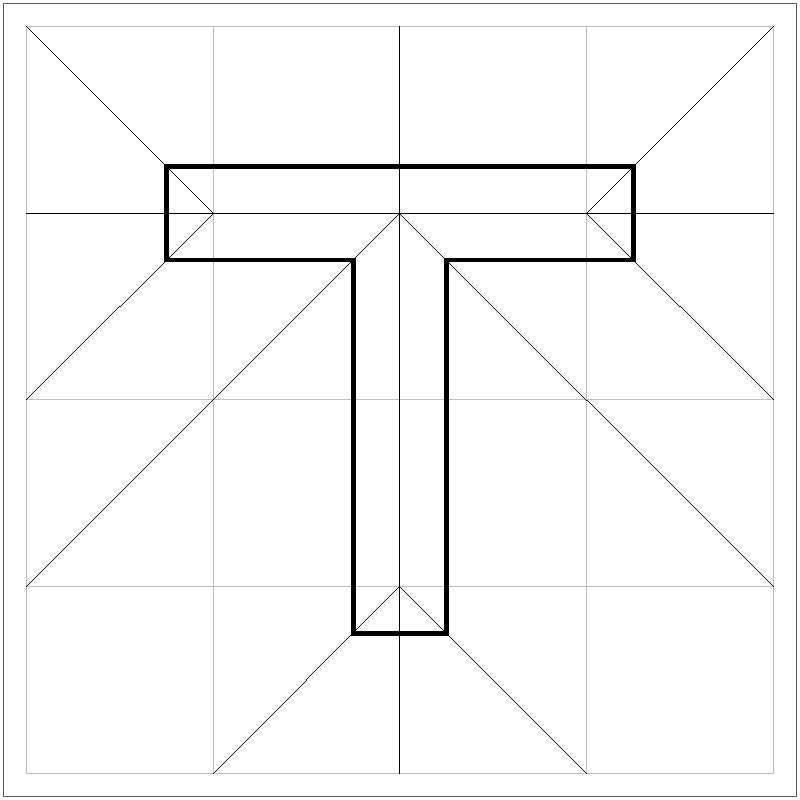
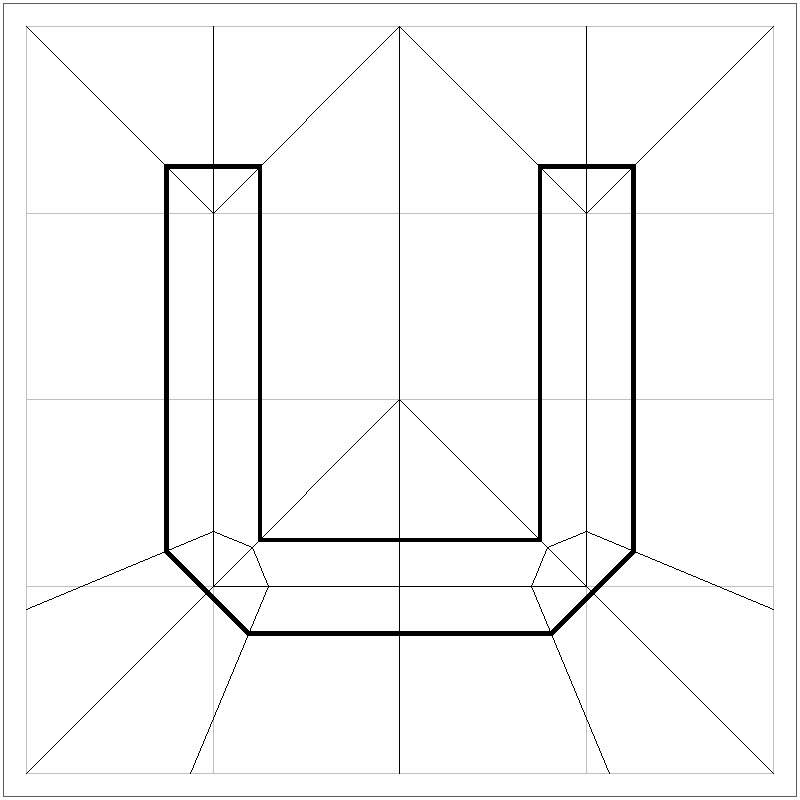
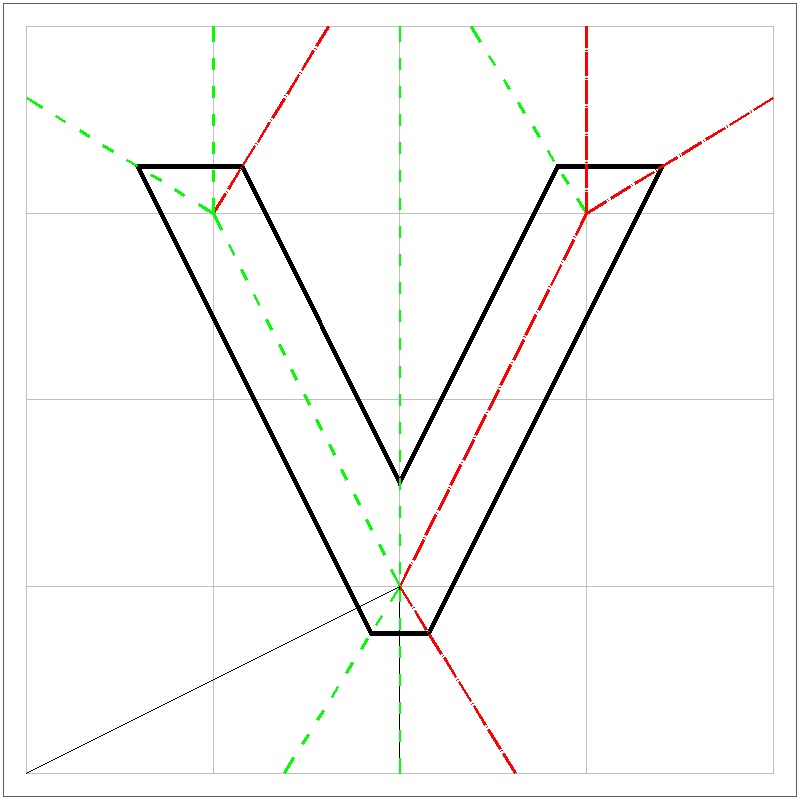
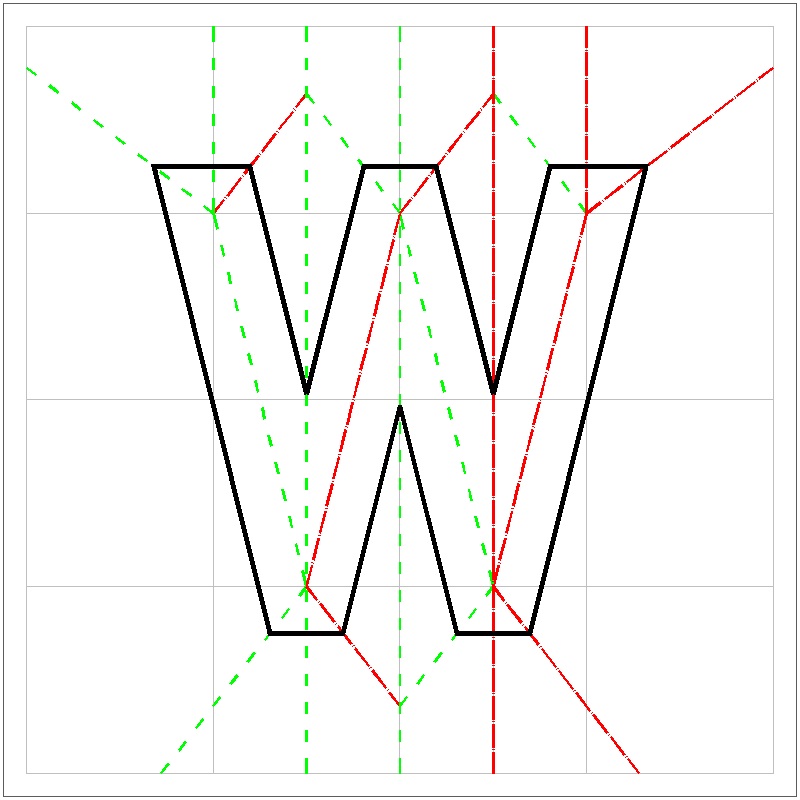
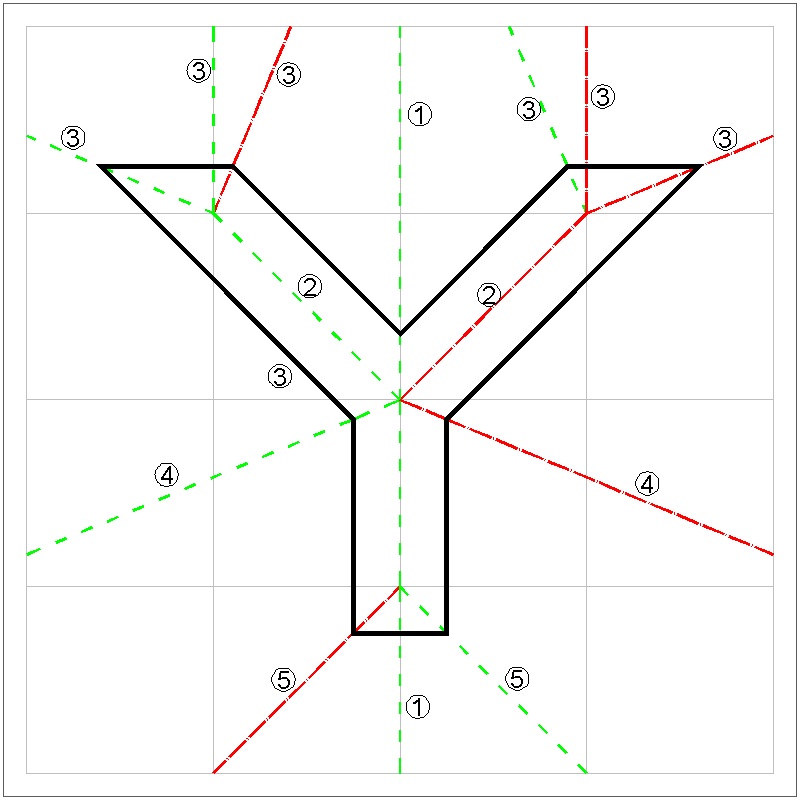
Numerals from 0 to 9
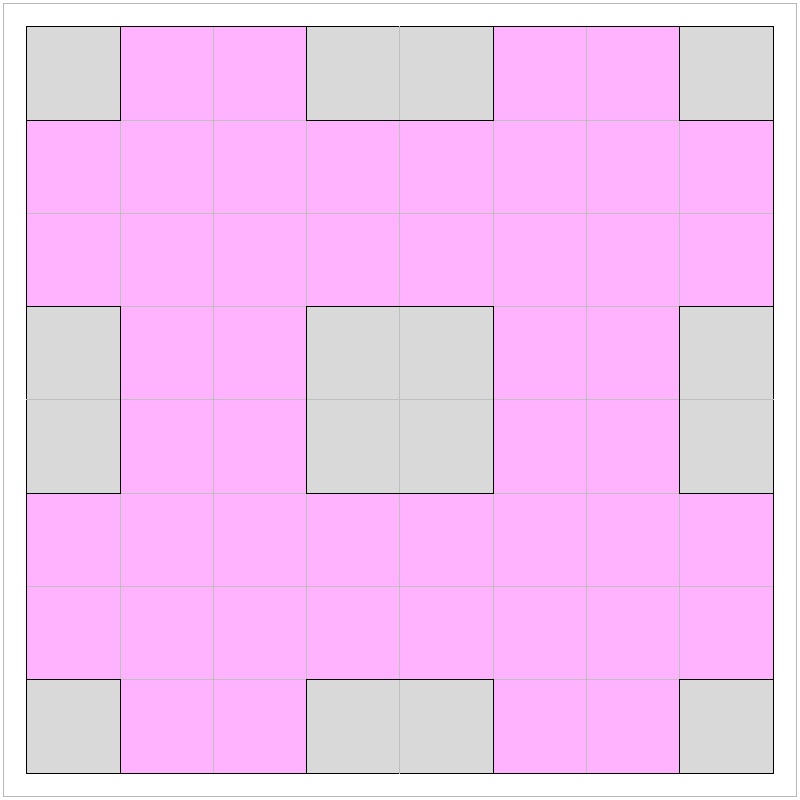
Square with 8 x 8 grids case -Flat Folding & Yamamoto Folding
| Flat
Yamamoto |
Flat
Yamamoto |
Flat
Yamamoto |
Flat
Yamamoto |
Flat
Yamamoto |
| Flat
Yamamoto |
Flat
Yamamoto |
Flat
Yamamoto |
Flat
Yamamoto |
Flat
Yamamoto |
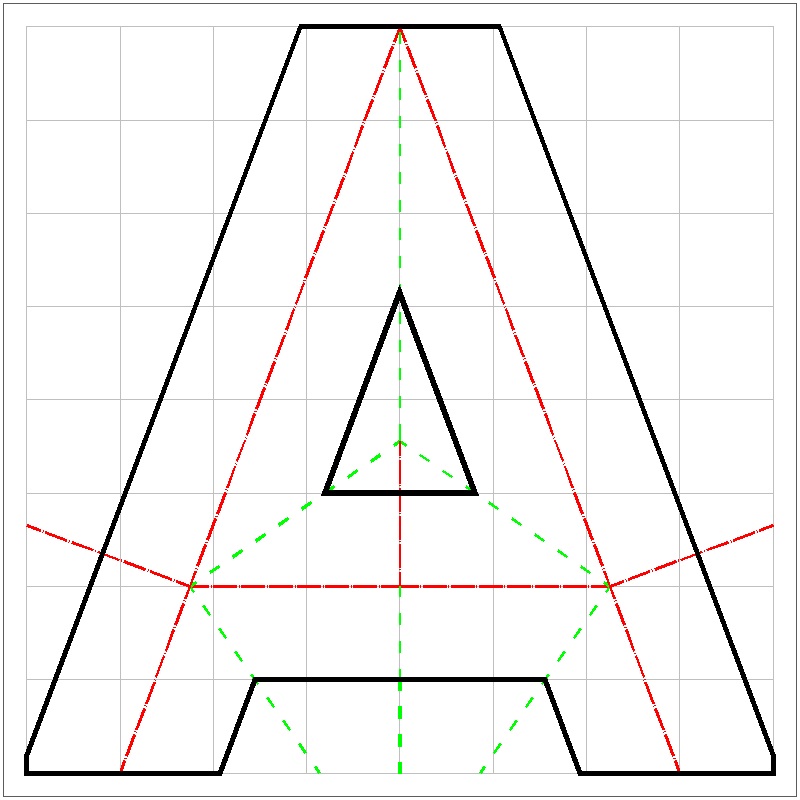
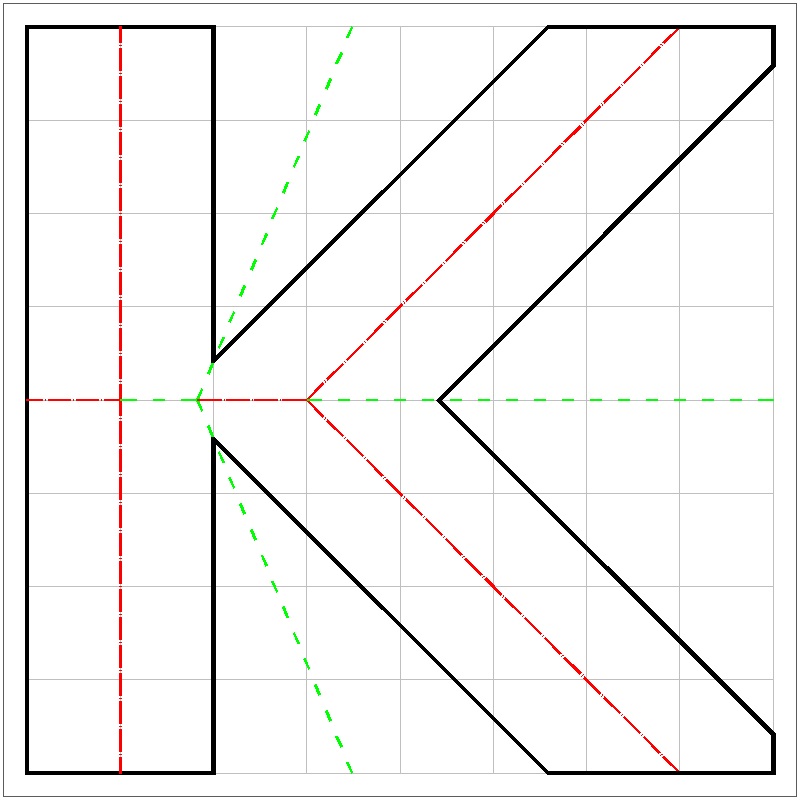
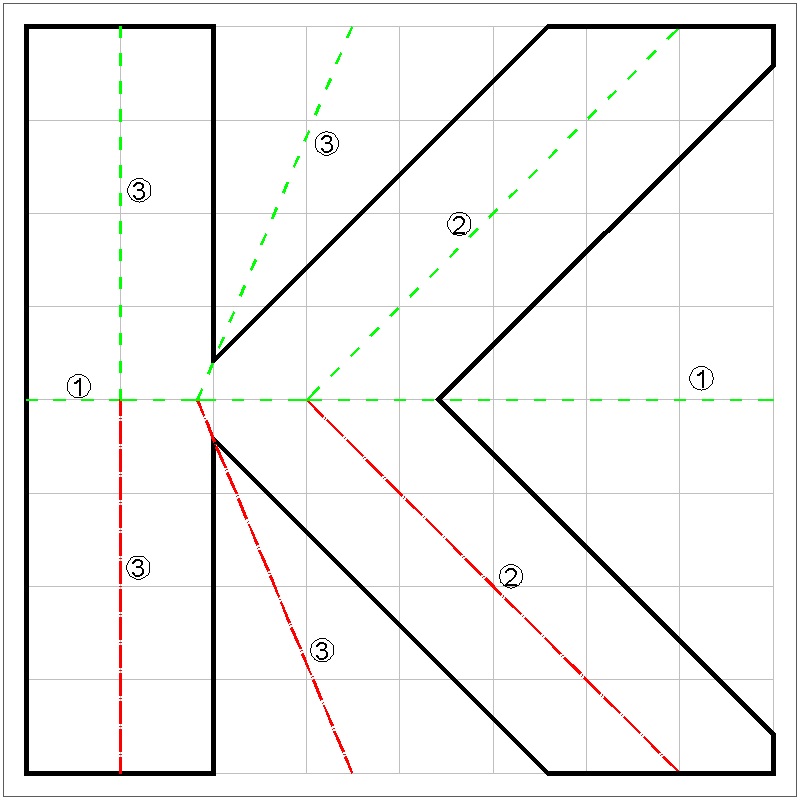
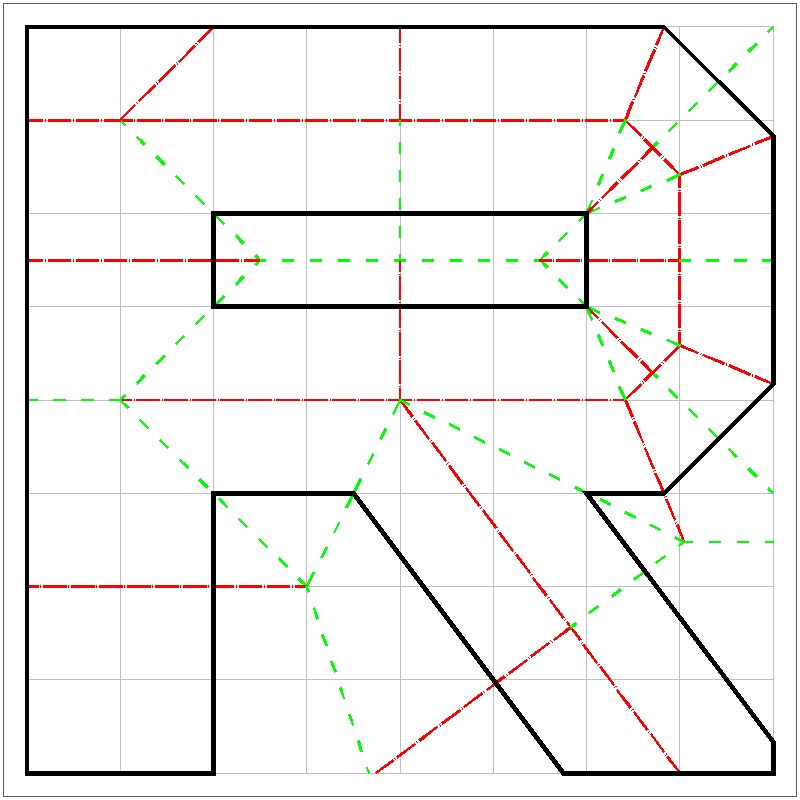
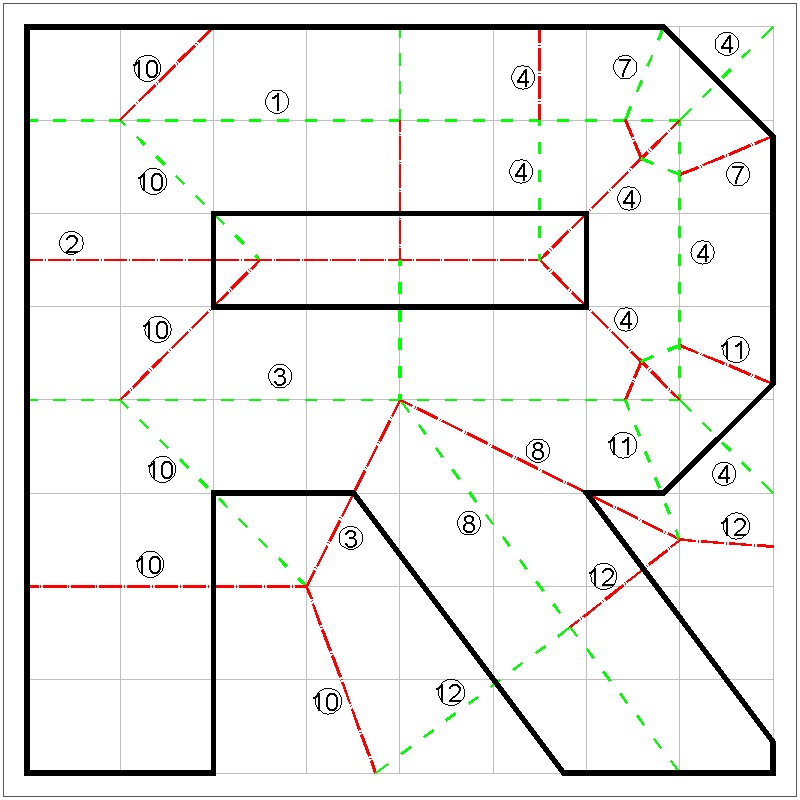
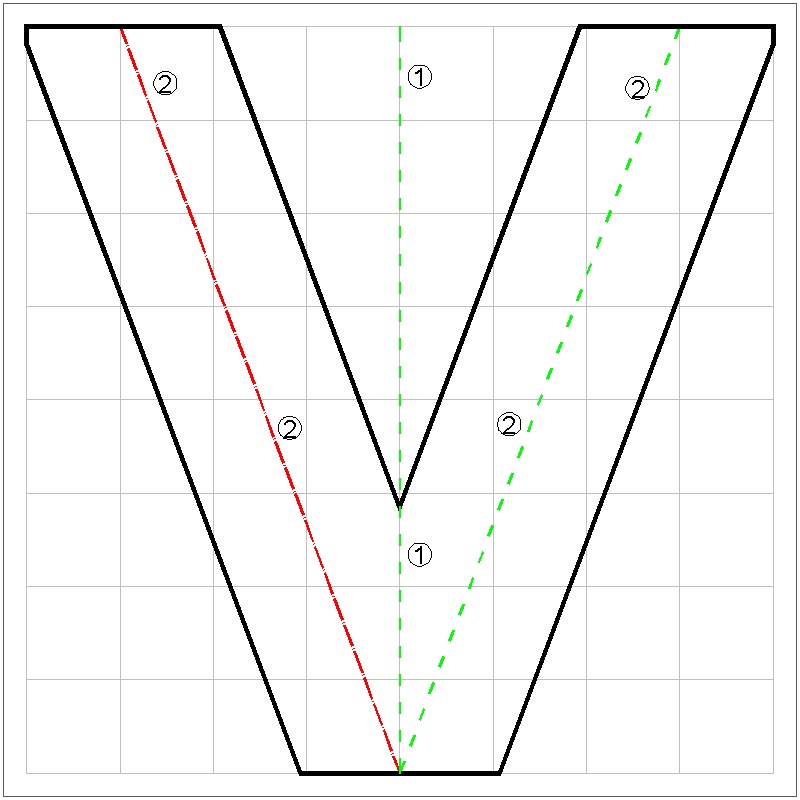
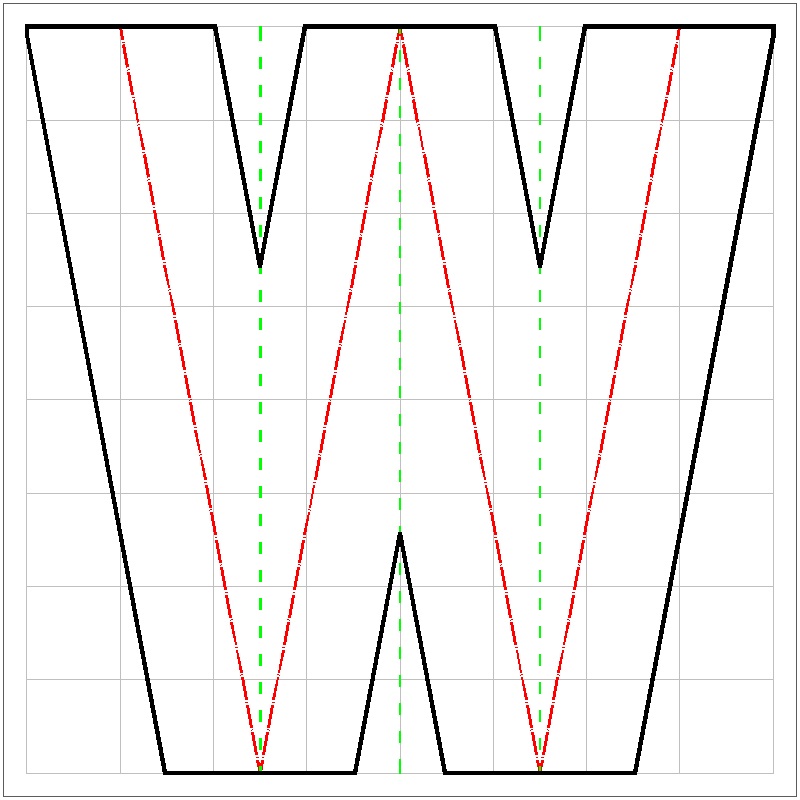
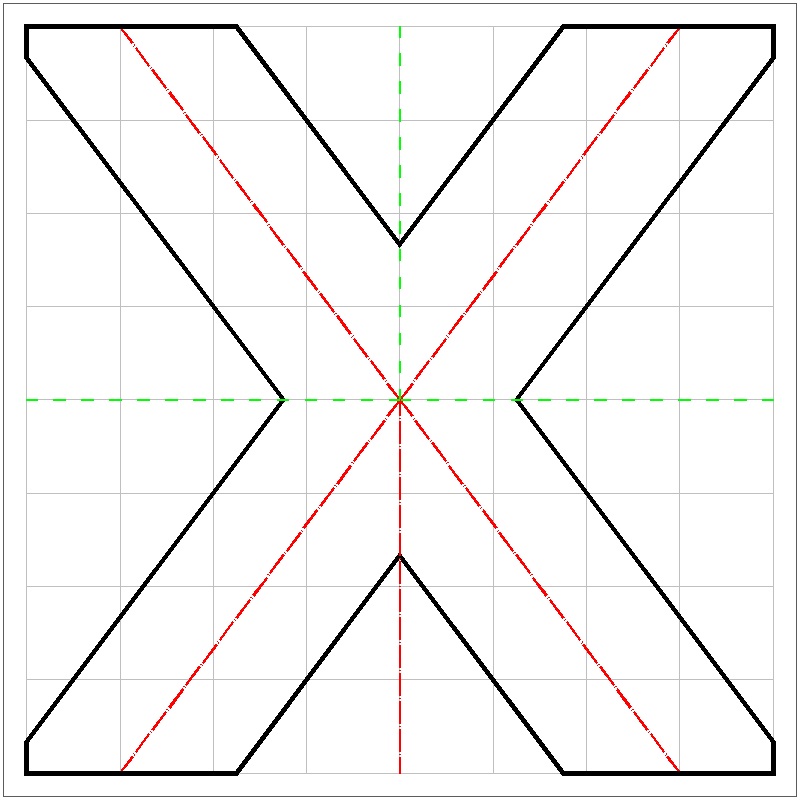
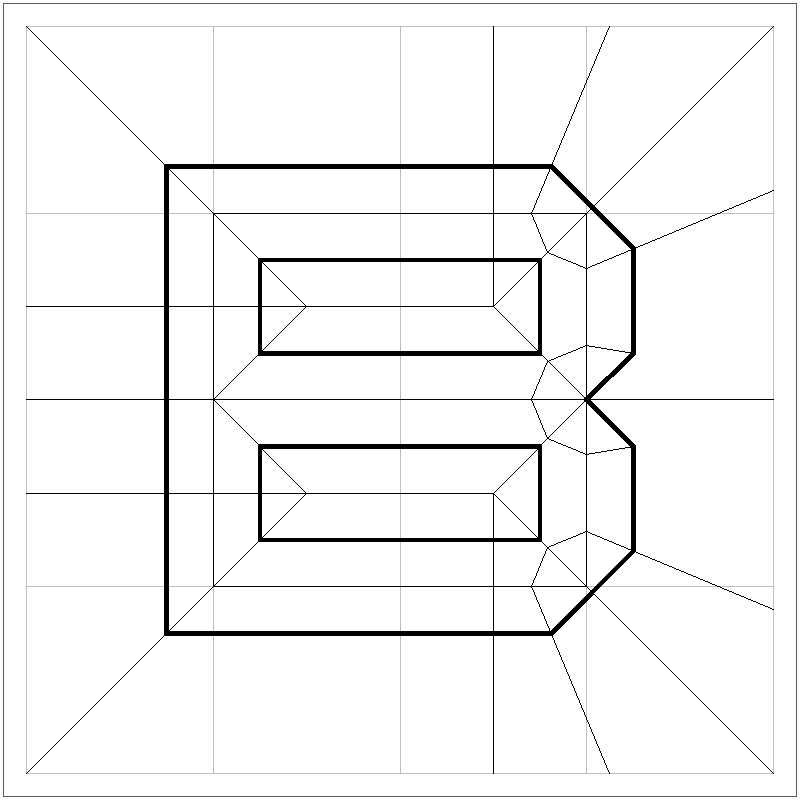
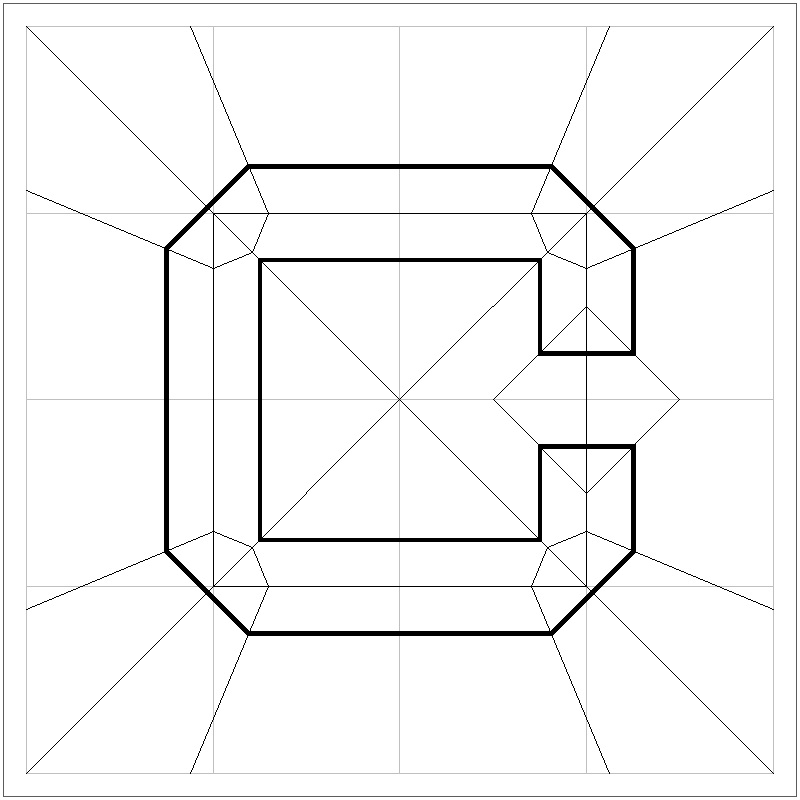
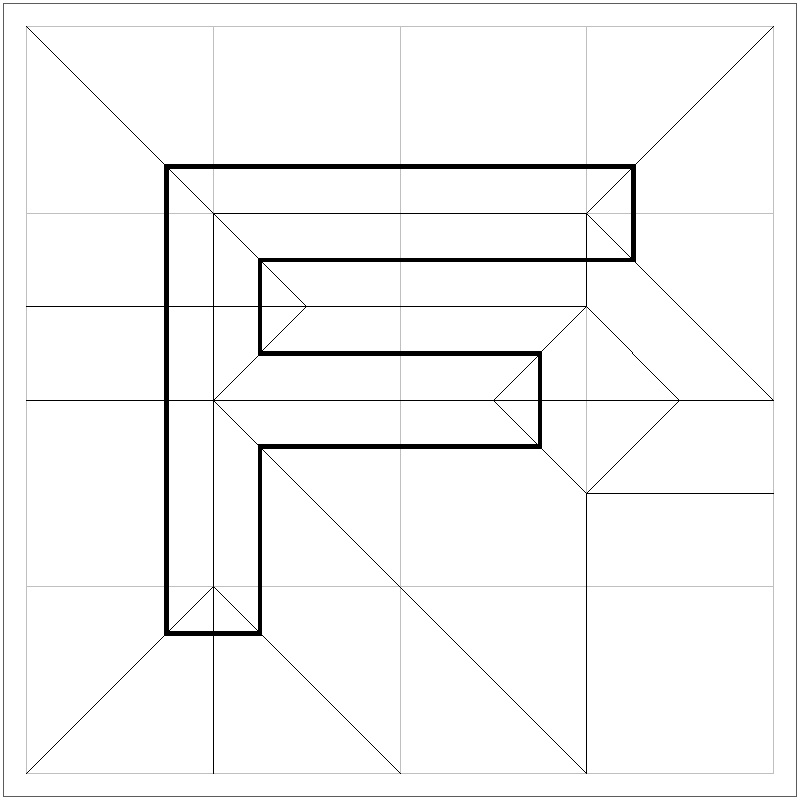
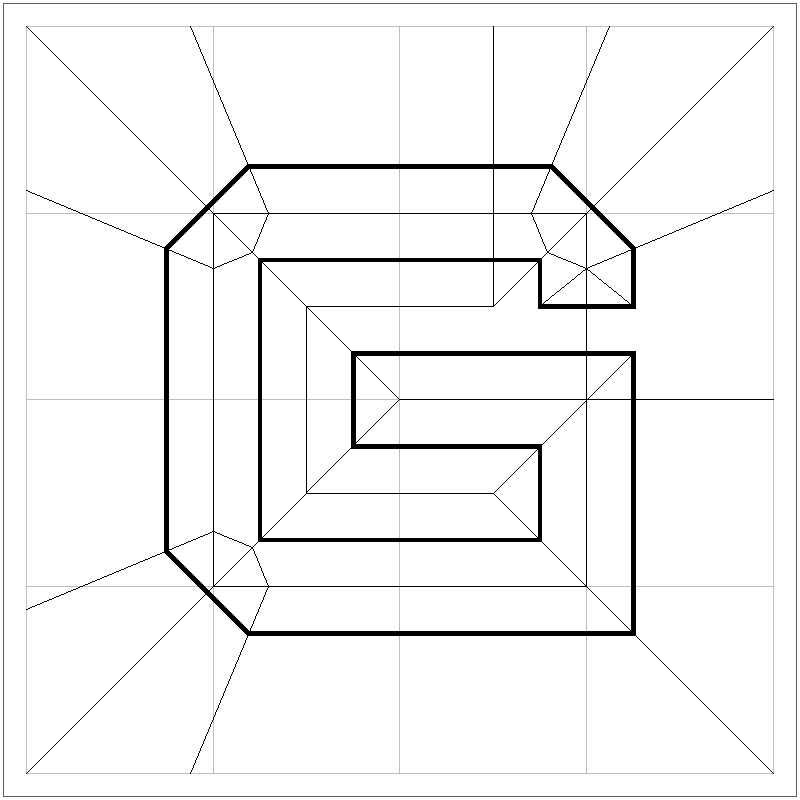
Alphabet from A to Z (capital letters)
Square with 8 x 8 grids case -Flat Folding & Yamamoto Folding
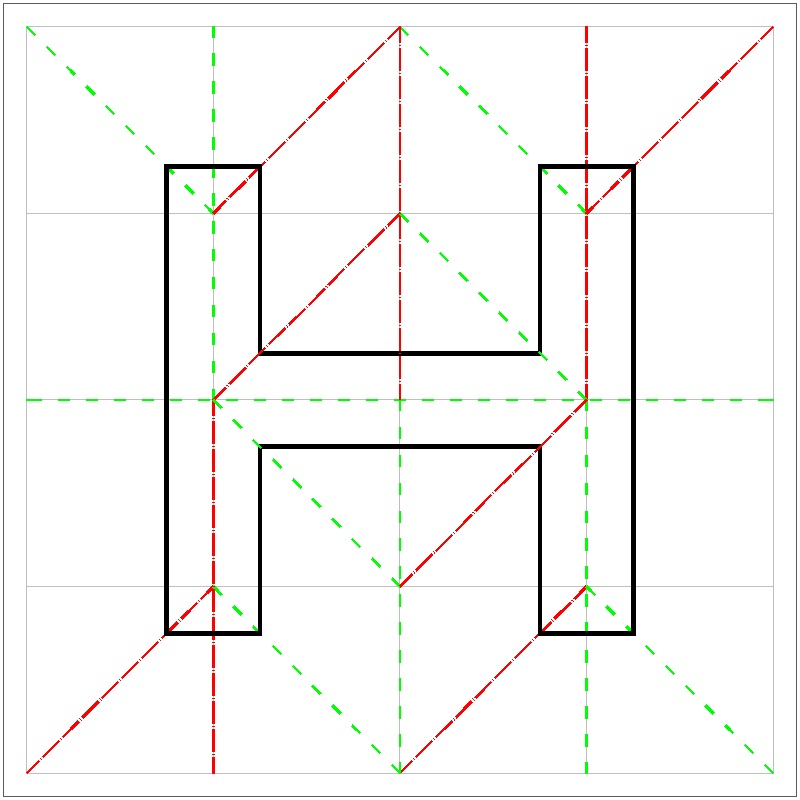
Square with 4 x 4 grids case -Flat Folding & Yamamoto Folding
US Standard size (8.5 X 11 in.) with 4 x 4 rectangular grids case -Flat Folding & Yamamoto Folding
A4 Standard with rectangular 4 x 4 grids case -Flat Folding & Yamamoto Folding
References - Internet
- The Fold-and-Cut Problem (Erik Demaine)
- Erik's Lectures in 6.849: Geometric Folding Algorithms:
- Single Cut Origami- The Institute for Figuring
- "Voronoi Diagram." Wolfram Math World. April 30, 2009.
- Straight Cut Origami Ashley Shimabuku
- One-Cut Fold via the Art of Origami
- The One Cut Method of Flat Folding Origami
- Star of David: How to Cut one from a single sheet of rectangular paper
- Grand Illusions-Articles-The Fold and Cut Problem
- There are several U-Tube animations of One Cut Folding.
regarding "Betsy Ross Star": - 5-Pointed Star in One Snip
- Two Conundrums Concerning the Betsy Ross Five-Pointed Star
- Folding/one-cutting a Betsy Ross star form 8-1/2 x 10 paper
- How to Make the One-Cut Betsy Ross Star
One Cut Origami blog::Many interesting figures - One Cut Origami (in Japanese)
References - Books
- Yamamoto, Kousei: OneCut Origami (in Japanese) Book I , ISBN4-89491-065-9,Houbun-sha ,Tokyo, 2004.
- Yamamoto, Kousei: OneCut Origami (in Japanese) Book II , ISBN:978-4-89491-090-4,Houbun-sha ,Tokyo, 2006.
- Yamamoto, Kousei: OneCut Origami (in Japanese) Book III , ISBN:978-4-89491-236-6,Houbun-sha ,Tokyo, 2012.
For math saavy readers: - O'Rourke,Joseph.:"How to Fold it" (2011),Cambridge University Press
- Demaine,Erik D.,O'Rourke,Joseph.: Geometric Folding Algorithms: Linkages,Origami,Polyhedra, Cambridge University Press, New York, 2007
Books about 'Paper Magic" - Houdini,Harry. : Houdini's Paper Magic: The whole Art of Performing With Paper,Including Paper Tearing(Classic Reprint)
For easy reading - Gardner, Martin.: Origami,Eleusis,And the Soma Cube, MAA. 2007