click here to enlarge
click here to enlarge
click here to enlarge
Go to Fun_Math Content Table
|
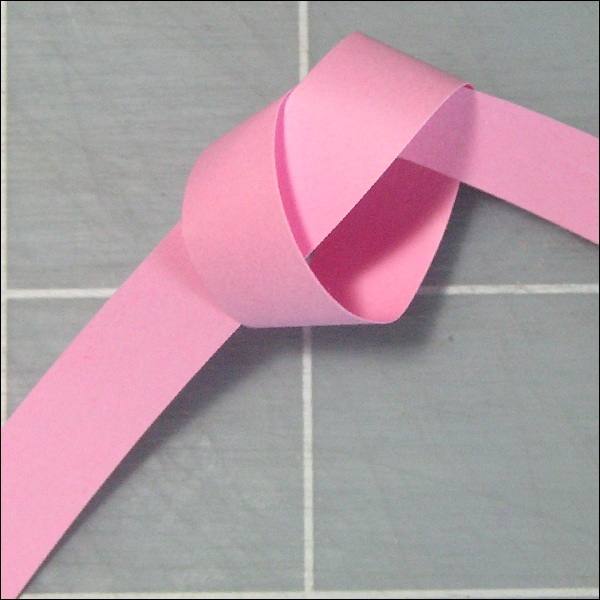
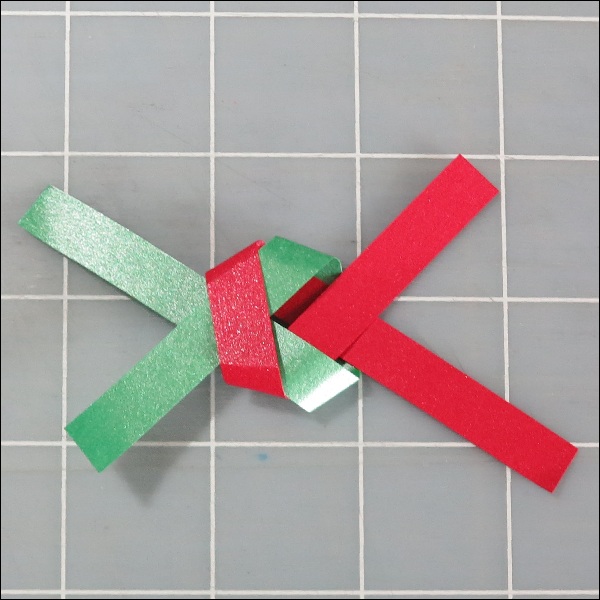
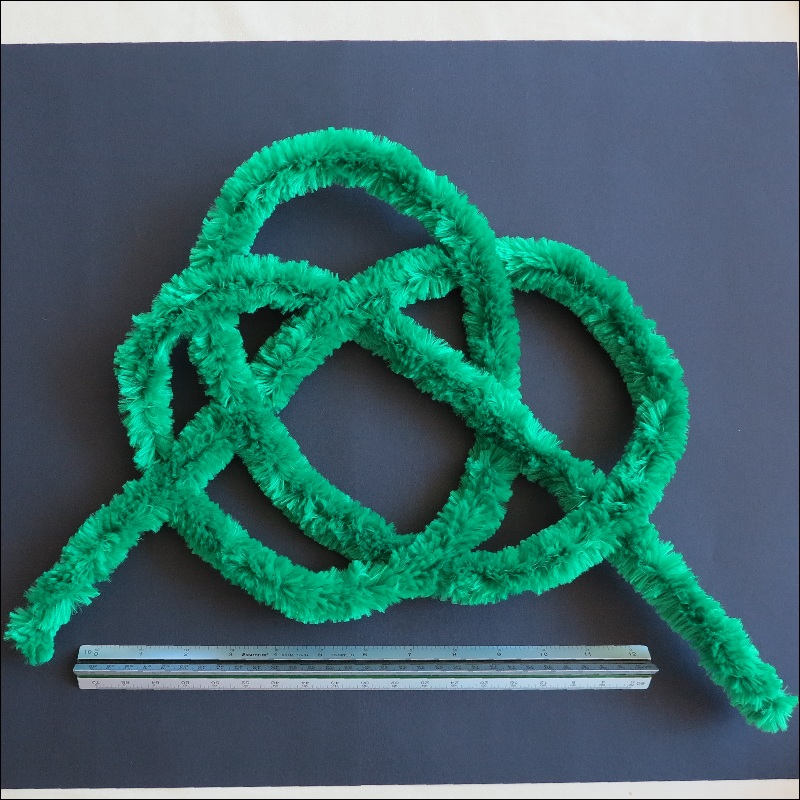
Fig.1 A simplest knot click here to enlarge |
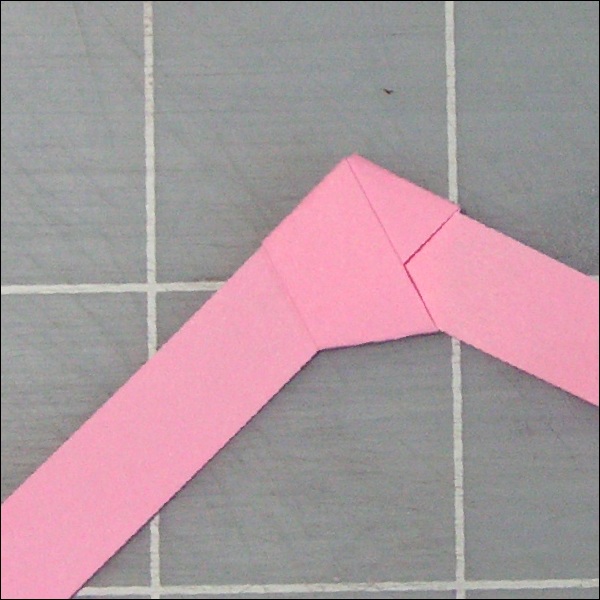
Fig.2 Resulting Pentagon click here to enlarge |
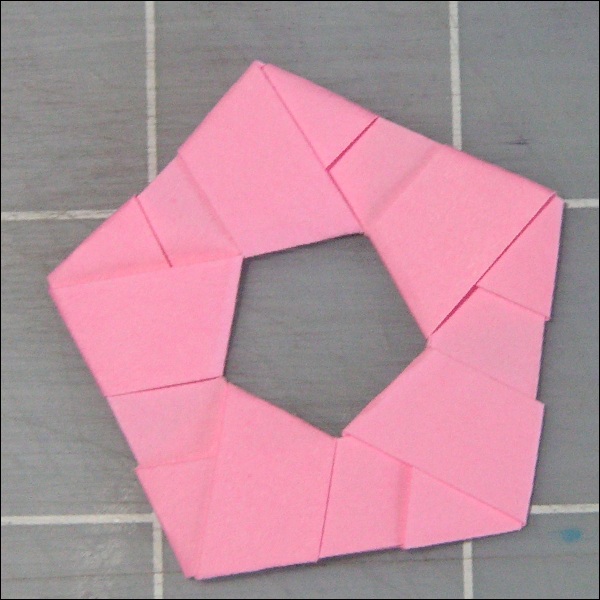
Fig.3 After 5 repetitions click here to enlarge |
|
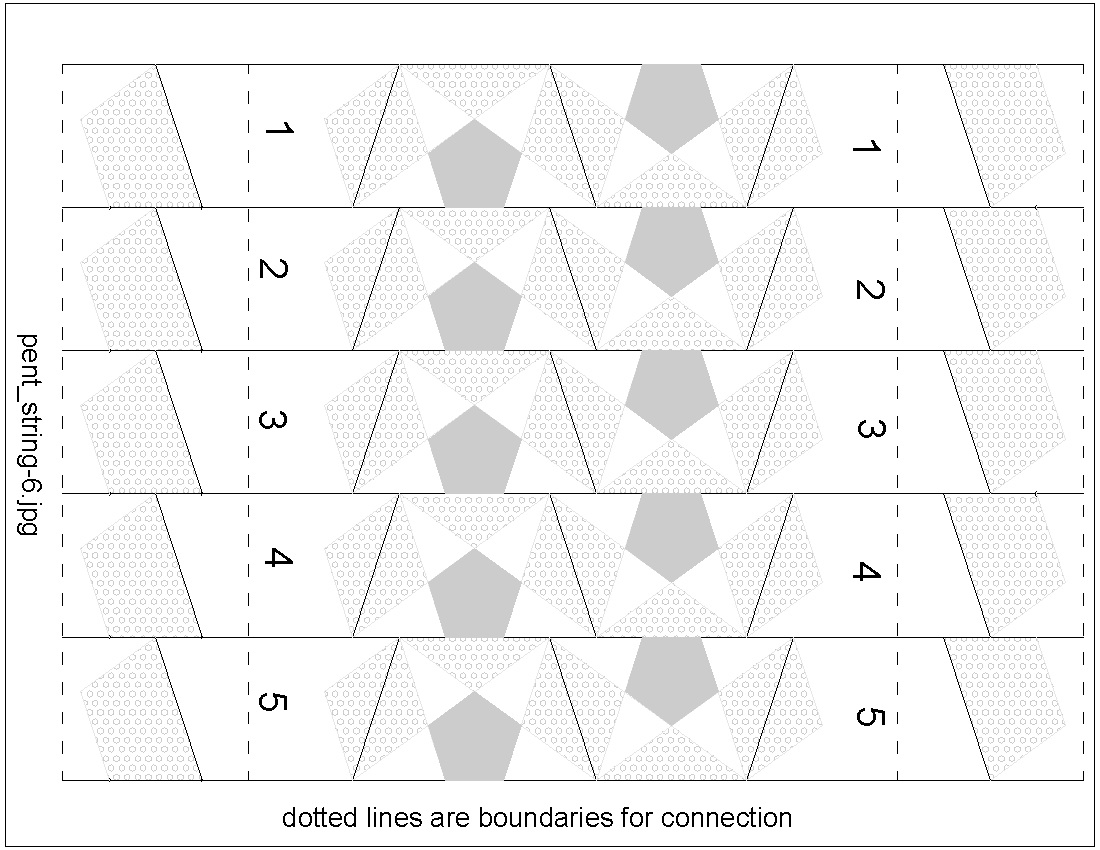
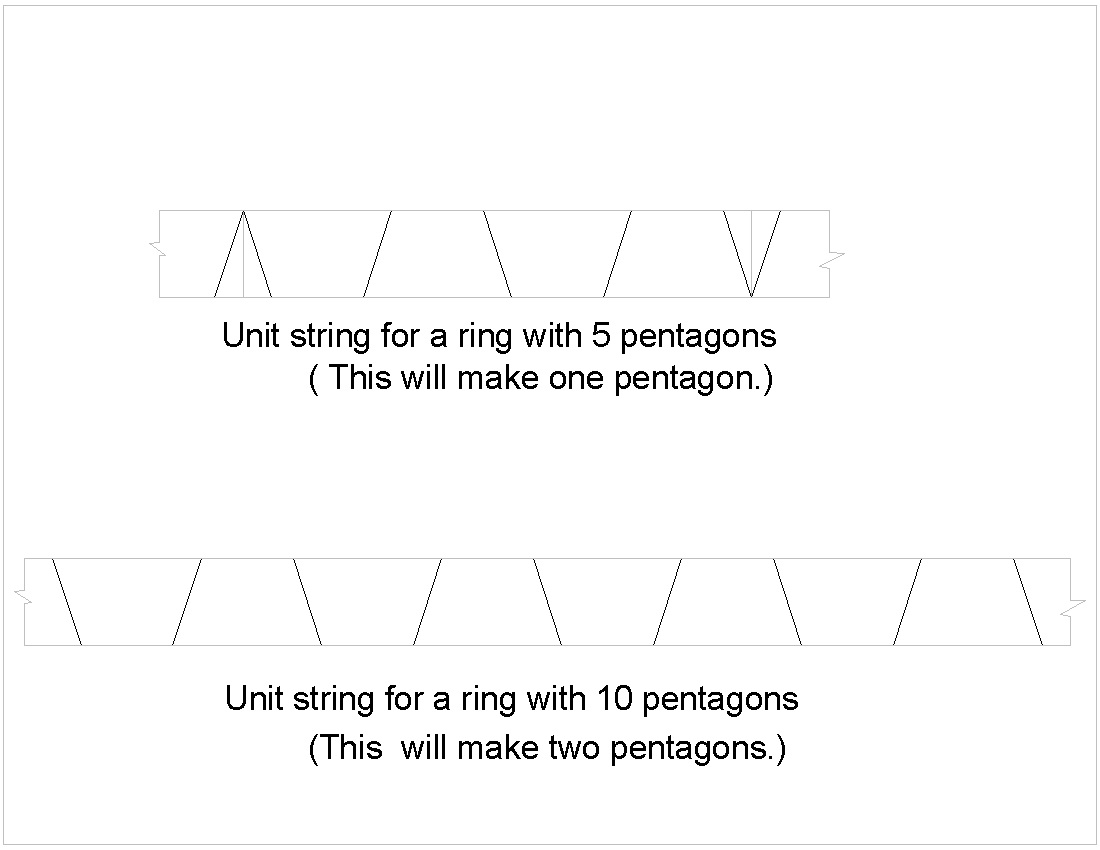
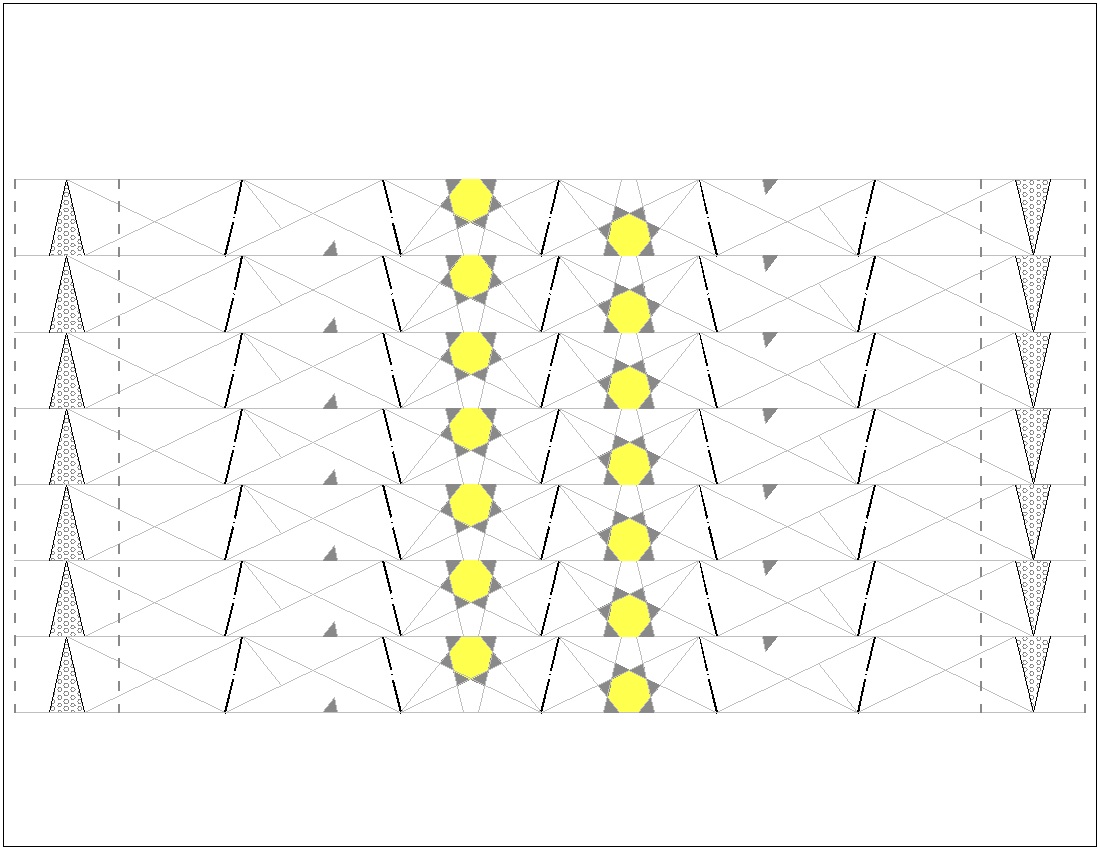
Fig.4: Paper Strings used click here to enlarge open PDF for print 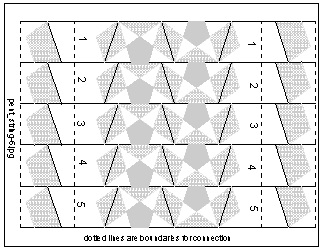 |
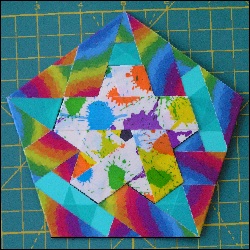
Fig. 5: Resulting ring click here to enlarge 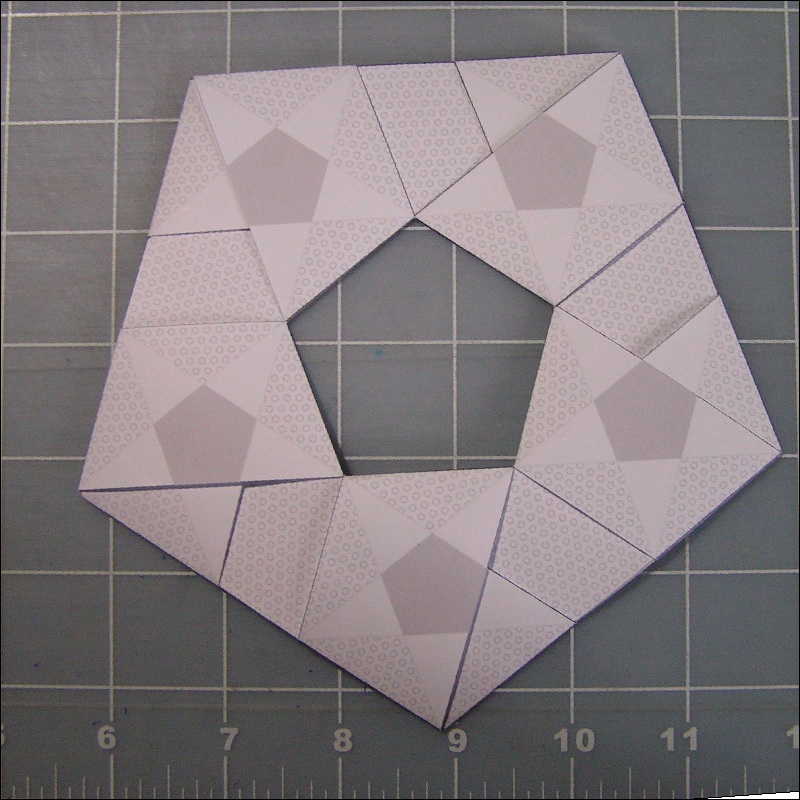 |
|
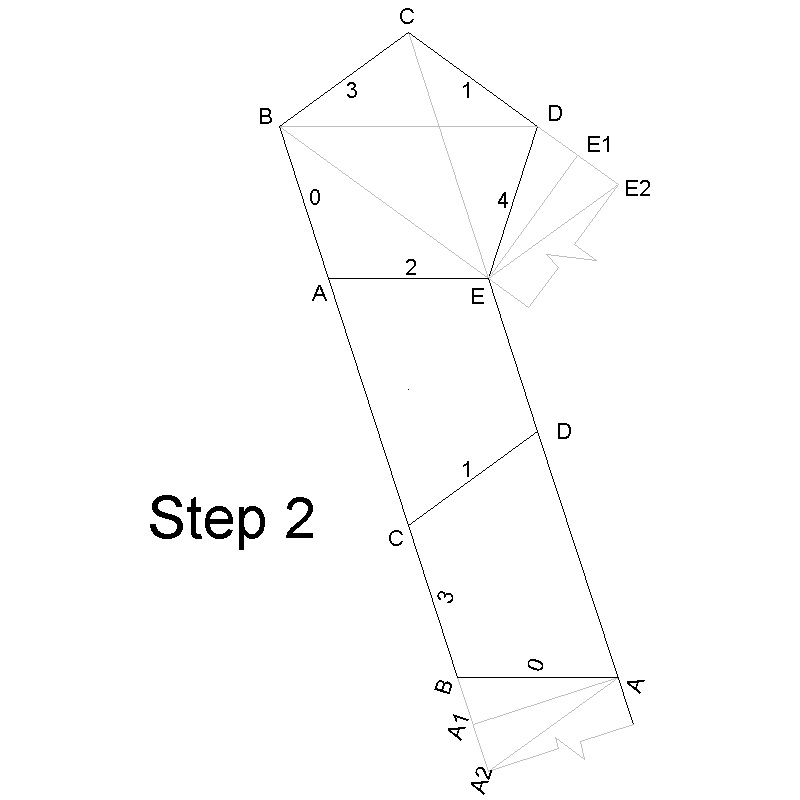
Fig. 6 Step 2: Inside boundary lines on the back click here to enlarge 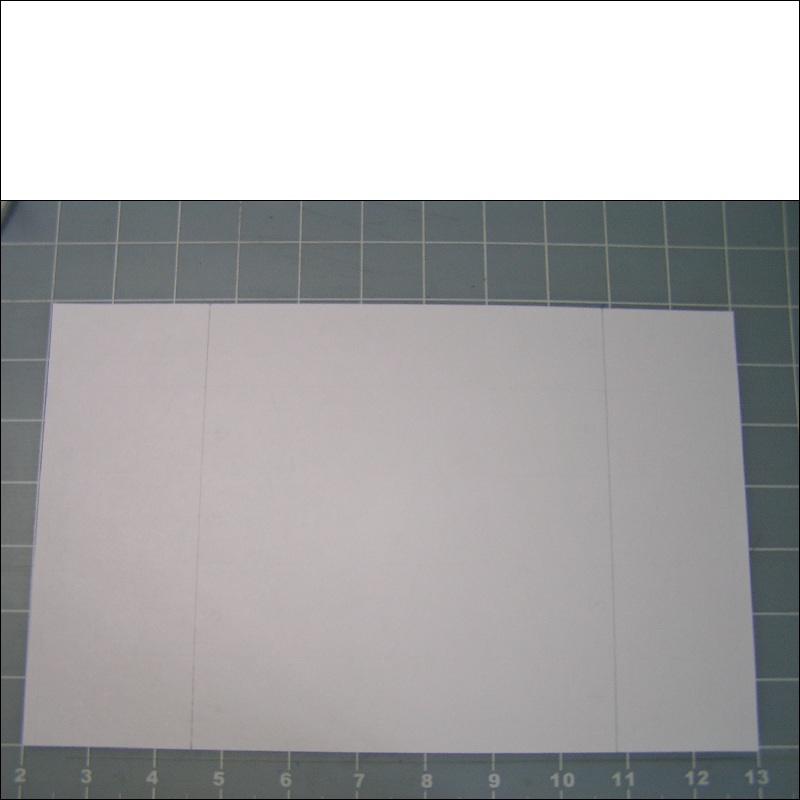 |
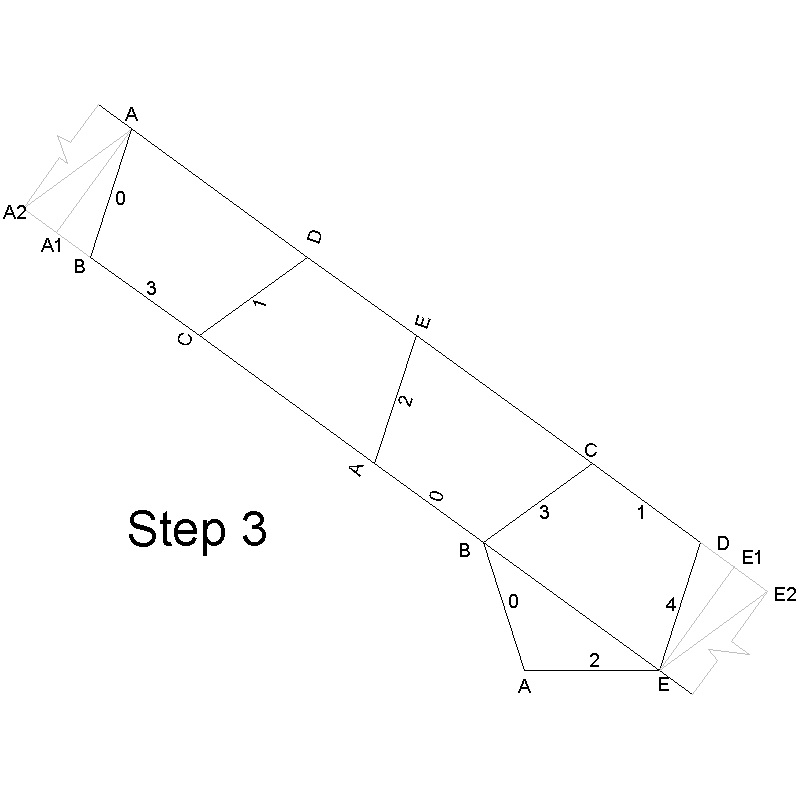
Fig. 7 Step 3: Cutting out paper strips click here to enlarge  |
Fig. 8: Connecting strips #1 & #2 click here to enlarge 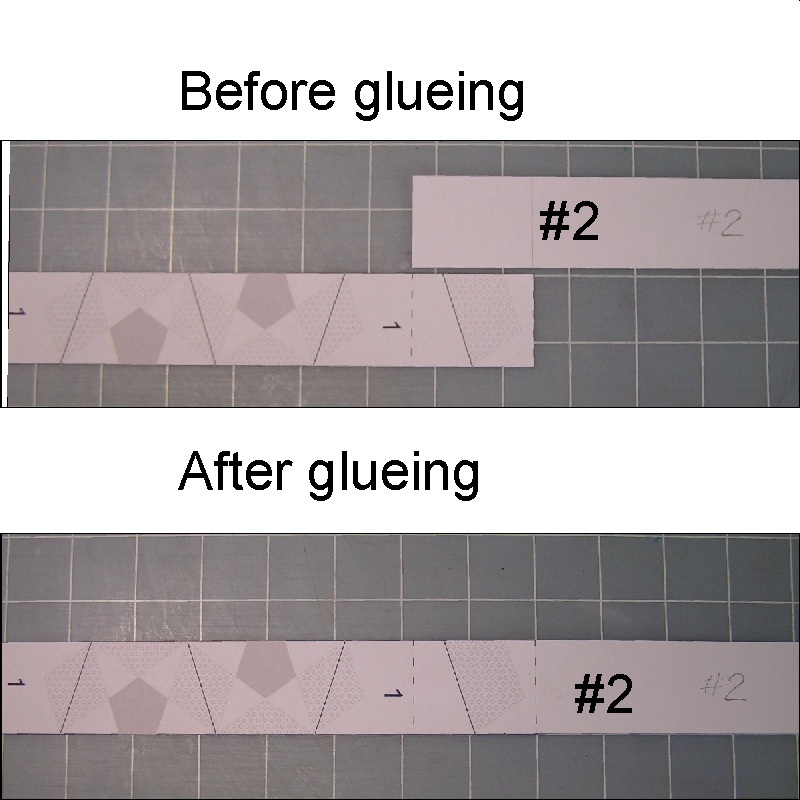 |
|
Fig.9: All strips connected click here to enlarge 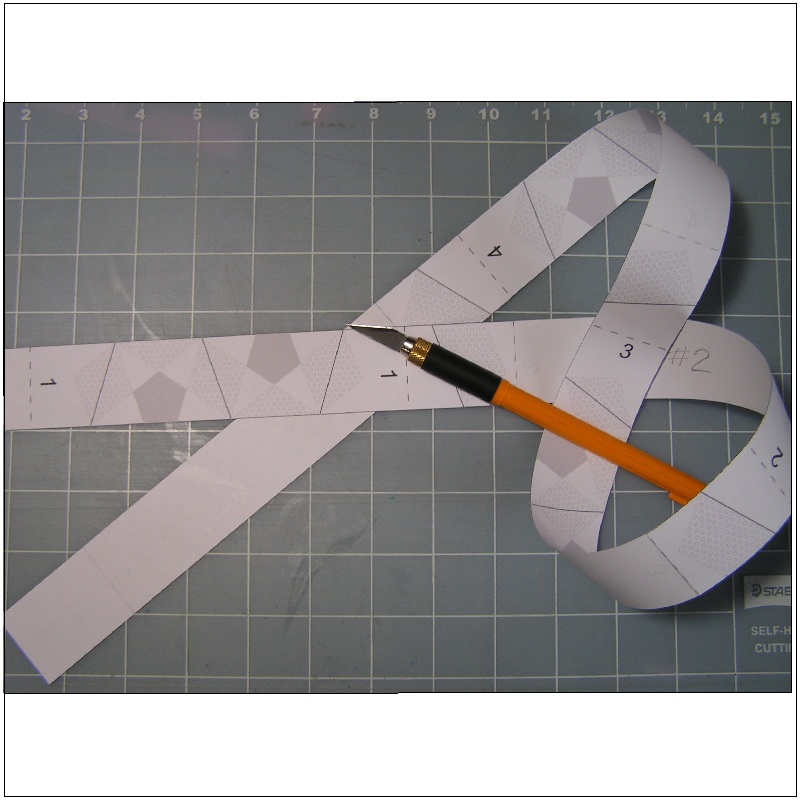 |
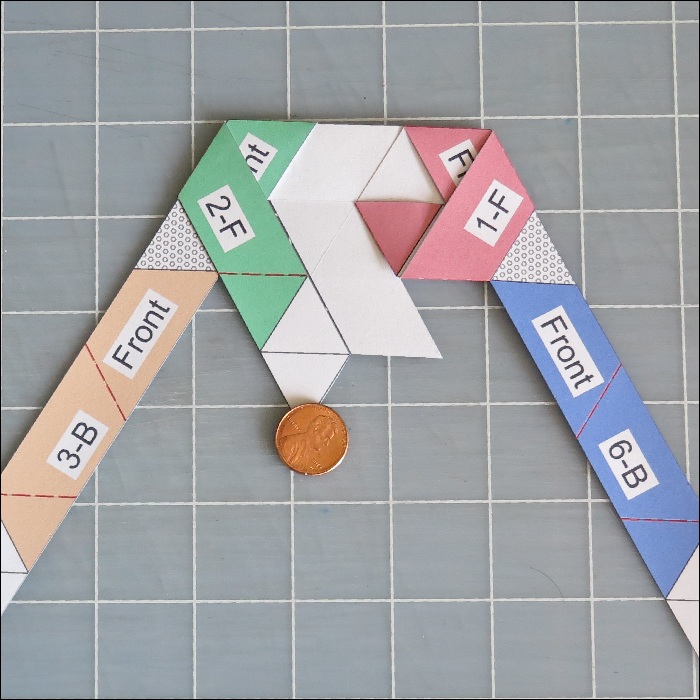
Fig.10: Step 6a: Make crease lines on #1 click here to enlarge 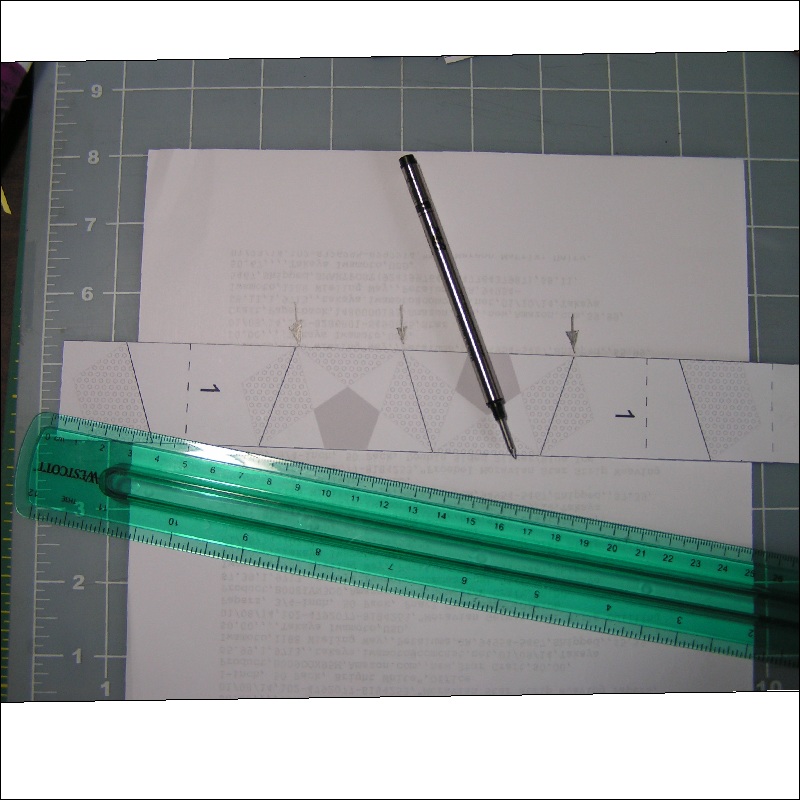 |
Fig.11: Step 6b: Make crease lines on #2 click here to enlarge 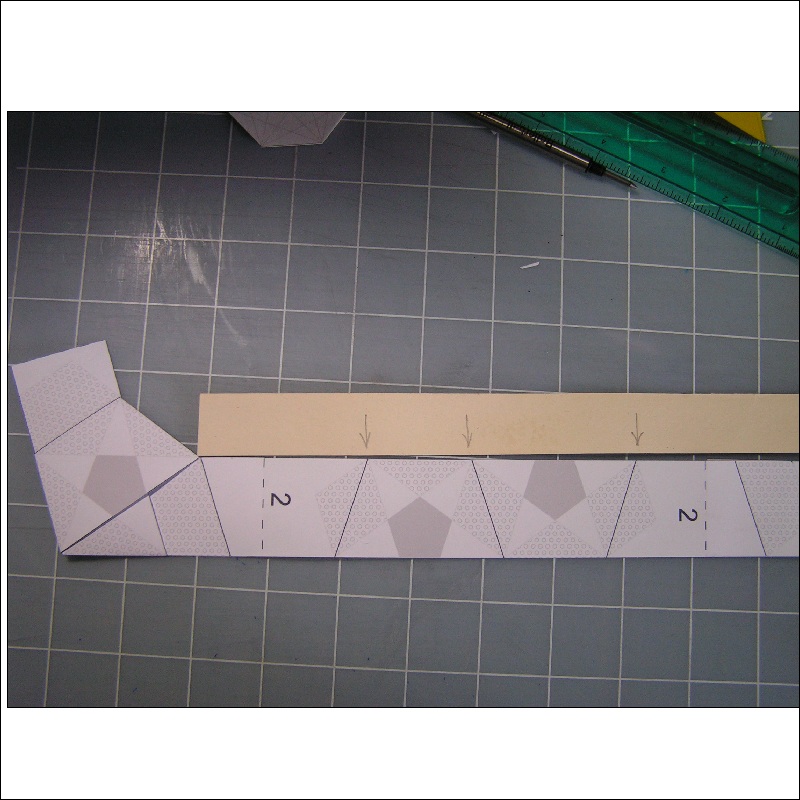 |
|
Fig.12: After step 6a & 6b click here to enlarge 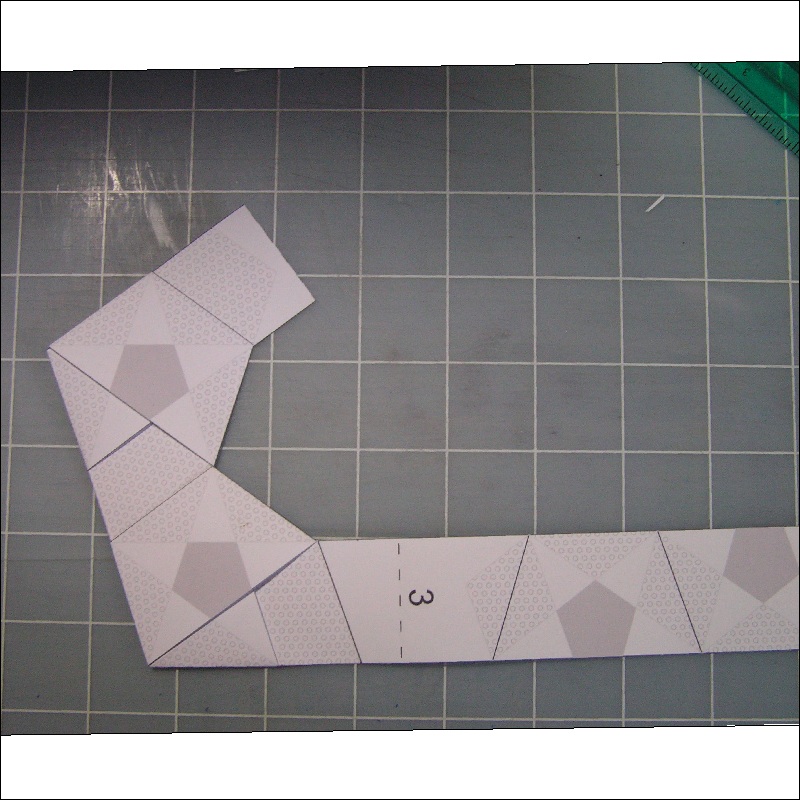 |
Fig.13: After processing #5 strip click here to enlarge 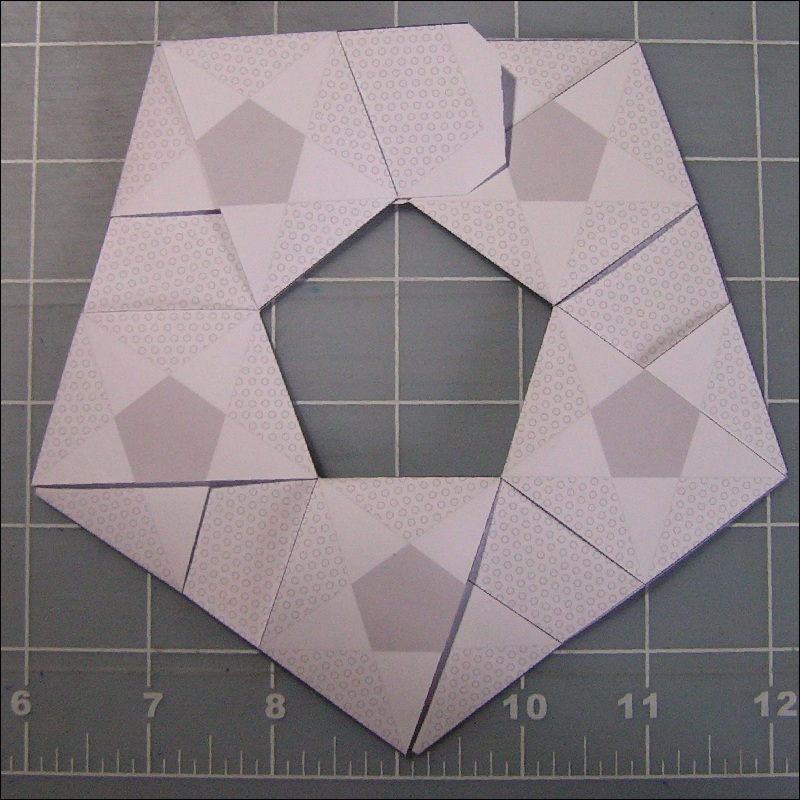 |
Fig.14: Finished look click here to enlarge |
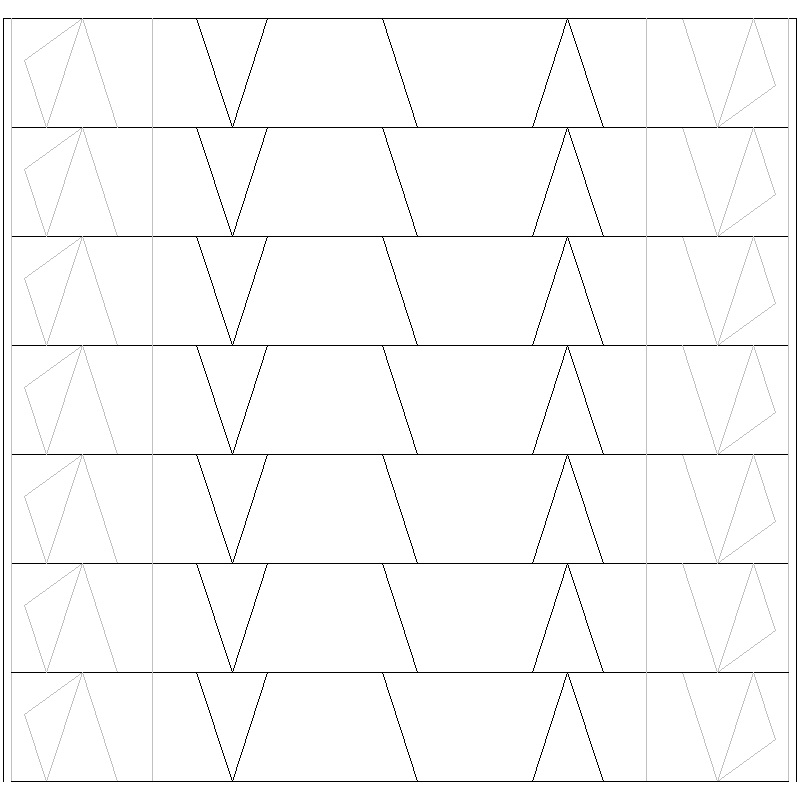
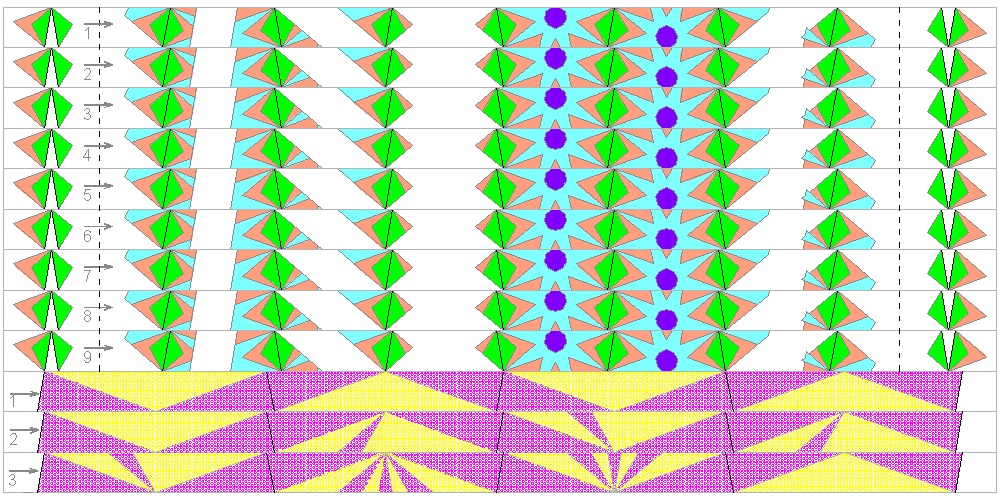
Step 1 Print out paper strip image shown in Fig. 4.
Step 2 There are two types of broken lines,on outside boundarties and inside with numbers.
On the back of the printed paper, mark the location of the inner broken lines by
a pencil.( Fig. 6 ) A light box is a handy tool if available, but a window pane does
the job too.
Step 3 Using a very sharp blade,cut out 5 pieces of strips with the same width. (Fig. 7 )
Step 4 Take strip #1 and #2 ,lay the left back side of #2 strip on the right edge of
#1 strip. Make sure that the dotted lines coincide.(Fig. 8 )
Step 5 Repeat this "glueing front to back" process for Strips #3,4,& 5.
The result is shown in Fig. 9 .
Step 6a Press an old ball point pen cartridge along the 3 solid lines on Tape #1.
(Fig. 10) Then apply "Yama Ori" for the creased lines.
The third folding must go through under two layers of strip. The result is shown
in Fig. 10.
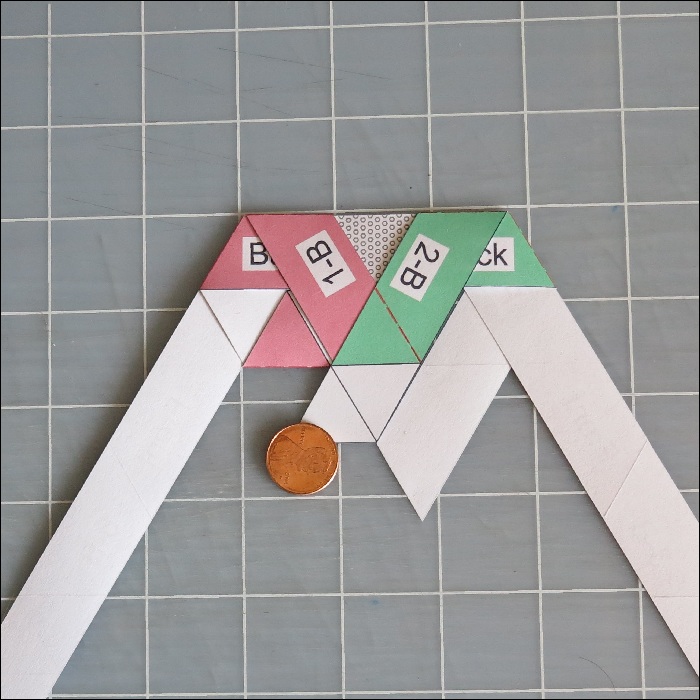
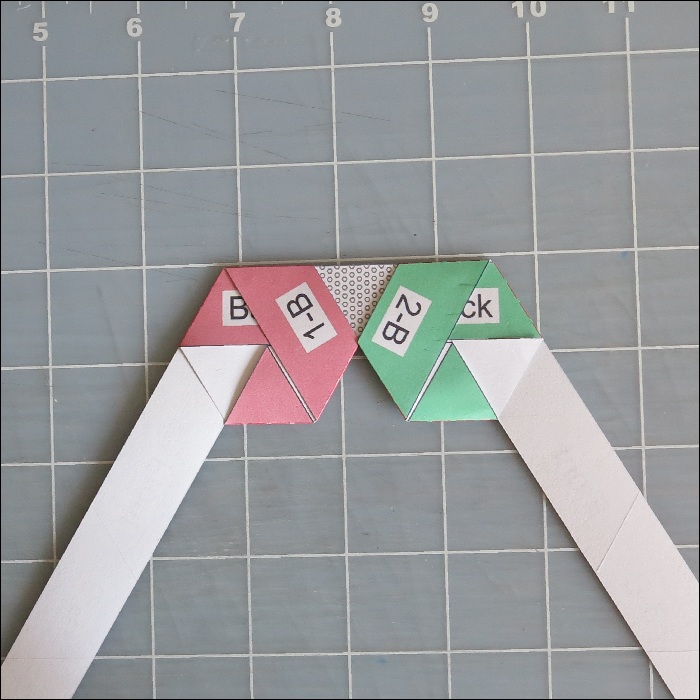
Step 6b Repeat the same Process on Tape #2 (Fig. 11). The result is shown in Fig. 12.
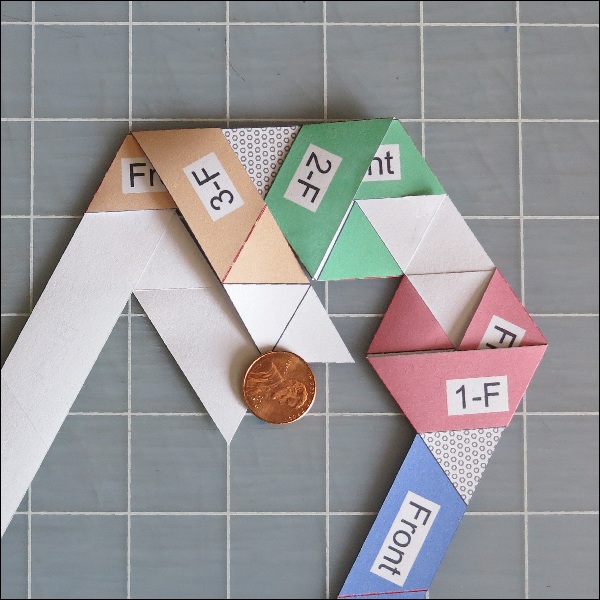
Step 7 Repeat the same process on tape #3 , 4 & 5. The result is shown in Fig. 13.
You will see both the ends of #1 and #5 are sticking out.
Using the friction between your fingers and the paper strip, push them
into each other slowly. Cutting the corners of edges will make this process easier.
Despite no glue usage during the folding stage ,the final product looks
very stable. Fig. 14
|
Fig.15: Paper Strings used click here to enlarge open PDF for print 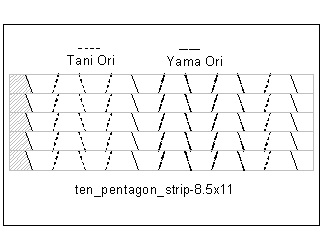 |
Fig. 16: Resulting ring click here to enlarge 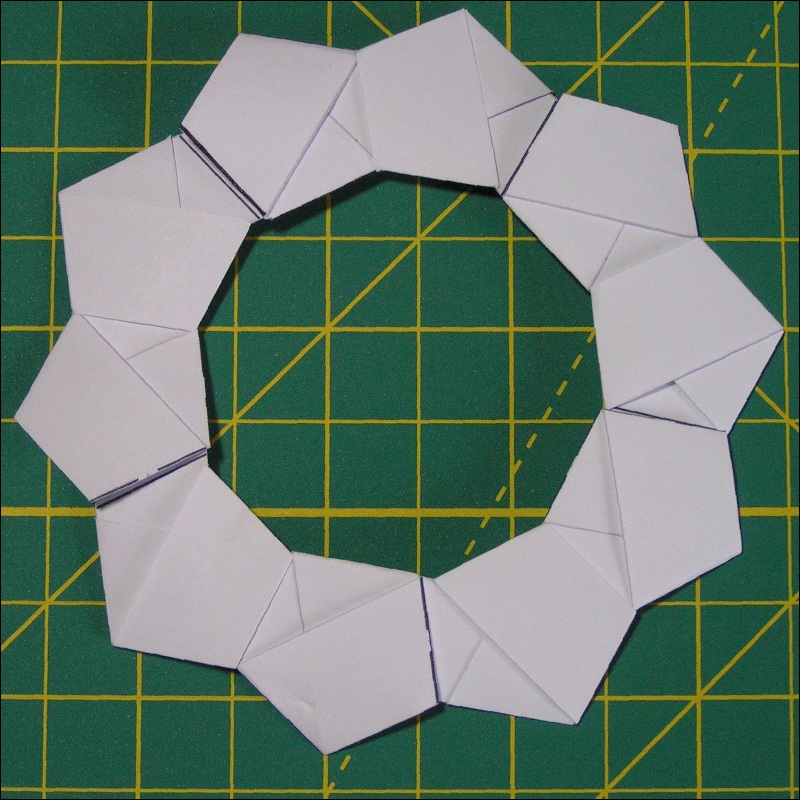 |
|
Fig. 17 Step 1-2: Fold the right hand side click here to enlarge 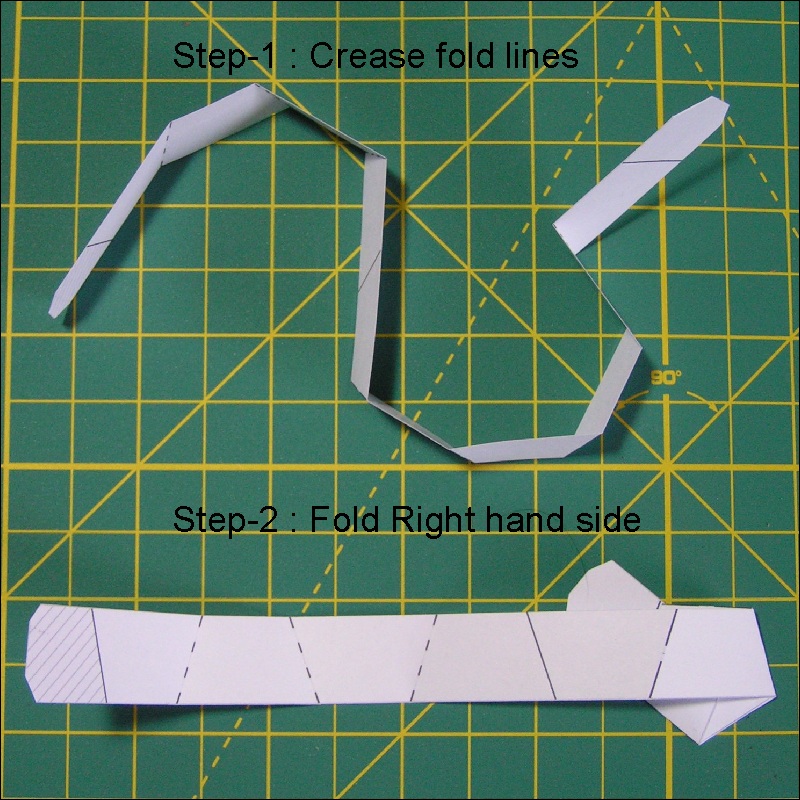 |
Fig. 18 Step 3: Left tape through the pentagon click here to enlarge 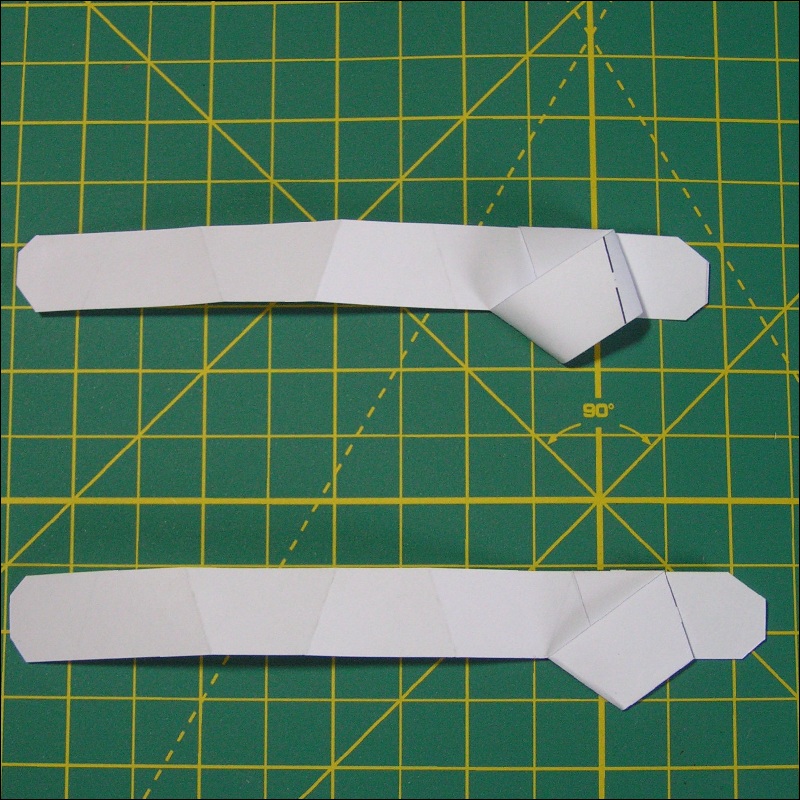 |
Fig. 19: Step 4: Make the left pentagon click here to enlarge 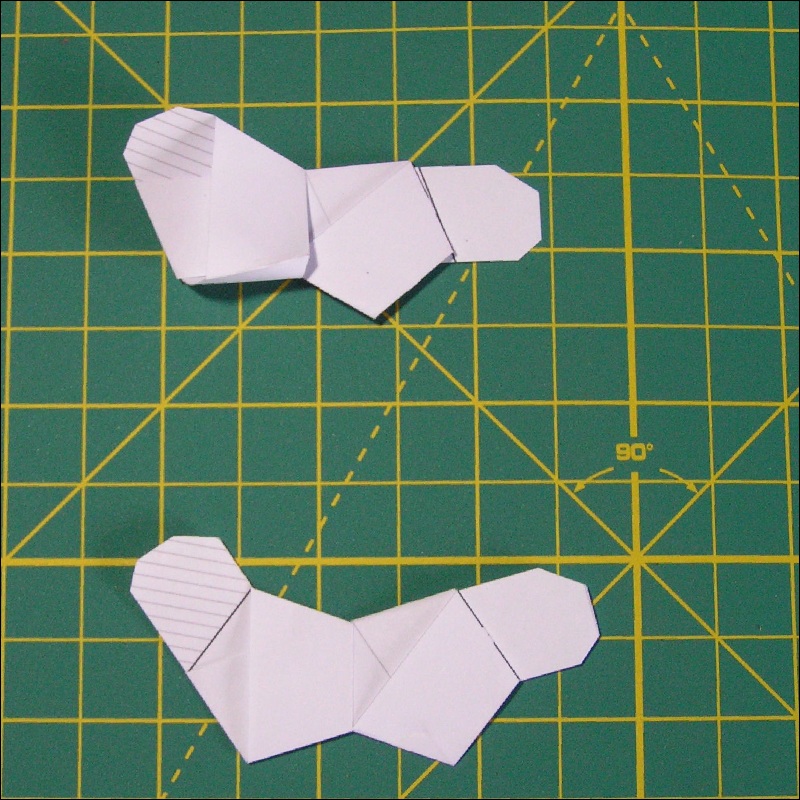 |
|
Fig.20: Step 5: Connect two units click here to enlarge 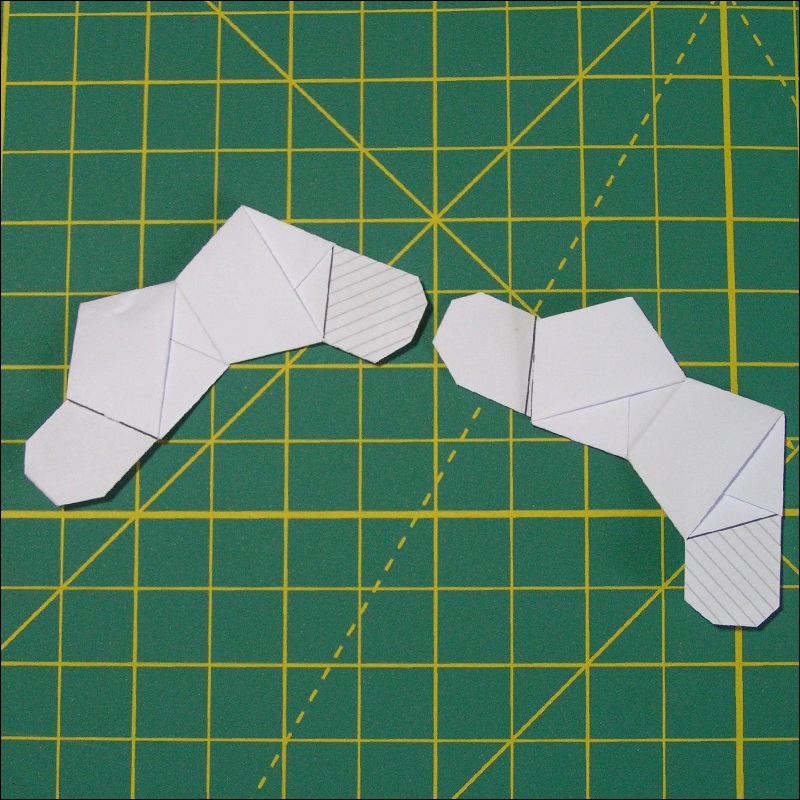 |
Fig.21: Step 6: Connect the 5-th unit click here to enlarge 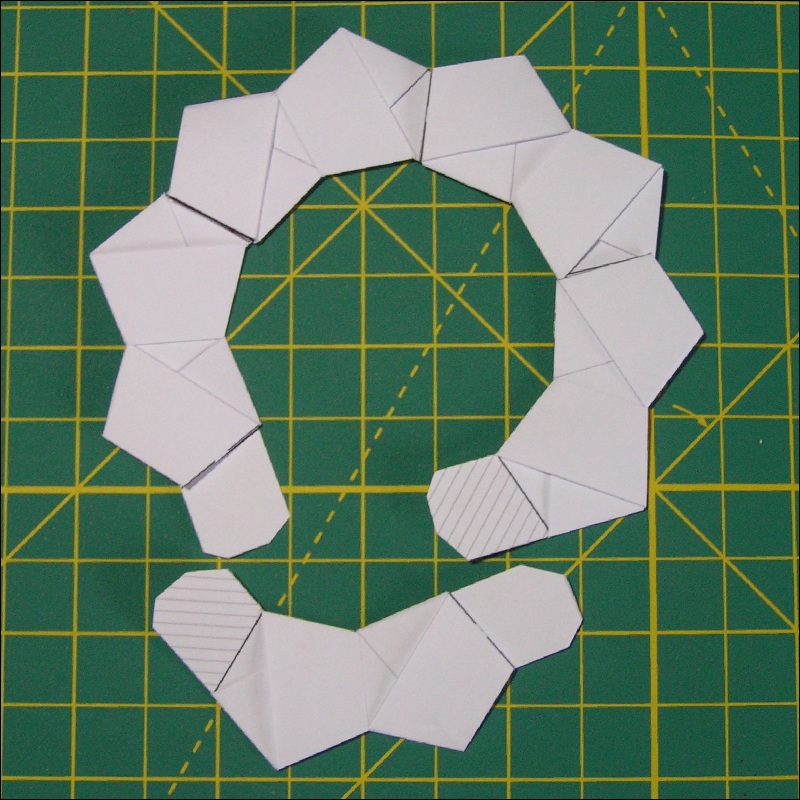 |
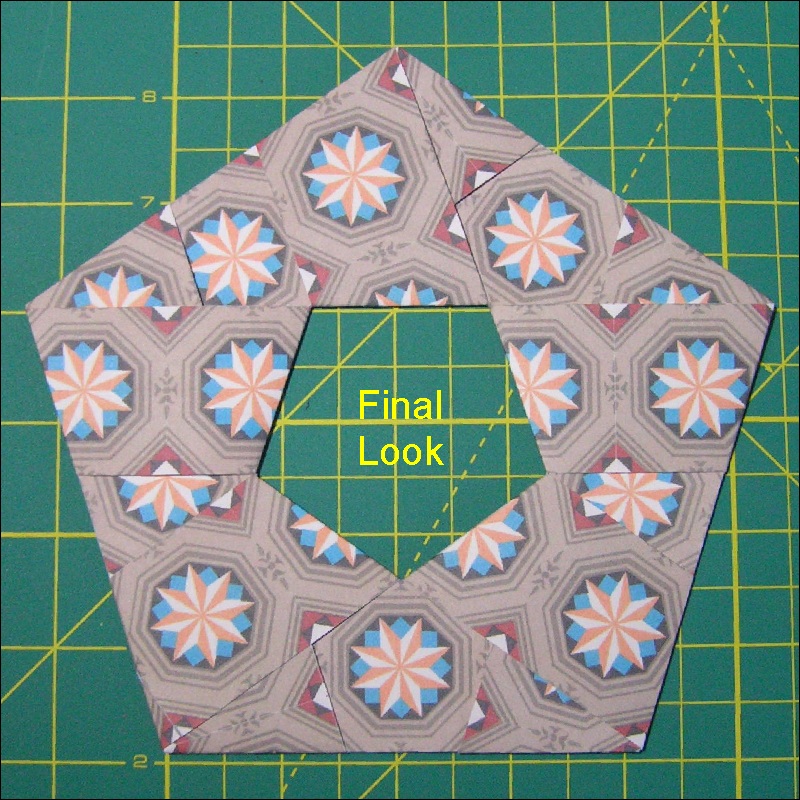
Fig.22: Final: Final look click here to enlarge |
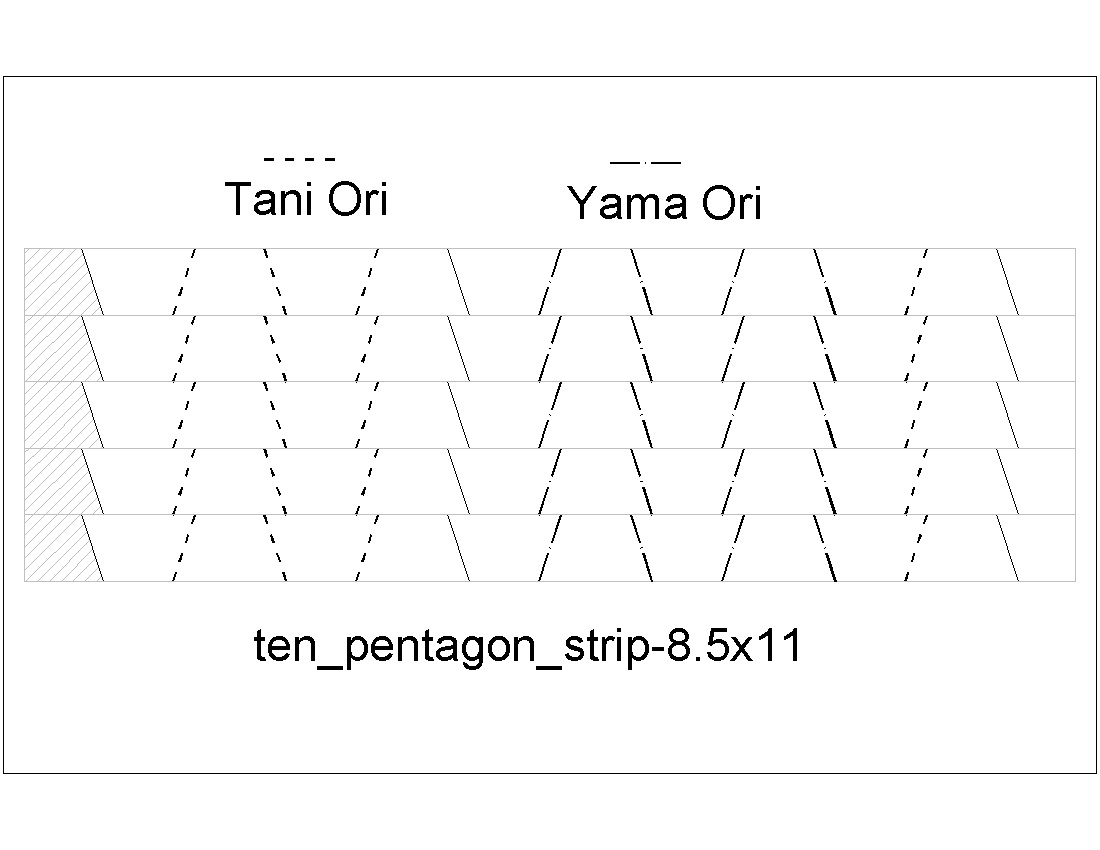
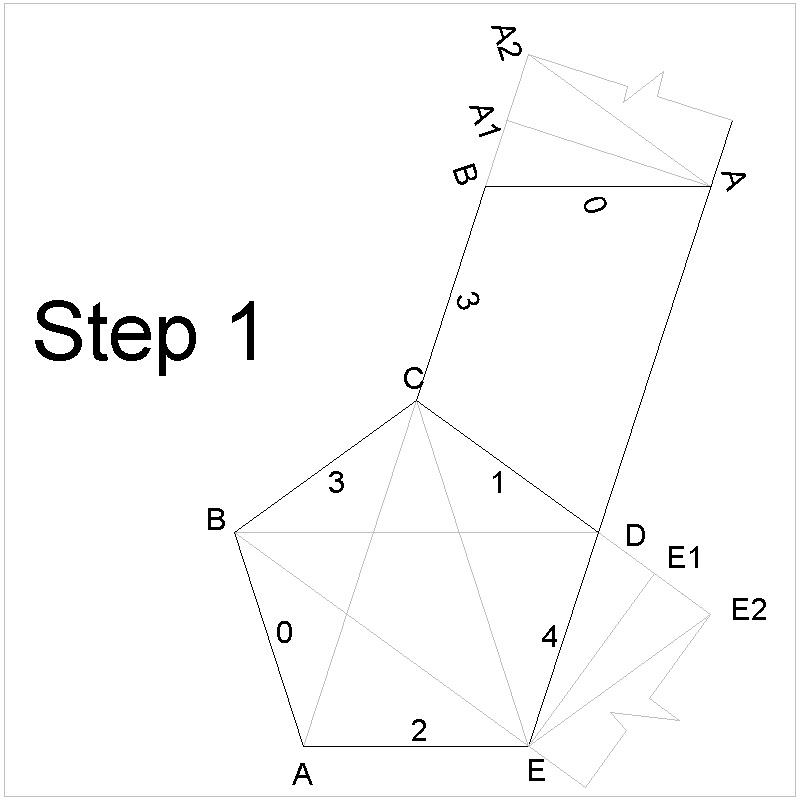
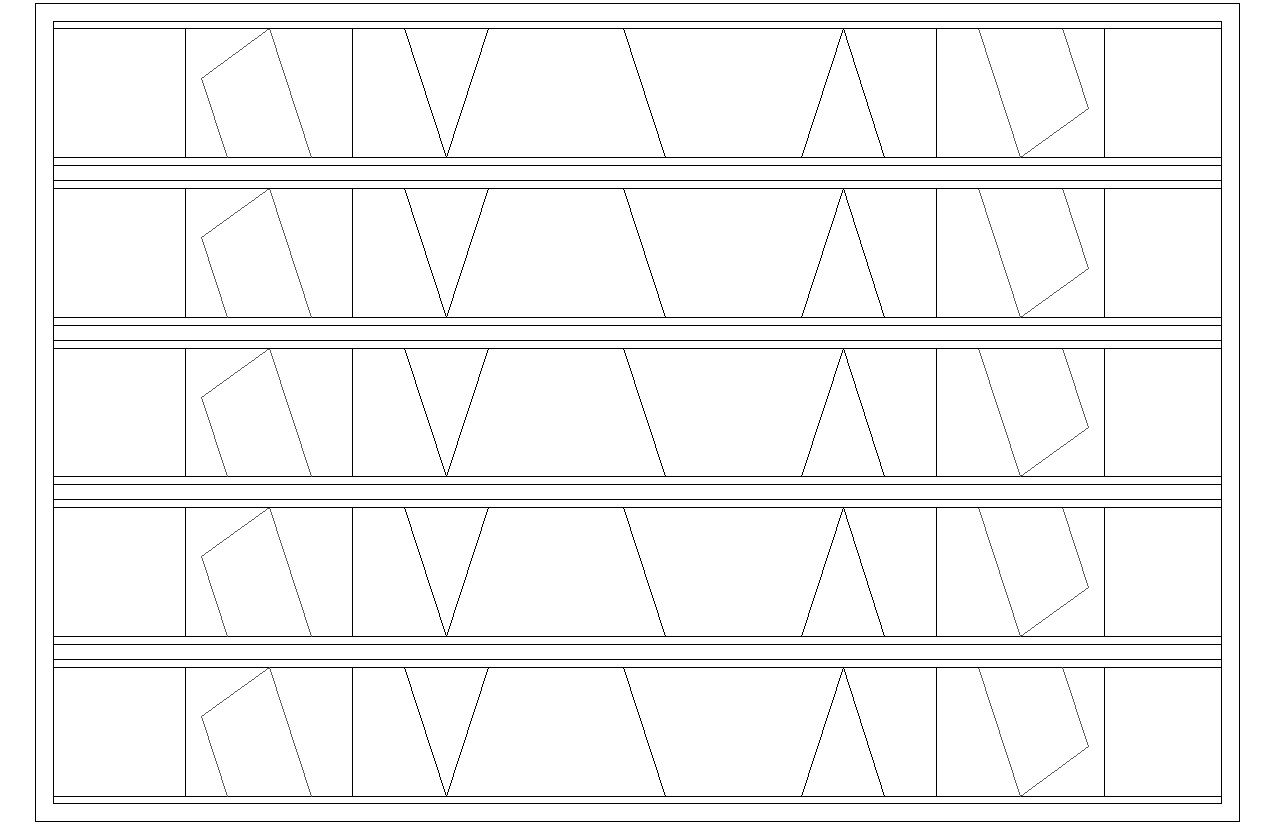
Step 1 Print out paper strip image shown in Fig. 15.
Mark the crease line by a ball point,then fold along the lines only locally.
"center" line is "Yama" ori ,and "dotted" line is "Tani" ori.
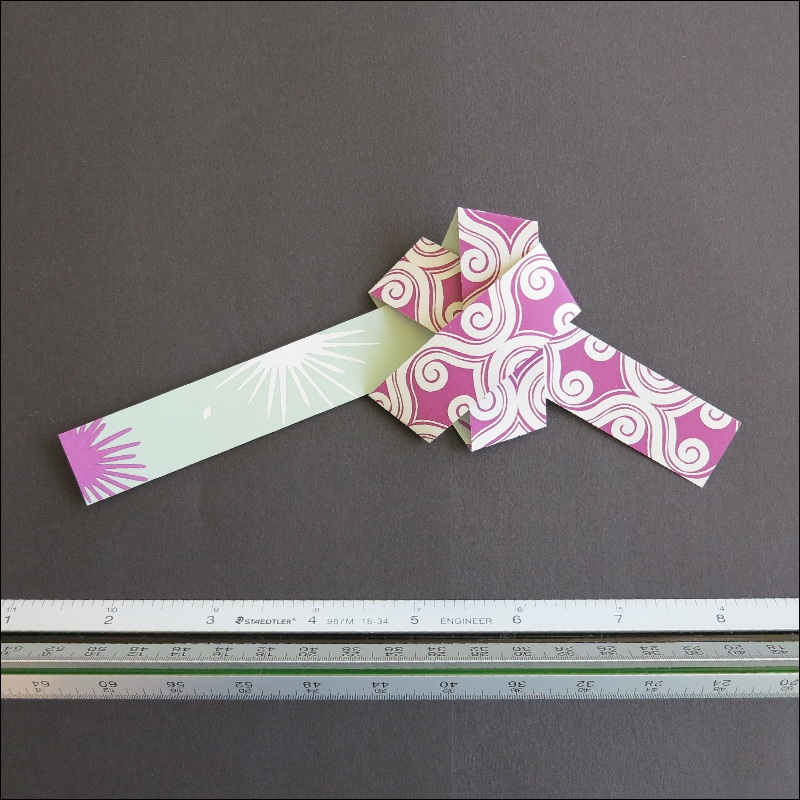
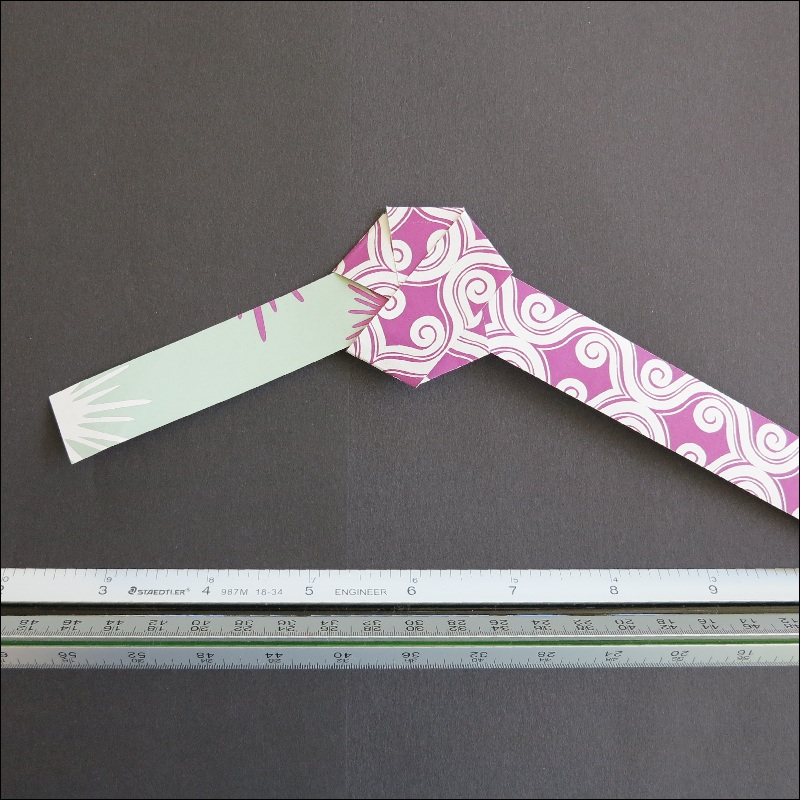
Step 2 Fold the right hand side. See Fig. 17.
Step 3 Put the LHS tape through the RHS pentagon's slot and pull it while holding right
hand side. (Fig. 18 )
Step 4 Make the left pentagon. Two pentagons unit is complete. (Fig. 19 )
Step 5 Repeat the process and make one more unit .(Fig. 20 )
Connect these 2 units by inserting into each other.
Step 6 Insert the final unit into 4 connected units . (Fig. 21)
|
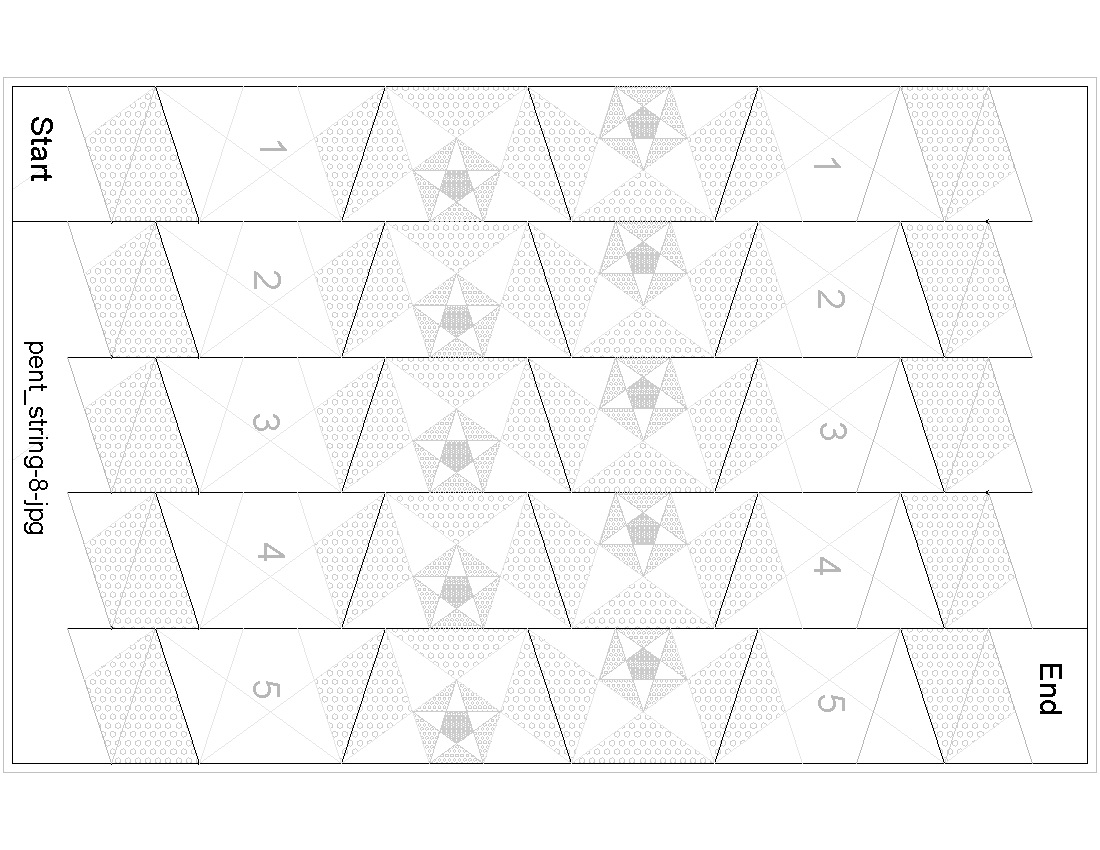
Fig.23-a: Paper Strings used #1 click here to enlarge Open PDF for print  |
Fig.23-b: Paper Strings used #2 click here to enlarge Open PDF for print 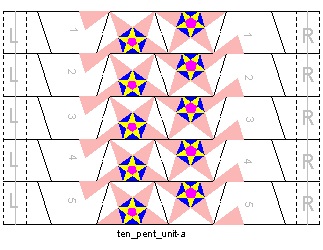 |
|
Fig. 24 Step 1: Make the "green"pentagon. click here to enlarge  |
Fig. 25 Step 2: Prepare the second strip. click here to enlarge 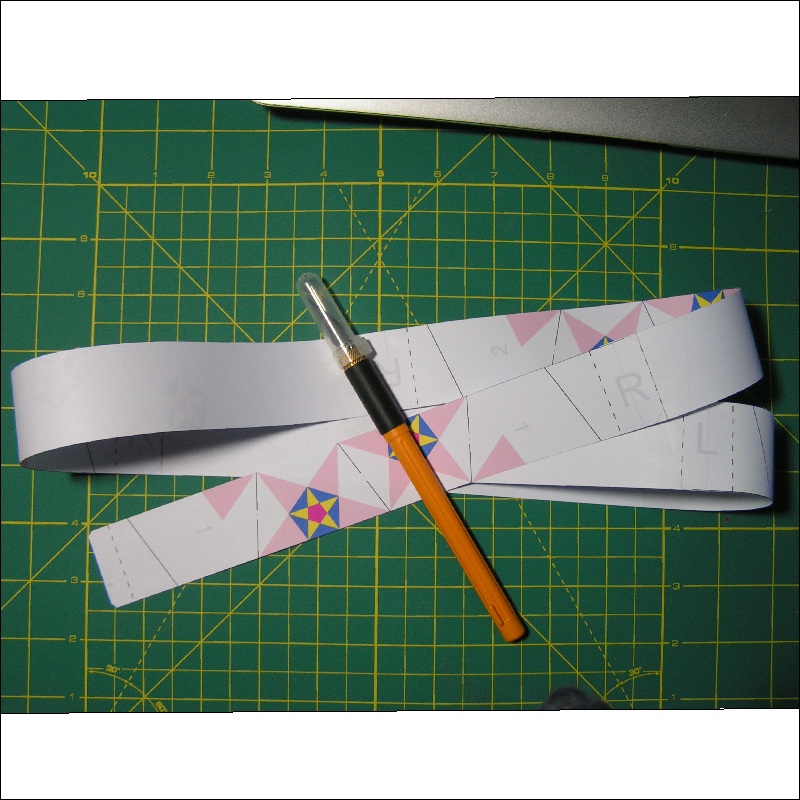 |
Fig. 26: Step 3-a: Insert short end strip click here to enlarge 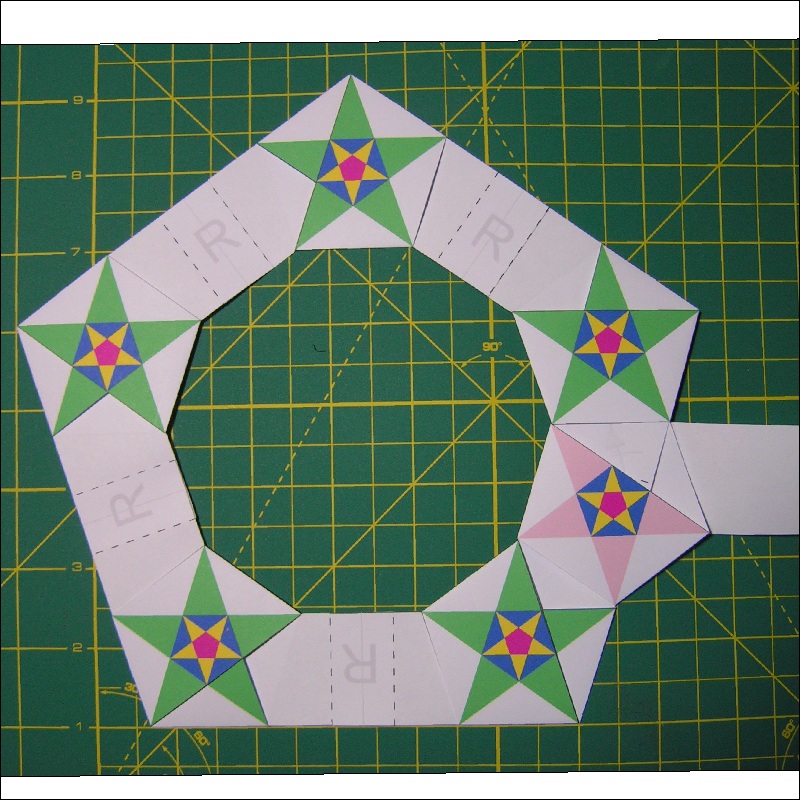 |
|
Fig.27: Step 3-b: Insert longer strip click here to enlarge 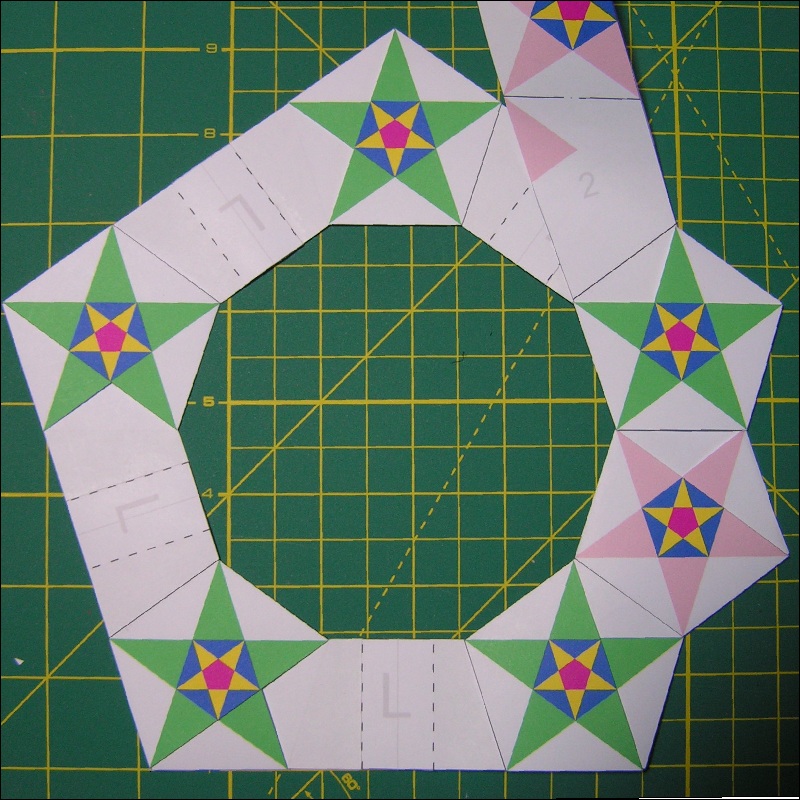 |
Fig.28: End: Final Look click here to enlarge 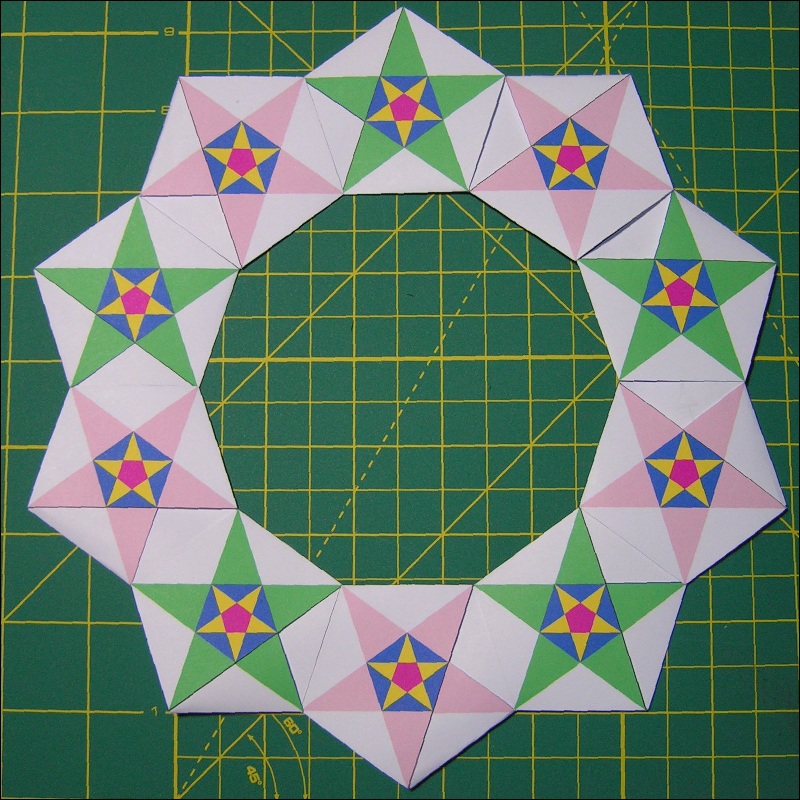 |
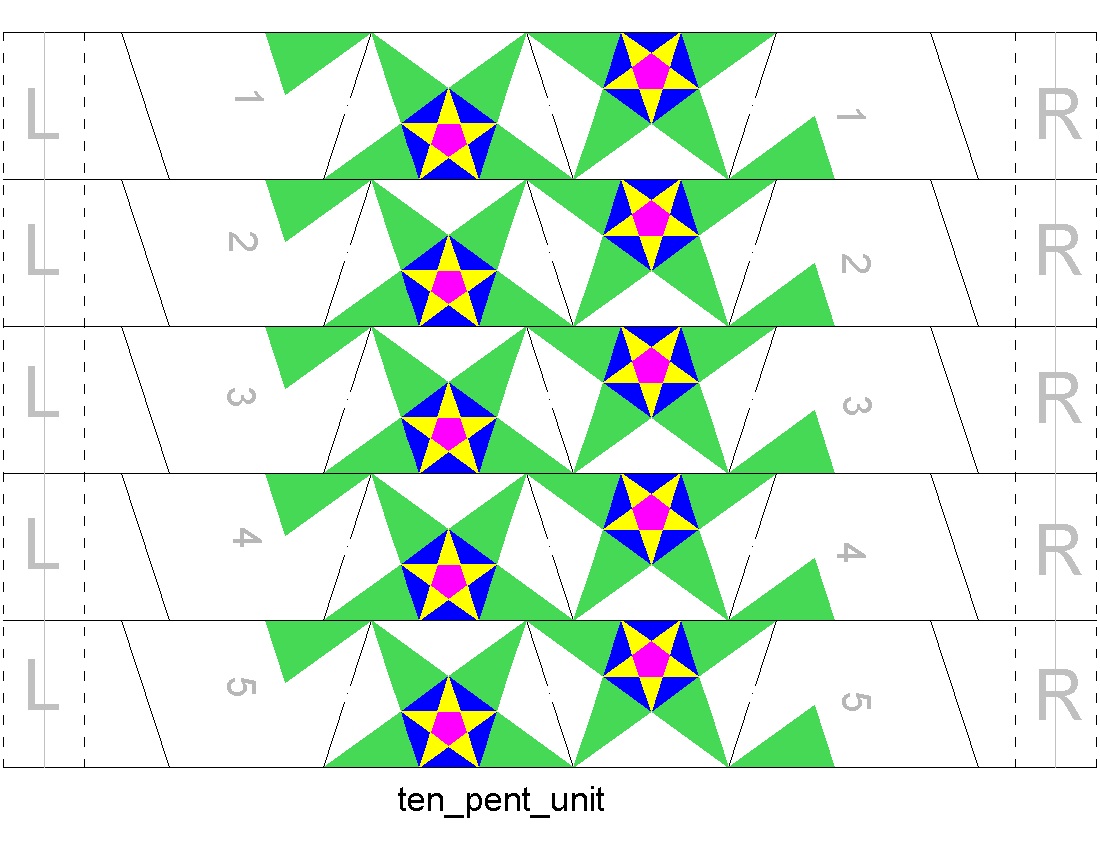
Step 1  After printing out Fig.23-a, connect 5 strips as it is done in the simple
       pentagon case.The difference is that there is a gap between pentagons.
       Then construct a pentagon ring as shown in Fig. 24. All the fold is "Yama-Ori".
       When properly done, the same letters ,either "R" or "L"  must show up
       between pentagons. The side of "R" is temporarily called the "front" face.
Step 2  After printing out Fig.23-b, connect 5 strips as it is done in step 1.
       See Fig. 25.
Step 3-a  Make crease lines on #1 section of the pink strip, and do Yama-ori.
         This will cover the space between "green" pentagons. Short end goes down
         the slot in the back face.(Fig. 26 )
Step 3-b  The longer strip will go upward through slots on the front face (Fig. 27).
Step 4  Repeat the step-3b process for the rest of the strip.
       The final look is as shown in Fig. 28.
|
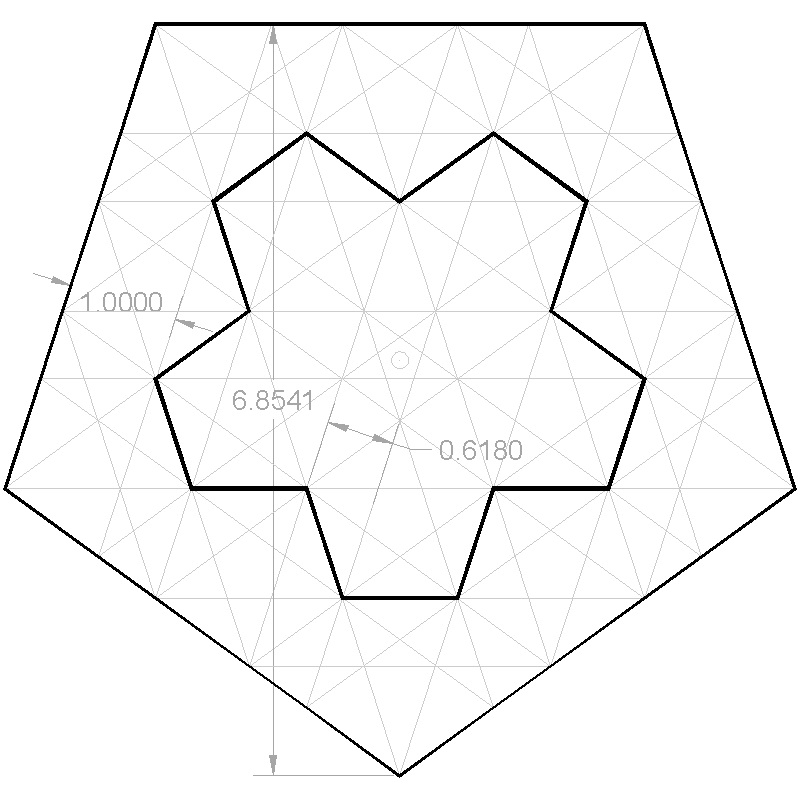
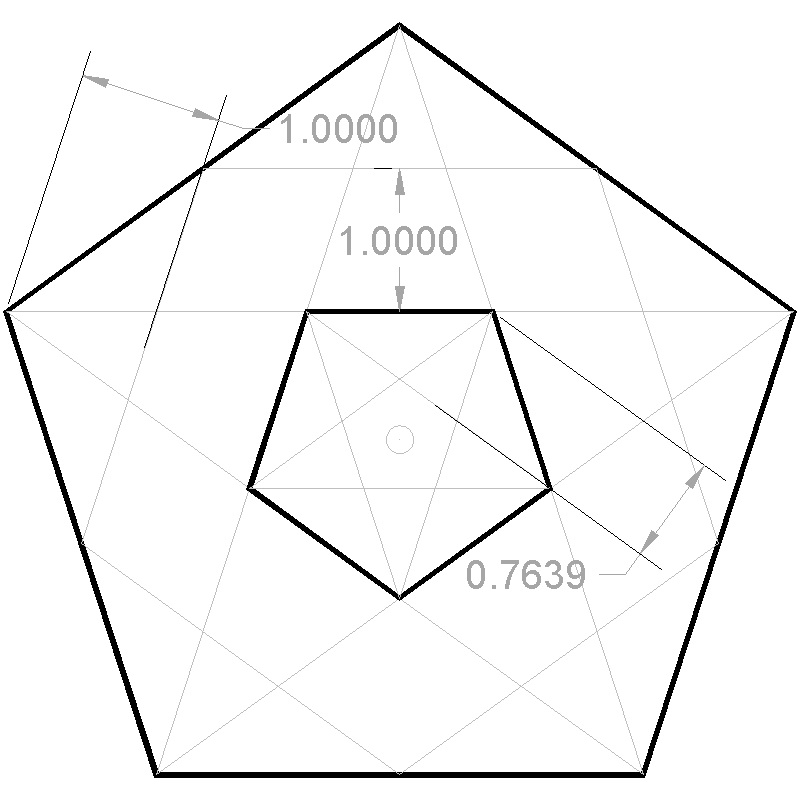
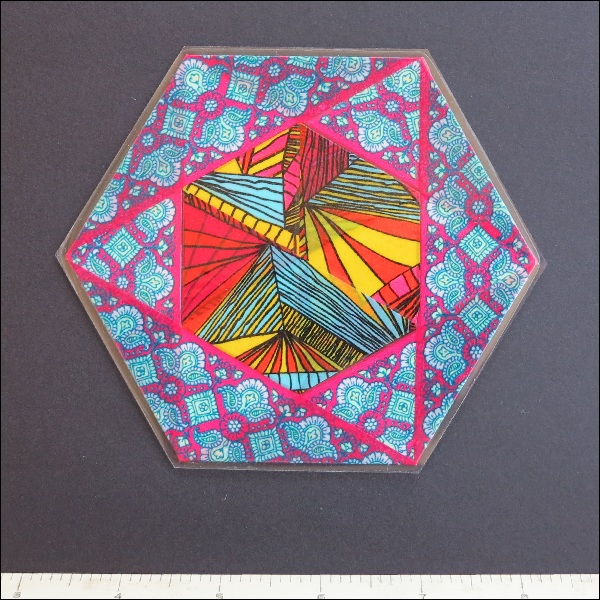
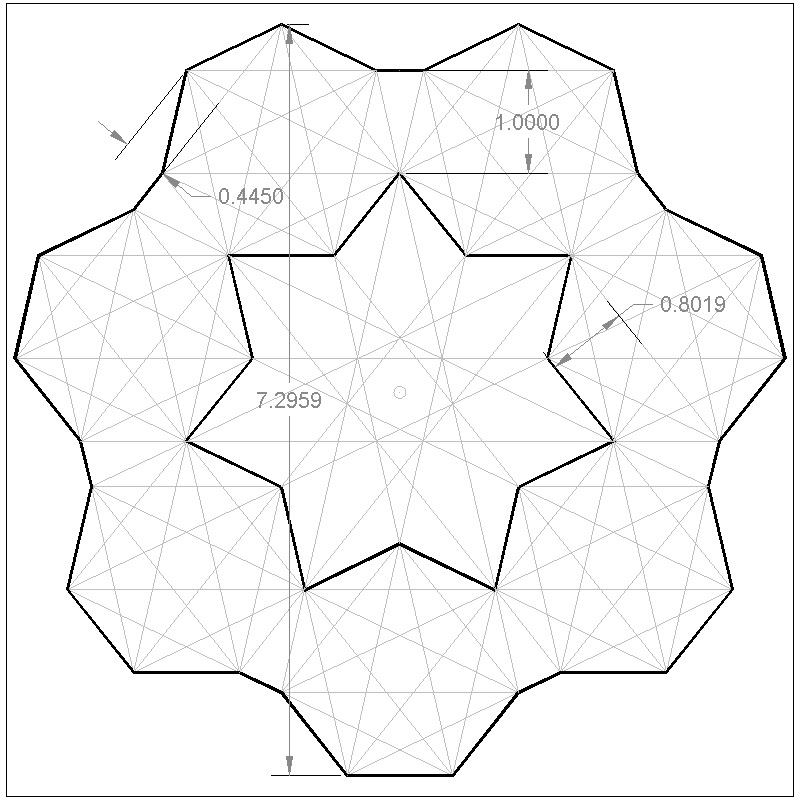
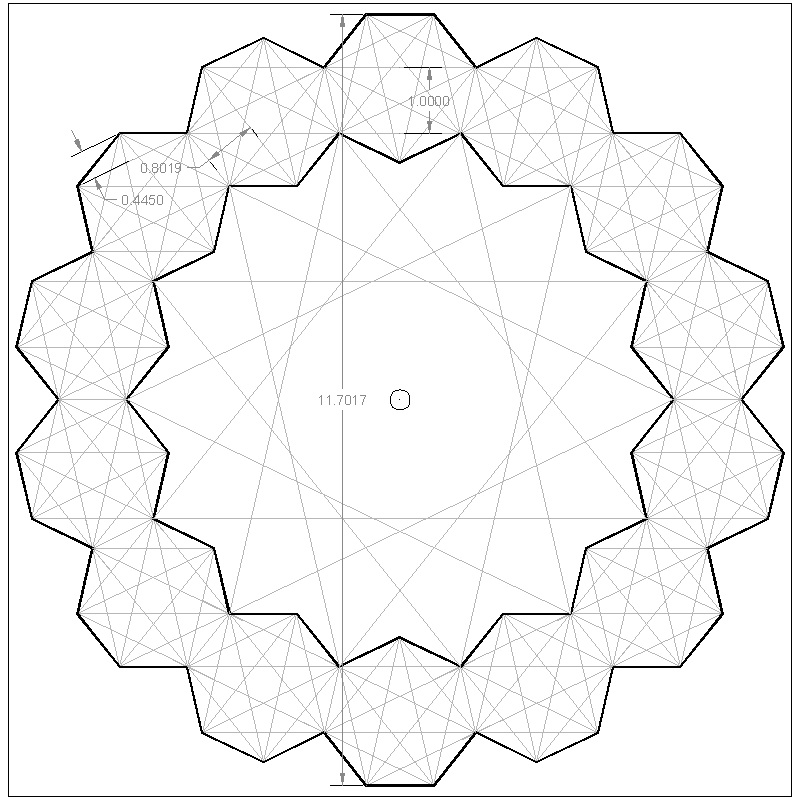
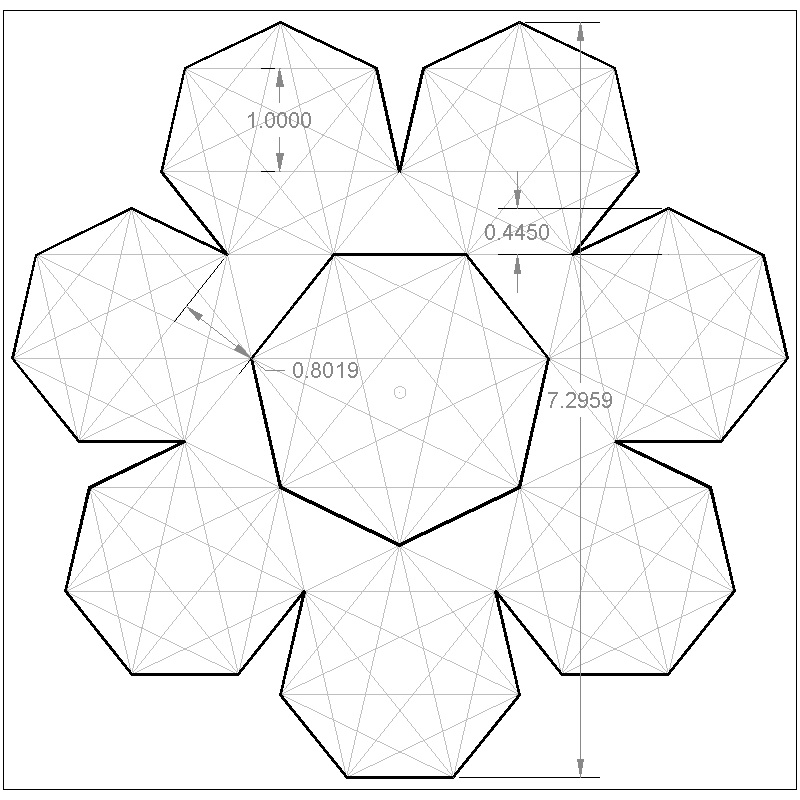
Fig.29: Regular Heptagon Case click here to enlarge 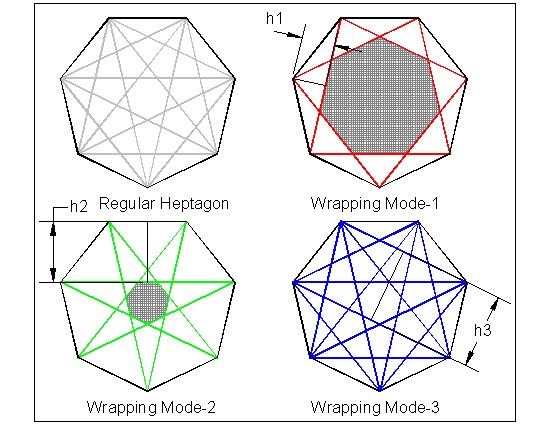 |
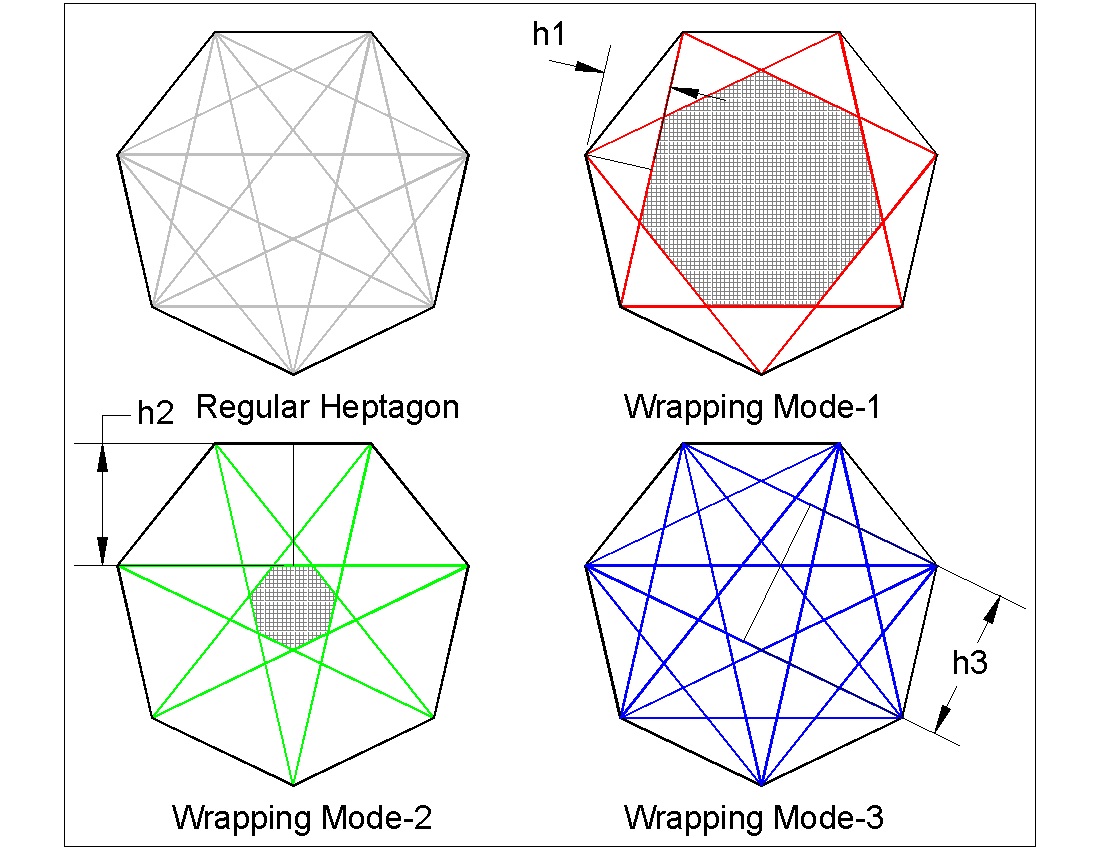
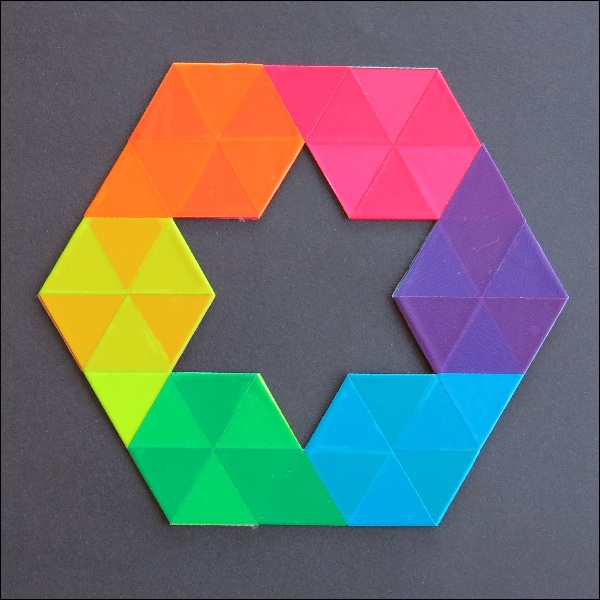
Let us consider how to wrap around general regular polygon by a constant width tape.
As an example, a regular heptagon as shown in Fig. 29 is chosen.
Each apex can be connected to other 3 apexes. Then observing the resulting network of lines,
it is easy to figure out that there are three different modes of tape wrapping.
Three tapes of width h1, h2 and h3 are used for this operation. The shaded areas in the
center are
the areas which is not covered by these tapes.
In general,
The number of modes for a given polygon 2x(N+1) , or 2xN+1 is N.
For example, a pentagon (N=2) , hexagon(N=2), heptagon(n=3),octagon(N=3), nonagon(N=4), etc.
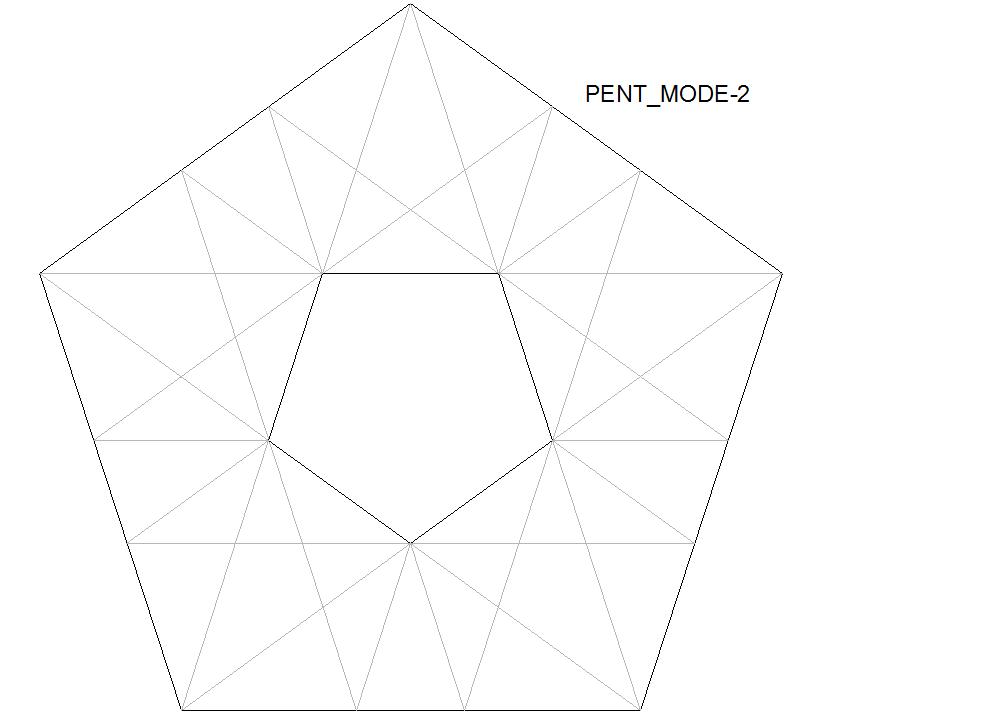
mode-1: made up of unit isosceles triangle including two sides of the polygon
mode-2: made up of unit trapezoid ,the top of which is the side of the polygon.
It is interesting to note that the simple exercise explained on the top of this article
can be constructed
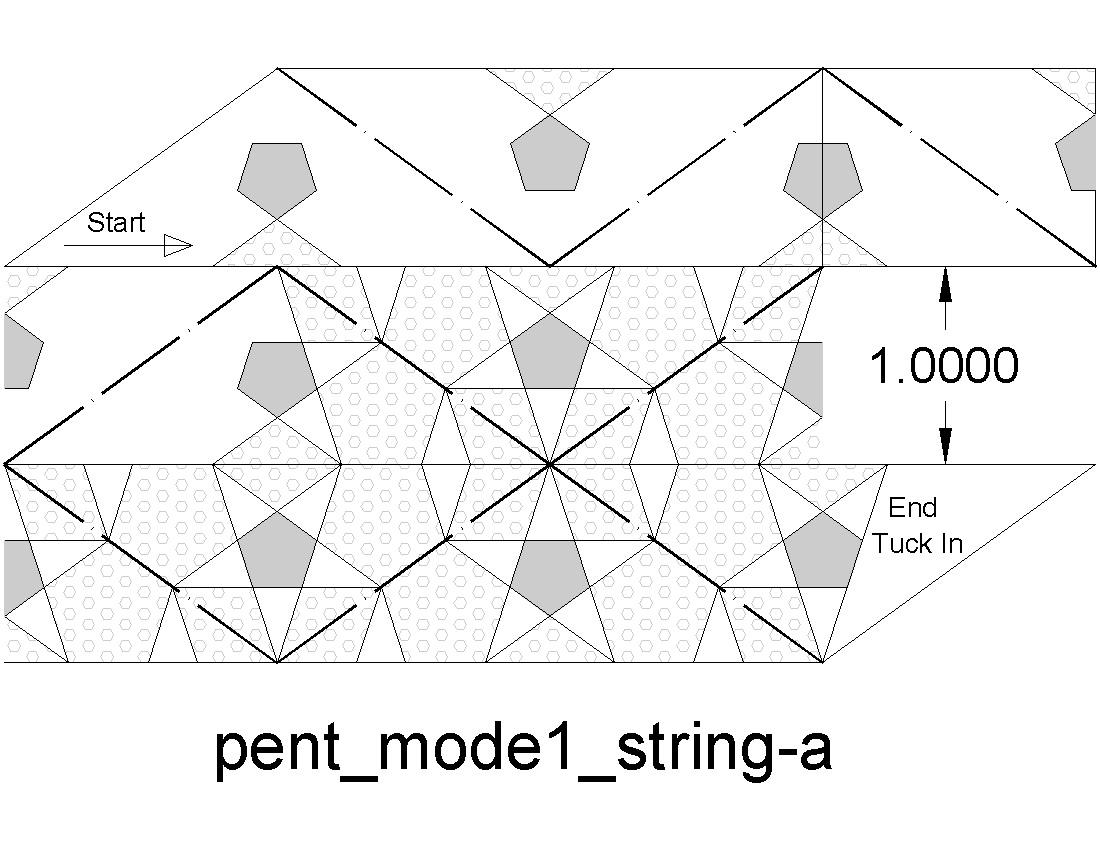
using mode-1 of the regular pentagon using the strip shown in Fig. 30.
|
Fig.30: Mode-1 String click here to enlarge Open PDF to print  |
Fig. 31: Resulting ring click here to enlarge 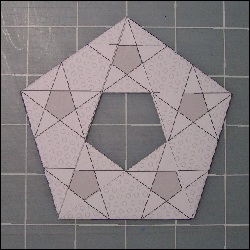 |
The final look of the pentagon ring is shown in Fig. 31. It is clear from this picture that
it is not easy to make the boundary of lines to line up to form a neat overall pattern.
The reason is obvious.
Basically what we are trying to do is squeezing one pentagon inside the same sized pentagon.
And it is not possible how thin the paper is.
Another sring pattern is tried using the string shown in Fig 32.
and its result , Fig. 33.
It was slightly easier to work on this, and the result looks a little better , but not much.
|
Fig.32: Mode-1 String click here to enlarge Open PDF to print 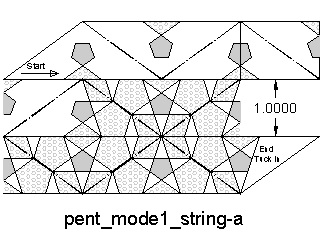 |
Fig. 33: Resulting ring click here to enlarge 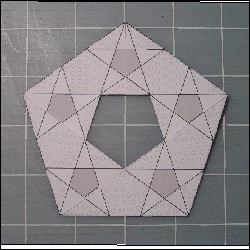 |
So the author came to the conclusion that " mode-1 " is not suitable to creating a nice
pre-designed
overall pattern. But this seemingly a futile effort gave a very interesting hint
for a new approach
to polygonal knots.
|
Fig. 34 Step 1-2: Template drawing Enlarge Print 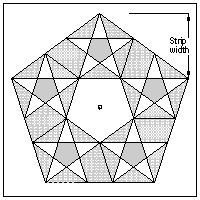 |
Fig. 35 Step 3: Print and cut-out template click here to enlarge  |
Fig. 36: Step 4: Prepare a tracing paper tape click here to enlarge 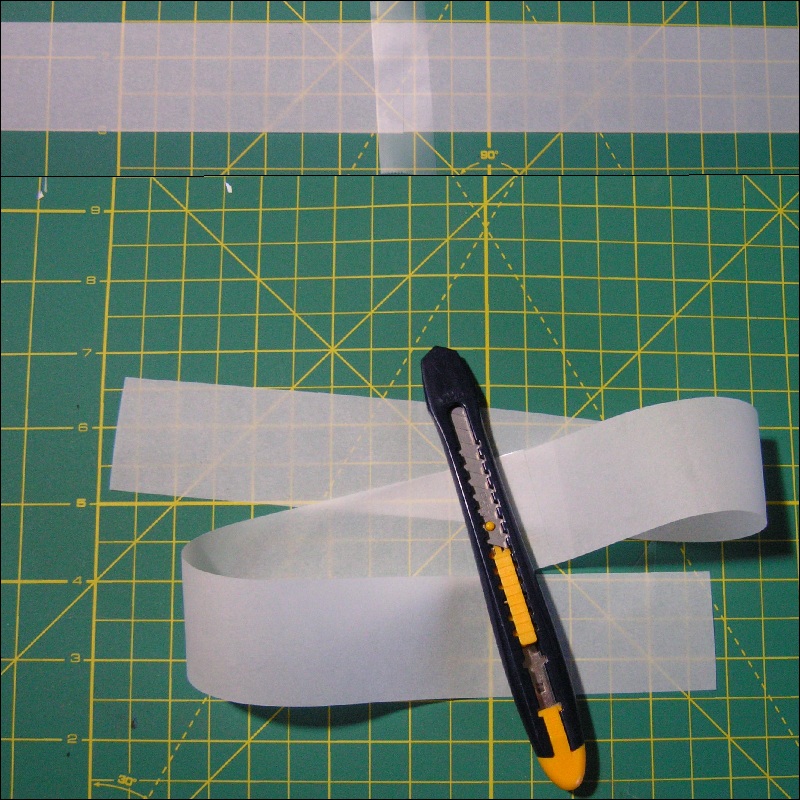 |
|
Fig.37: Step 5: Cover the template by tape click here to enlarge 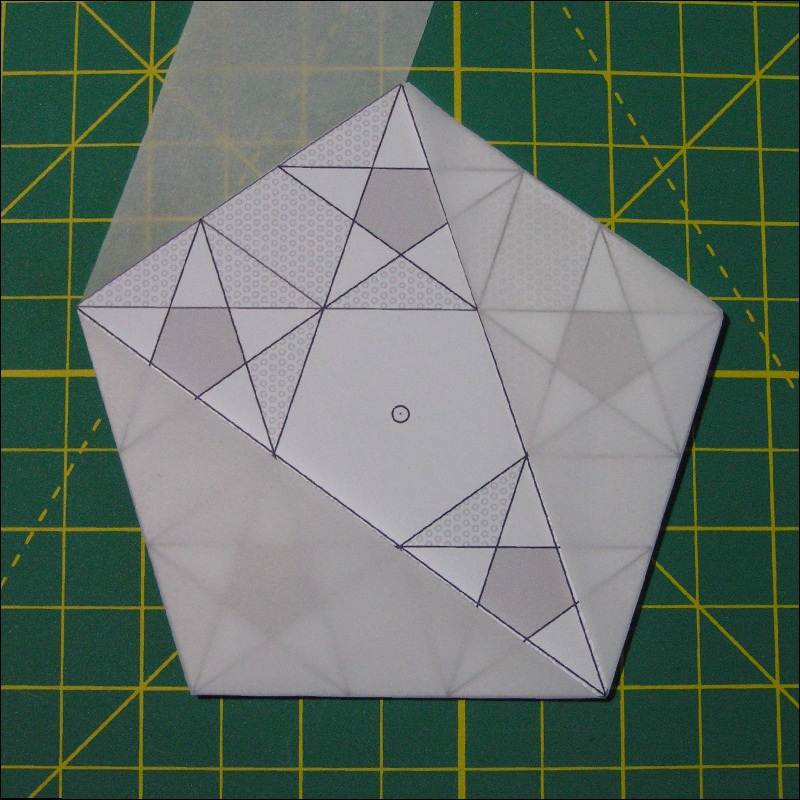 |
Fig.38: Step 6: Trace template's pattern click here to enlarge 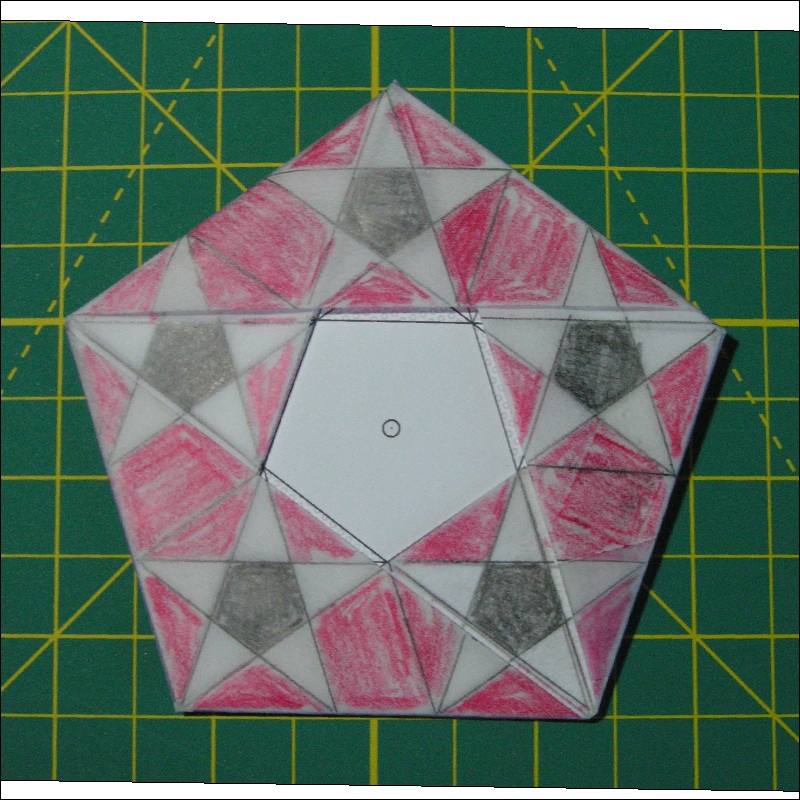 |
Fig.39: Final: Unfold the tracing paper tape click here to enlarge 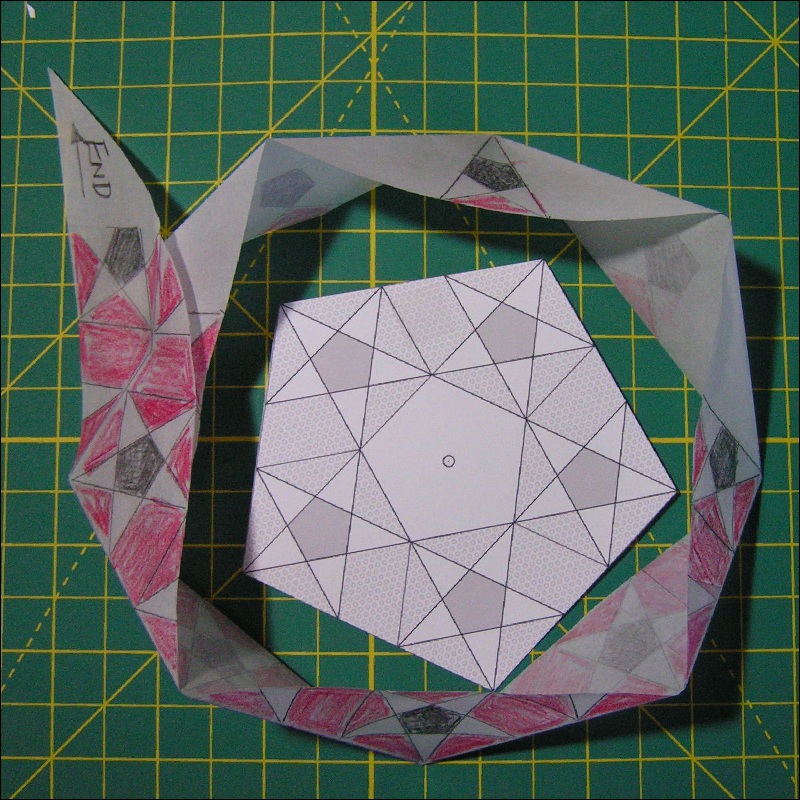 |
1. Printout Fig. 34 with hatching and solid border lines with the scale factor 1.5.
   In the drawing the strip width is set to a unit value,so the strip width is
   1.5 inch when printed out.
   Paste this onto any paper of higher weight index (around 60 ~ 100 lbs.).
   Cut out the pentagon. Now we have a thick pentagon template. (Fig. 35)
2. Cut out strips of 1.5 inch wide using "tracing paper" and connect them into a strip
   long enough to cover this pentagon 2 times around by MODE-1. (Fig. 36)
3. Using the tape, wrap around the template.  At the start and end of this process,
   "double sided tape" is used because the tape must be peeled off at the later step.
   Fig. 37
4. Now draw lines on the tracing paper strips.
   For the hatching,  use colored pencils. (Fig. 38)
5. When boundary lines and hatching are marked, peel off string. (Fig. 39)
6. Using this tape as a reference, make folding strip drawing using your favorite CAD
   software  The author used AutoCAD R-2013 , but any software package is fine.
   Drawing of Fig. 30 is created in this manner, and Fig. 32 is a modification based
   on Fig. 30.
2. Trials:
mode 1
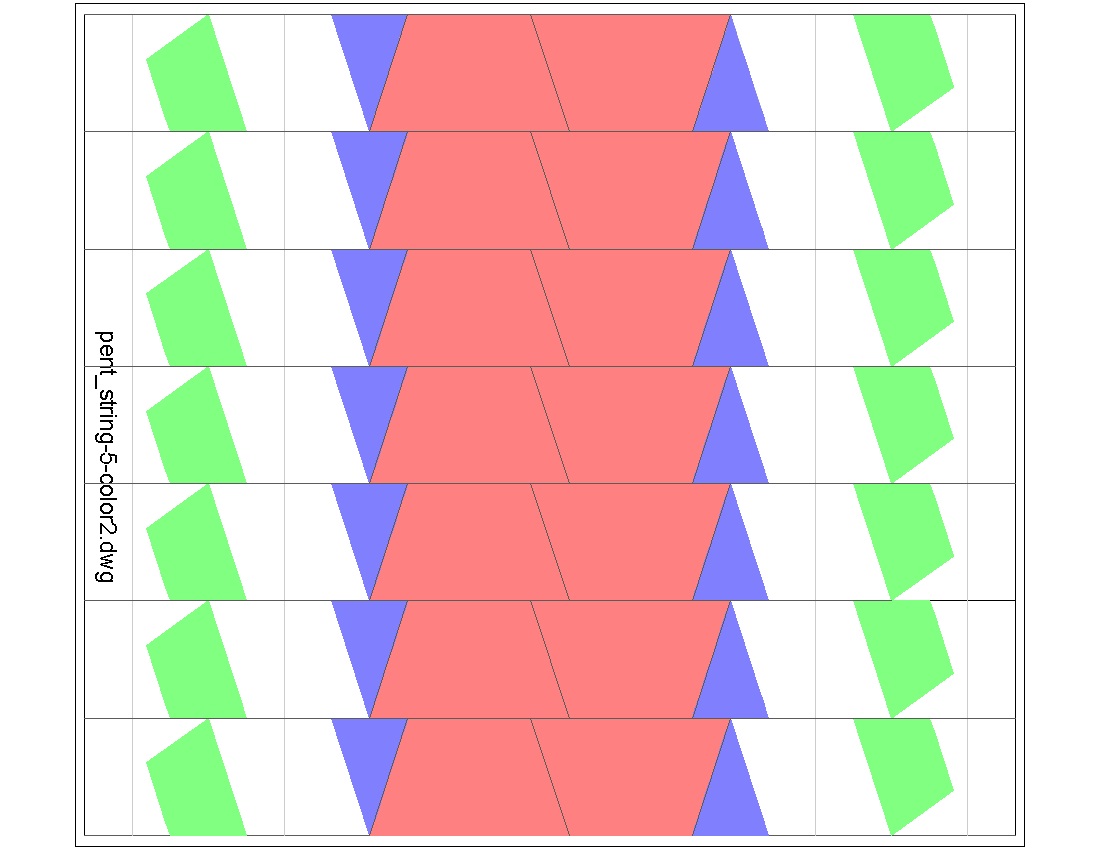
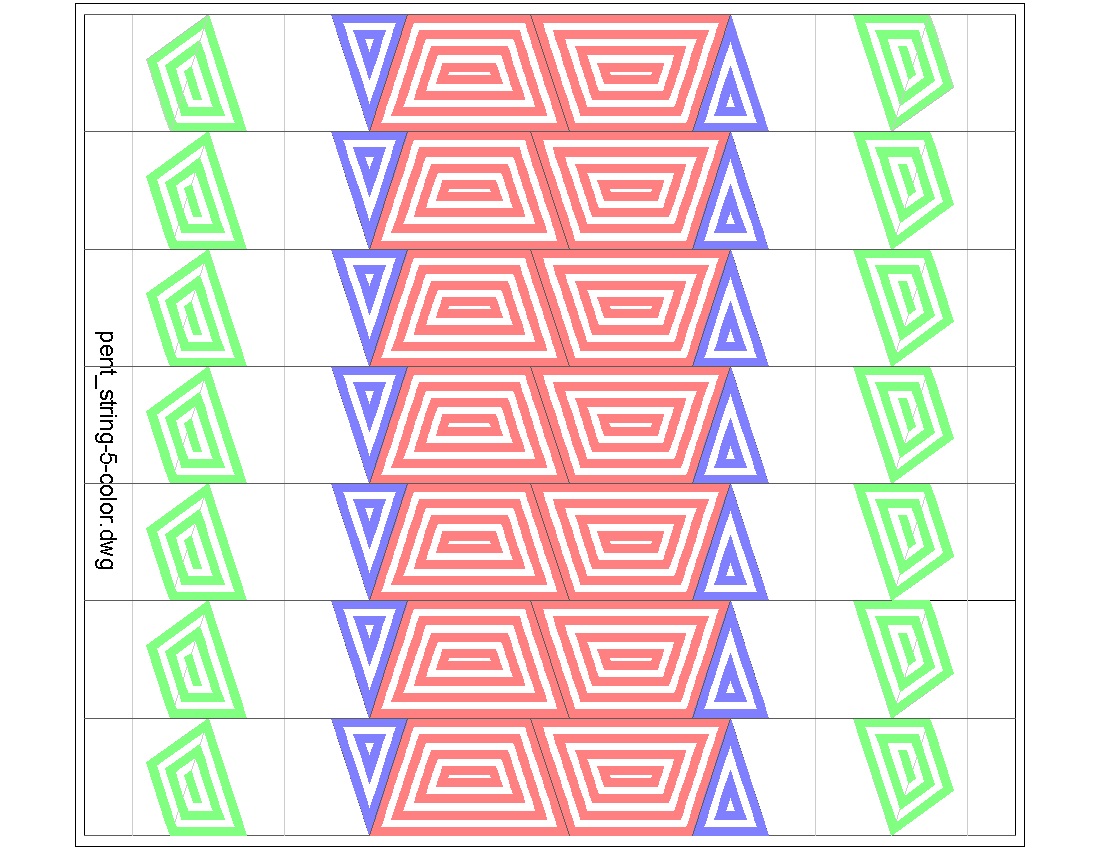
Let us replace the tracing paper in step 4 by a synthetic decorative adhesive tape, and
custom made tape with repeating patterns,width of which are the same 1.5 inch.
They are shown in Fig. 40, and the results , Fig. 41 , 42 below .
|
Fig.40: Strips used click here to enlarge  |
Fig.41: Adhesive tape case click here to enlarge 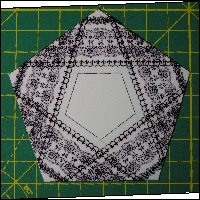 |
Fig.42: Paper tape case click here to enlarge  |
--Mode 2--
Preparation of a template and its matching tape
If we watch carefully at Fig.4 & 5, and reverse the process from Fig. 4 to Fig. 5
backward,we can make a pentagon ring.
The process goes this way.
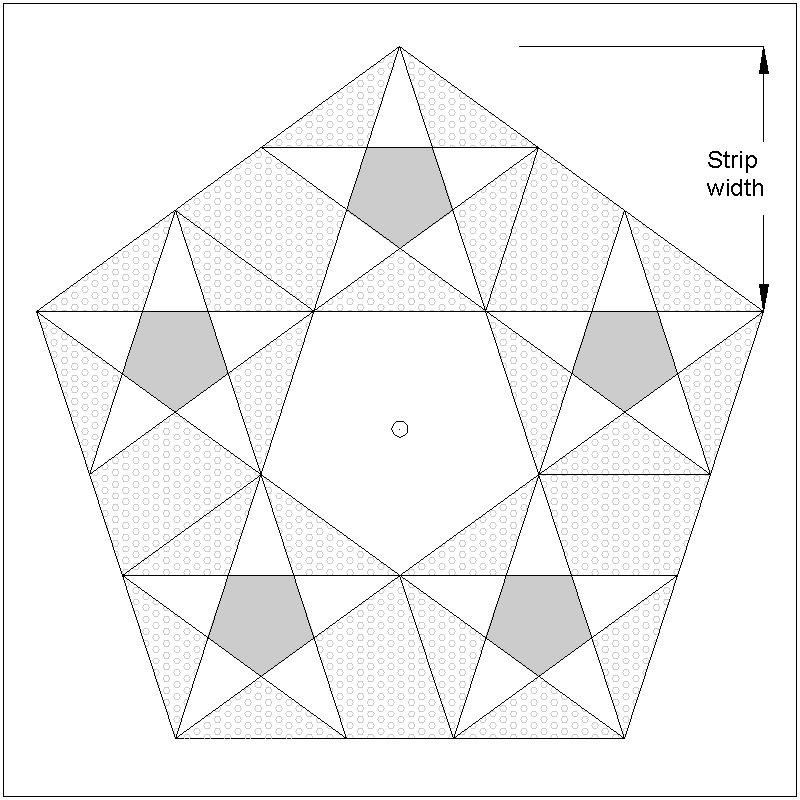
step 1: print the pentagon ring drawing (Fig. 43), and paste it onto a thick piece
of paper.The paper width in the drawing is set to one unit, so if the scale
factor is 1.5,this ring require a strip of 1.5 inch wide.
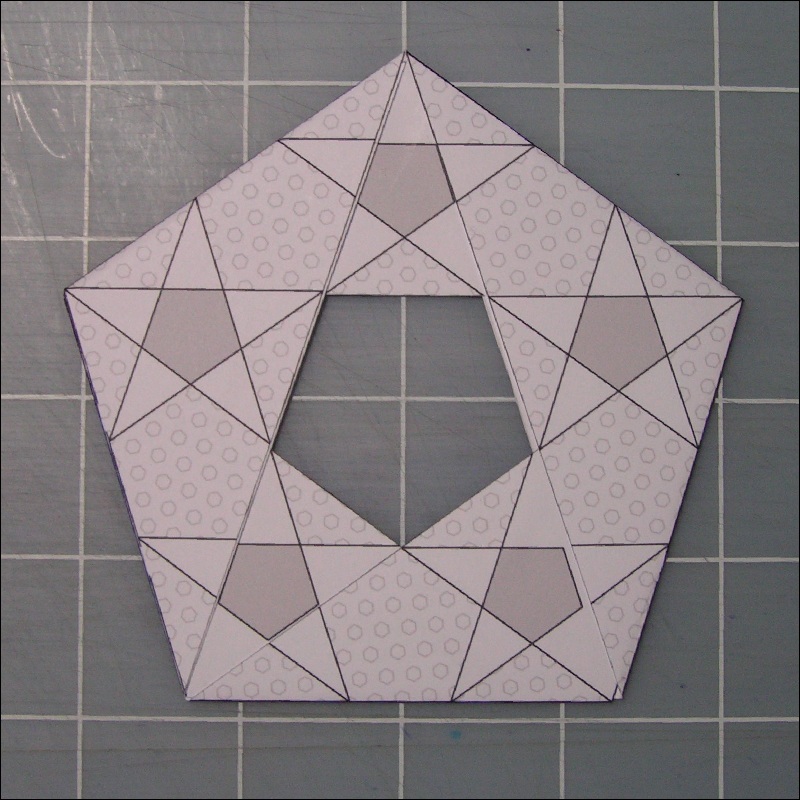
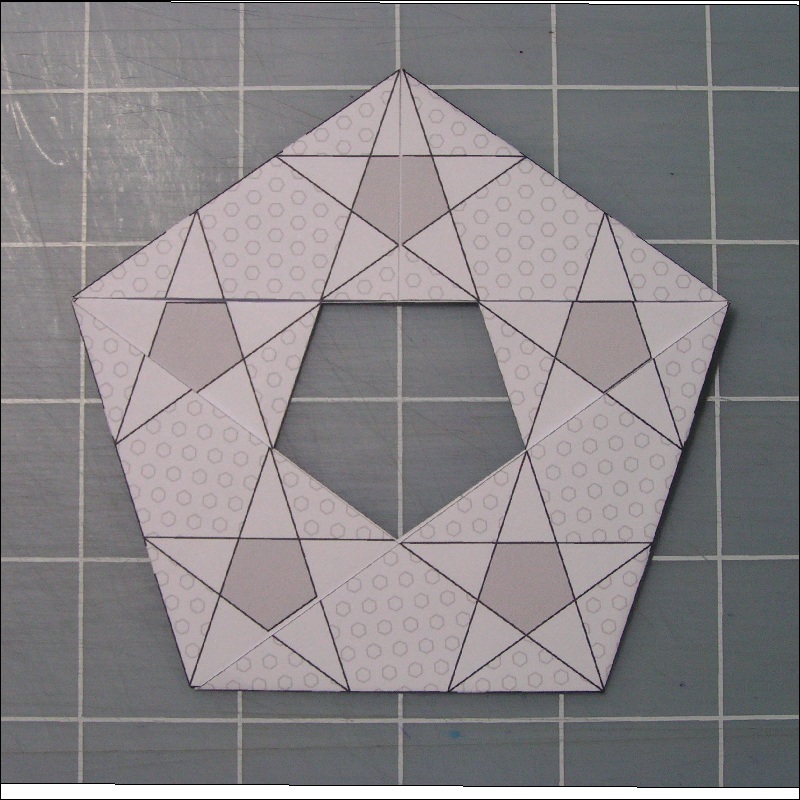
step 2: Cut along the inner & outer boundary lines, and make a template. (Fig. 44)
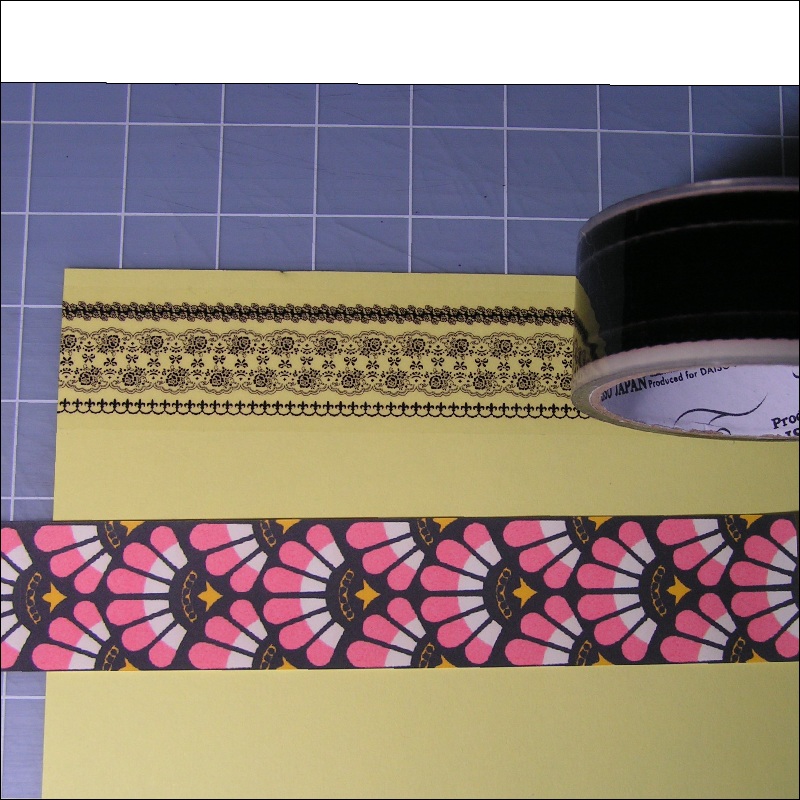
step 3: Print out the paper tape pattern drawing . The width of the strip is set to
1.0 , so print out with scale factor of 1.5. (Fig. 45)
Note: The total length of tape = 39.9 X tape width
|
Fig.43: template used click here to enlarge Print PDF 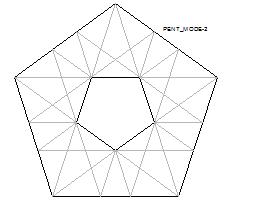 |
Fig.44: Cut out template click here to enlarge 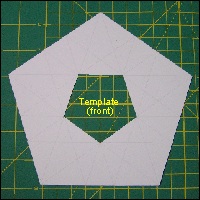 |
|
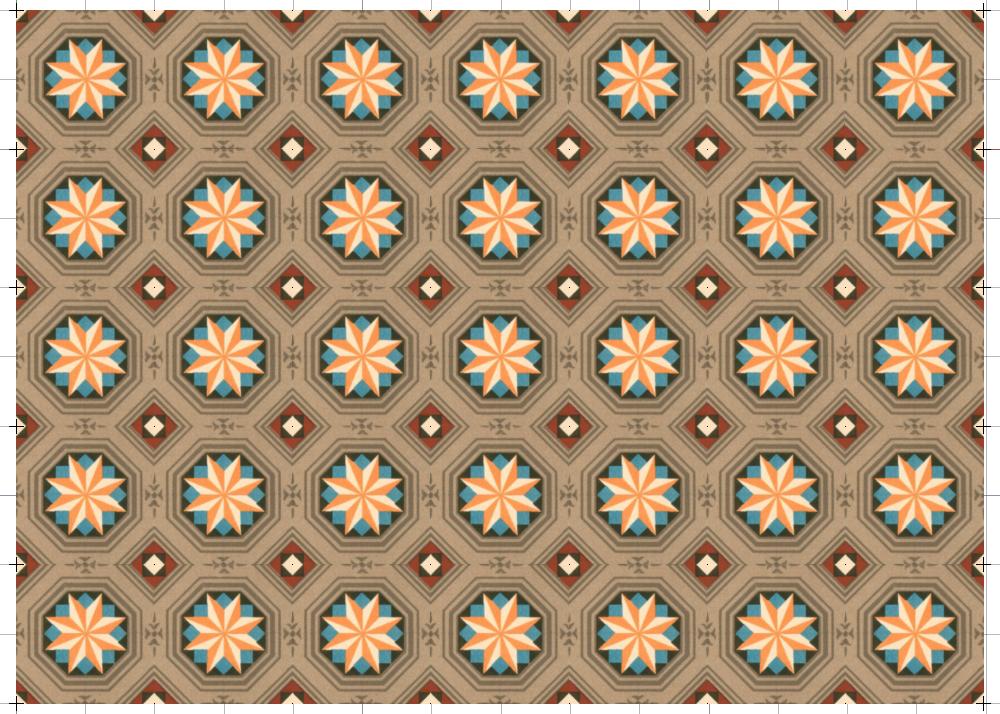
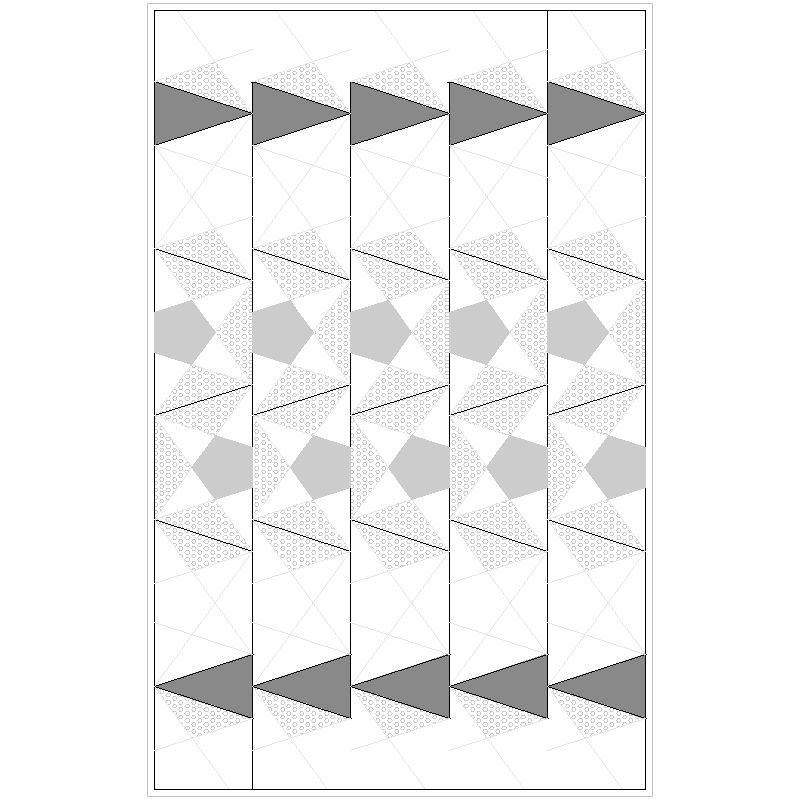
Fig.45: Image pattern used click here to enlarge open PDF to print 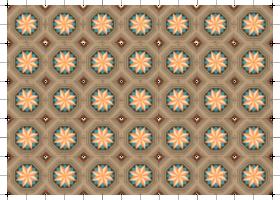 |
Fig.46: Strip used click here to enlarge 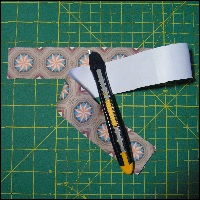 |
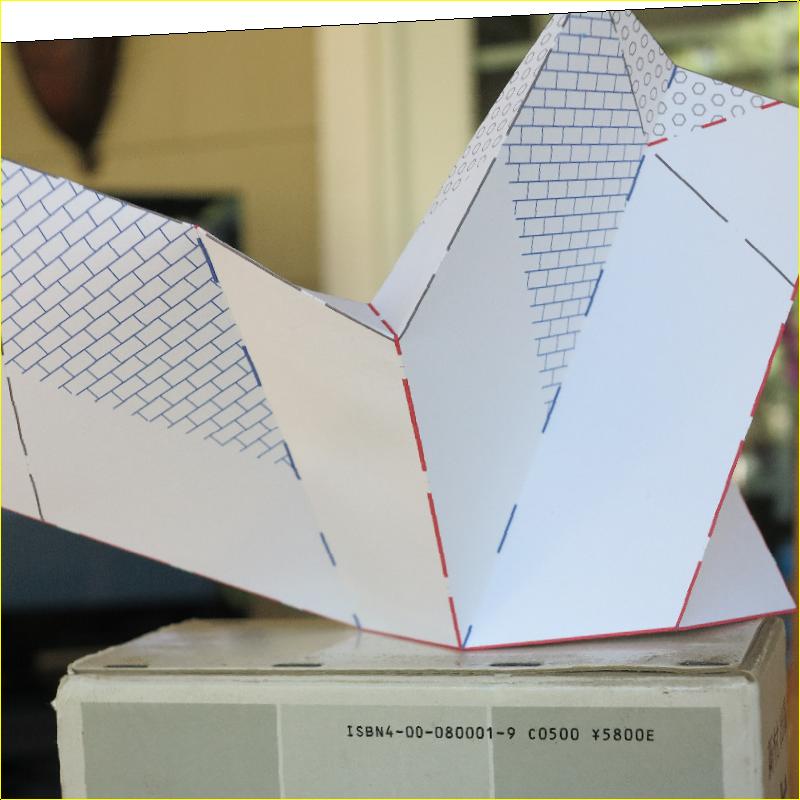
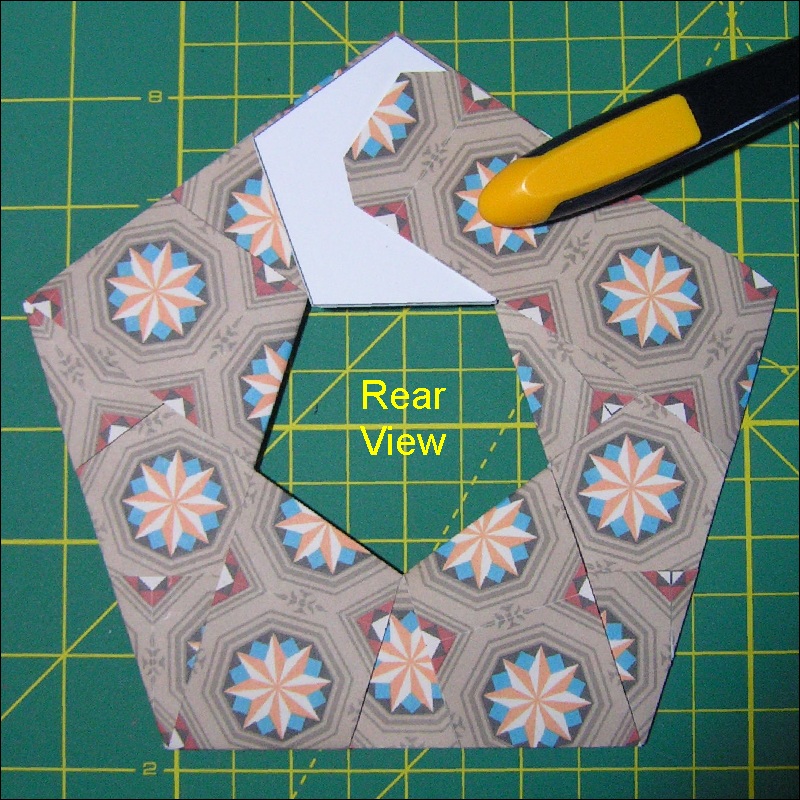
Folding Process
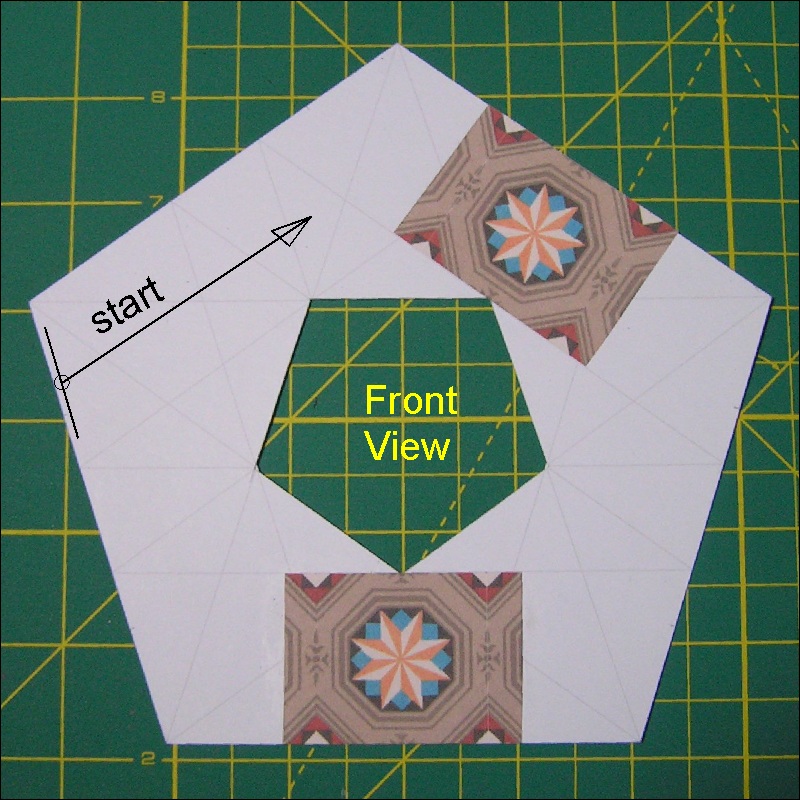
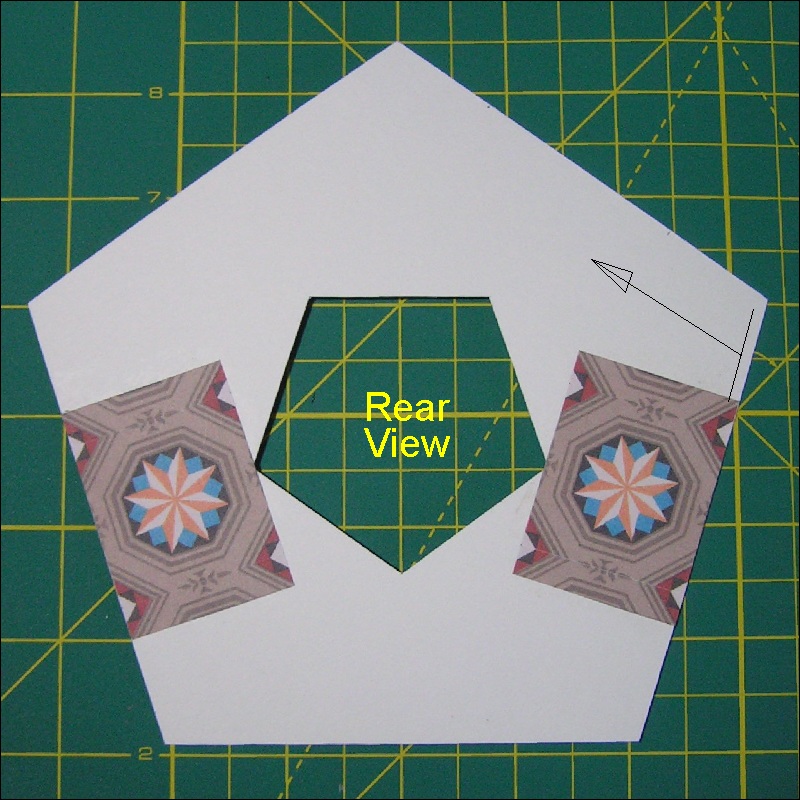
step-4 Before the folding begins, a few tricks must be applied.
Triangle areas between corner pentagons must be covered by short pieces
of the strip. Front and rear views are shown in Fig. 47 & 48.
There is a reason for this operation.
For details, refer to Tape Weaving Section.
|
Fig.47: Template-Front View click here to enlarge 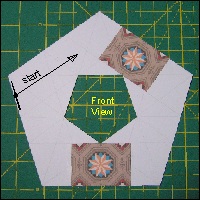 |
Fig.48: Template-Rear View click here to enlarge 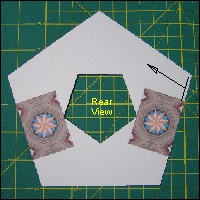 |
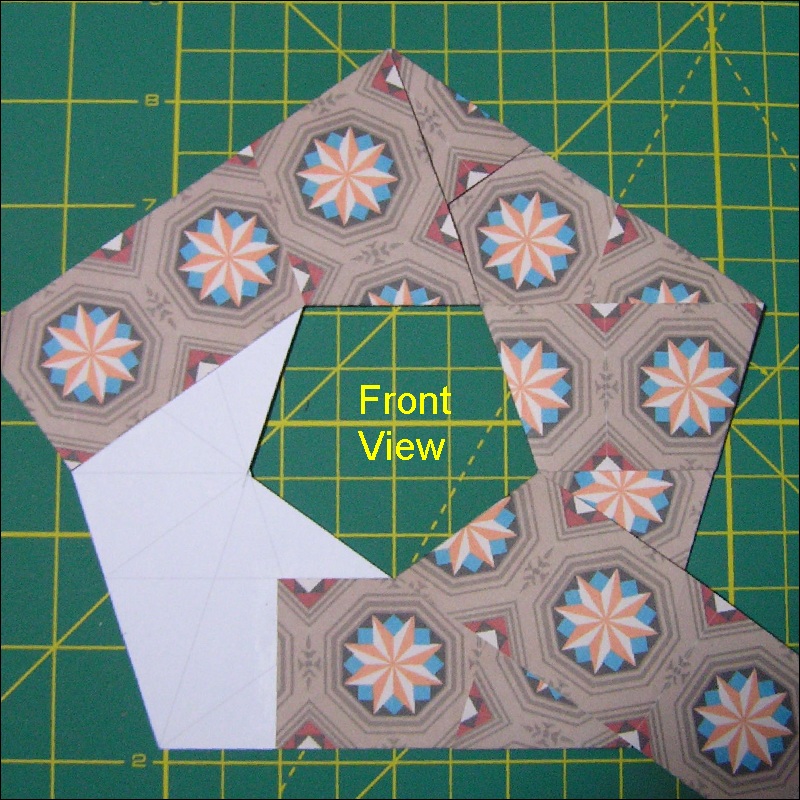
Fig.49: Start Folding click here to enlarge 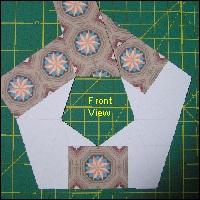 |
|
Fig.50: Folding at half way point click here to enlarge 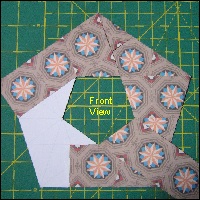 |
Fig.51: Handling of the end piece click here to enlarge 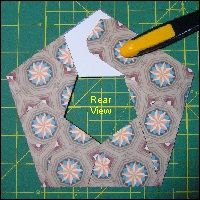 |
Fig.52: End of Folding click here to enlarge 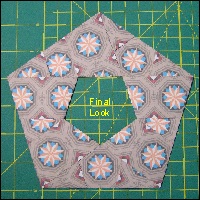 |
|
Start click here to enlarge 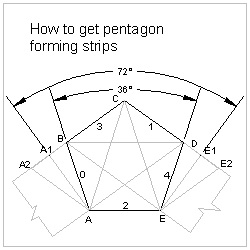 |
Step 1 click here to enlarge 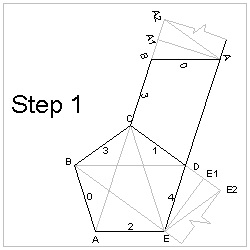 |
Step 2 click here to enlarge 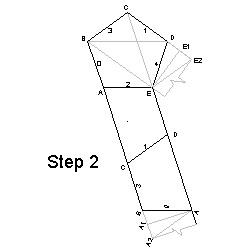 |
Step 3 click here to enlarge 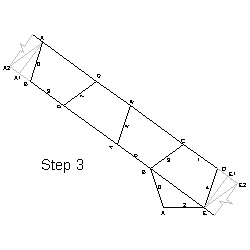 |
|
Unit strips click here to enlarge 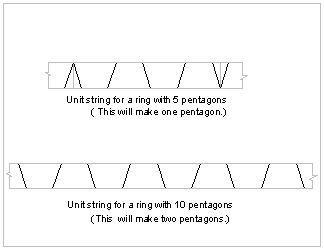 |
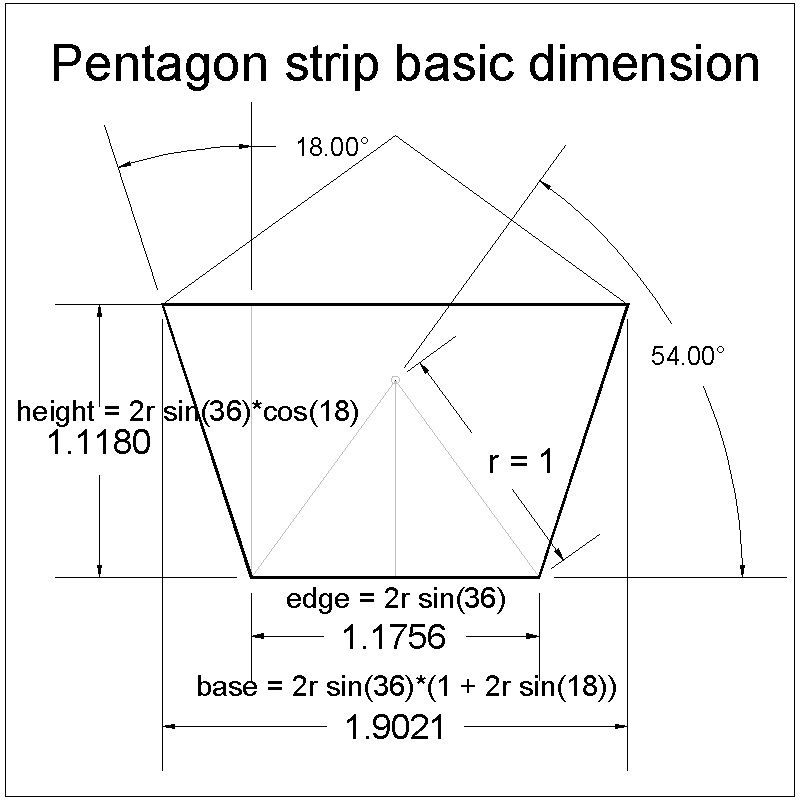
Geometry of basic element click here to enlarge  |
|
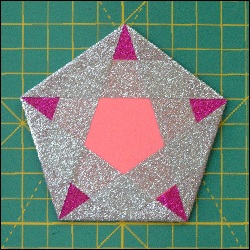
Pentagon Case #1 click here to enlarge click here to see the paper strip 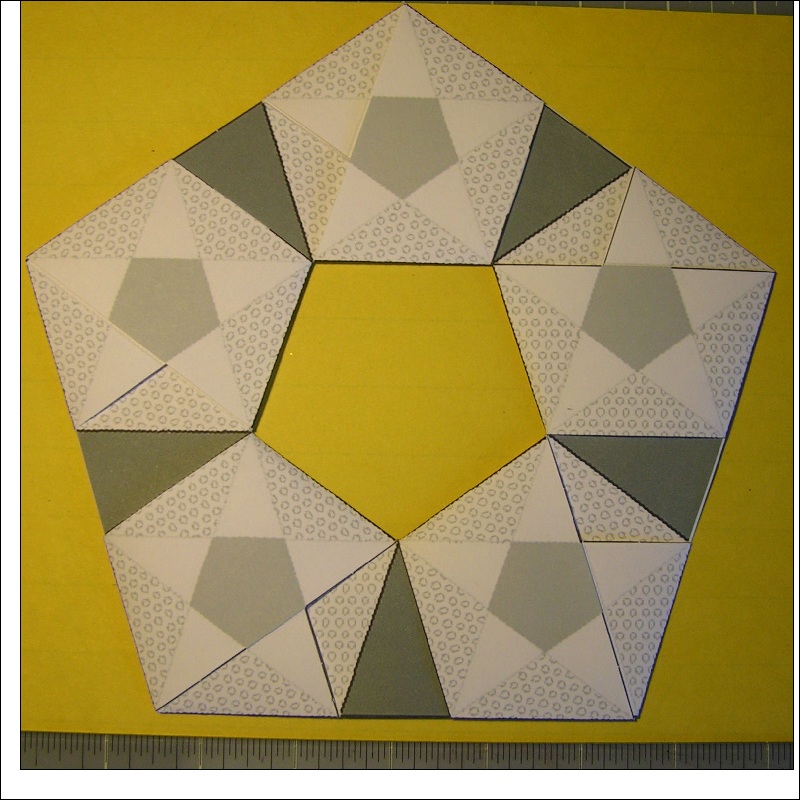 |
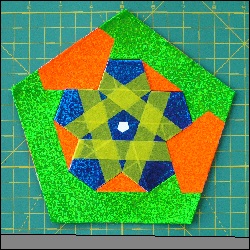
Pentagon Case #2 click here to enlarge click here to see the paper strip 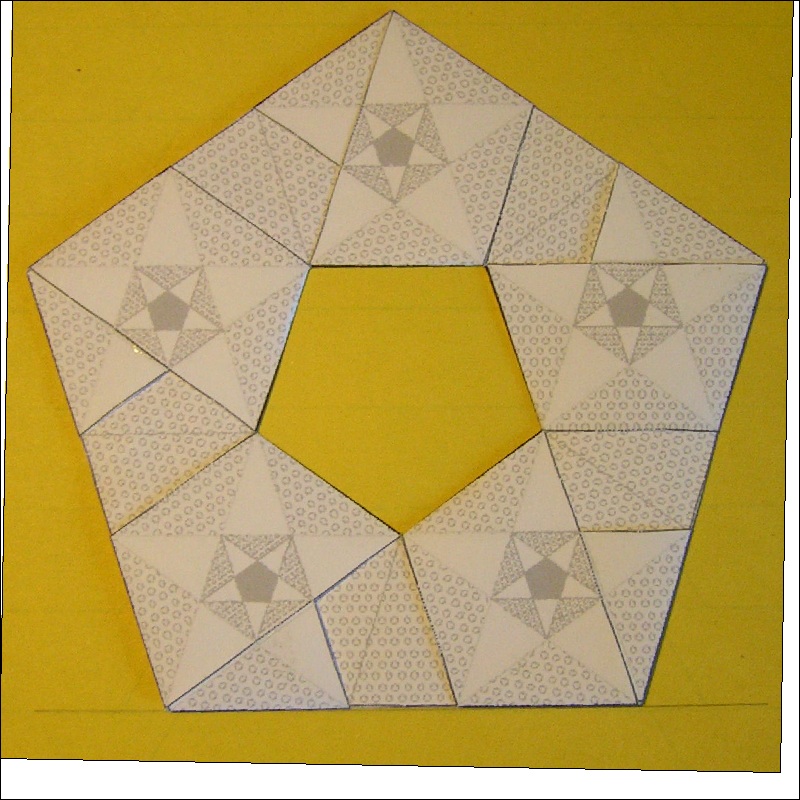 |
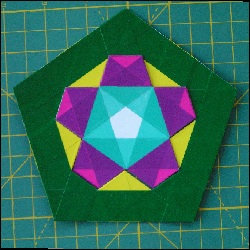
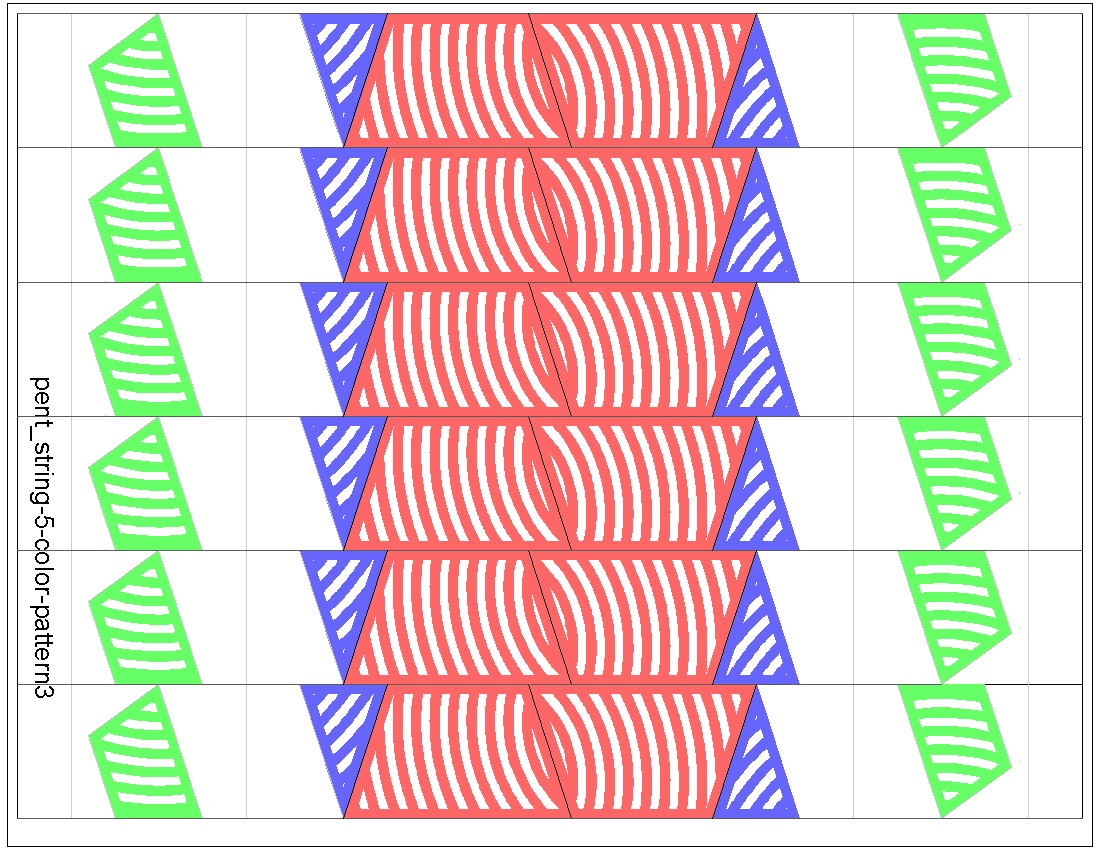
Pentagon Case #3 click here to enlarge click here to see the paper strip 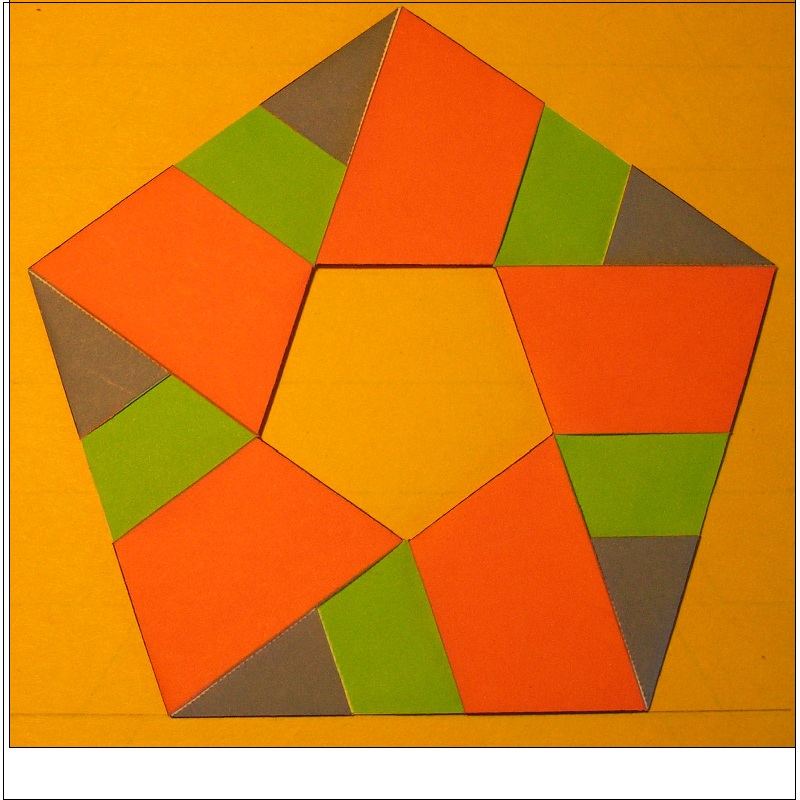 |
|
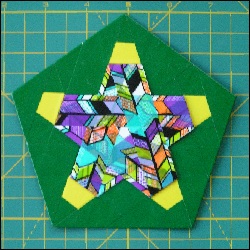
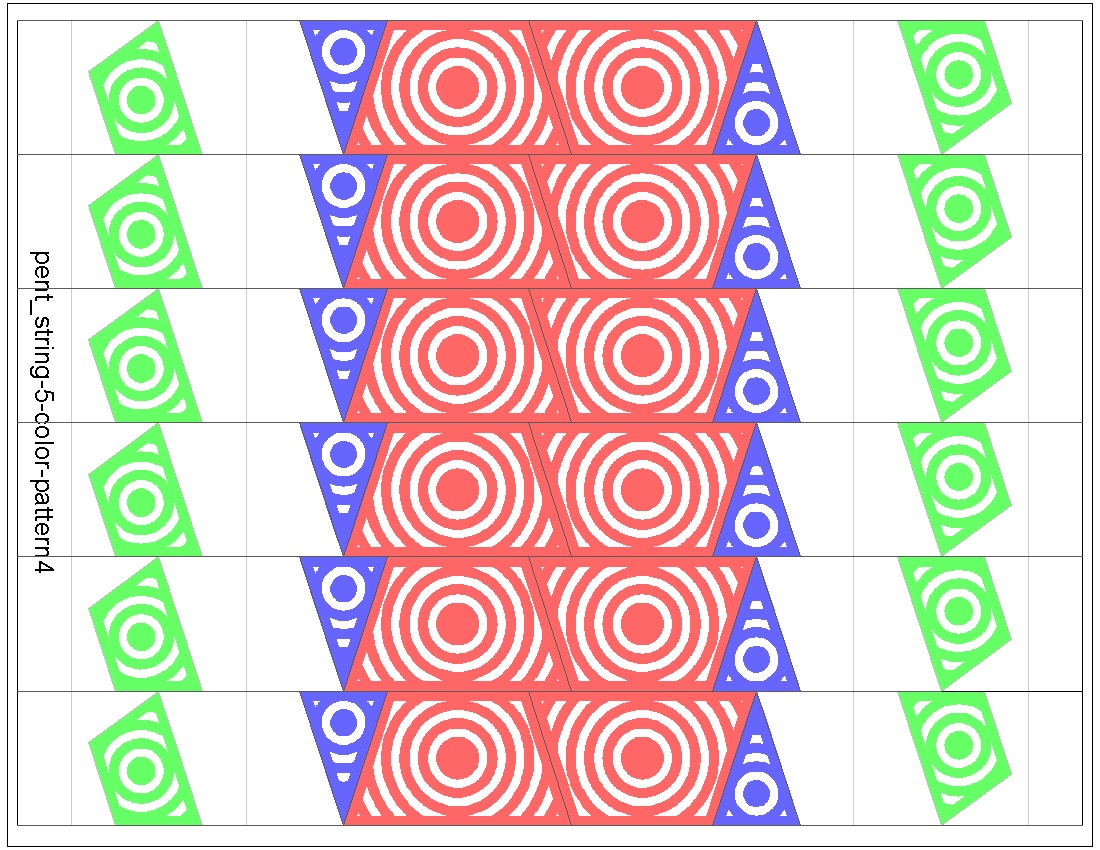
Pentagon Case #4 click here to enlarge click here to see the paper strip 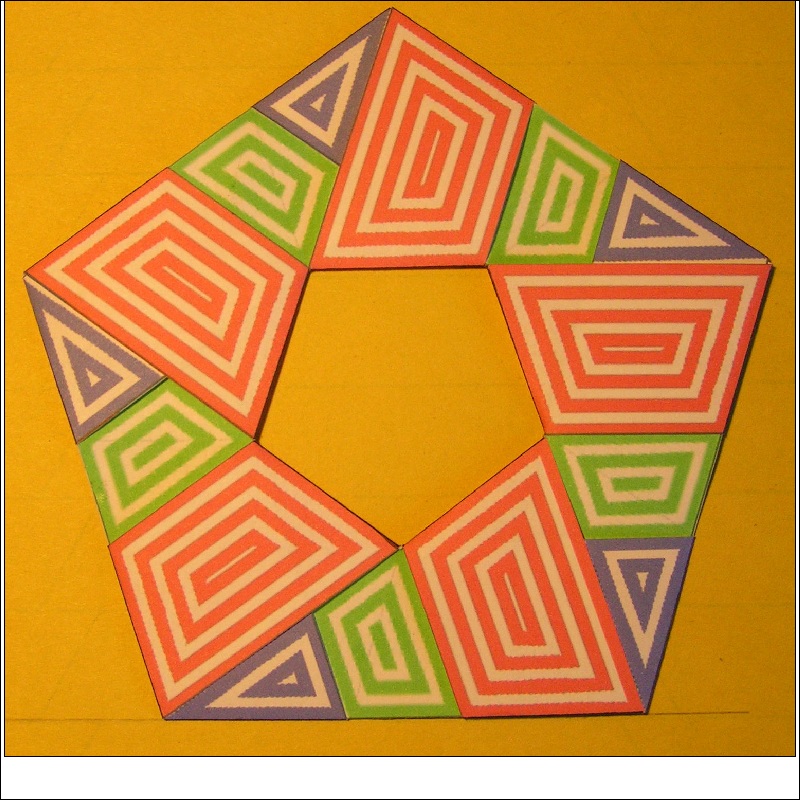 |
Pentagon Case #5 click here to enlarge click here to see the paper strip 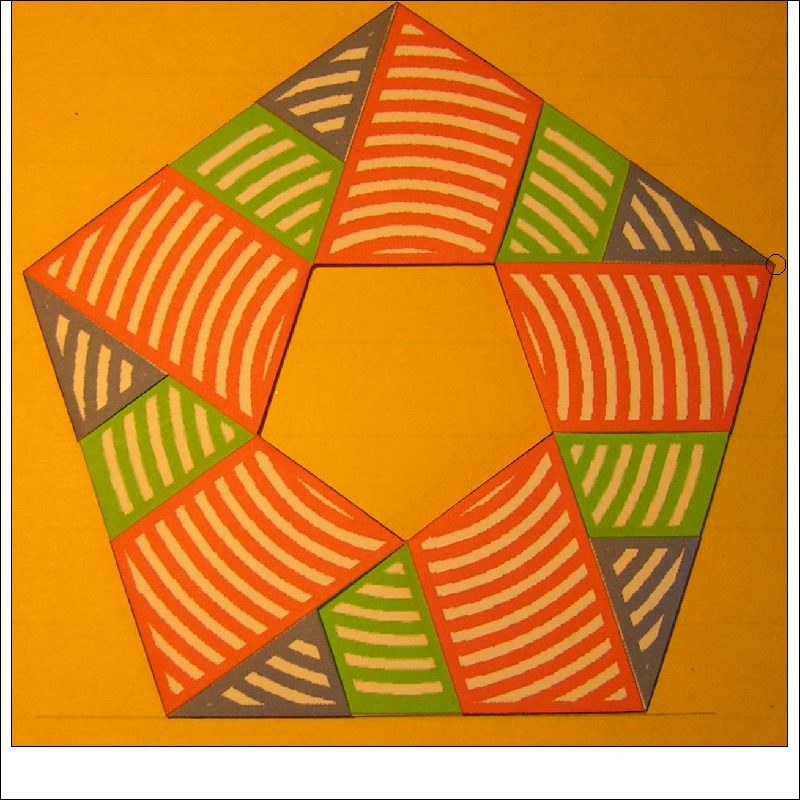 |
Pentagon Case #6 click here to enlarge click here to see the paper strip 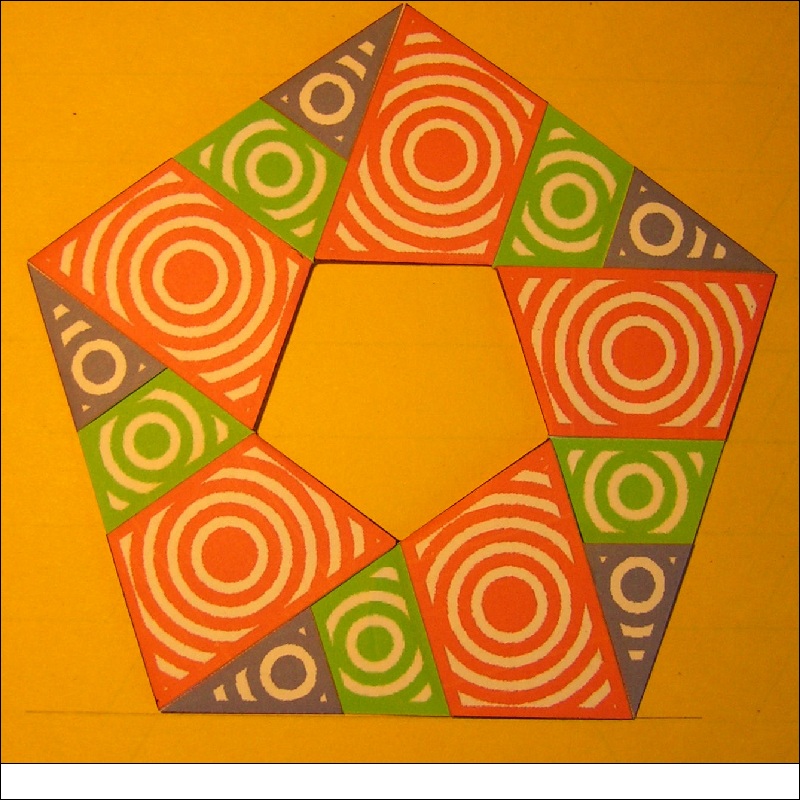 |
|
Pentagon Case #7 click here to enlarge click here to see the paper strip 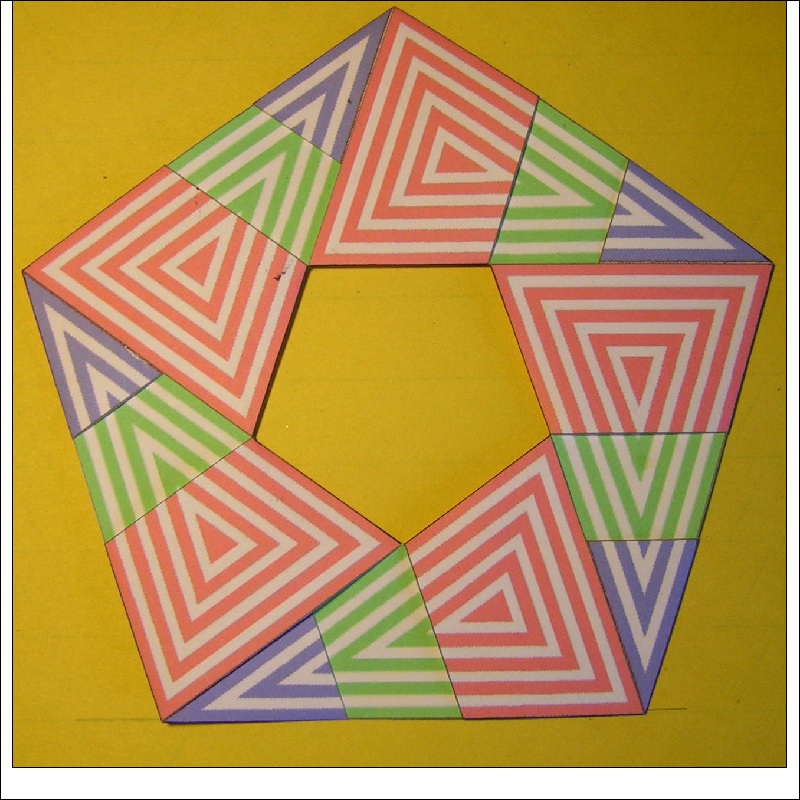 |
Pentagon Case #8 click here to enlarge click here to see the paper strip 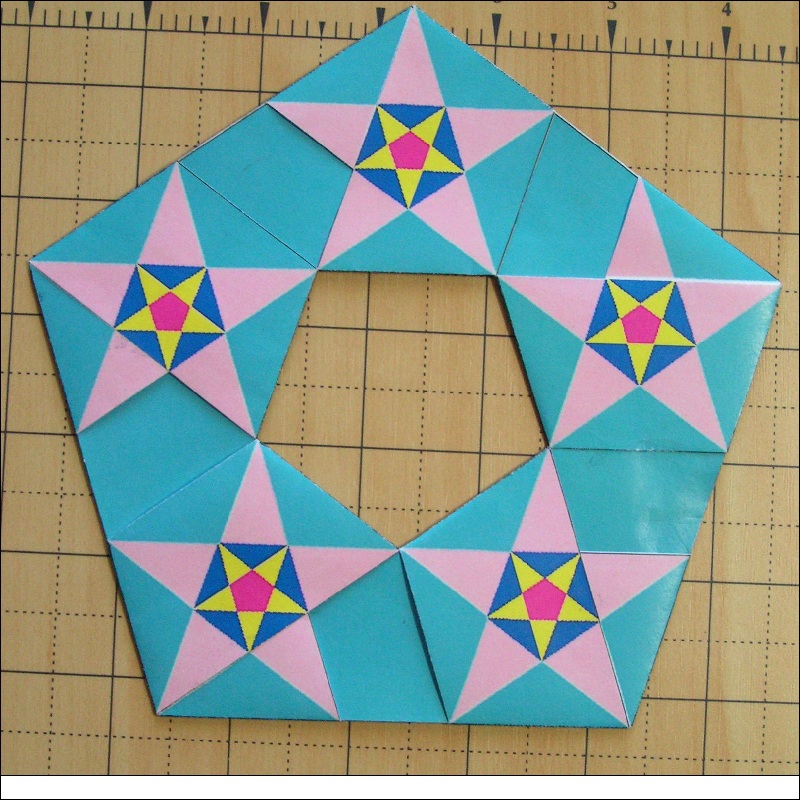 |
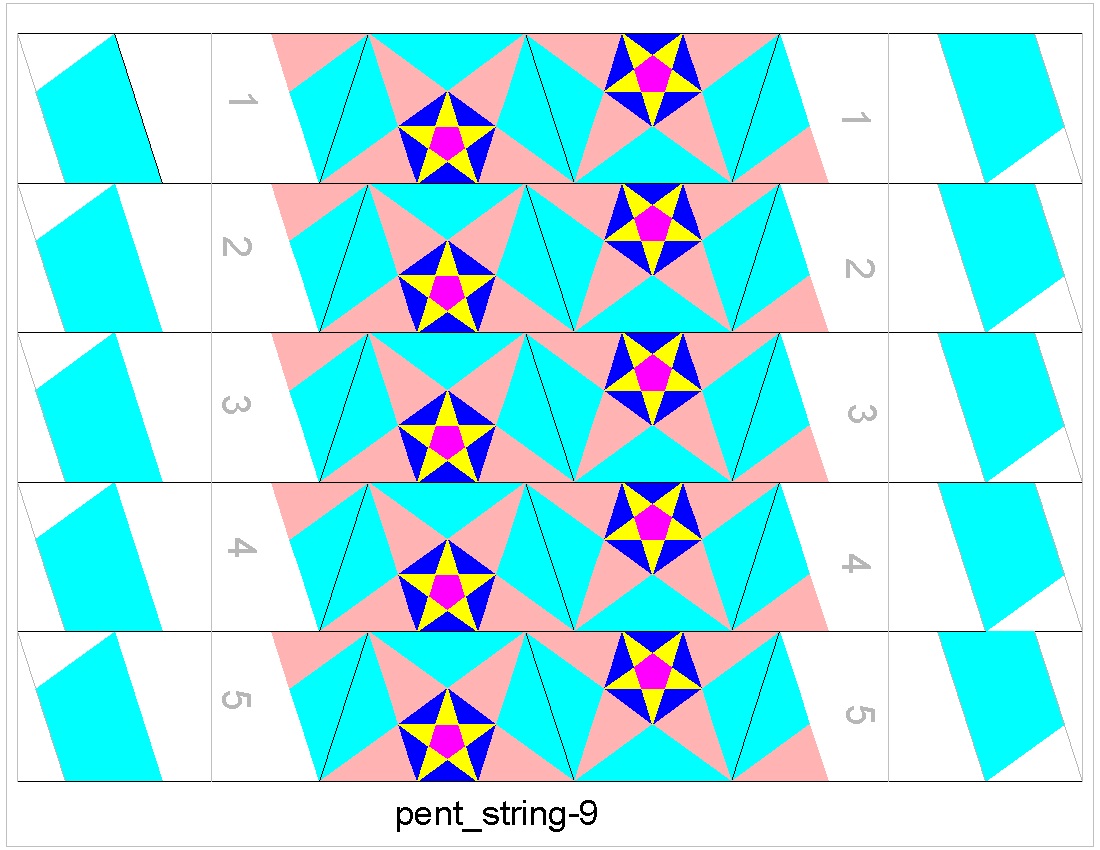
Pentagon Case #9 click here to enlarge click here to see the paper strip 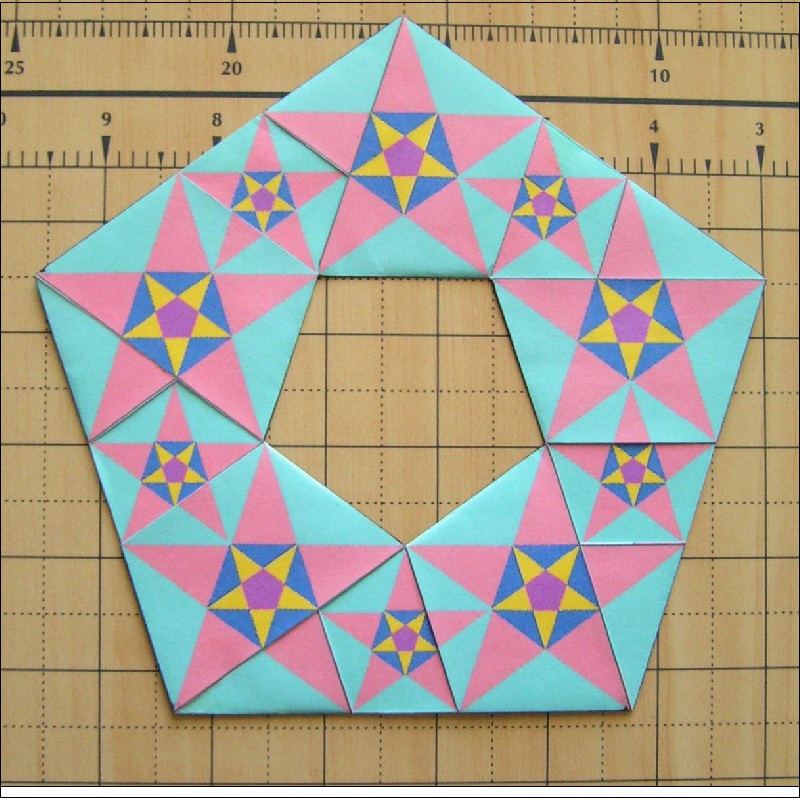 |
|
How to make a pentagon string click here to enlarge 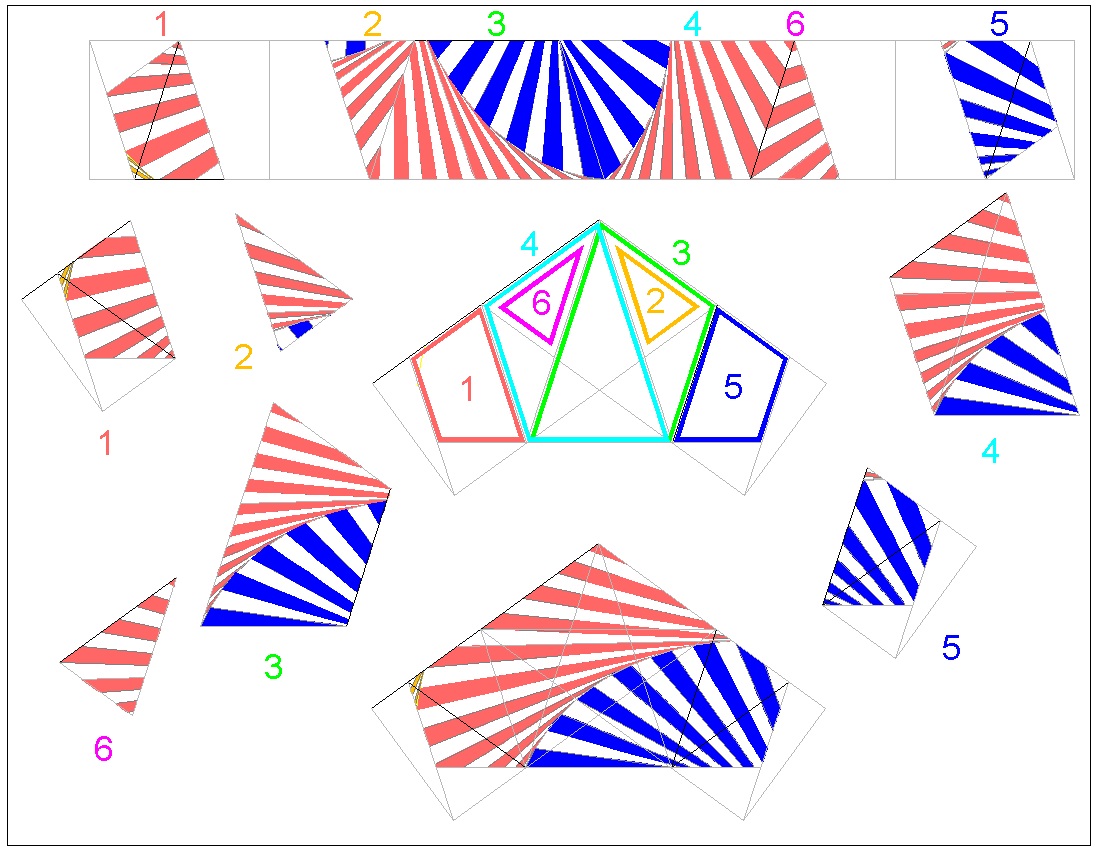 |
|
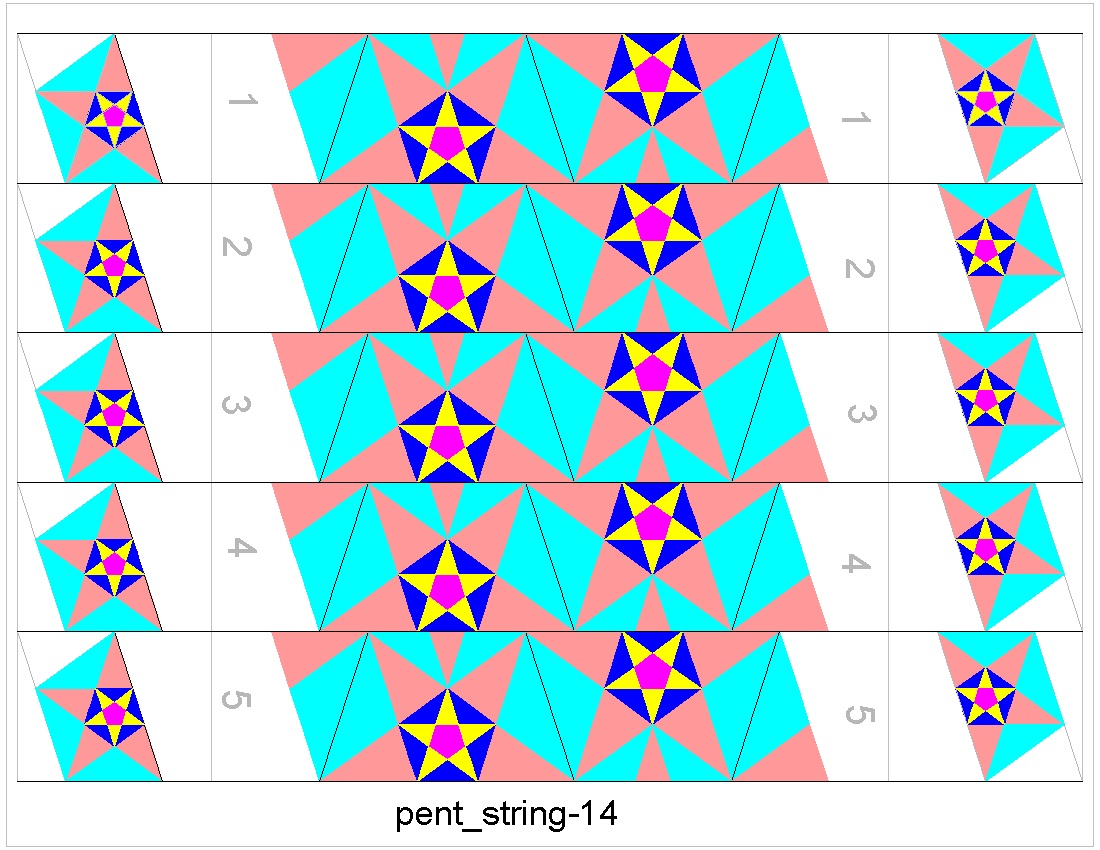
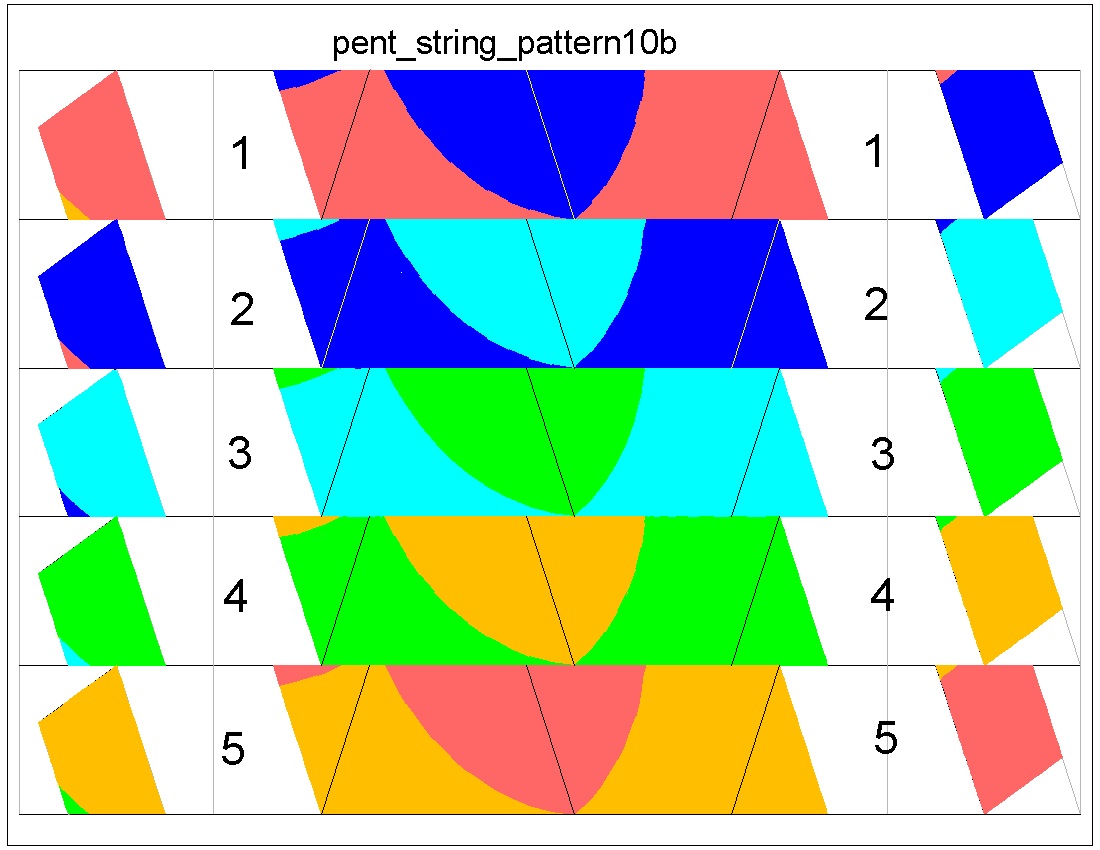
Pentagon Case #10 click here to enlarge click here to see the paper strip 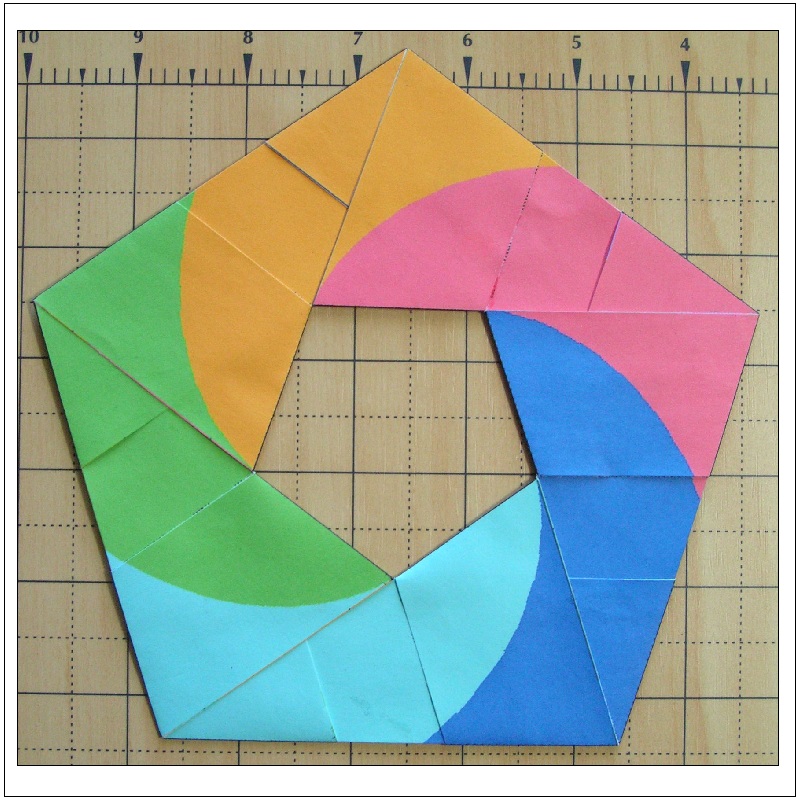 |
Pentagon Case #11 click here to enlarge click here to see the paper strip 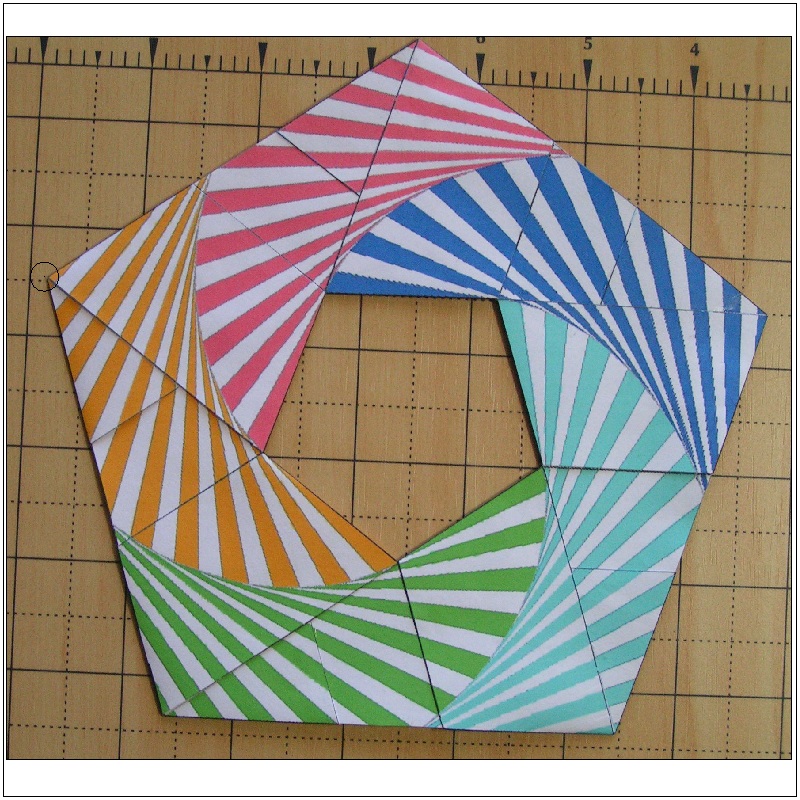 |
|
Pentagon Case #12 click here to enlarge click here to see the paper strip 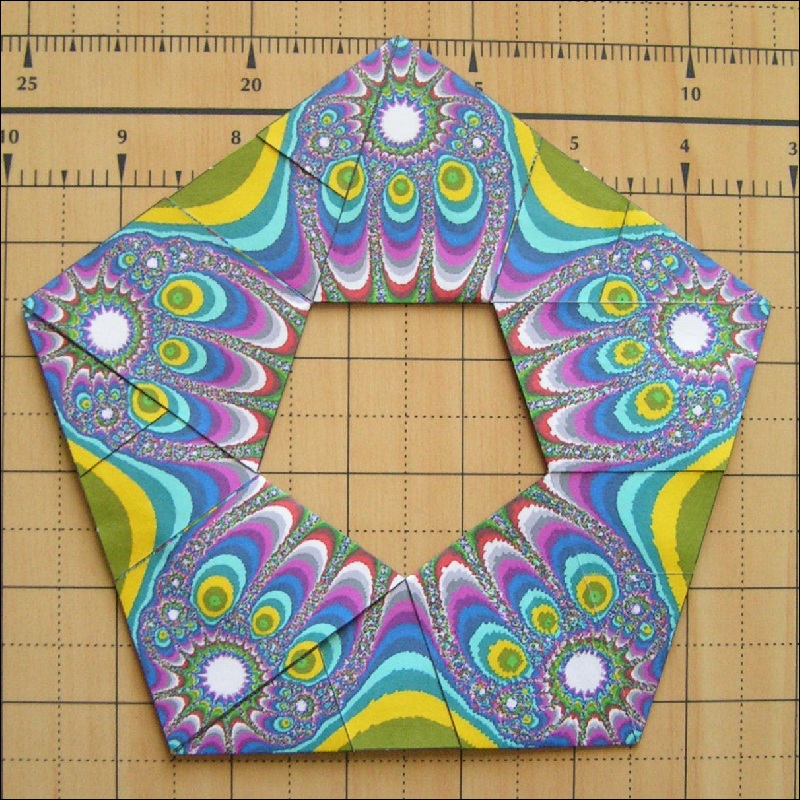 |
Pentagon Case #13 click here to enlarge click here to see the paper strip 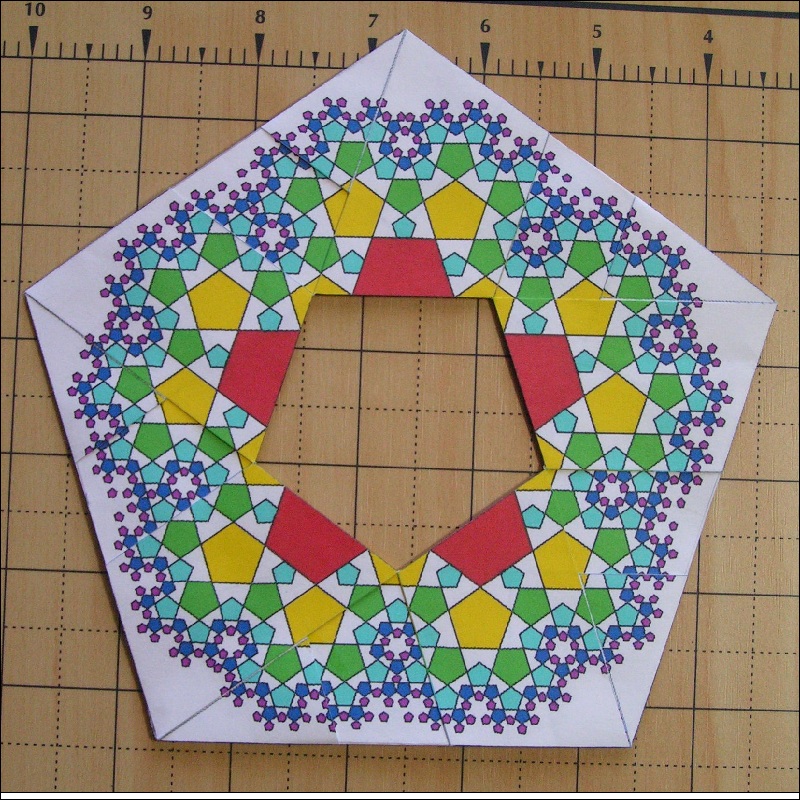 |
Pentagon Case #14 click here to enlarge click here to see the paper strip 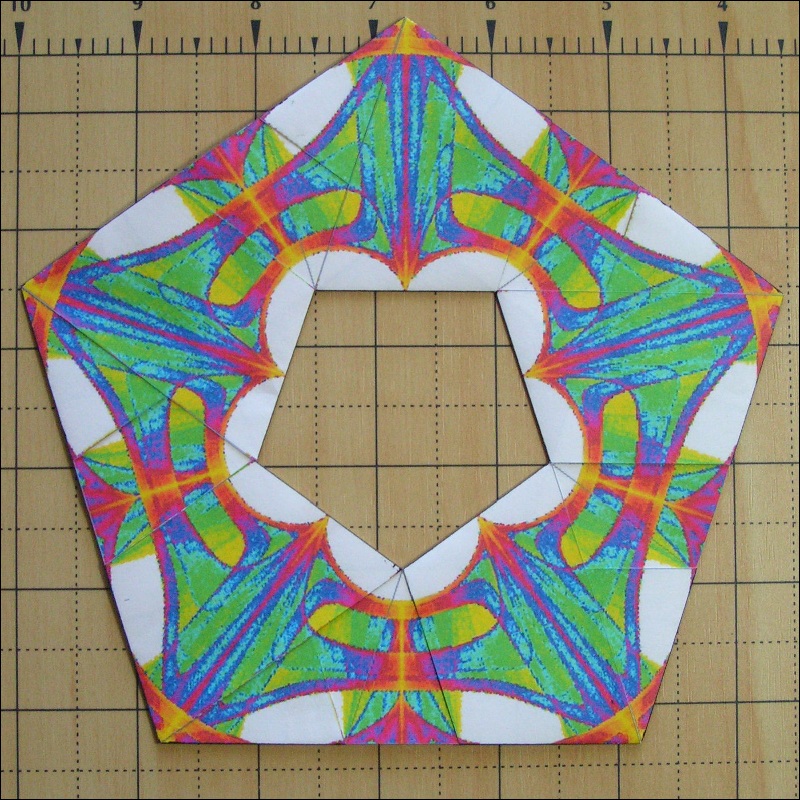 |
|
Pentagon Case #15 click here to enlarge click here to see the paper strip 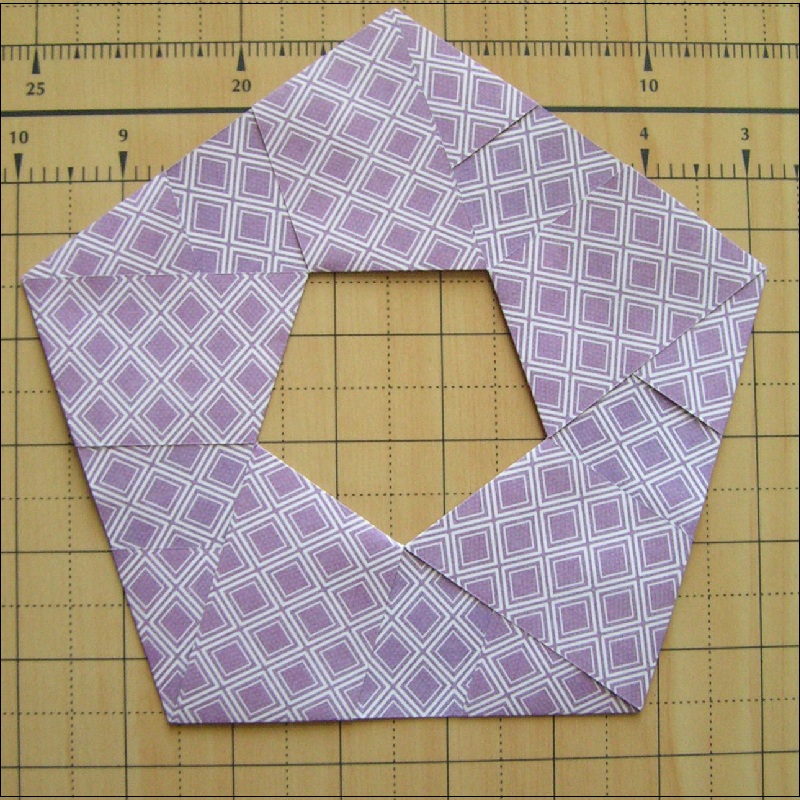 |
Pentagon Case #16 click here to enlarge click here to see the paper strip 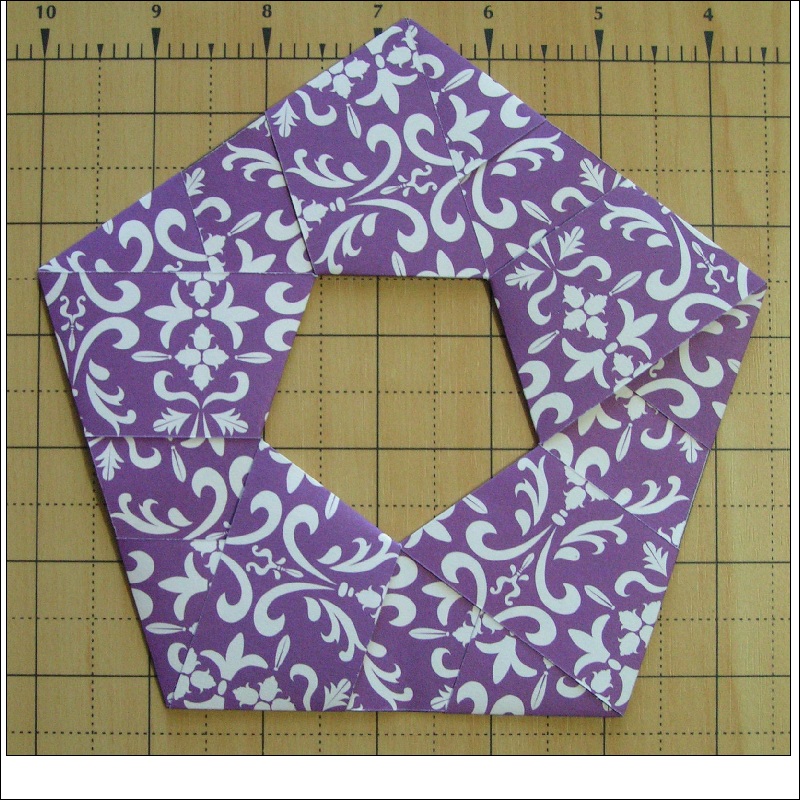 |
Pentagon Case #17 click here to enlarge click here to see the paper strip 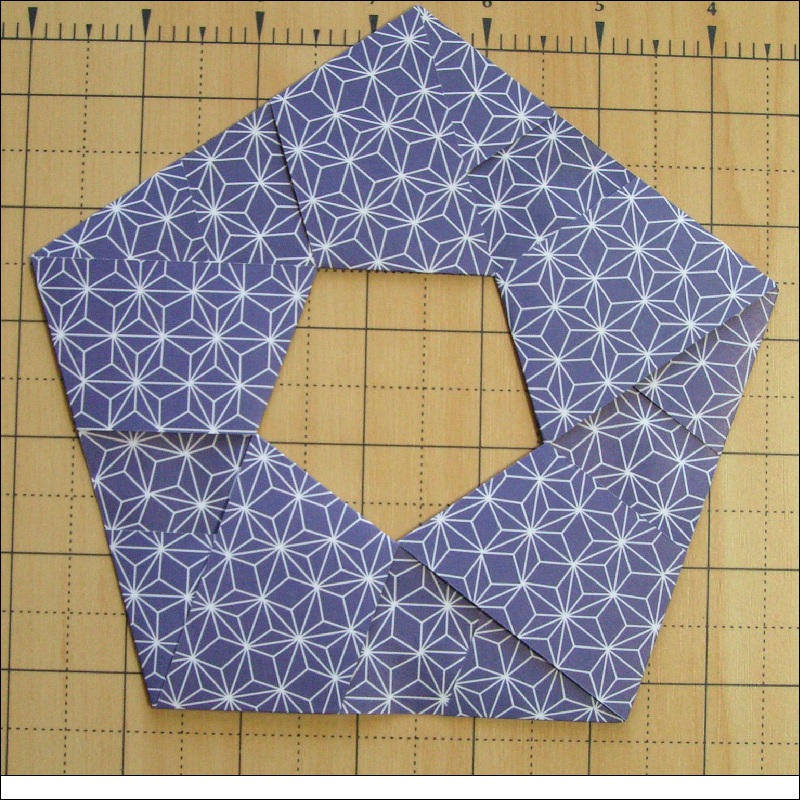 |
|
Pentagon Case #18 click here to enlarge click here to see the paper strip 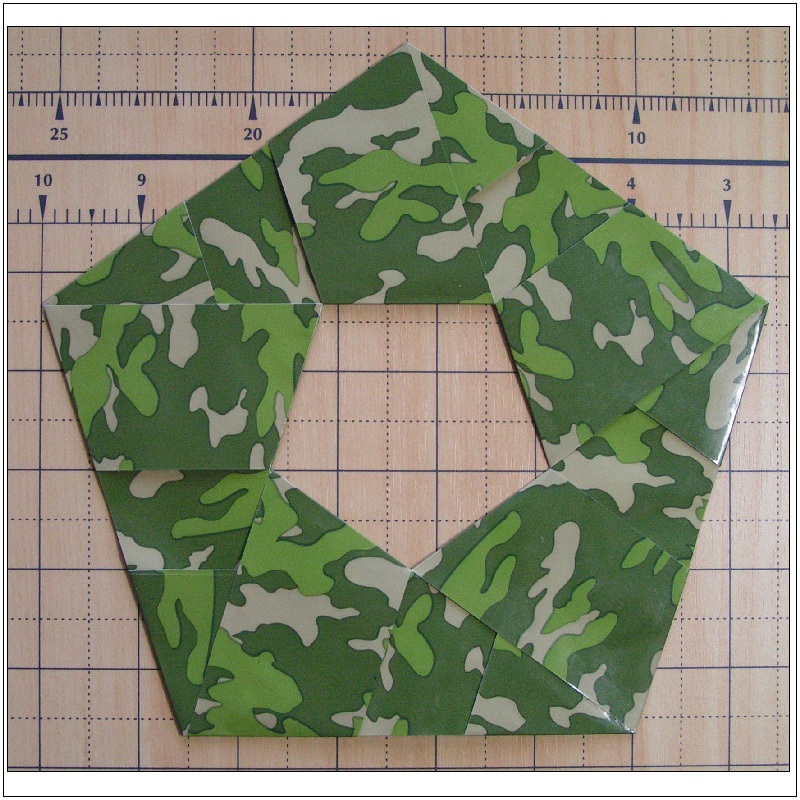 |
Pentagon Case #19 click here to enlarge click here to see the paper strip 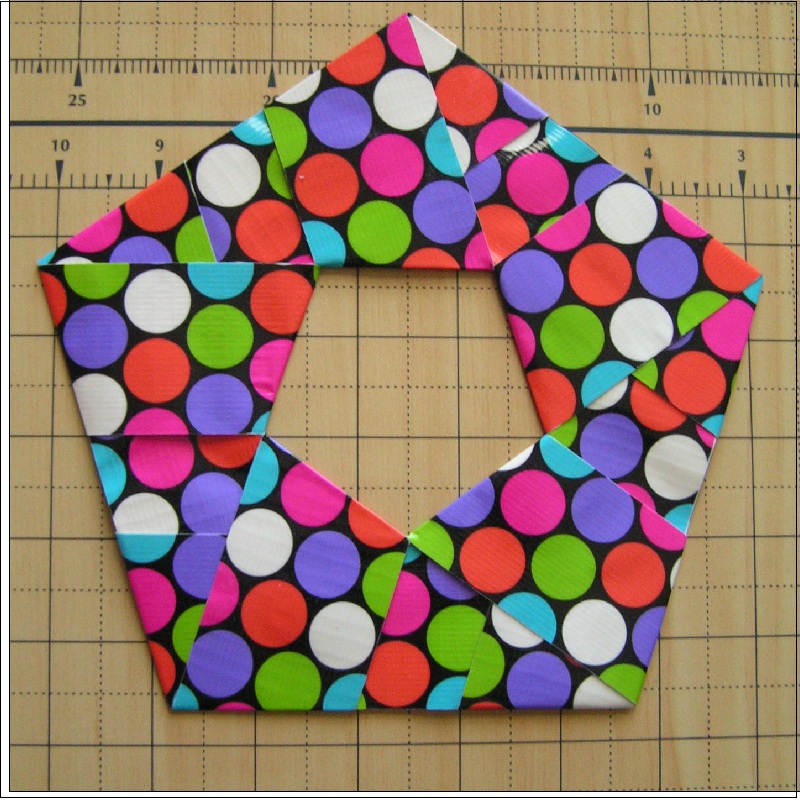 |
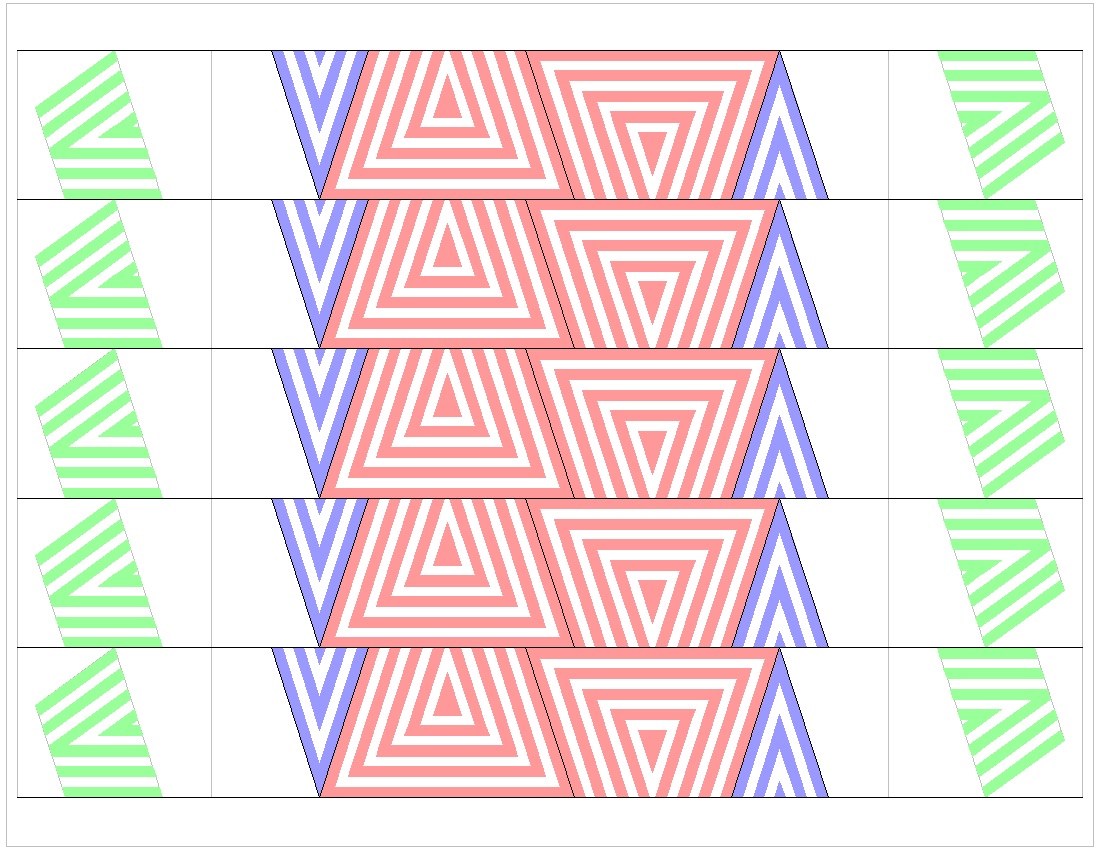
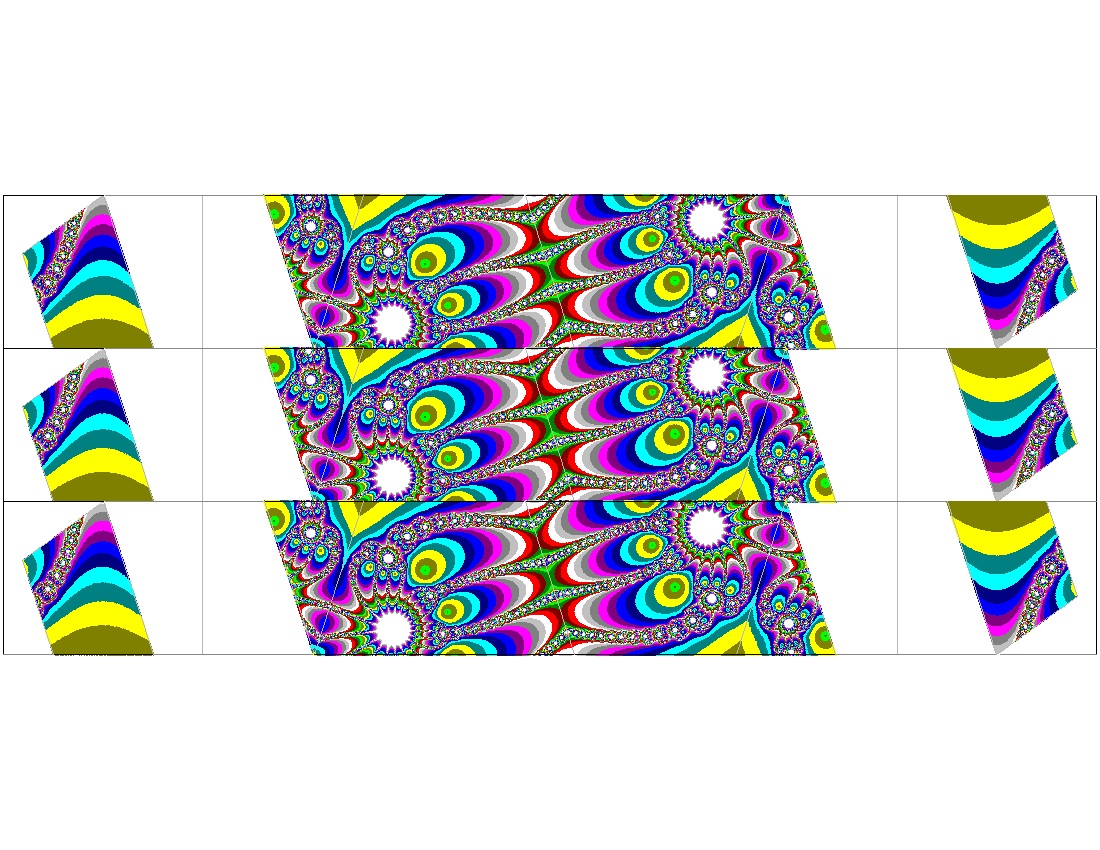
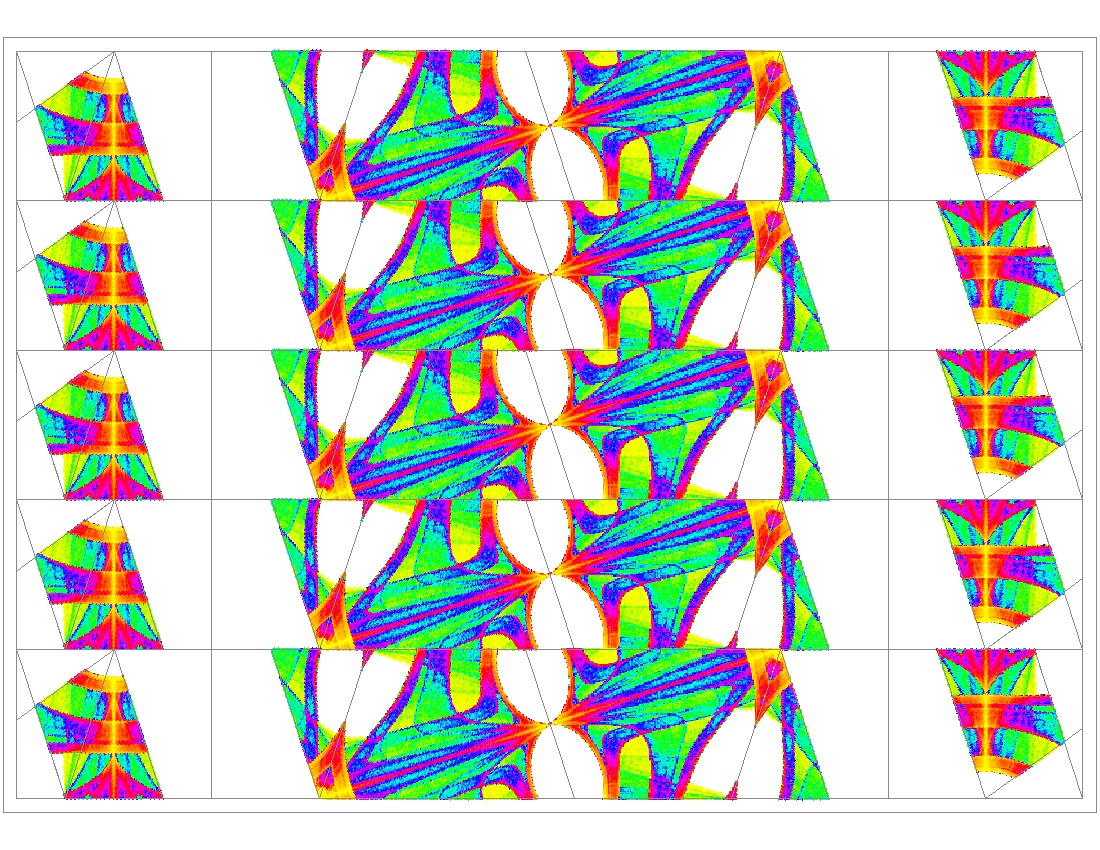
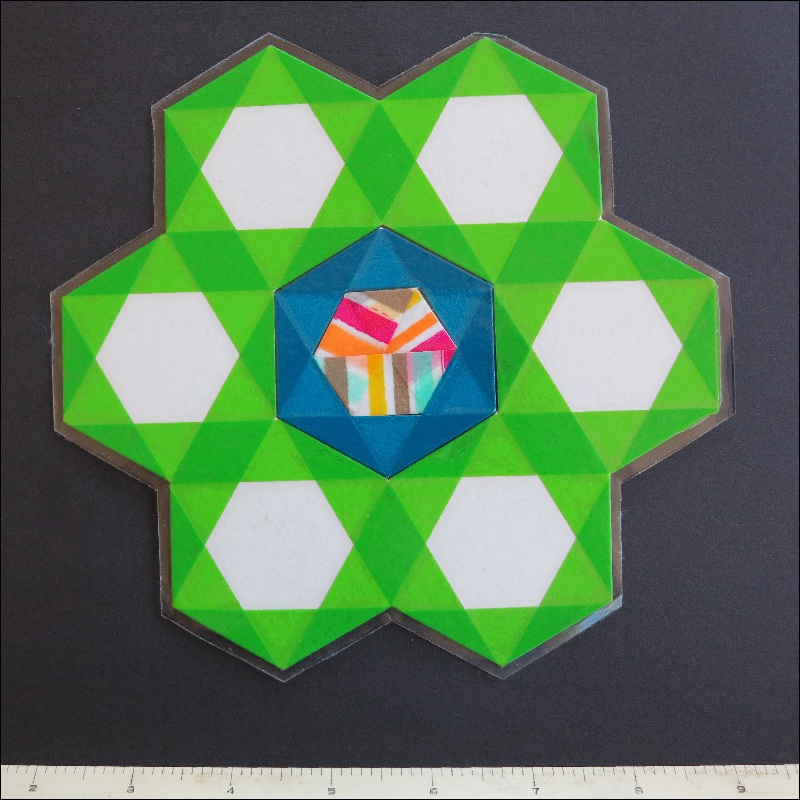
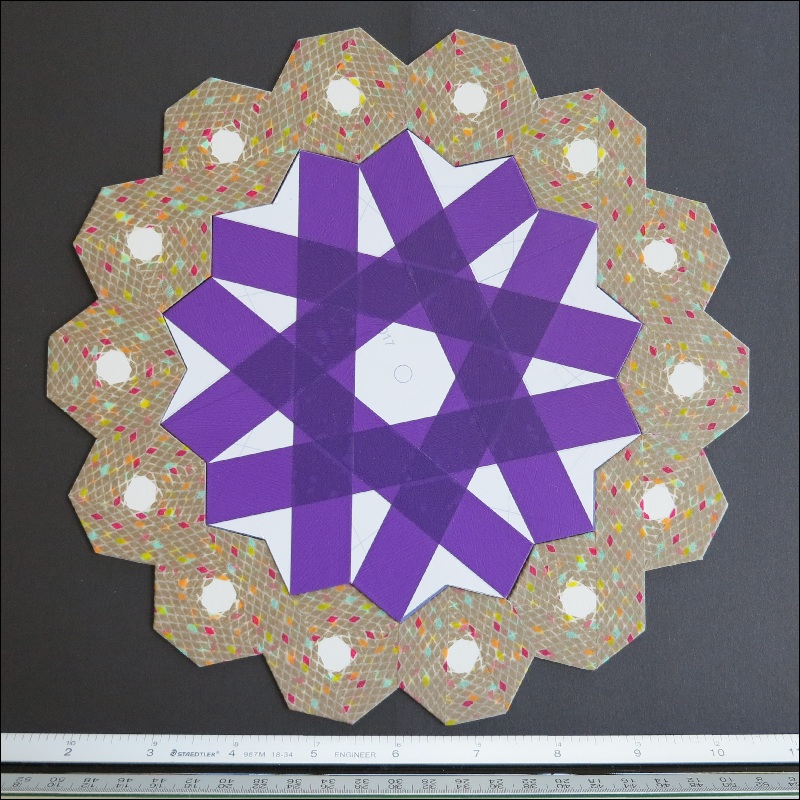
     The introduction of pentagon patterned templates, which are made up of
    equilateral triangle grids, opens up a wide open area of beautiful patterns.
    Here are several examples ranging from basic to their variations.
|
Pentagon template #1 click here to enlarge 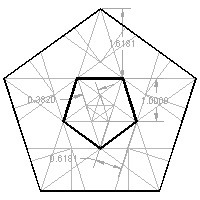 |
Pentagon template #2 click here to enlarge 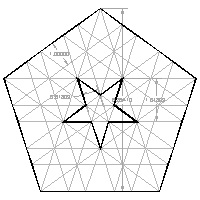 |
Pentagon template #3 click here to enlarge 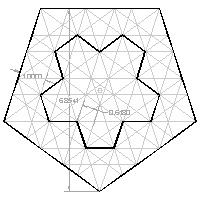 |
|
Pentagon template #4 click here to enlarge 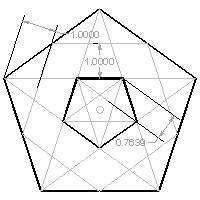 |
Pentagon template #5 click here to enlarge  |
Pentagon template #6 click here to enlarge  |
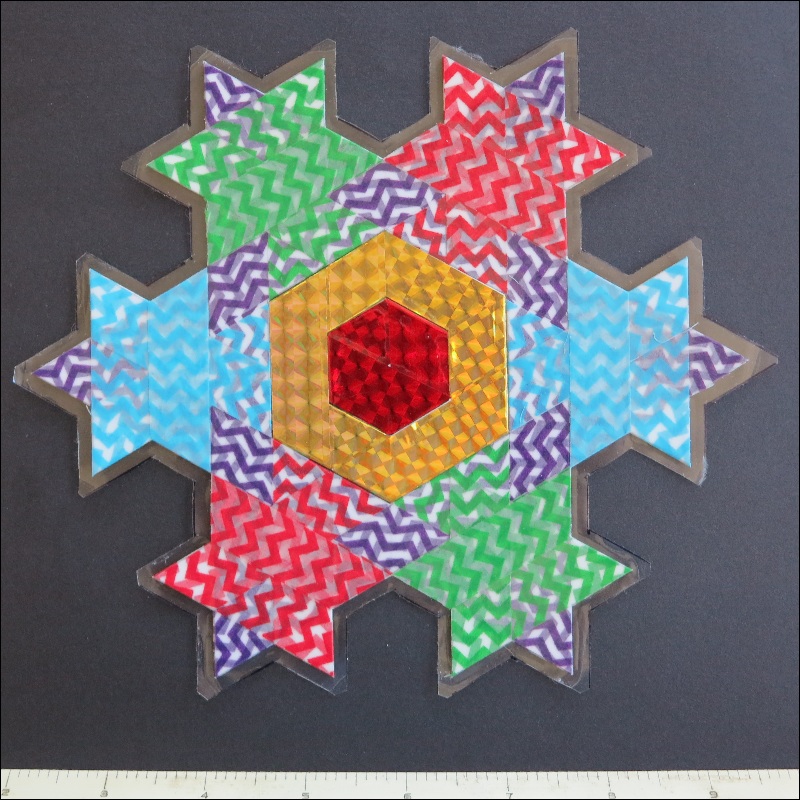
     There are many variations of pentagon based patterns.
    The typical cases are shown below.
|
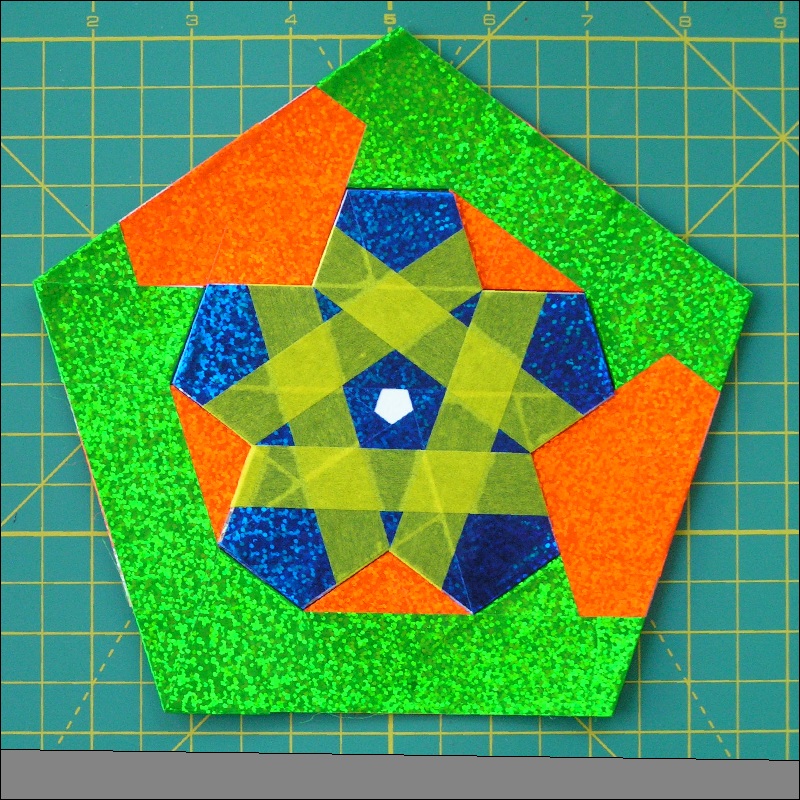
sample #1 click here to enlarge click to see the template  |
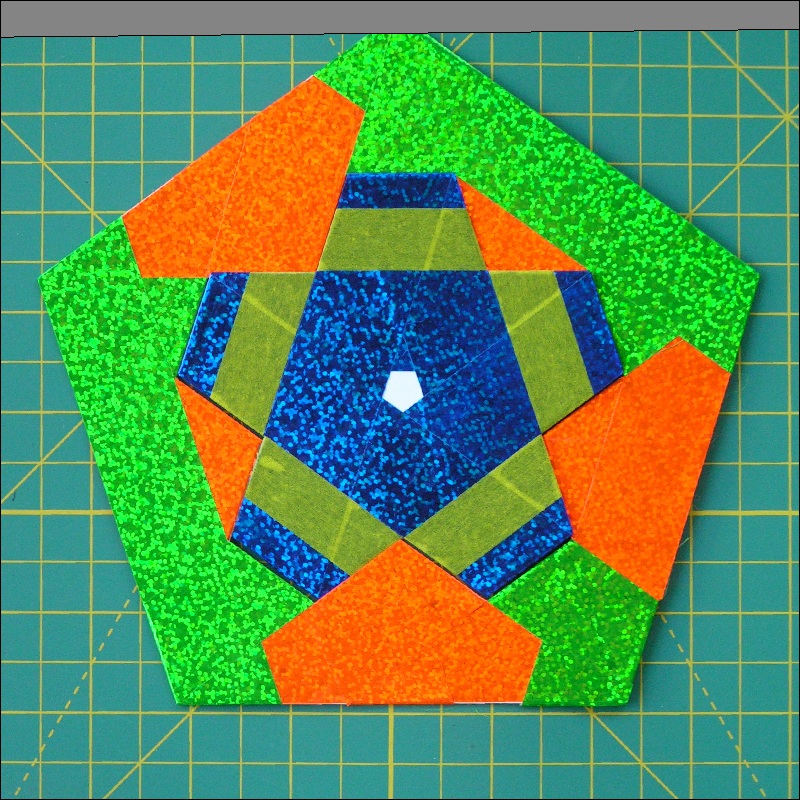
sample #2 click here to enlarge click to see the template  |
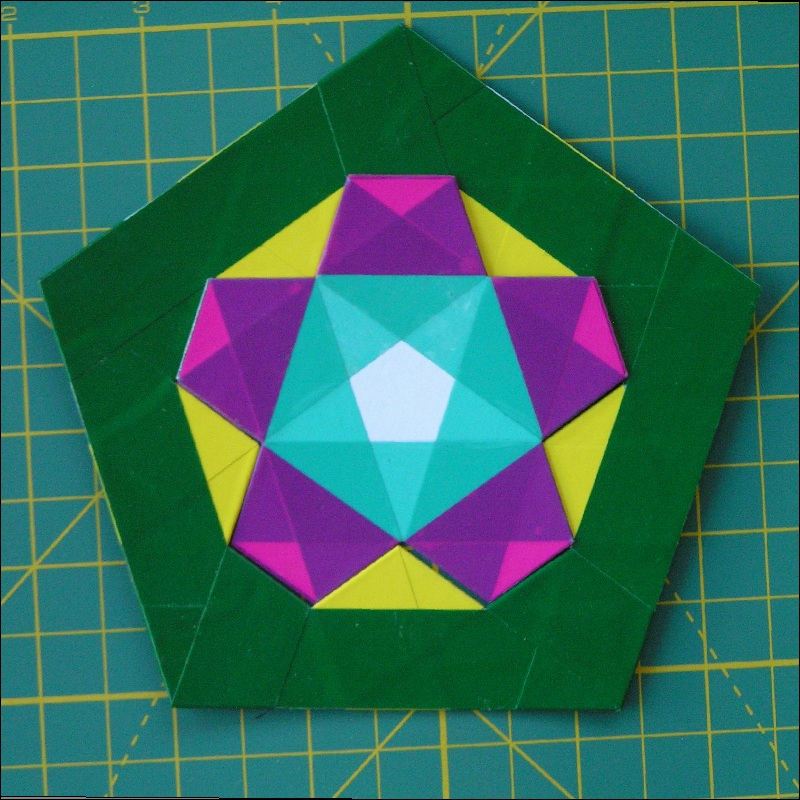
sample #3 click here to enlarge click to see the template 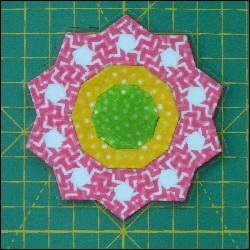 |
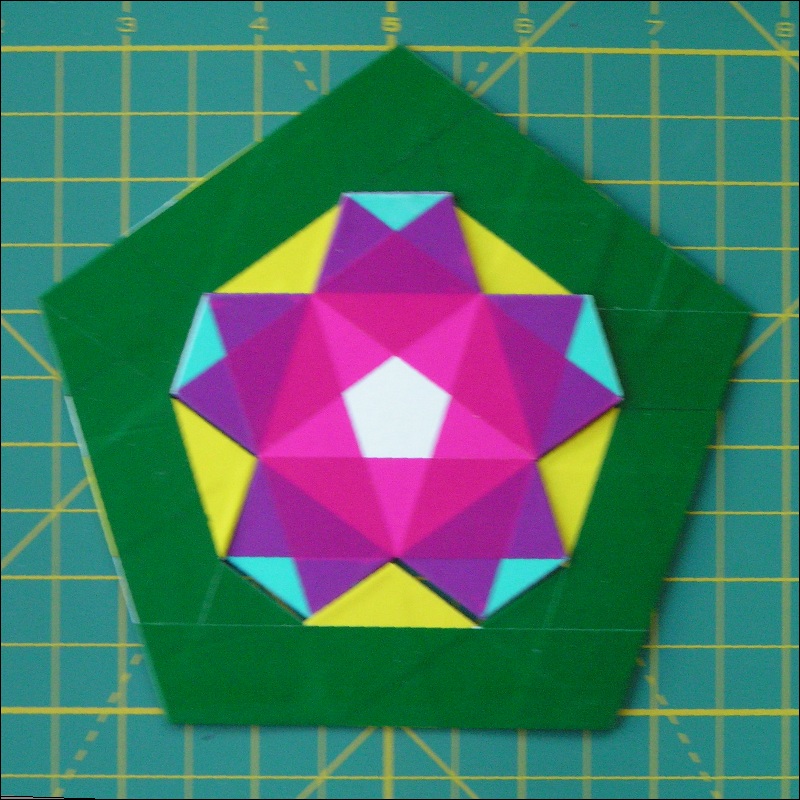
   All the tape widths are the same. This is a very rare case.
   Weaving pattern:
    	Outer most is mode-1 of pentagon.
    	Middle is mode-2 of decagon.
    	Inner most is mode-4 of decagon.
    sample #1	All tape width = 3/4 inch	 synthetic decorative
    sample #2	All tape width = 15 mm		 Washi decorative
    sample #3	All tape width = 10 mm		 Washi decorative
|
sample #4 click here to enlarge click to see the template  |
sample #5 click here to enlarge click to see the template  |
sample #6 click here to enlarge click to see the template 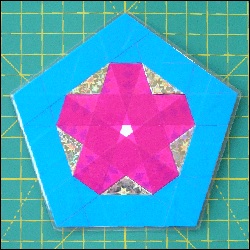 |
sample #4 1 inch wide custom made paper strips see tape 1 see tape 2
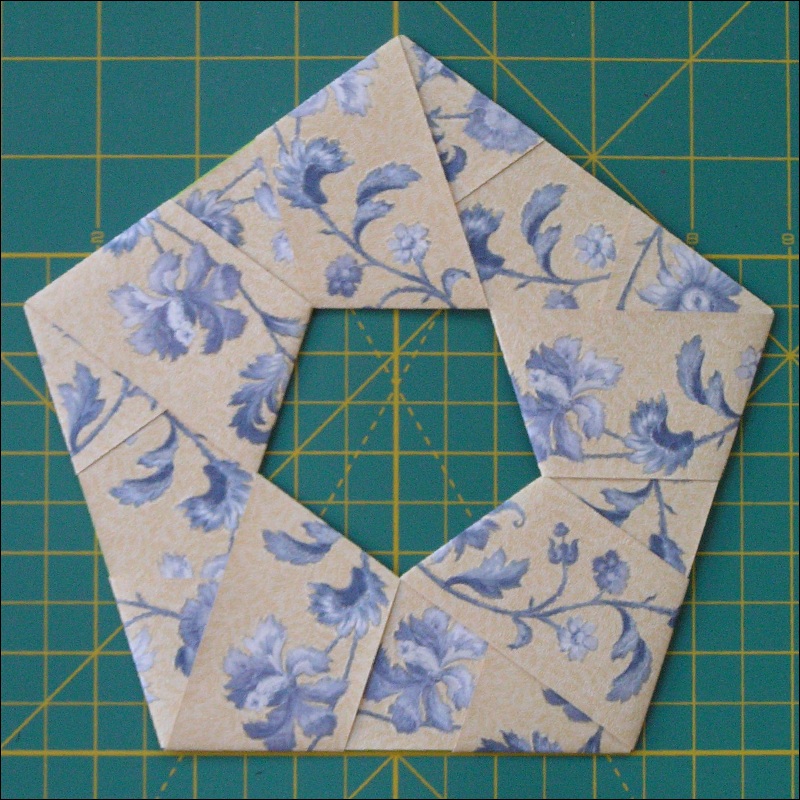
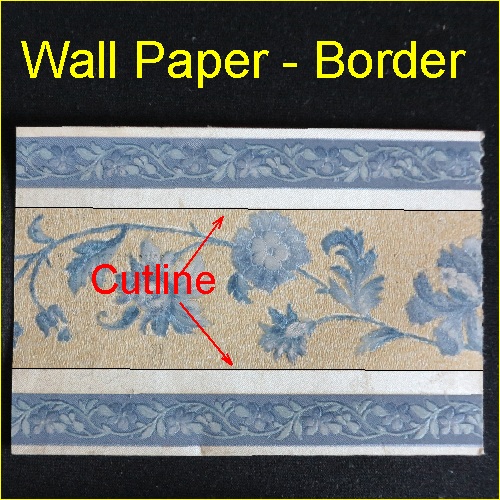
sample #5 43 mm wide strip cutout from a border wall paper see the border wall paper Both top and bottom pieces will be used later for octagon cases. Advantage of using a border wall paper is the availability of long, seamless (60 ~ 80 inches) strips . sample #6 3/4 inch wide synthetic adhesive tapes. Cut the template along the solid lines to get outer & inner pieces. The inner piece cut line is offset about 1/100 inch toward the center so that both pieces will fit after taping.
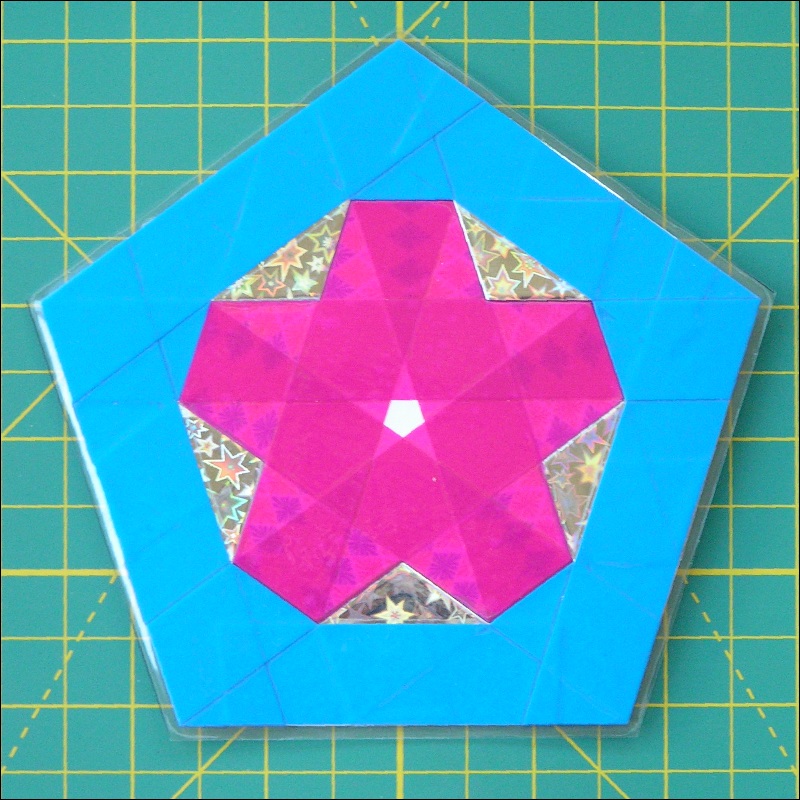
  sample #7   The template is similar to that of sample #6 except its interior pattern.
  sample #8   Mode 2 for basic pentagon with 3/4 inch silver & red adhesive tapes
  sample #9   The template is the same as sample #6 except its width (1 inch).
	      16 mm Washi tape (yellow) is added onto the interior blue tape.
  sample #10   Similar to sample #6
  sample #11   Basic pentagon mode-2   3/4 inch adhesive tape
  sample #12   Basic pentagon mode-2   3/4 inch adhesive tape
|
sample #13 click here to enlarge click to see the template 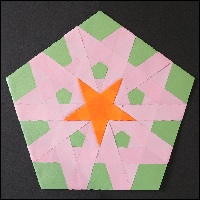 |
sample #14 click here to enlarge click to see the template 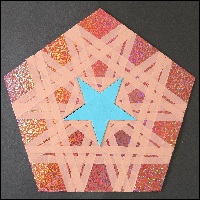 |
sample #15 click here to enlarge click to see the template 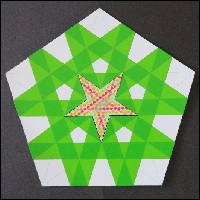 |
  sample #13   Similar to sample #6
  sample #14   Basic pentagon mode-2   3/4 inch adhesive tape
  sample #15   Basic pentagon mode-2   3/4 inch adhesive tape
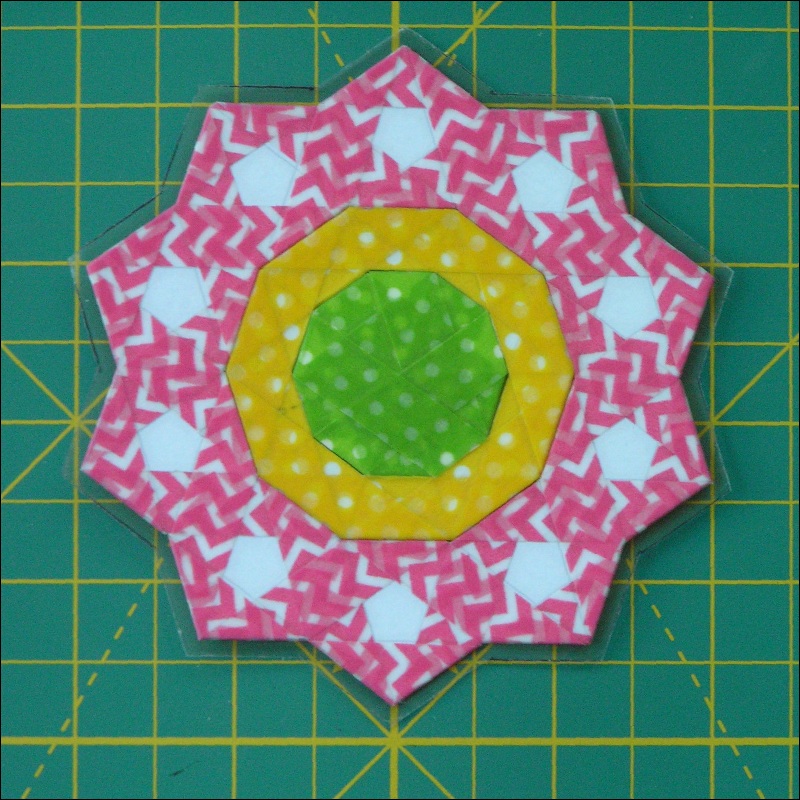
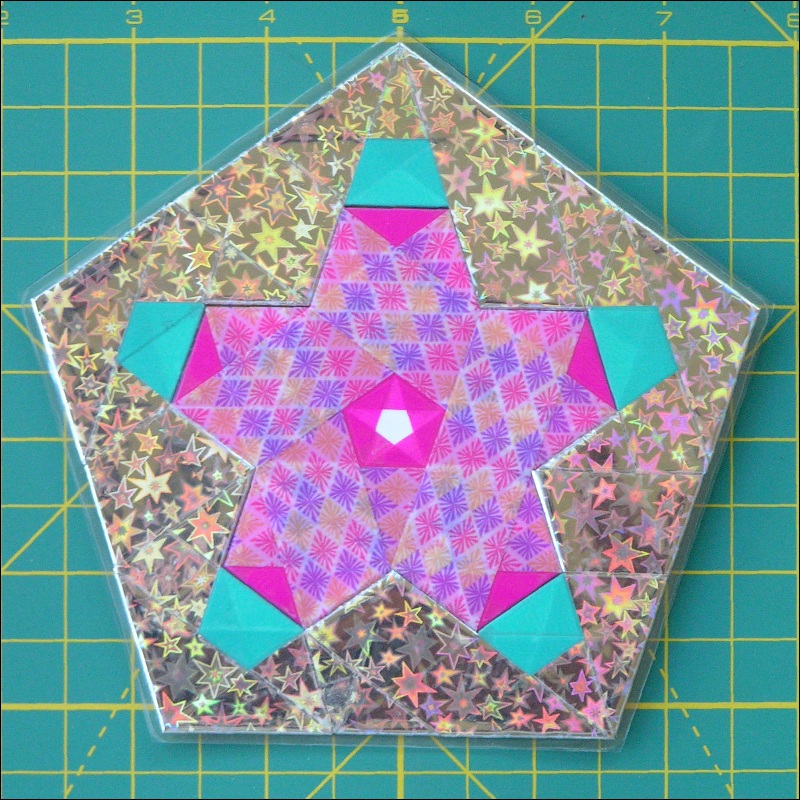
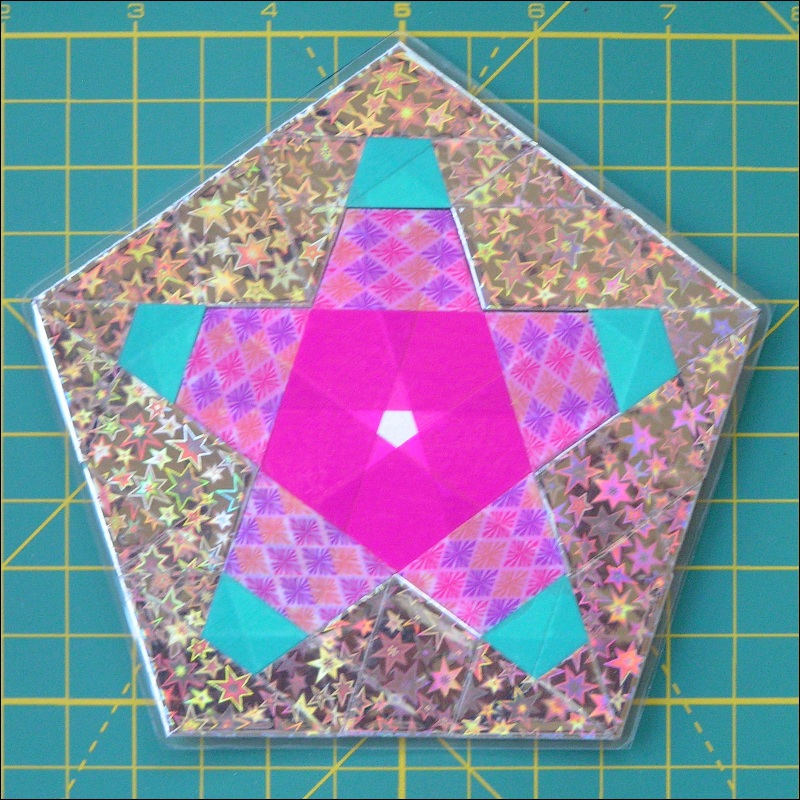
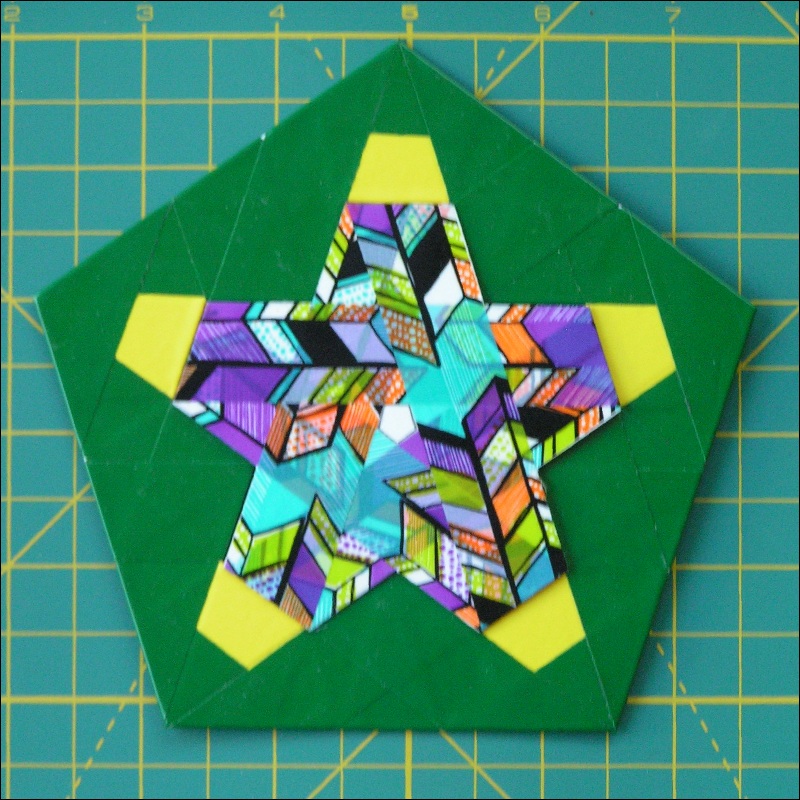
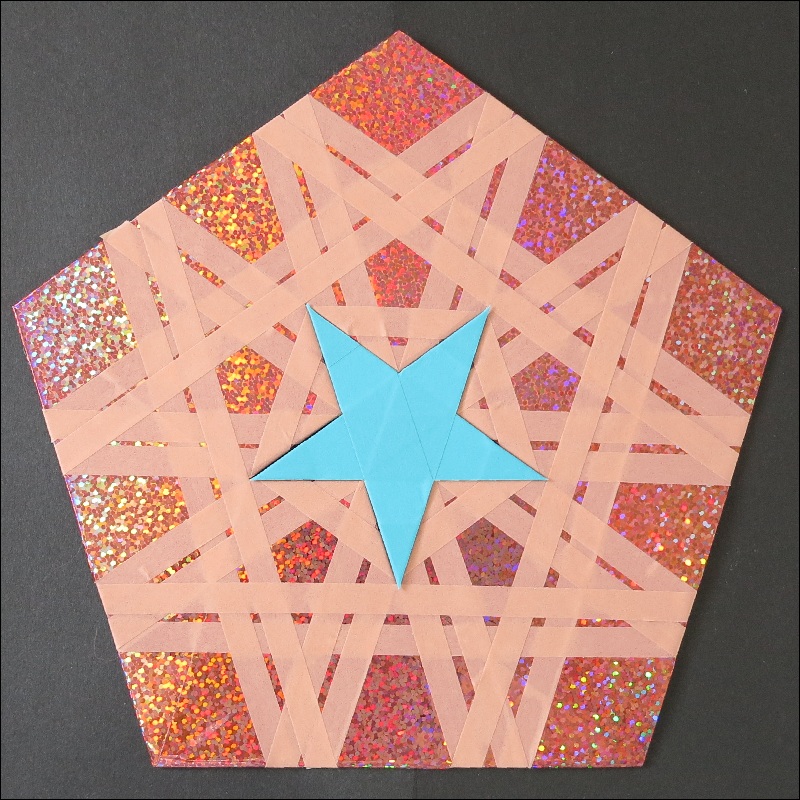
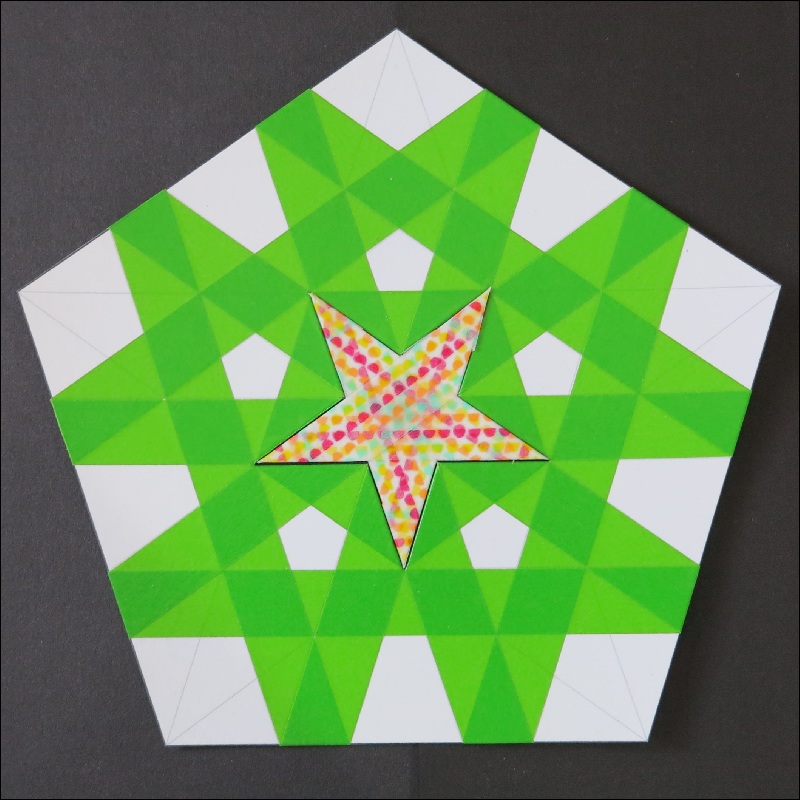
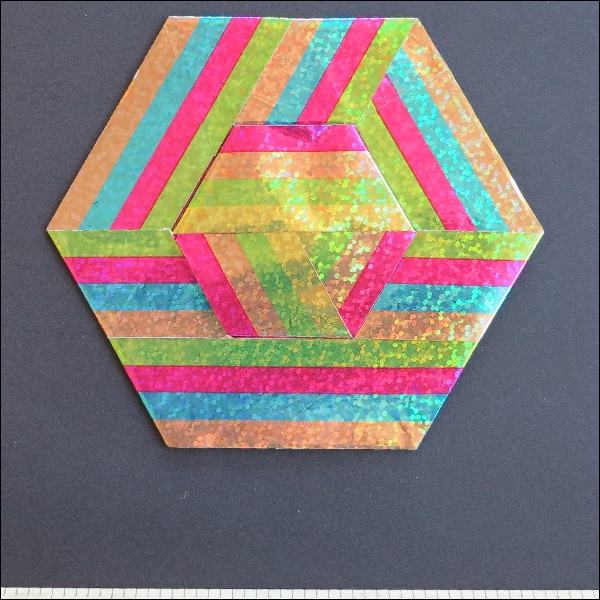
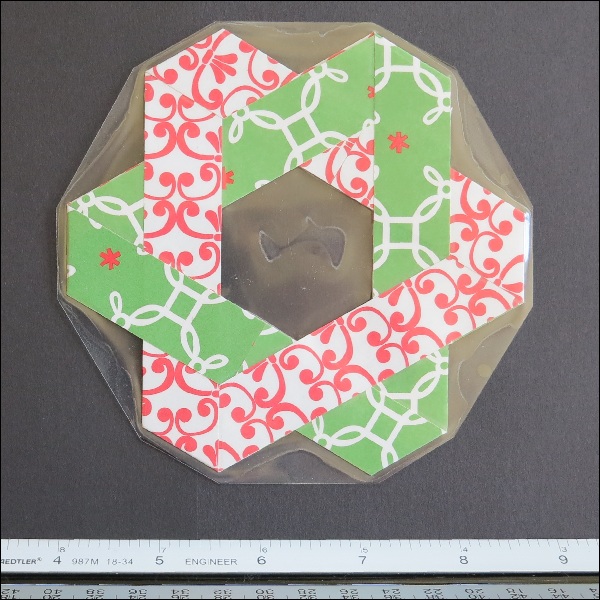
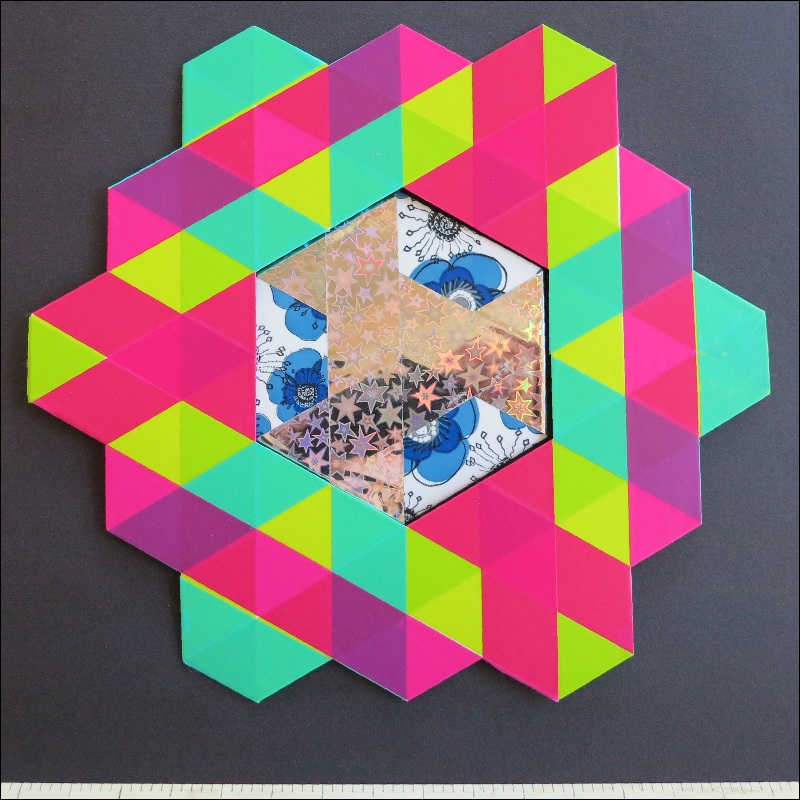
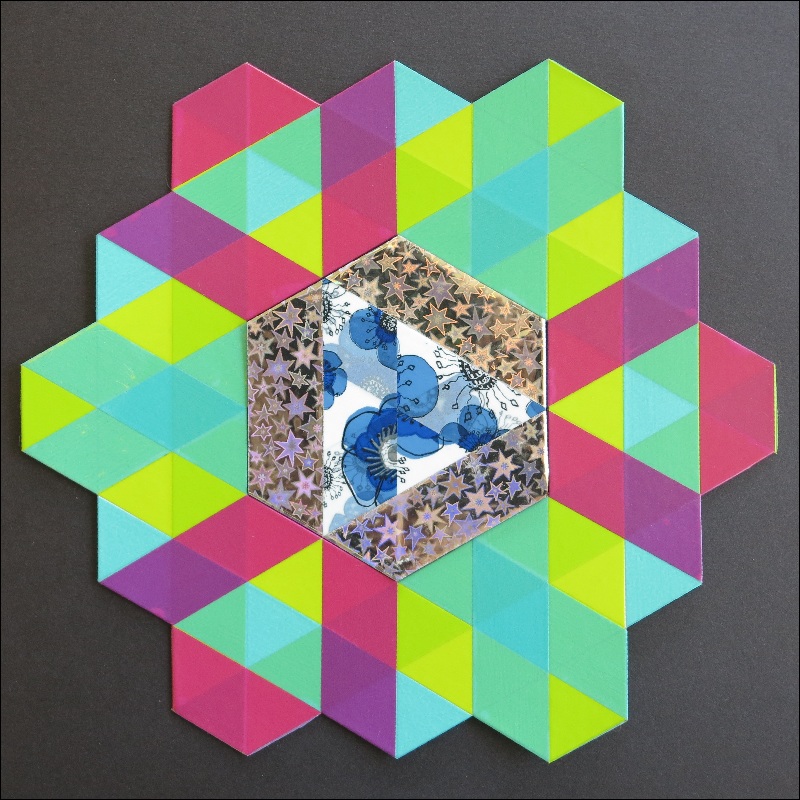
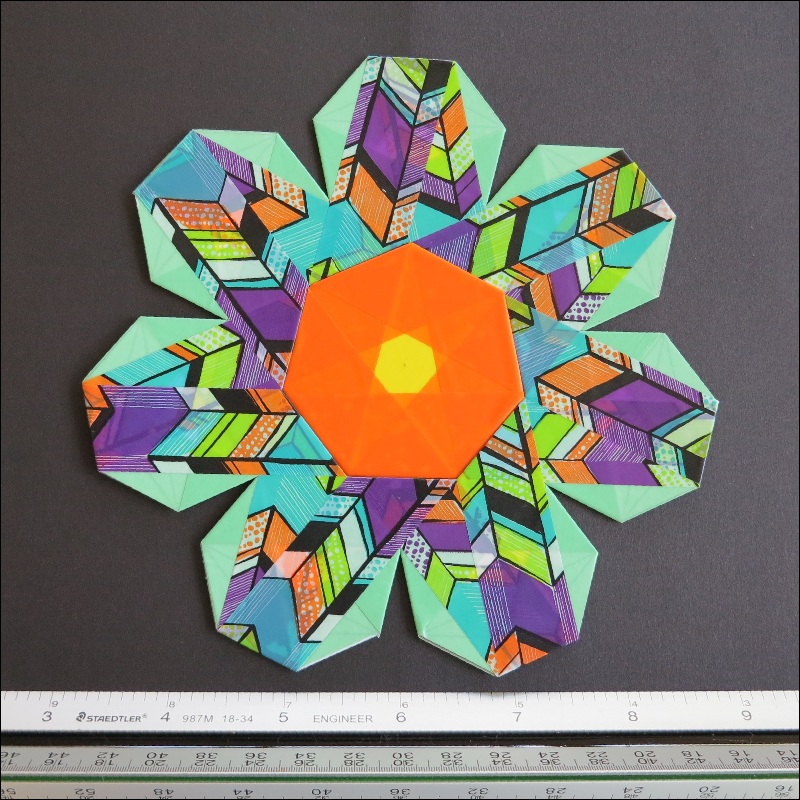
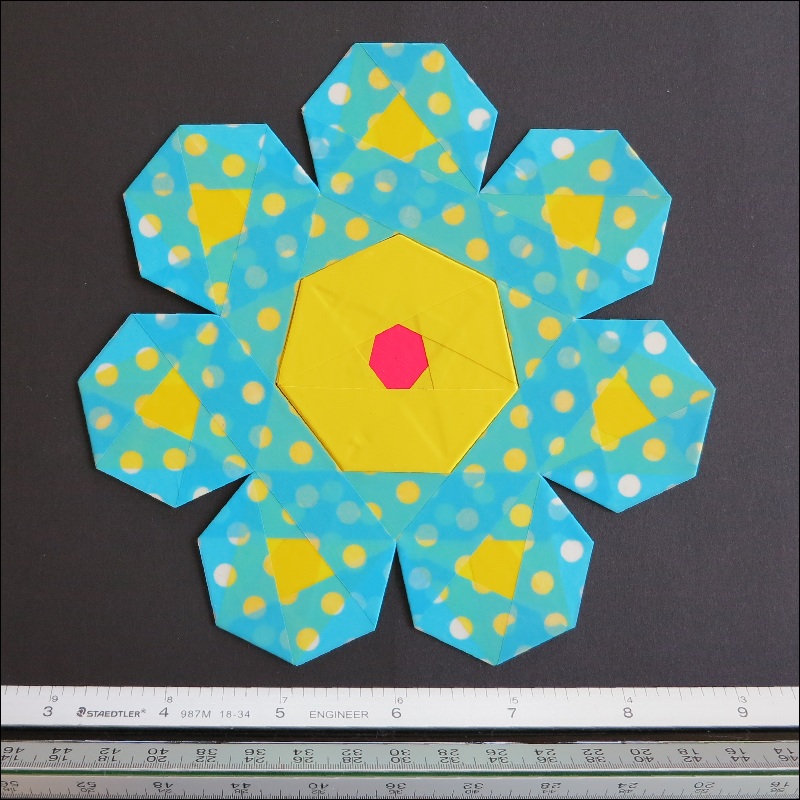
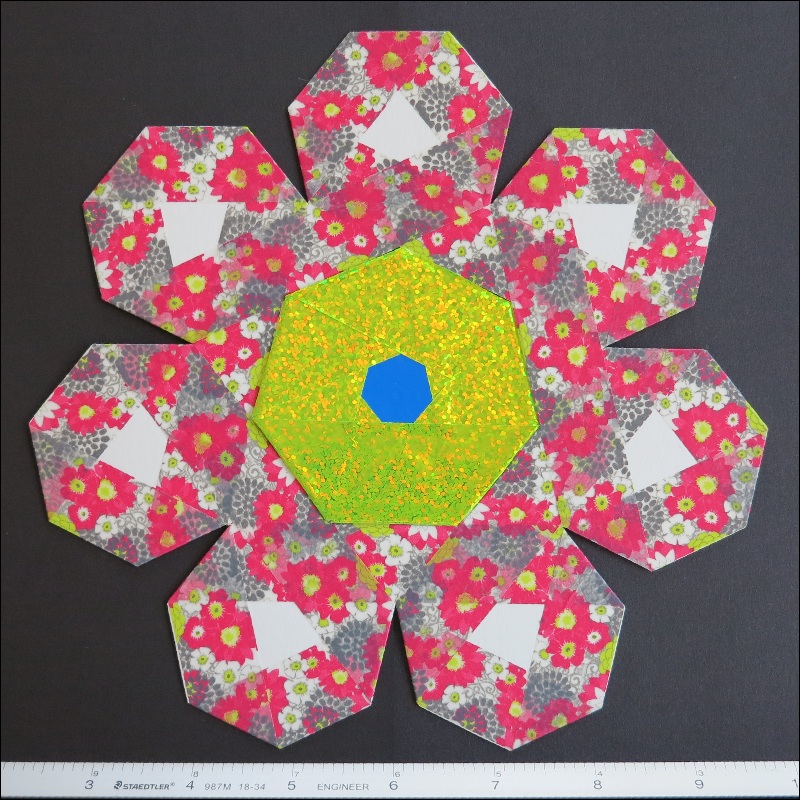
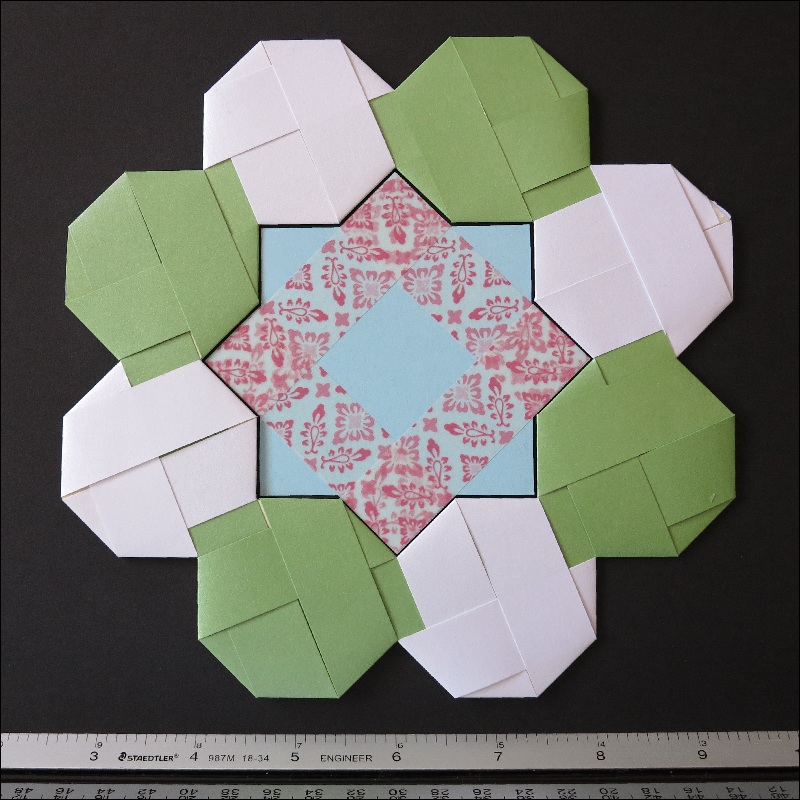
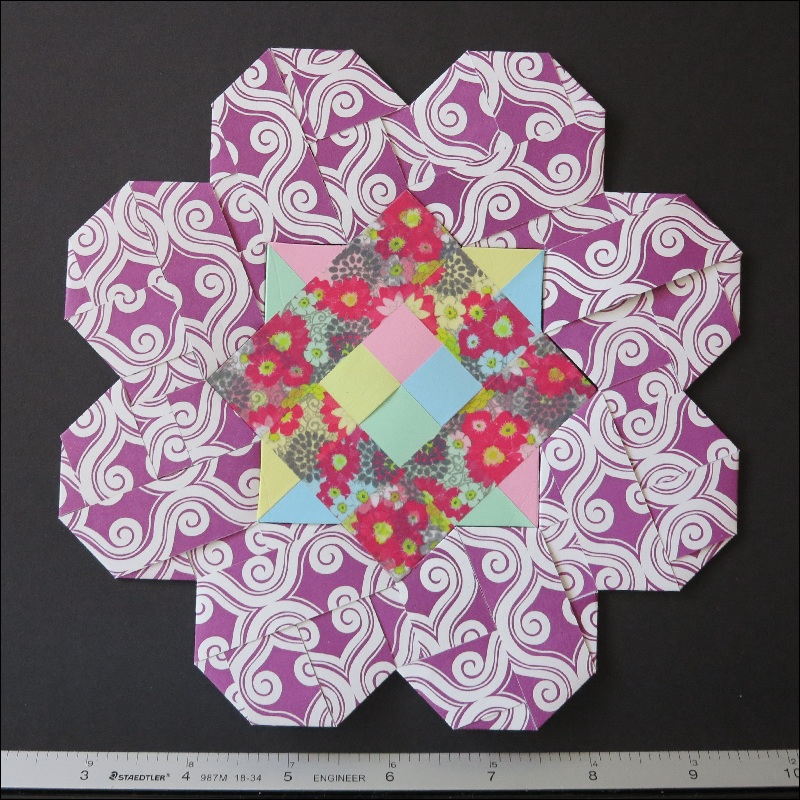
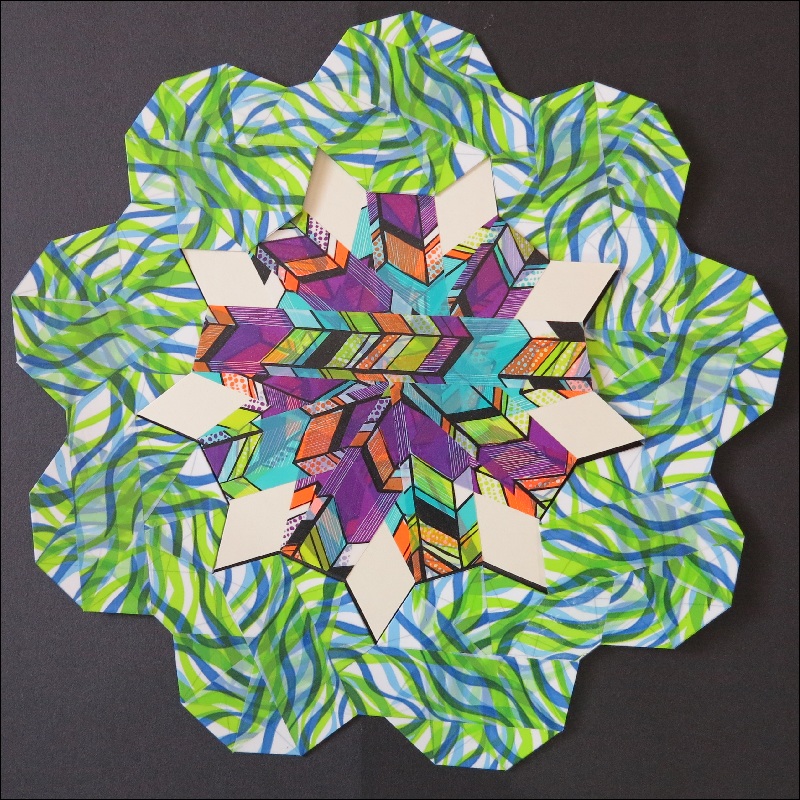
Most of the examples shown for the pentagon case above are without the pentagon
 in the center. When it becomes necessary to fill up that void space to make
 a complete pentagon, we have to do the following tricks. The precedure is explained
using a sample pattern used for the 2016 OrigamiUSA convention class.
|
Paper Strings used click here to enlarge open JPG for print 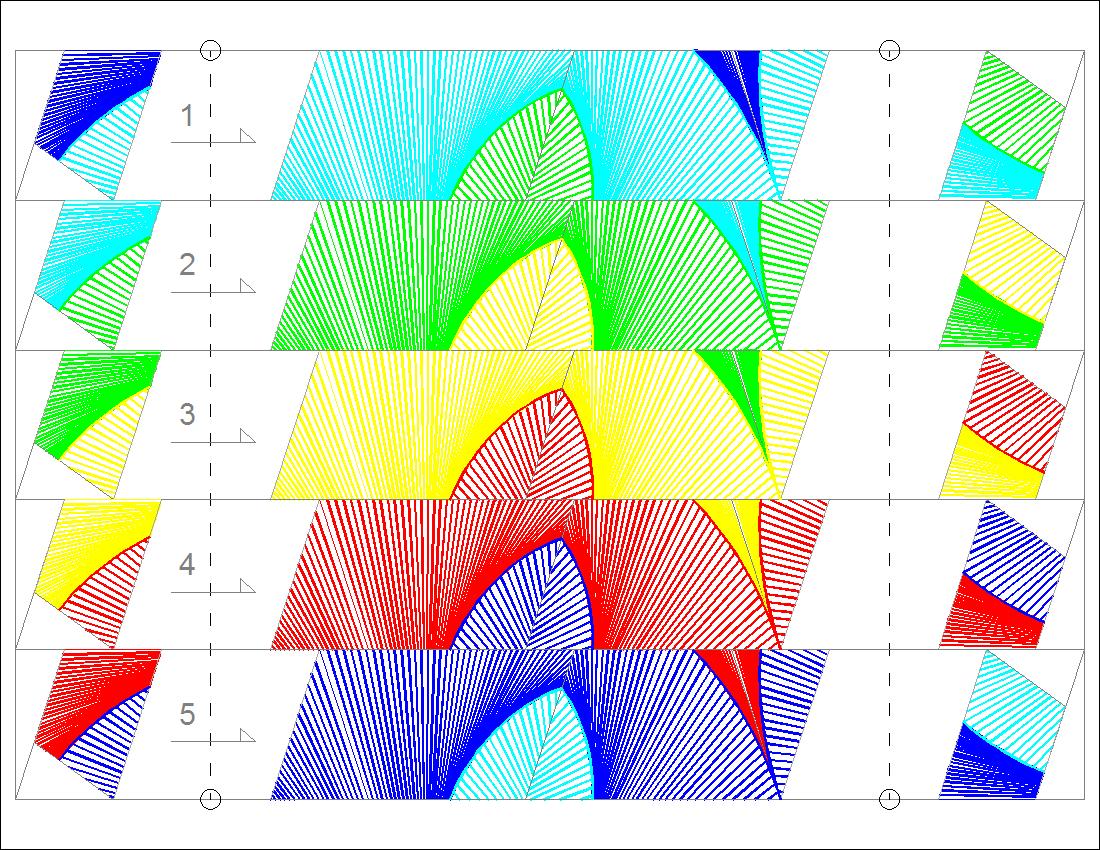 |
strip and center piece click here to enlarge open JPG for print 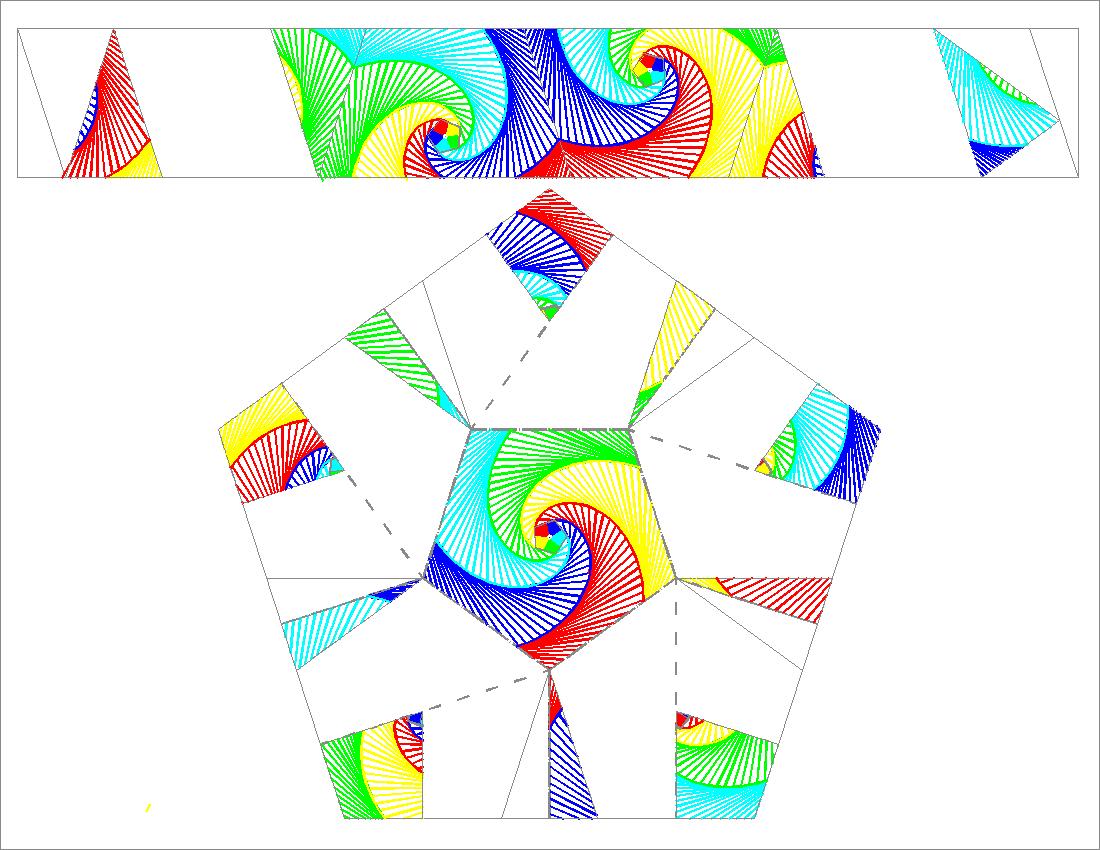 |
|
Finished Model : Front & Rear View click here to enlarge open JPG for print 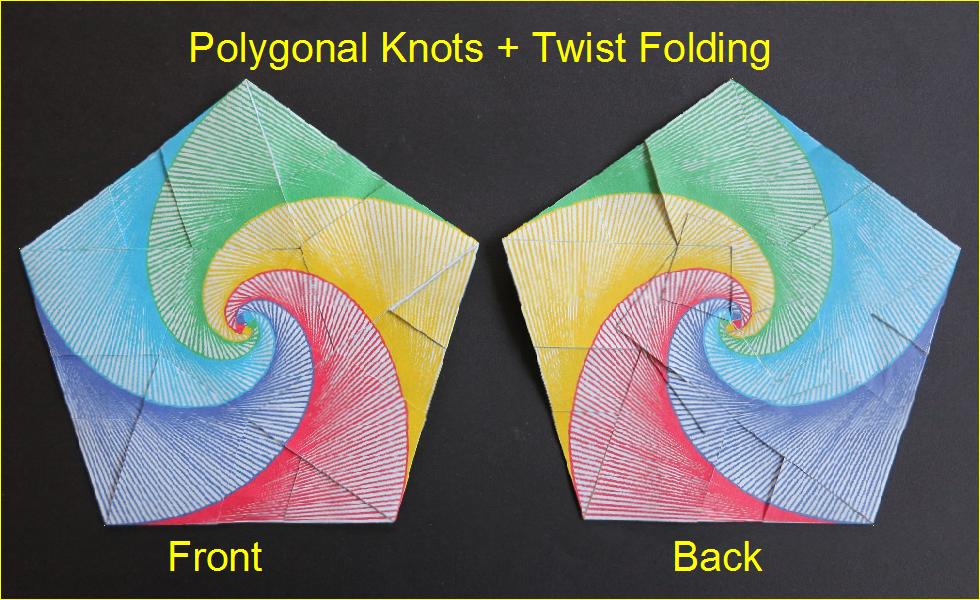 |
|
Folding lines for center piece click here to enlarge open JPG for print 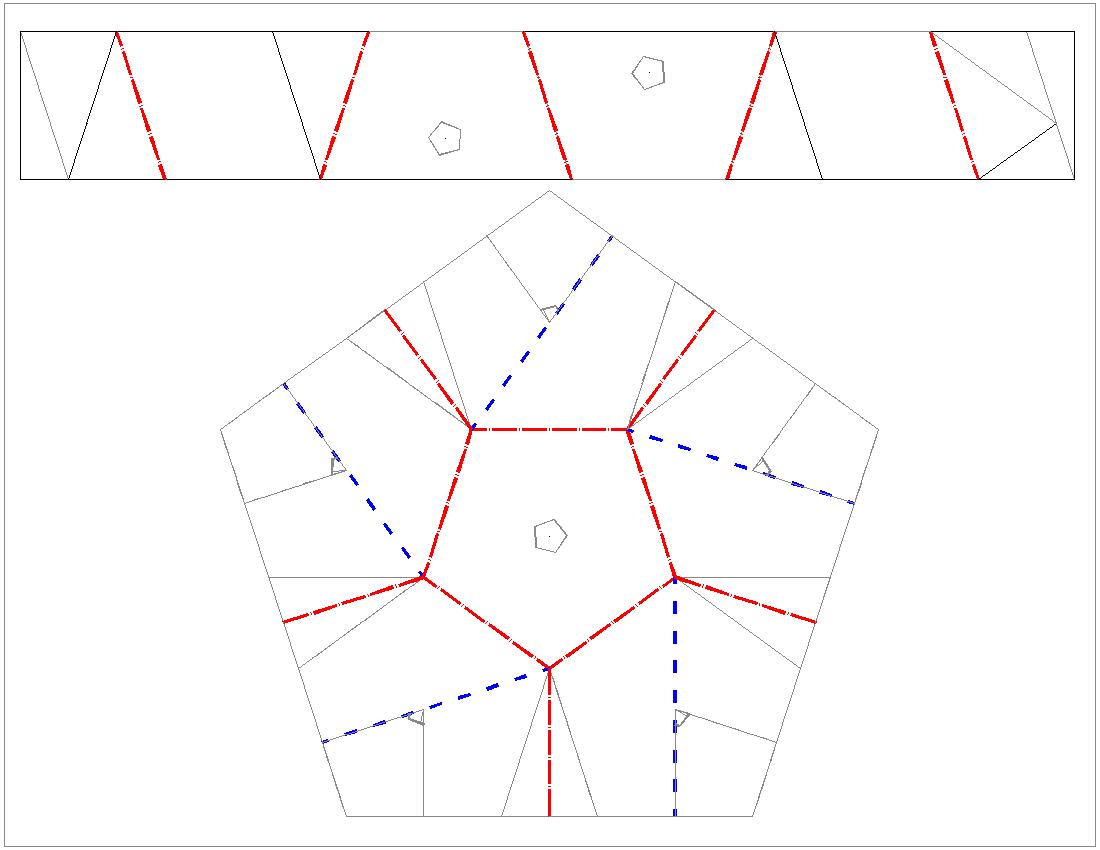 |
|
Outside pentagon ring click here to enlarge 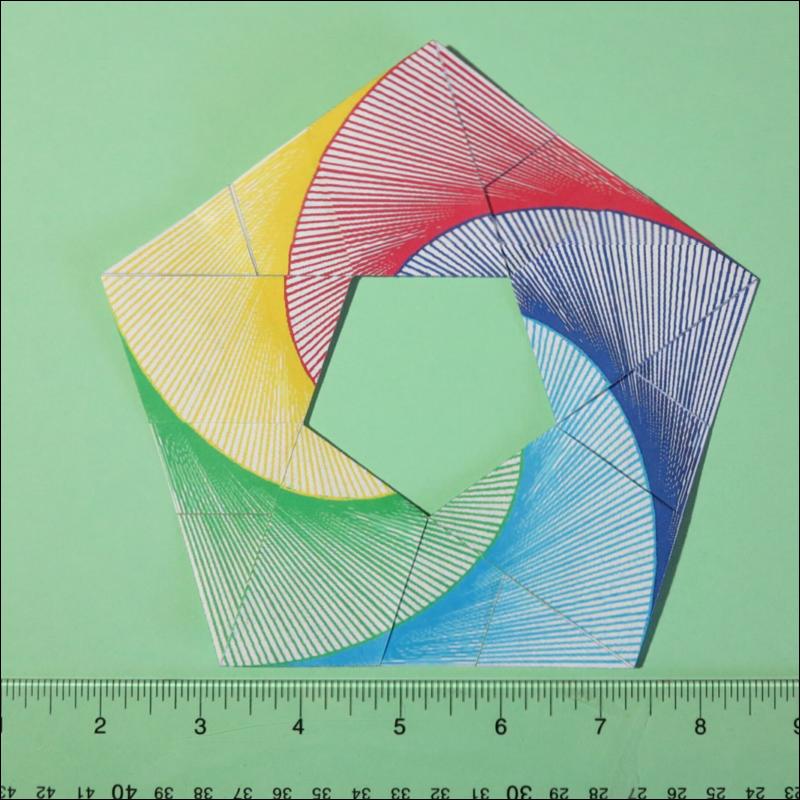 |
Option-1 result click here to enlarge 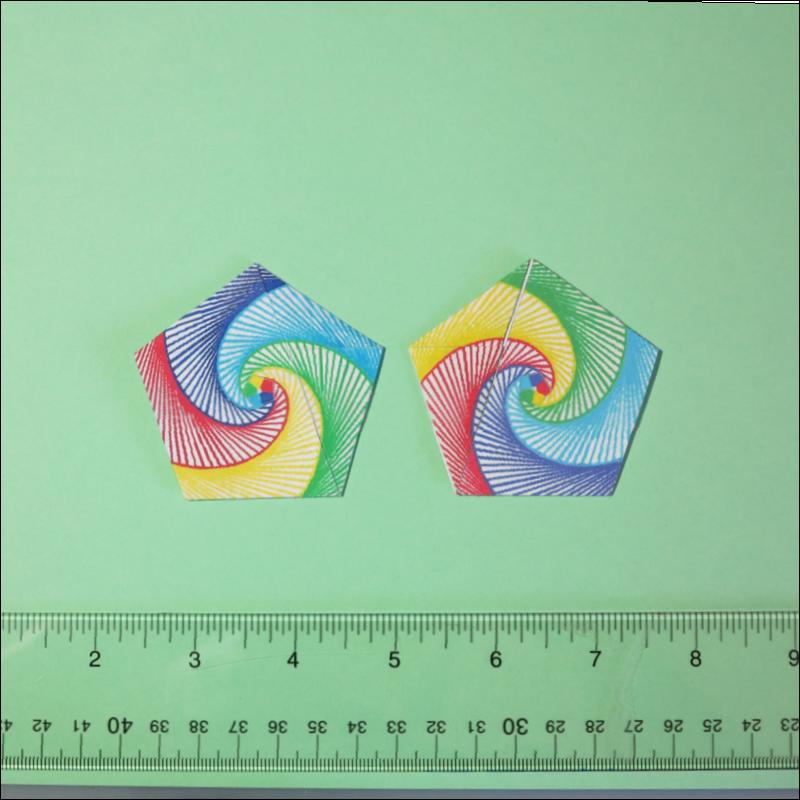 |
|
Option-2 result click here to enlarge 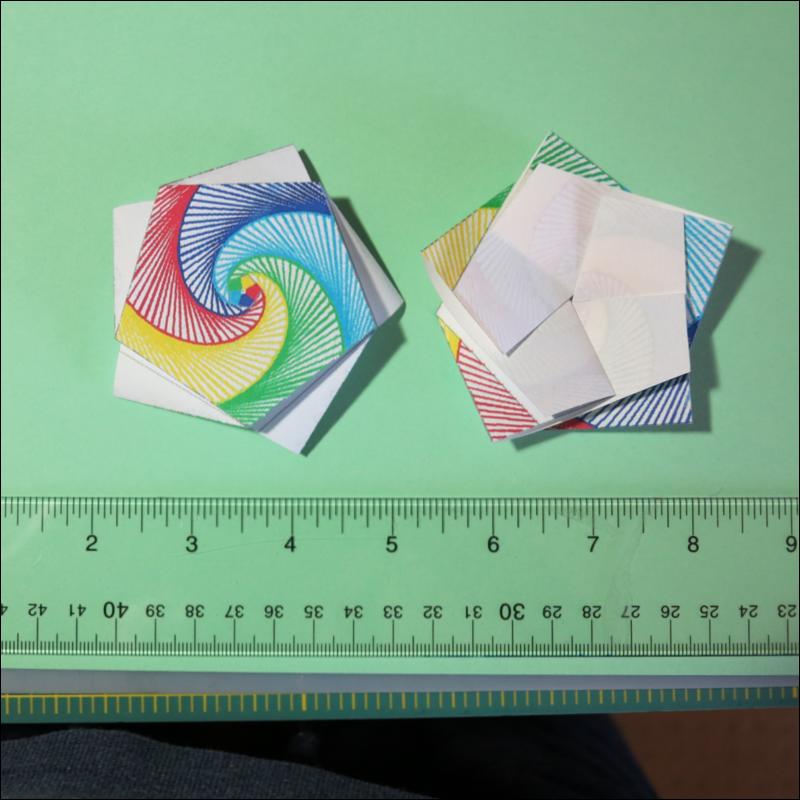 |
Final step of option-2 click here to enlarge 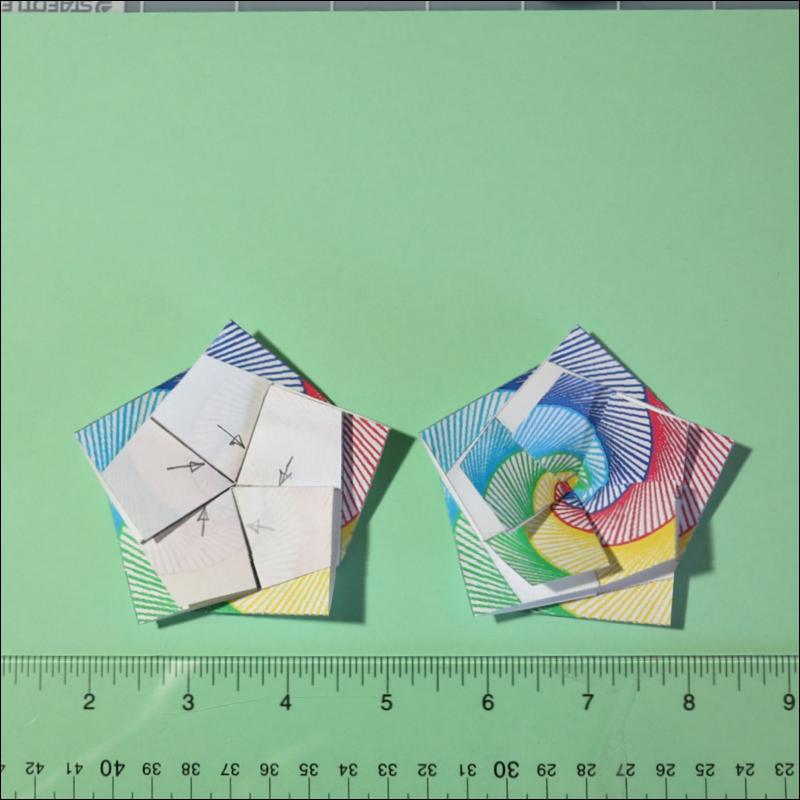 |
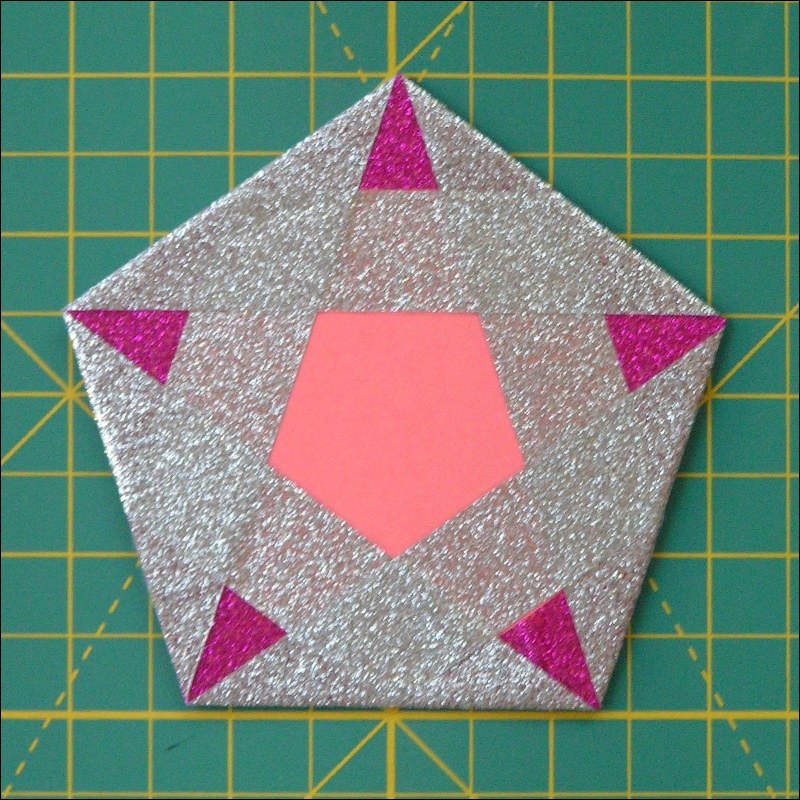
Steps to make the filled up pentagon.
step 1: cut out 5 pieces of strips. Follow the "Step by step instructions of making
the simplest pentagon ring . This will result in the configuration as shown
in Fig 5. There is a vacant pentagon space in the center.
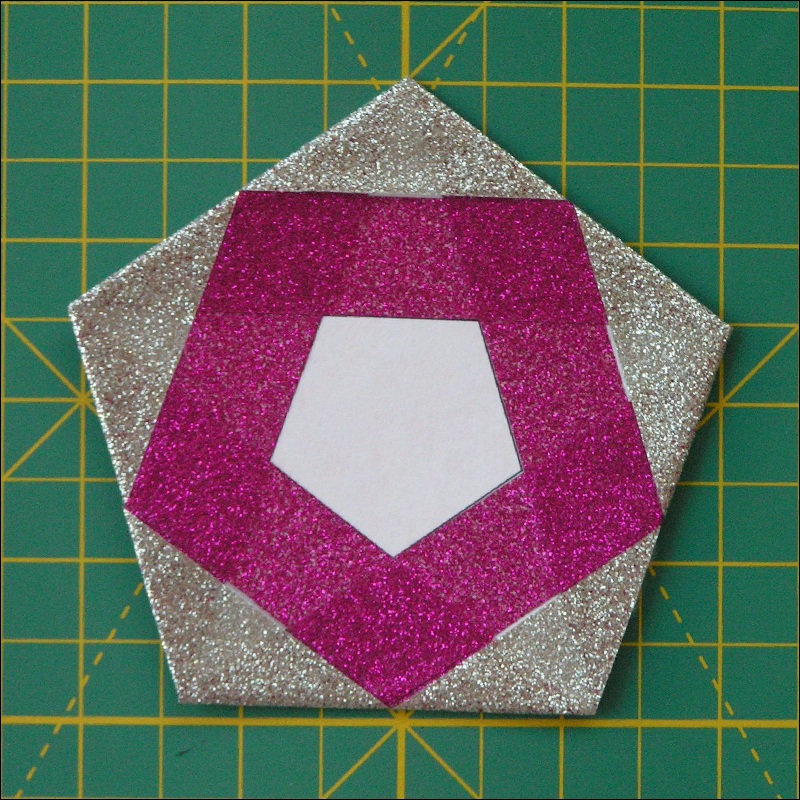
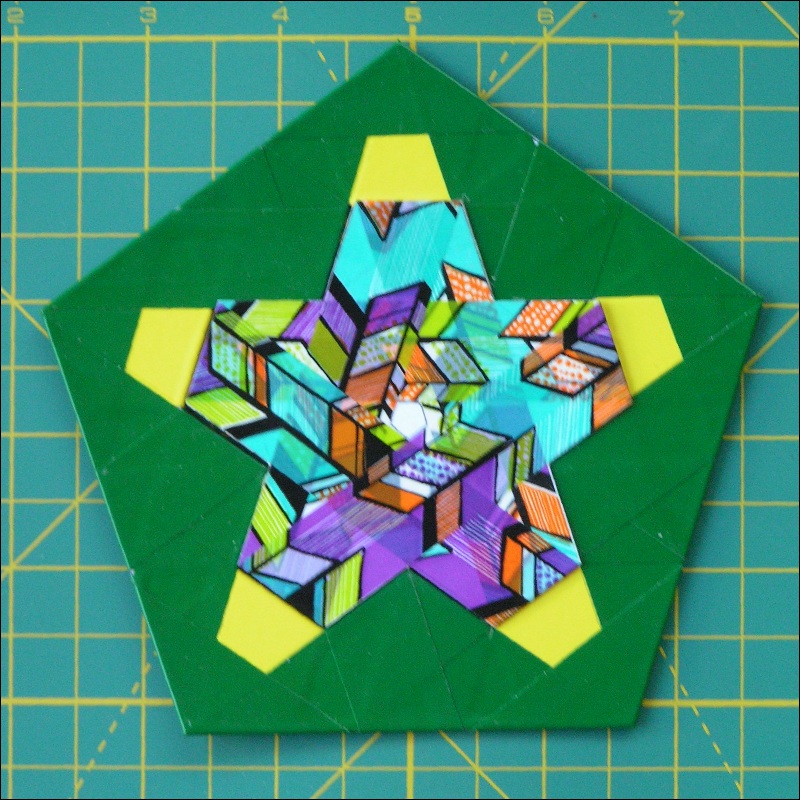
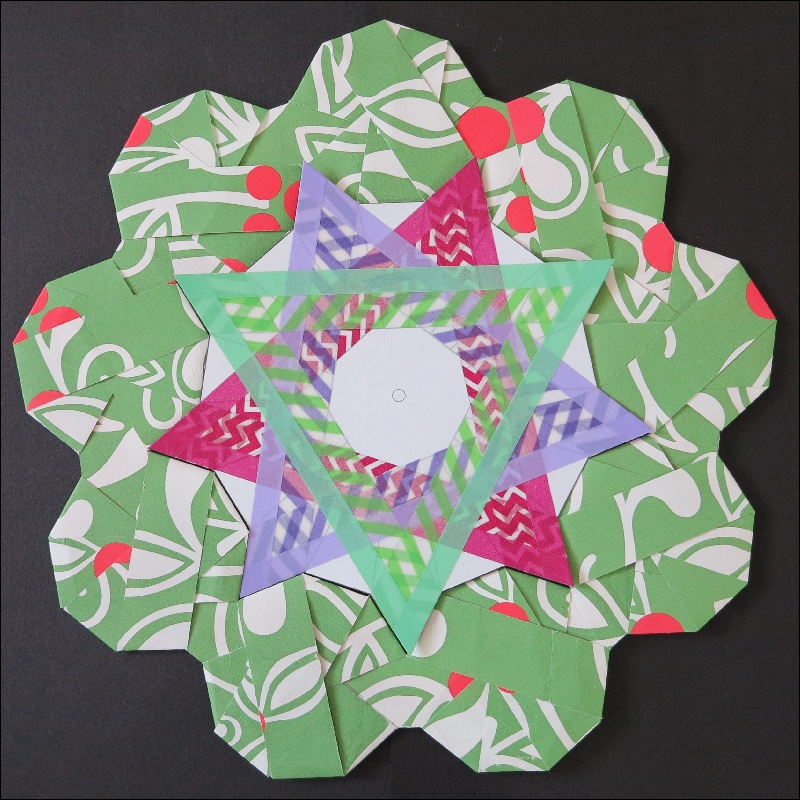
step 2:There are 2 options to make a pentagon which will fit the center.
option 1: using a single paper strip in the figure above "strip and center piece"
Notice the pattern differs slightly from the pentagon strip in the left above.
option 2: apply "twist fold" to the pentagon figure in "strip and center piece".
In order to make the folding lines clear, a separate figure is shown above.
"mouintain fold" is shown by red color, and "valley fold", by blue.
The resulting center pieces after folding are also shown for both cases.
One more step is required for option 2 to make the back side match the
surrounding pattern. Mark pencil lines along the folded edges( shown by arrows),and
make scissor cuts along the lines. Open all 5 flaps as shown in the figure.
Glue these flaps and the option-2 process is finished.
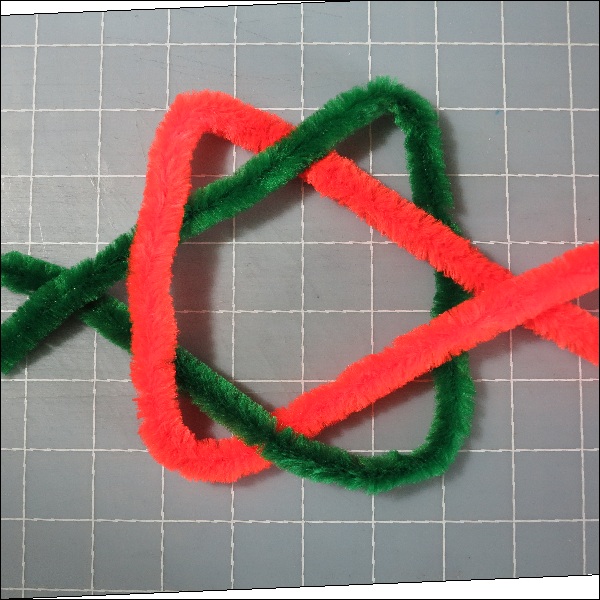
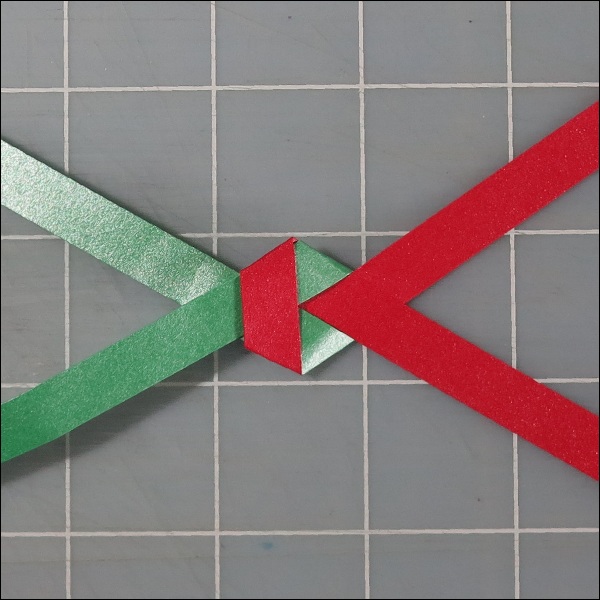
      Figure A   Knot pattern by two pipe cleaners.
      Figure B   Knot by 3/8 inch quilling tape
      Figure C   quilling tapes flattened
|
Figure A click here to enlarge 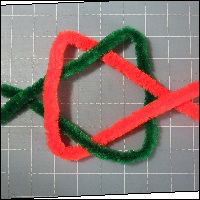 |
Figure B click here to enlarge 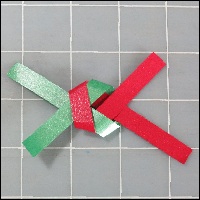 |
Figure C click here to enlarge  |
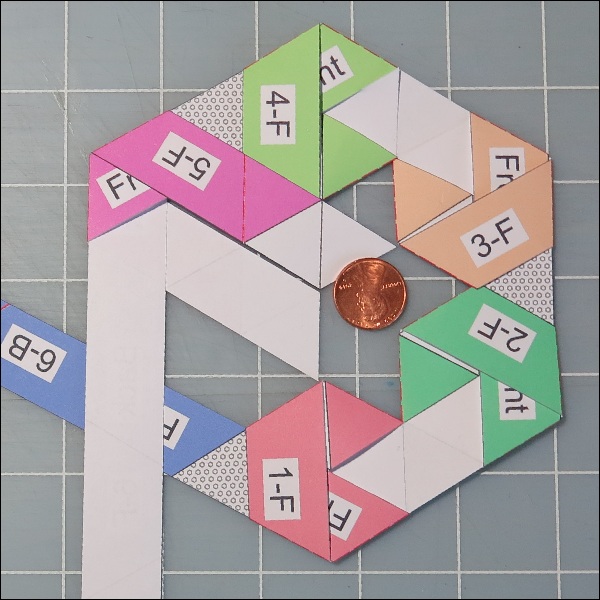
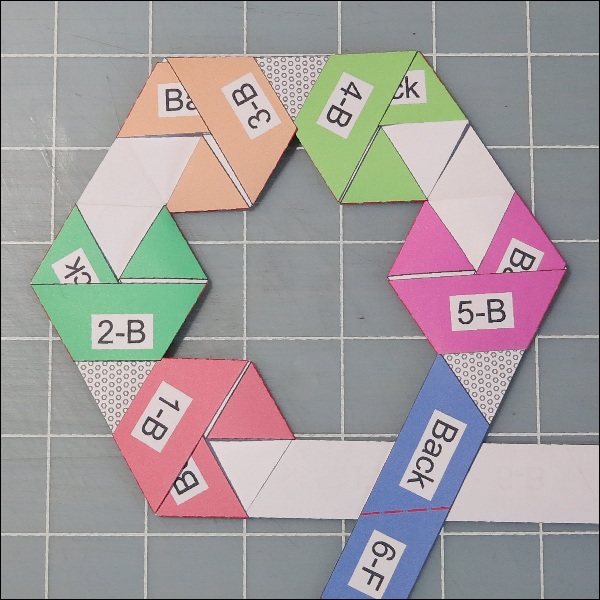
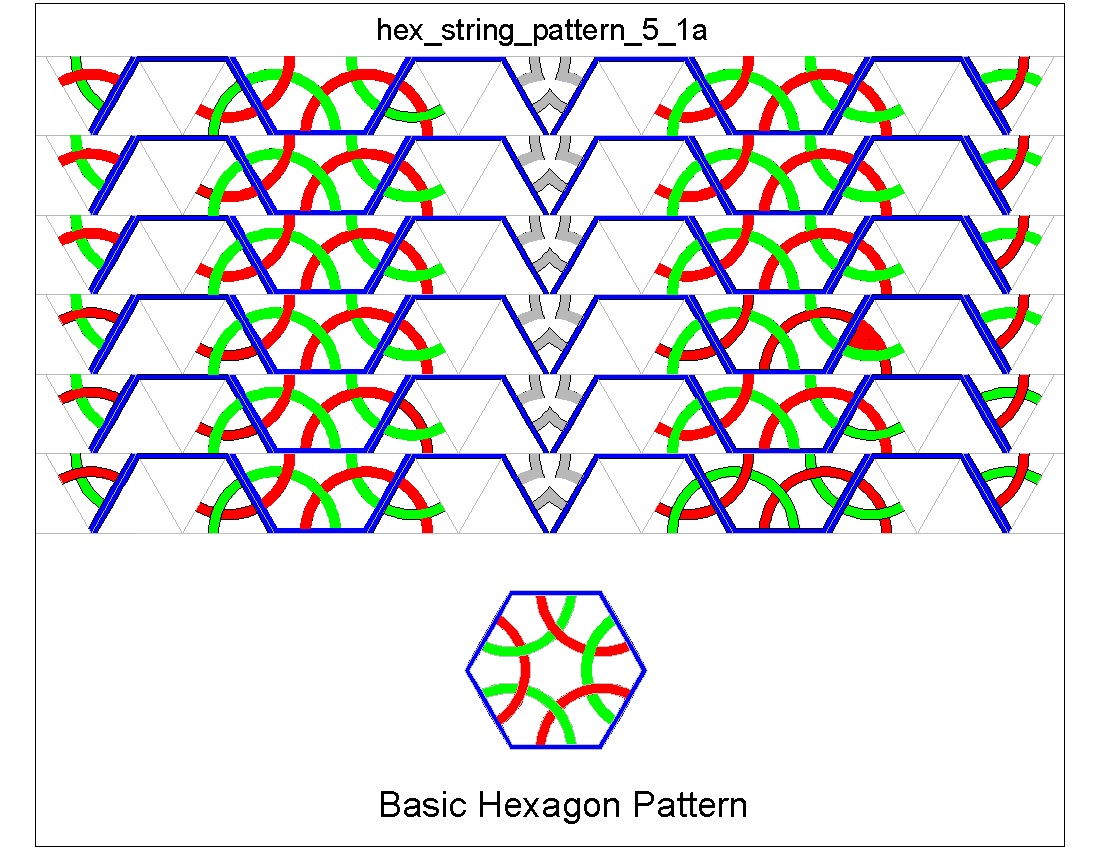
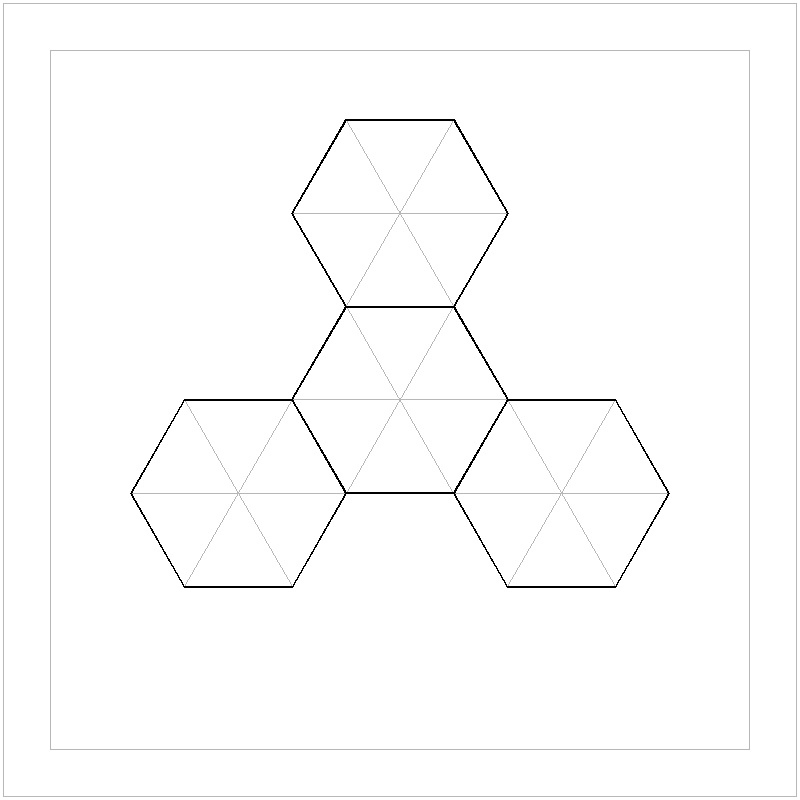
     The first step is to print out the drawing below. Then using the old ballpoint
    cartridge, trace the red lines. This process makes "mountain fold" easier .
    Using a very sharp pointed knife, cut out 6 pieces of strips. This ring requires
    6 hexagon units and we start the folding process following the figures from
    "Hexagon #1" through "Hexagon #6".
|
Trial #1 Drawing click here to enlarge & print  |
Trial #1 Result enlarge Front View Back  |
|
Hexagon #1 Front click here to enlarge 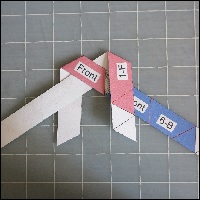 |
Hexagon #1 Back click here to enlarge 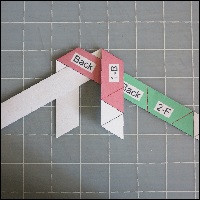 |
Hexagon #1 End Front Back  |
|
Hexagon #2 Front click here to enlarge  |
Hexagon #2 Back click here to enlarge  |
Hexagon #2 End Front enlarge Front View Back 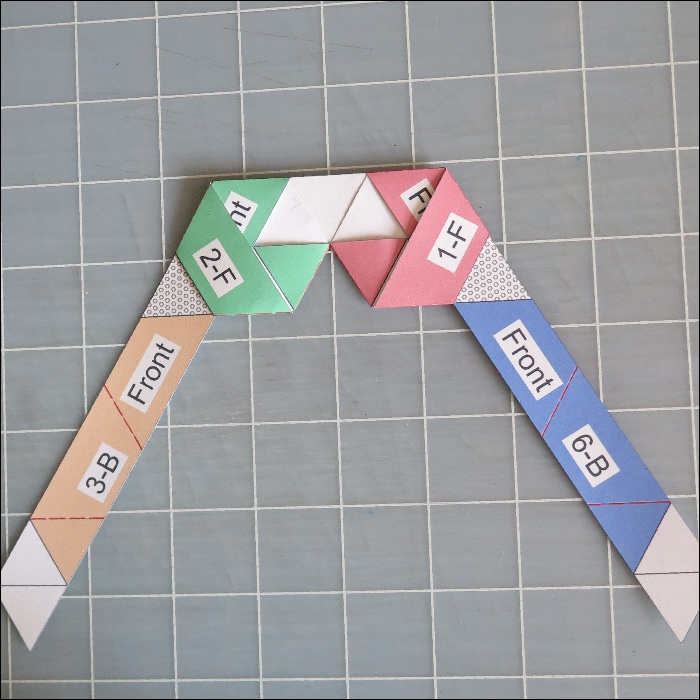 |
|
Hexagon #3 Front click here to enlarge 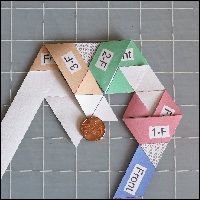 |
Hexagon #3 End enlarge Front View Back 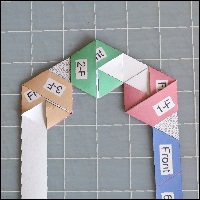 |
Hexagon #4 Front click here to enlarge 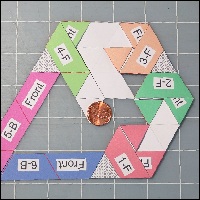 |
|
Hexagon #4 End enlarge Front View Back 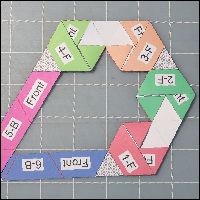 |
Hexagon #5 Front click here to enlarge 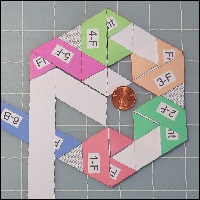 |
Hexagon #5 End enlarge Front View Back 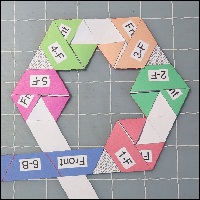 |
|
Hexagon #6 Front click here to enlarge 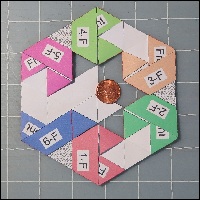 |
Hexagon #6 End enlarge Front View Back |
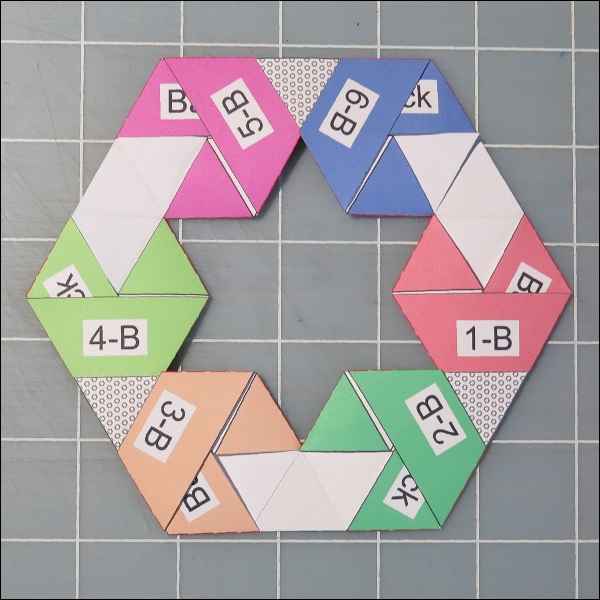
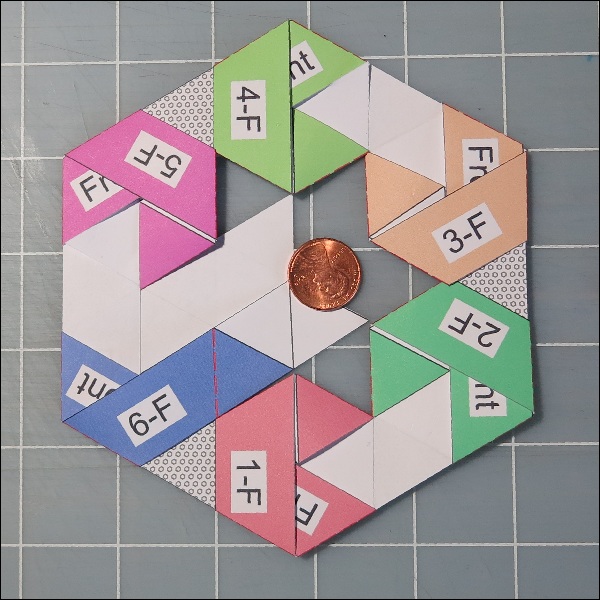
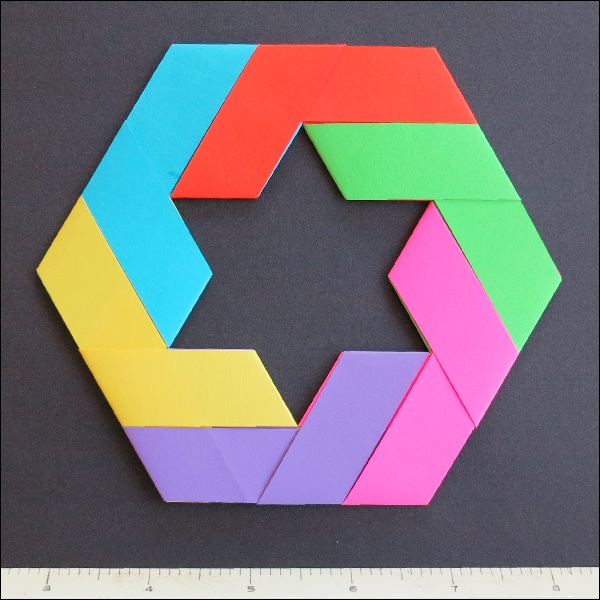
     When printer papers of 6 different colors are used instead of a plain white color,
    and the same process is applied , the result will be as shown in the following figure.
    Can you notice the difference ?
     One of the problem of this folding scheme is that the unit hexagon is not a complete
    hexagon which is missing just one triangular segment. The following "Trial fold #2"
    addresses this issue. It also gives a hint on how to make the predetermined hexagonal
    pattern.
|
Variation of #1 click here to enlarge 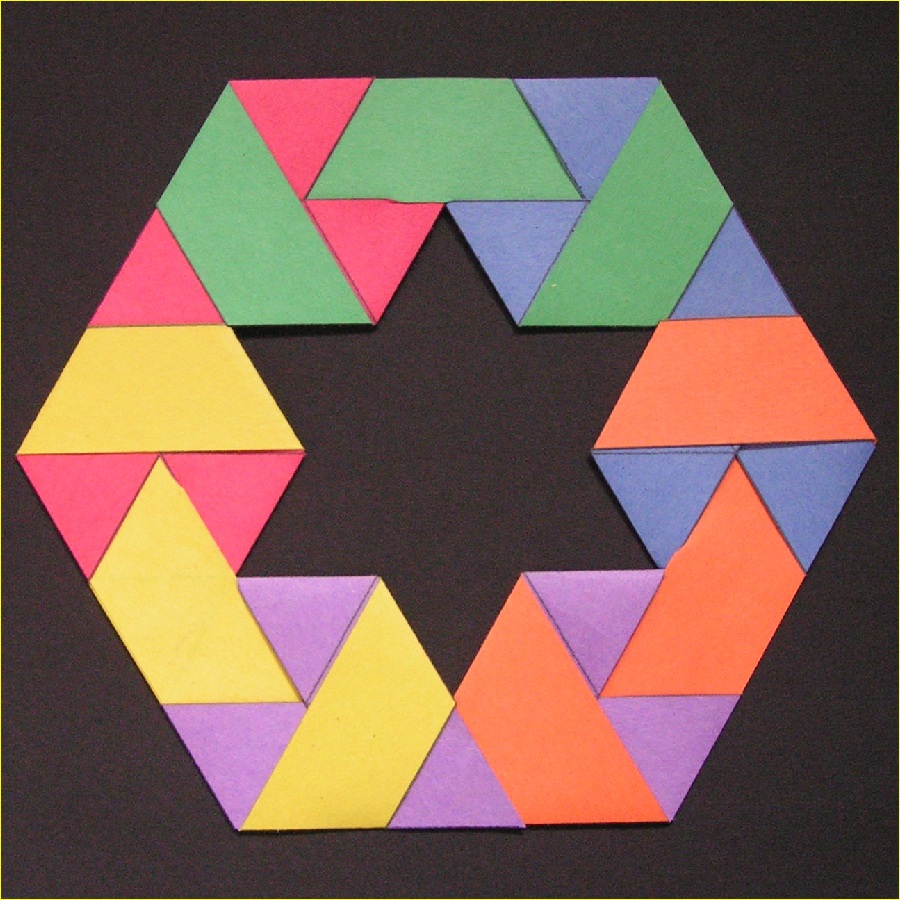 |
|
Trial #2 Drawing click here to enlarge & print 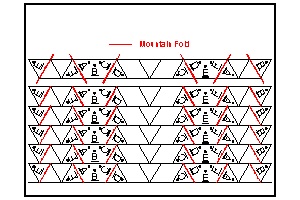 |
Trial #2 Result enlarge the image 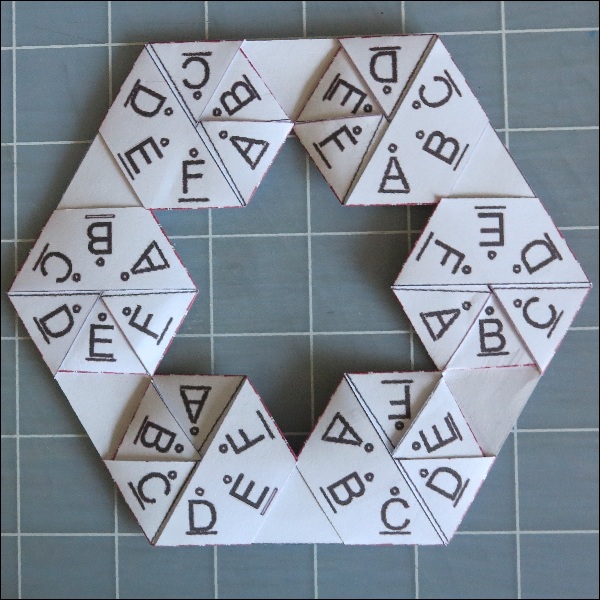 |
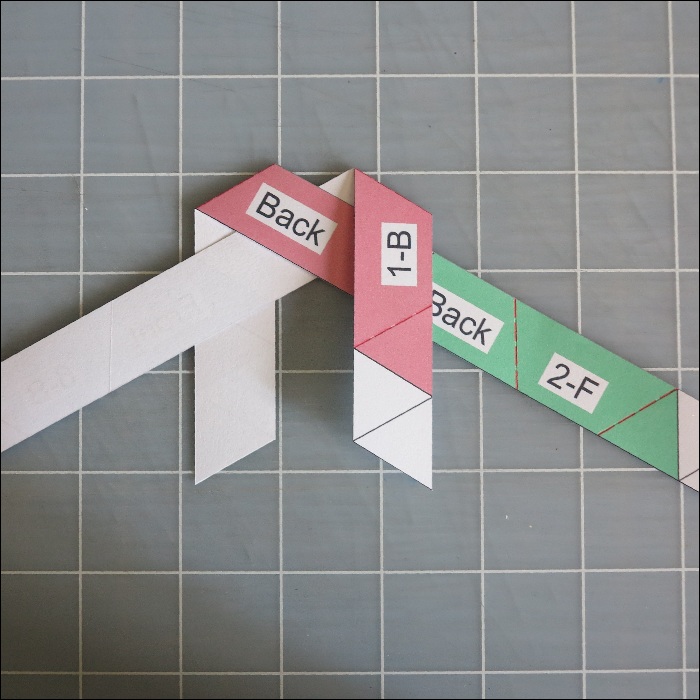
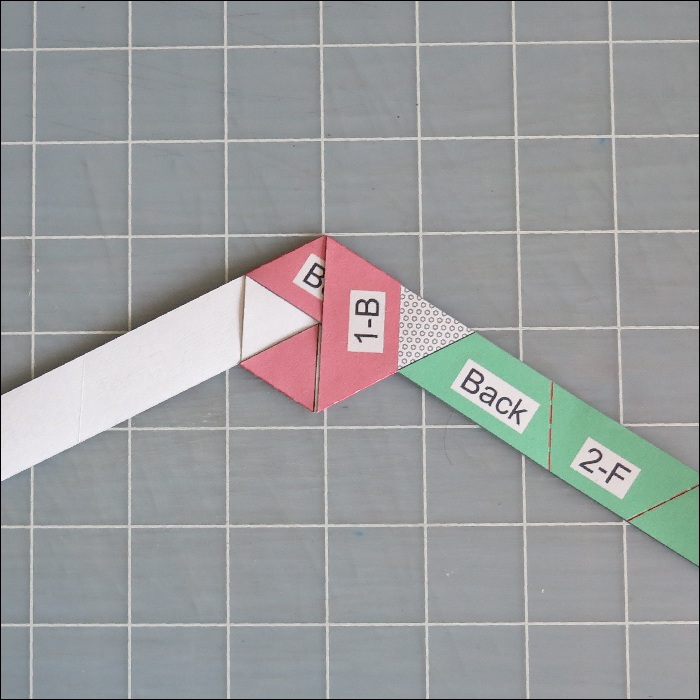
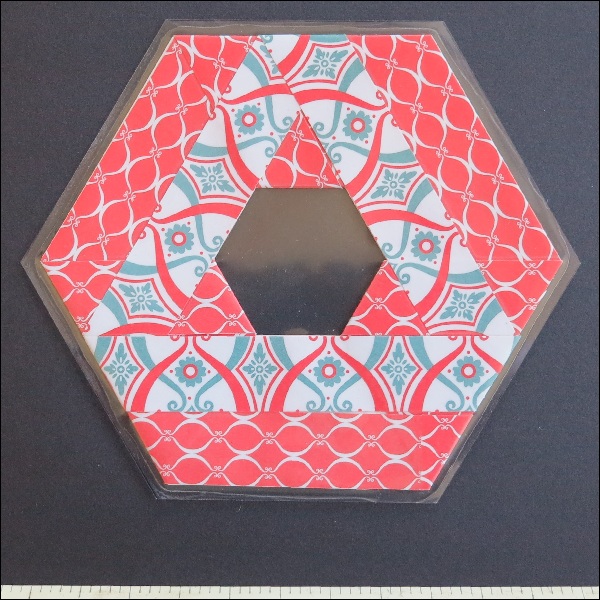
Basically the folding steps are similar to #1 case except the edges extend out
one more triangle units. And these extras will be folded and tucked into the
hexagon unit. The following figures illustrate the first hexagon making process.
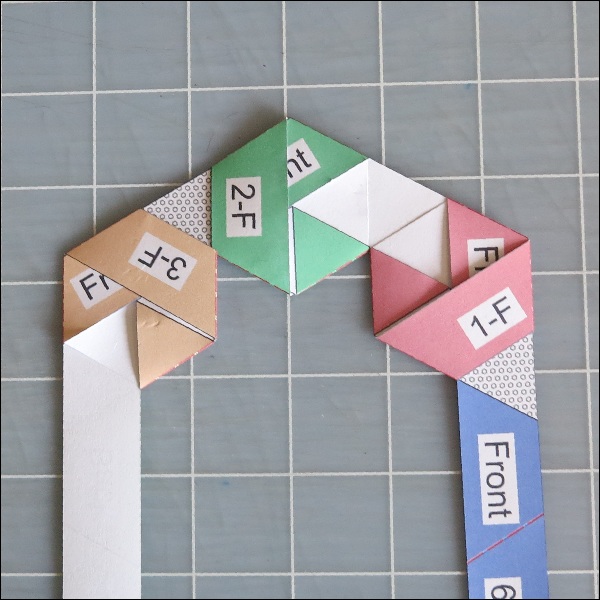
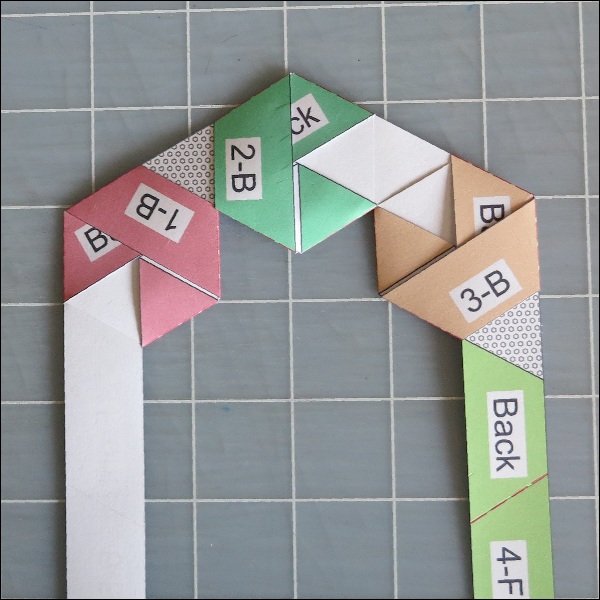
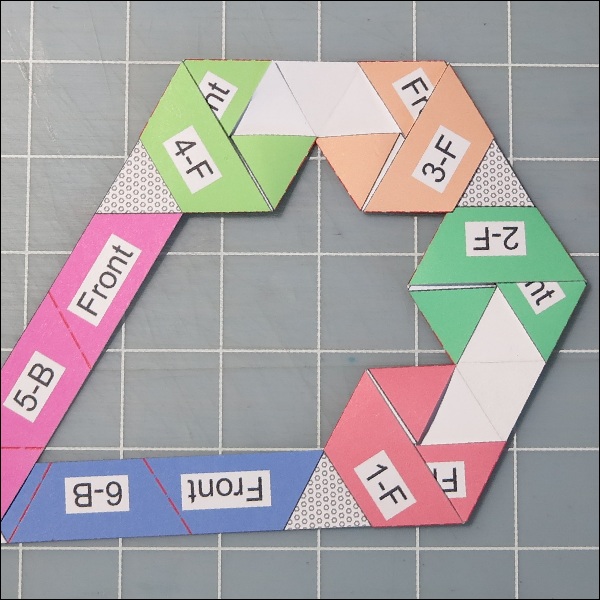
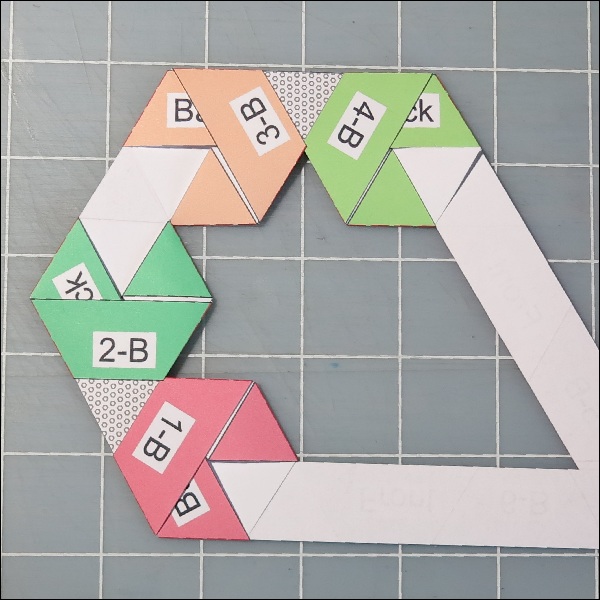
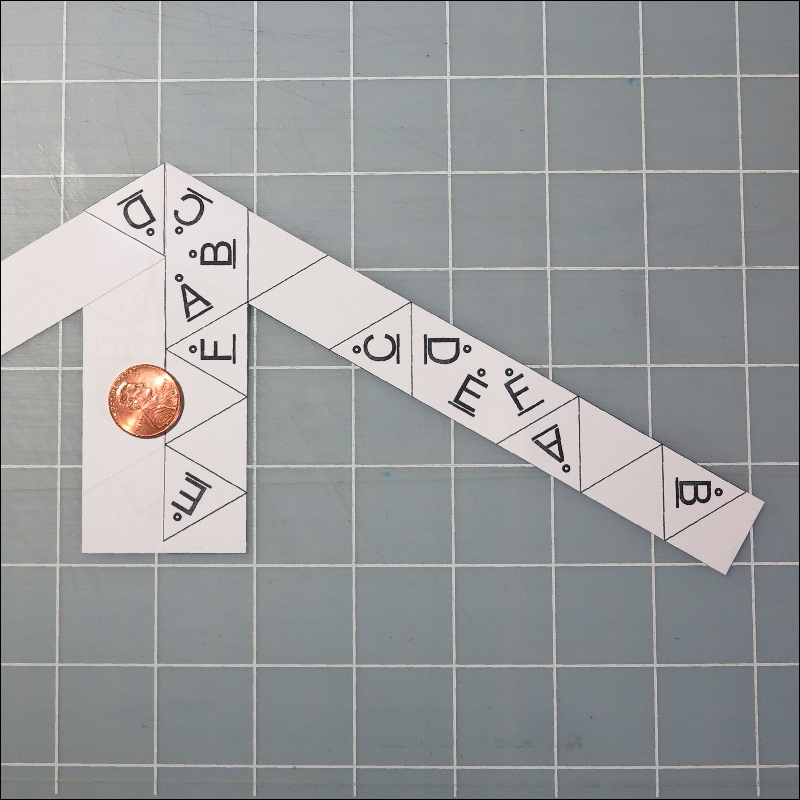
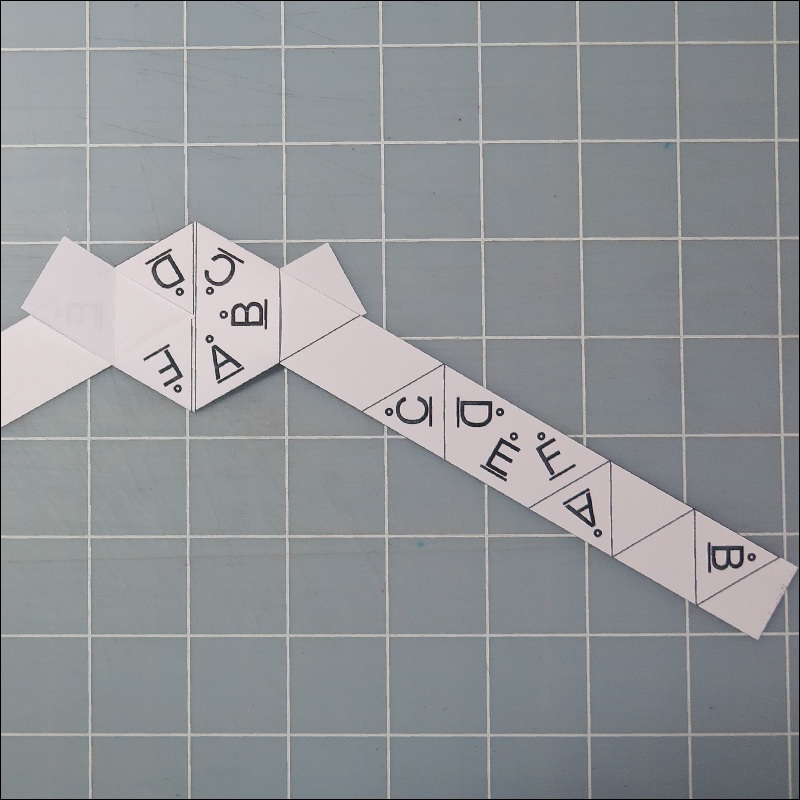
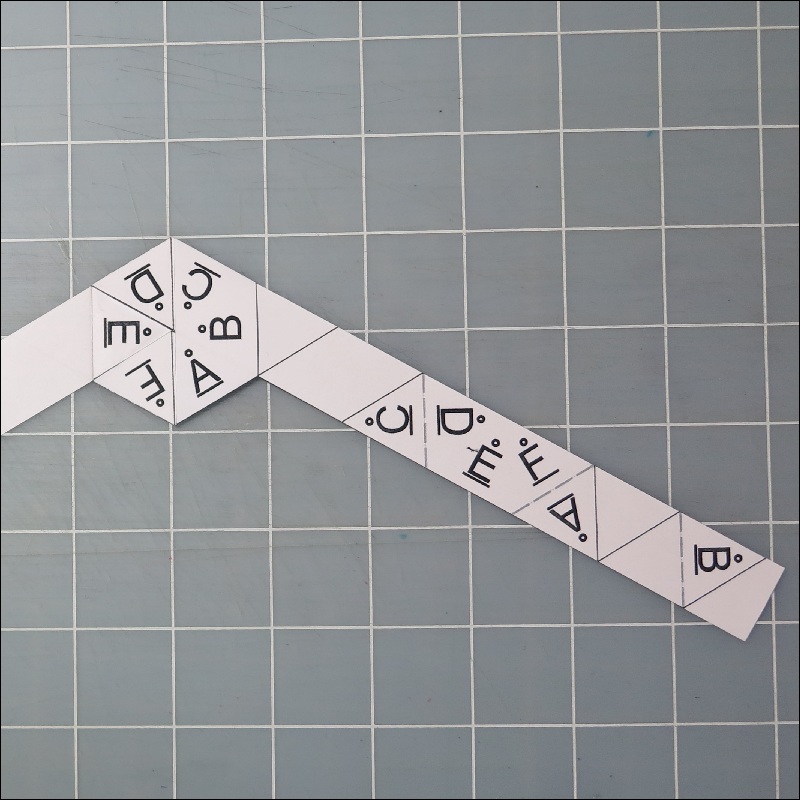
step 1: Cross 2 strips just like #1 case.
step 2: Intersect these strips to form a hexagon.
Notice extra triangle pieces.
step 3: Fold back these extra pieces into the hexagon.
|
Hex #2 step-1 click here to enlarge 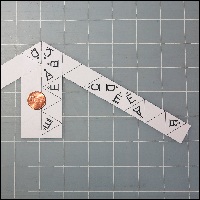 |
Hex #2 step-2 click here to enlarge 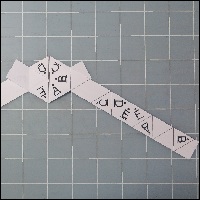 |
Hex #2 step-3 click here to enlarge 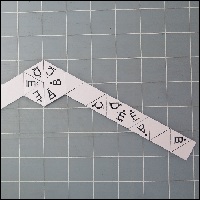 |
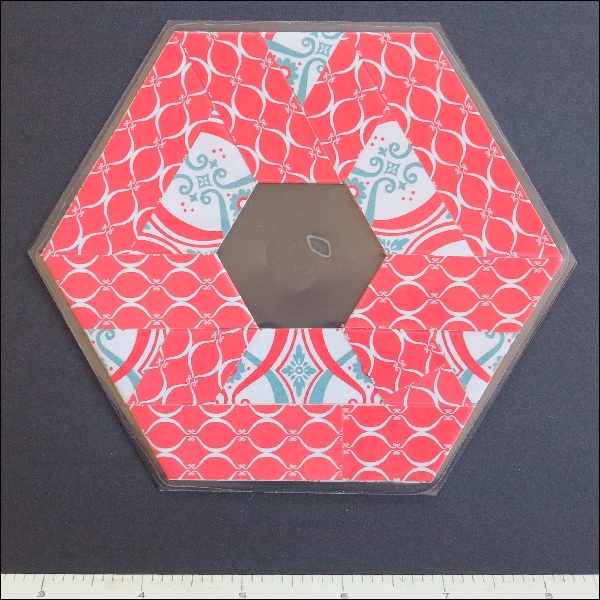
Now we know how to repeat the same hexagon pattern, a few examples will be shown.
|
Example #1 Drawing click here to enlarge & print 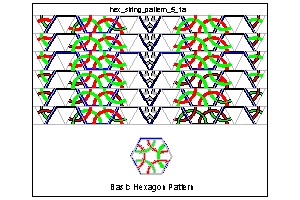 |
Example #1 Result enlarge the image 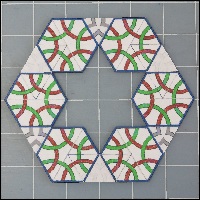 |
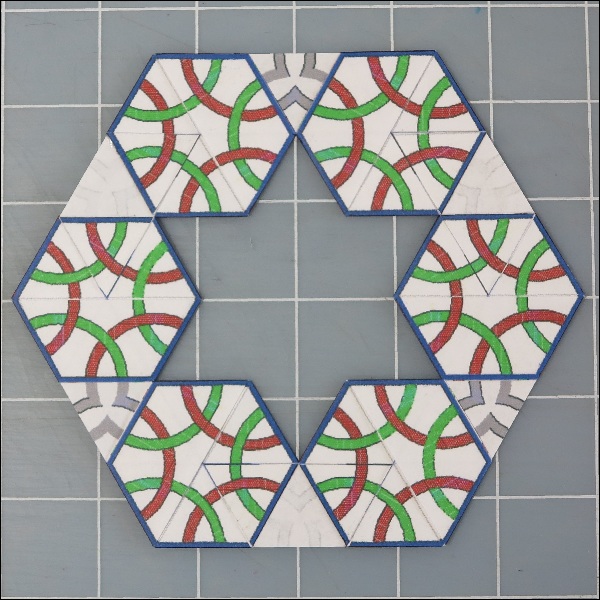
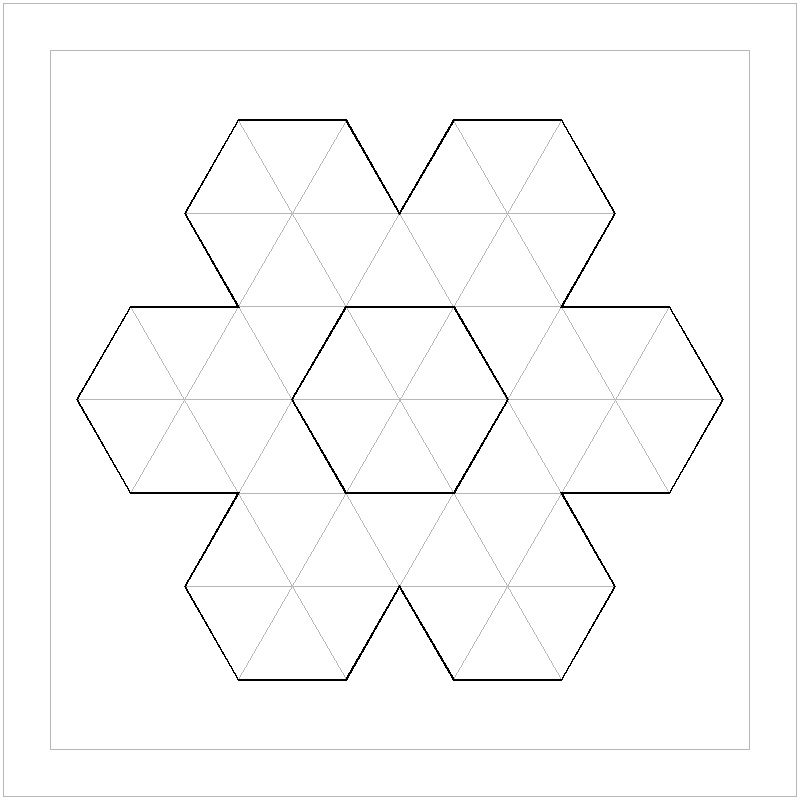
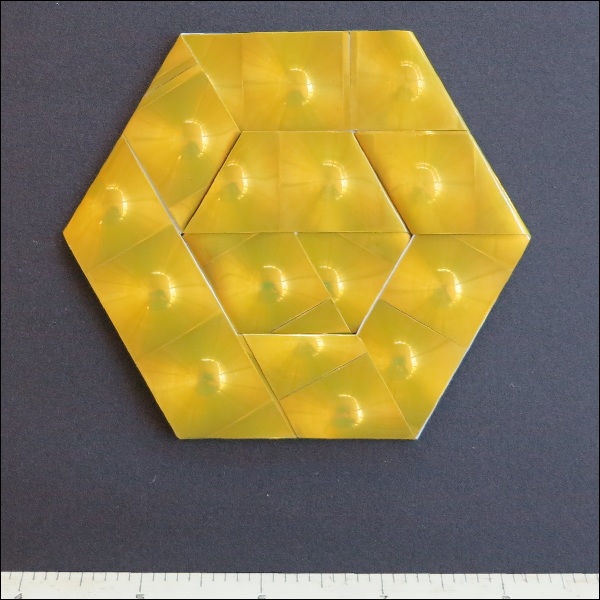
     As shown in the photos below, it is also possible to create rings made up
    of 3 and 12 hexagon units. The paper strings required are  repetitions of
    equilateral triangle pattern.
|
Hexagon Case #1 click here to enlarge 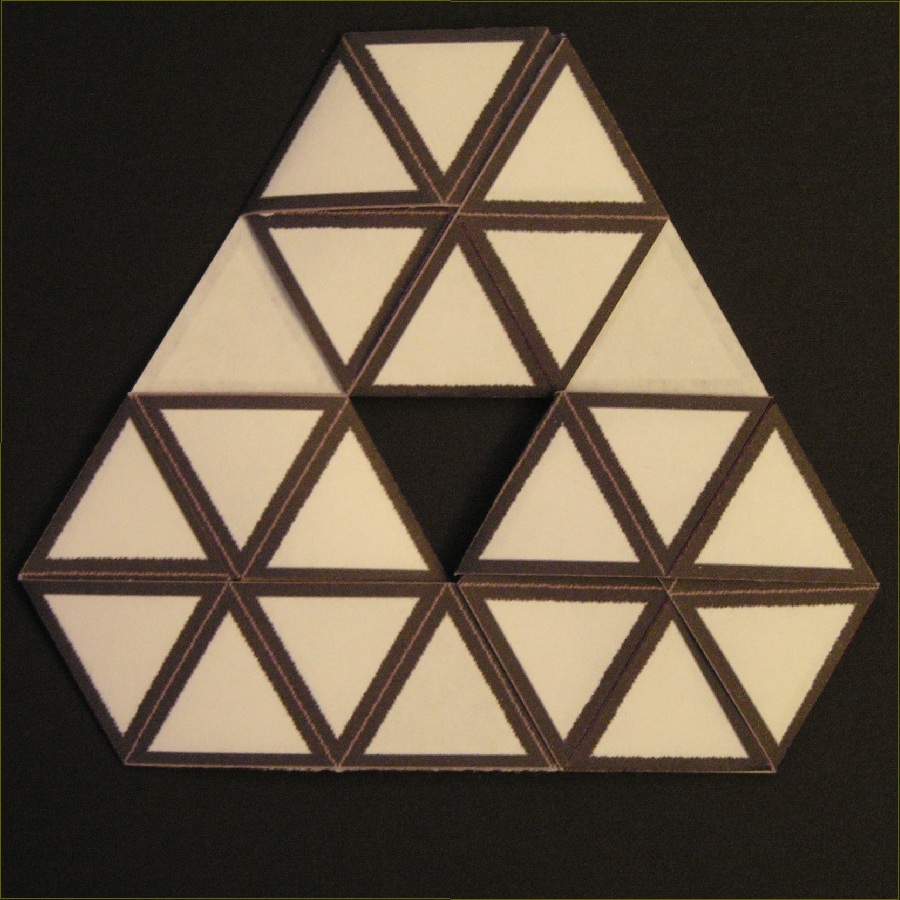 |
Hexagon Case #3 click here to enlarge 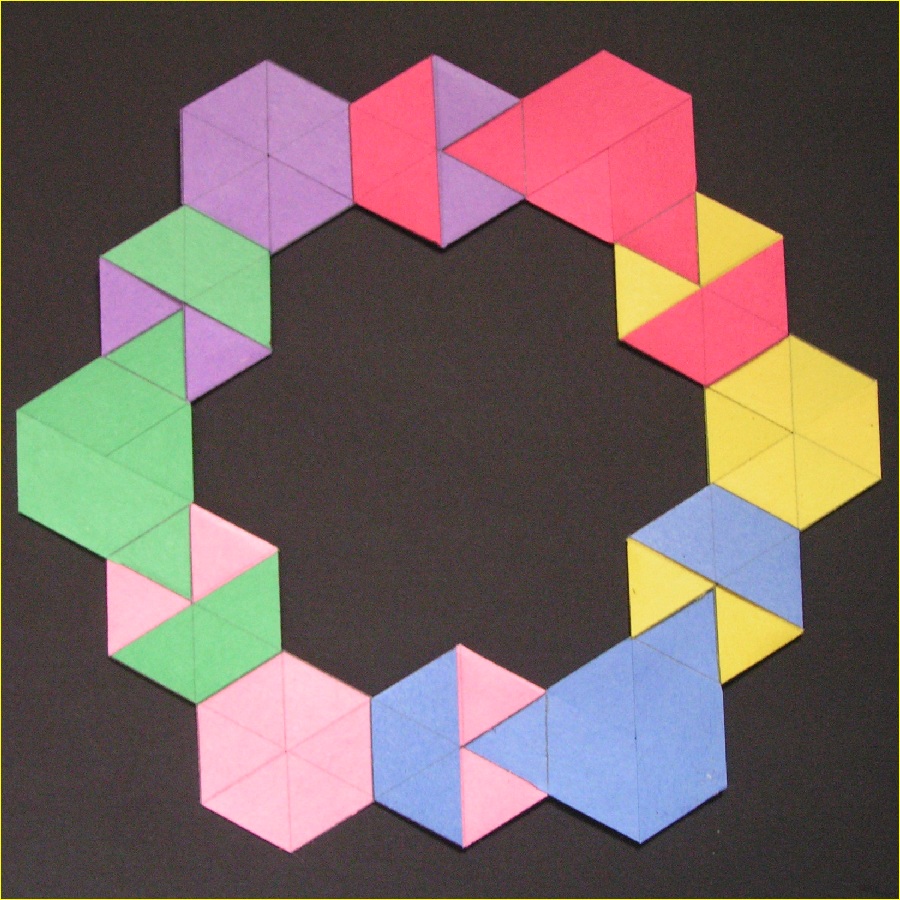 |
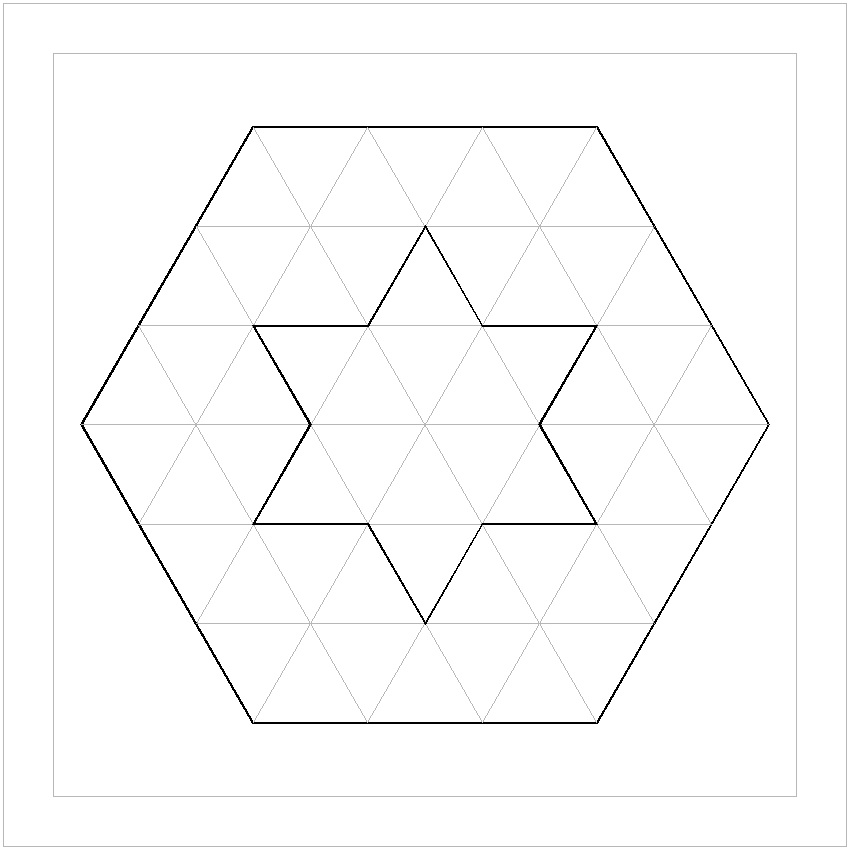
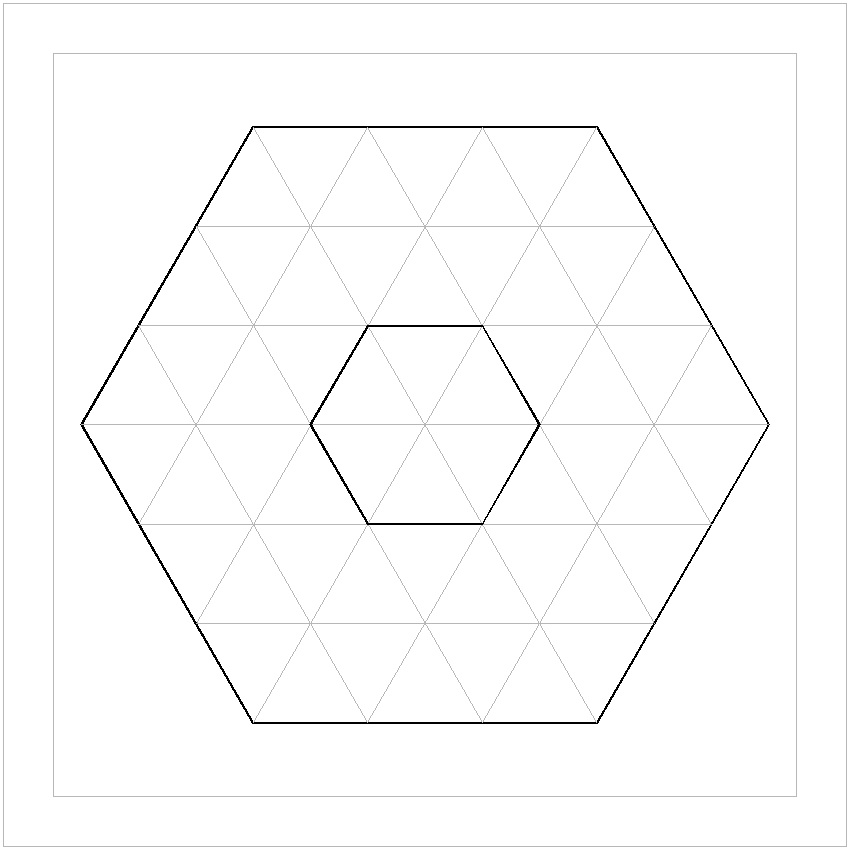
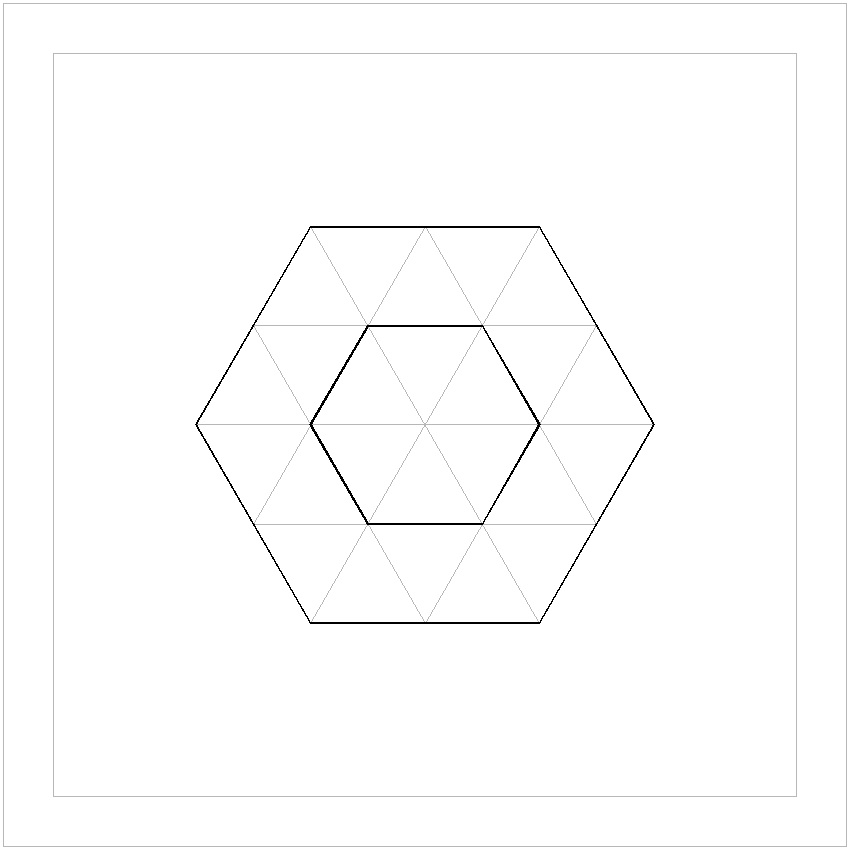
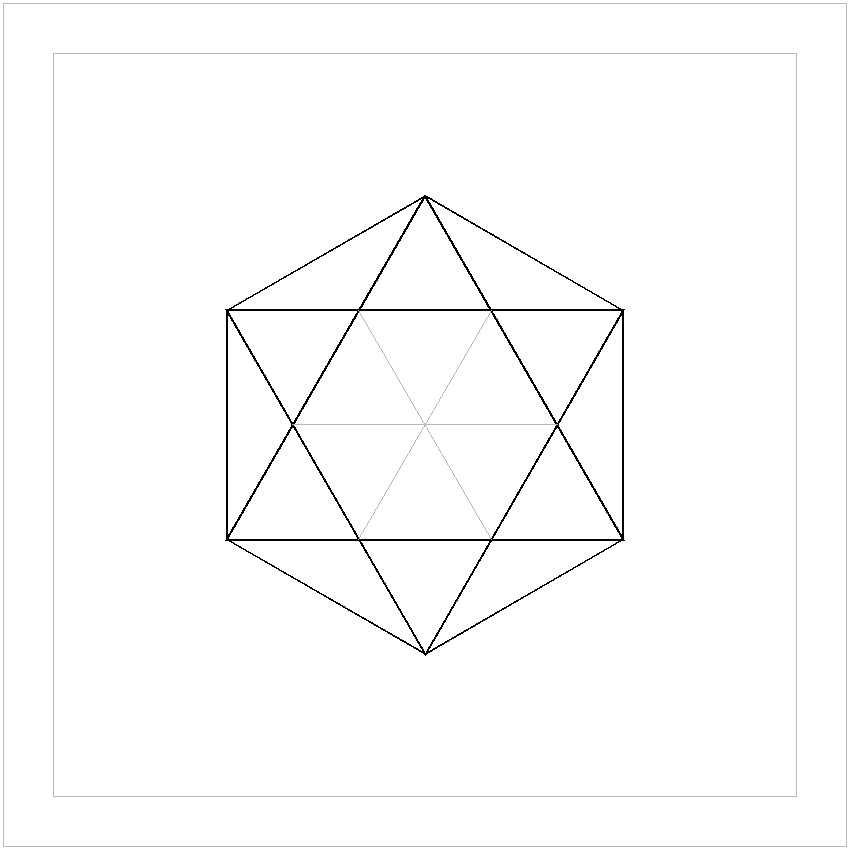
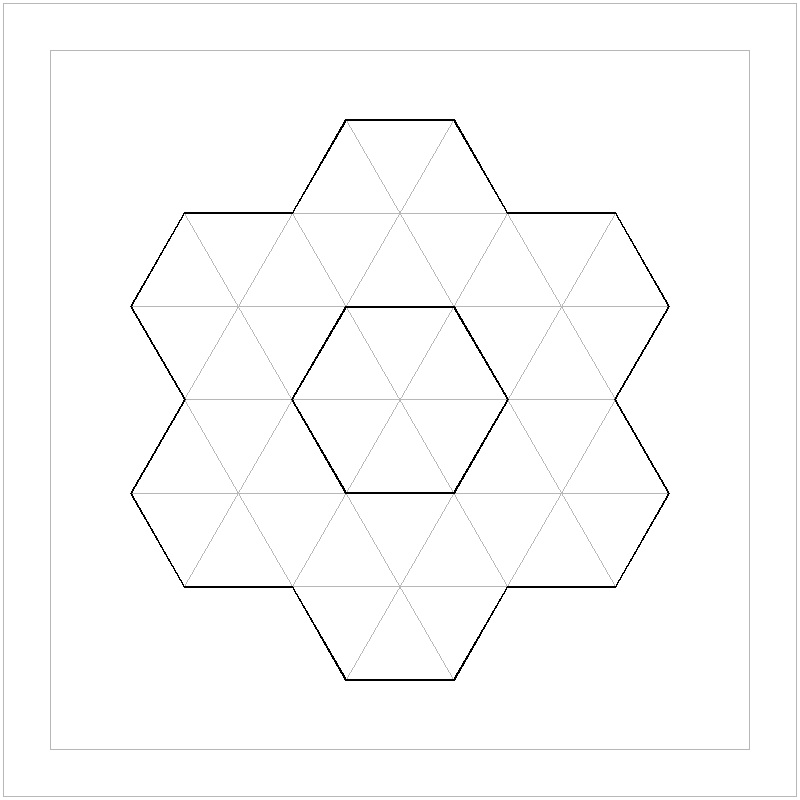
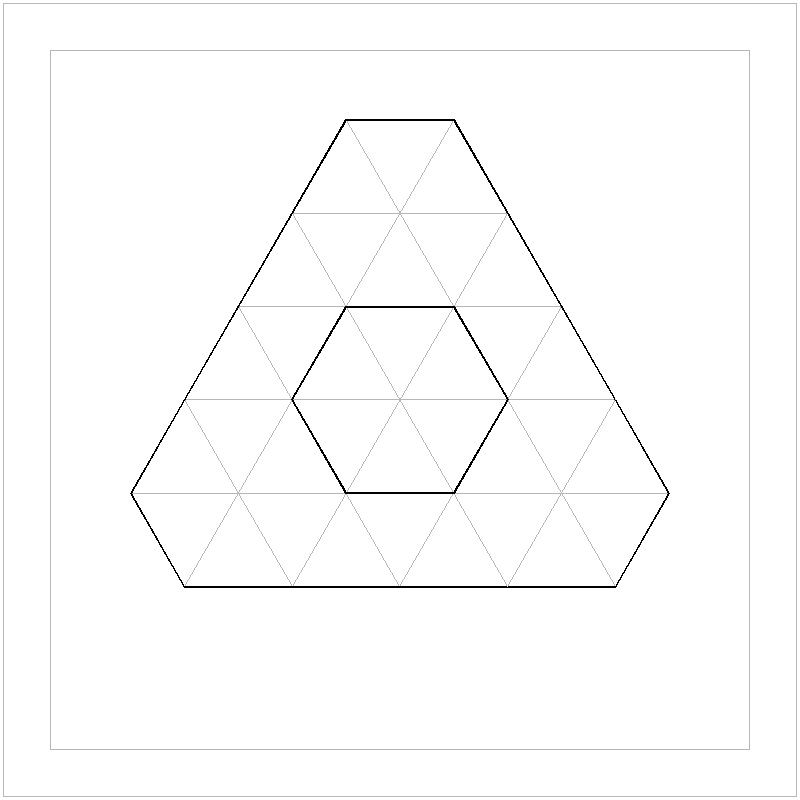
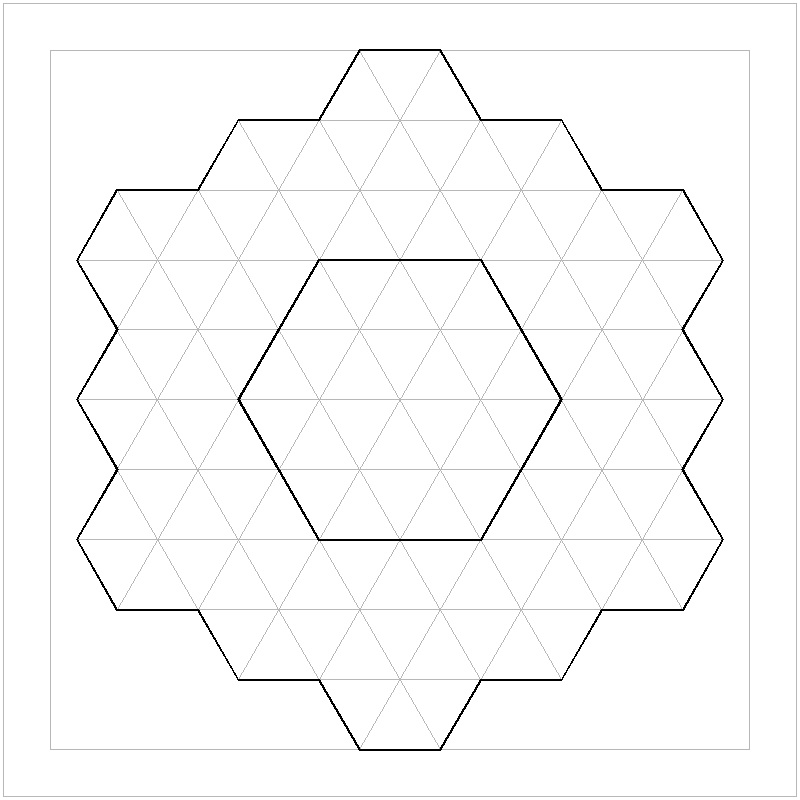
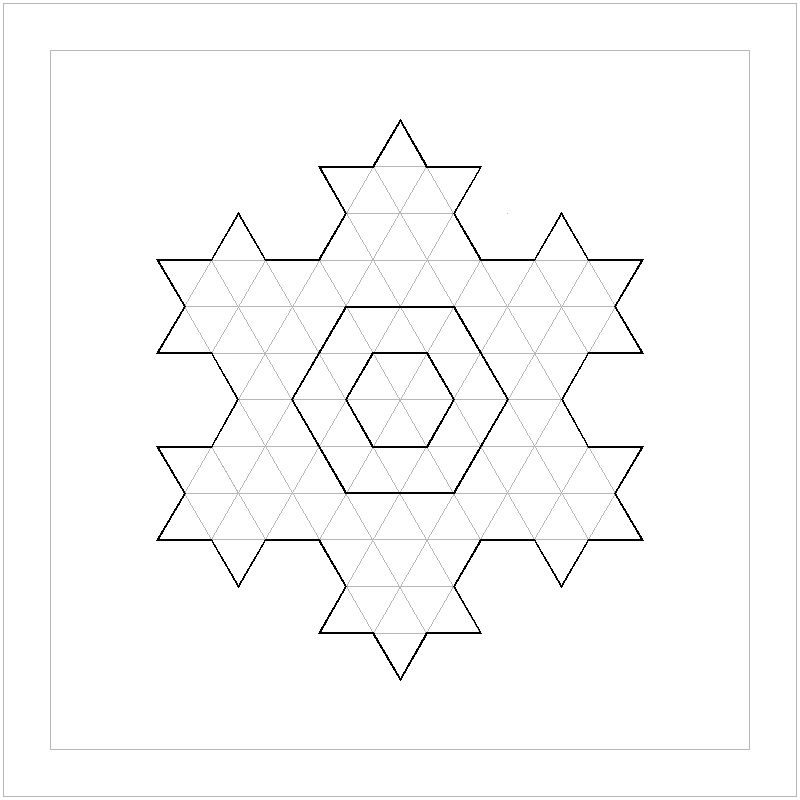
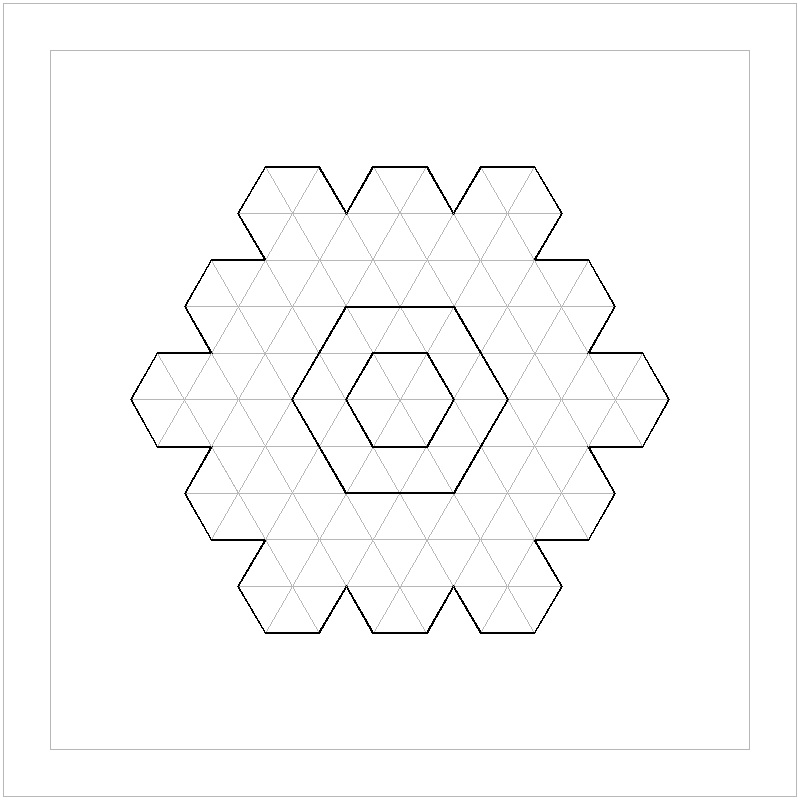
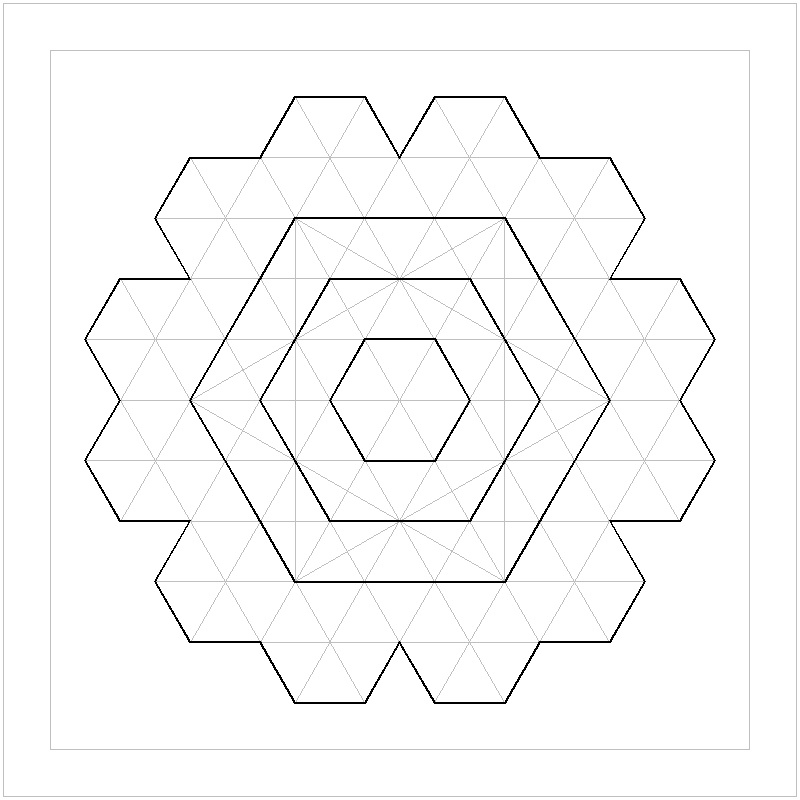
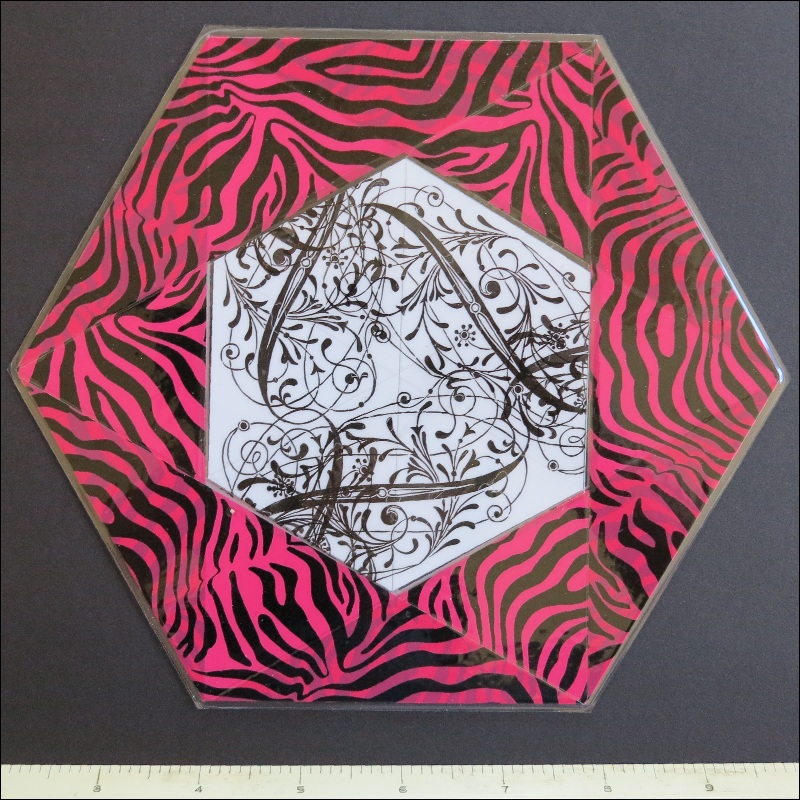
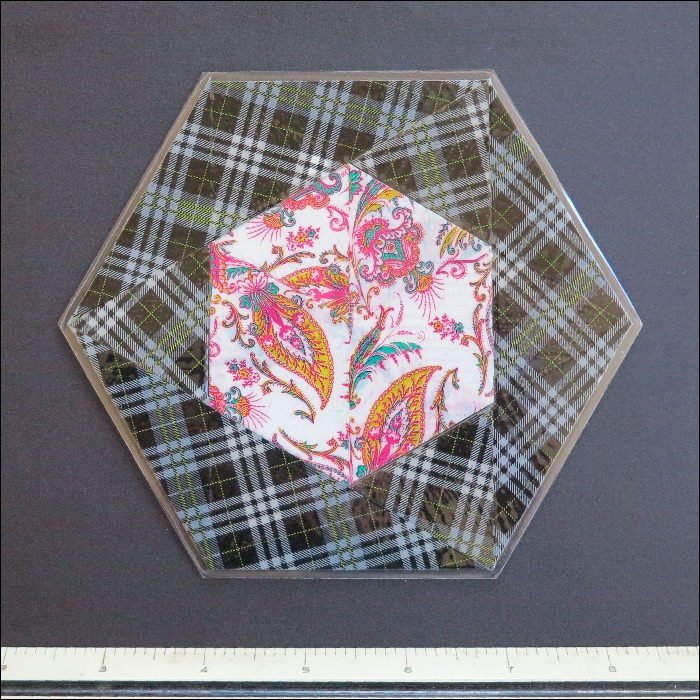
     The introduction of hexagon patterned templates, which are made up of
    equilateral triangle grids, opens up a wide open area of beautiful patterns.
    Here are several examples ranging from basic to their variations.
|
Hexagon template #1 click here to enlarge  |
Hexagon template #2 click here to enlarge 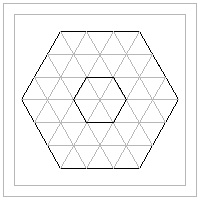 |
Hexagon template #3 click here to enlarge 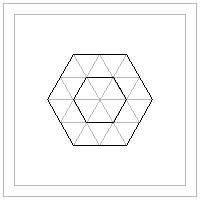 |
|
Hexagon template #4 click here to enlarge 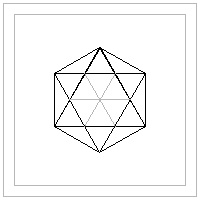 |
Hexagon template #5 click here to enlarge 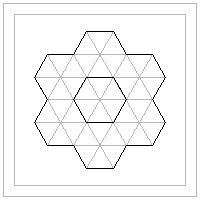 |
Hexagon template #6 click here to enlarge 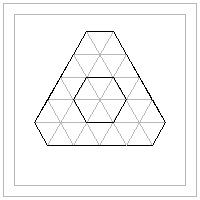 |
|
Hexagon template #7 click here to enlarge 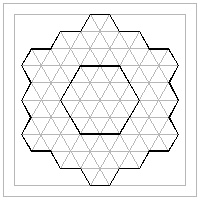 |
Hexagon template #8 click here to enlarge 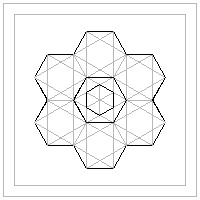 |
Hexagon template #9 click here to enlarge  |
|
Hexagon template #10 click here to enlarge  |
Hexagon template #11 click here to enlarge 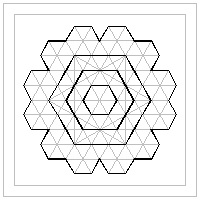 |
Hexagon template #12 click here to enlarge 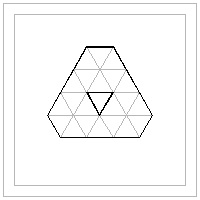 |
|
Hexagon template #13 click here to enlarge 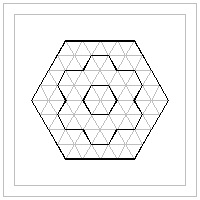 |
Hexagon template #14 click here to enlarge 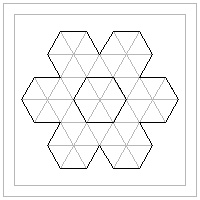 |
Hexagon template #15 click here to enlarge 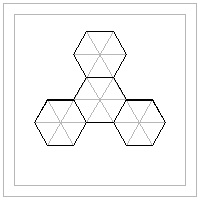 |
|
#1 example-a click here to enlarge  |
#1 example-b click here to enlarge  |
#1 example-c click here to enlarge  |
|
Template Ex-#2a click here to enlarge 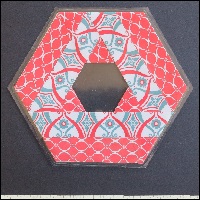 |
Template Ex-#2b click here to enlarge 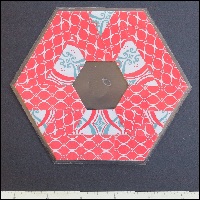 |
Template Ex-#2c click here to enlarge  |
|
Template Ex-#3a click here to enlarge  |
Template Ex-#3b click here to enlarge 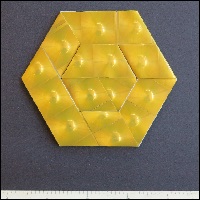 |
Template Ex-#2c click here to enlarge  |
|
Template Ex-#4a click here to enlarge  |
Template Ex-#4b click here to enlarge 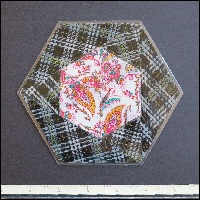 |
Template Ex-#4c click here to enlarge 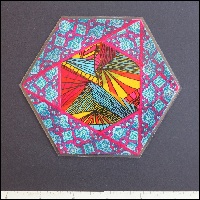 |
|
Template Ex-#5a click here to enlarge 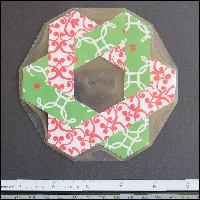 |
Template Ex-#5b click here to enlarge  |
Template Ex-#5c click here to enlarge  |
|
Template Ex-#6a click here to enlarge 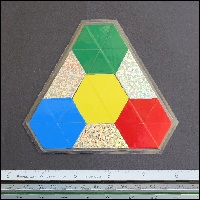 |
Template Ex-#6b click here to enlarge  |
Template Ex-#6c click here to enlarge  |
|
Template Ex-#7a enlarge front enlarge back  |
Template Ex-#7b click here to enlarge  |
Template Ex-#7c click here to enlarge  |
|
Template Ex-#8a click here to enlarge 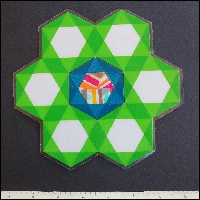 |
Template Ex-#8b click here to enlarge  |
Template Ex-#8c click here to enlarge  |
|
Template Ex-#9a click here to enlarge 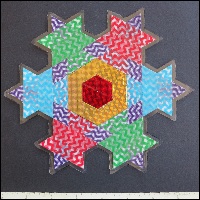 |
Template Ex-#9b click here to enlarge  |
Template Ex-#9c click here to enlarge  |
|
Template Ex-#10a click here to enlarge  |
Template Ex-#10b click here to enlarge  |
Template Ex-#10c click here to enlarge  |
|
Template Ex-#11a click here to enlarge  |
Template Ex-#11b click here to enlarge 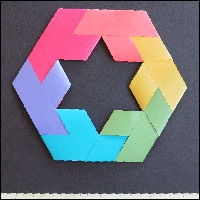 |
Template Ex-#11c click here to enlarge  |
|
Template Ex-#12a click here to enlarge  |
Template Ex-#11b click here to enlarge  |
Template Ex-#11c click here to enlarge  |
|
Template Ex-#13a click here to enlarge  |
Template Ex-#13b click here to enlarge  |
Template Ex-#11c click here to enlarge 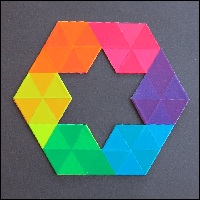 |
      Figure A   Knot pattern by a pipe cleaner.
      Figure B   Knot by 3/4 inch quilling tape with double pattern
      Figure C   quilling tapes flattened
|
Figure A click here to enlarge 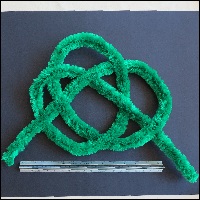 |
Figure B click here to enlarge 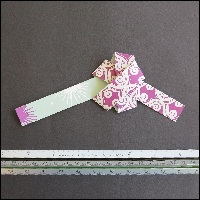 |
Figure C click here to enlarge 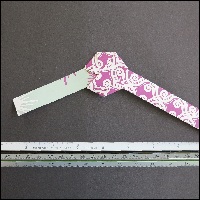 |
     The first step is to print out the drawing below. Then as is done in "Pentagon Case"
    mark two dotted lines in the back of the printed sheet to identify the boundaries
    to connect paper strips. Before cutting 7 pieces of paper strips, it is recommended
    to trace the "mountain fold" lines using the unusable cartridge of any ball point pen .
    The reason is that it is much easier to trace lines with some pressure before all pieces
    are still connected in a sheet of paper instead of separate pieces.
     This process makes "mountain fold" easier during the folding process.
    Using a very sharp pointed knife, cut out 7 pieces of strips. This ring requires
    7 hexagon units and theoretically we can make it from a single strip made up of 7 unit
    strips.
     But practically it is easier to start with a strip with two unit strips connected,
    and after making one heptagon unit, add a next strip , and so on. The result will look
    like the one shown in the photo image below.
|
Trial Drawing click here to enlarge & print 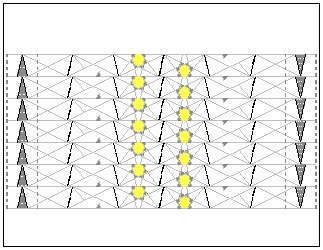 |
Trial Result click here to enlarge 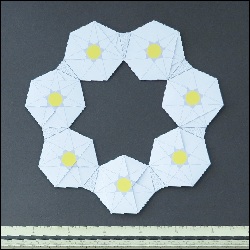 |
	Addition of colors to the previous example makes the heptagon ring
       a bit more artistic.
|
Variation Drawing click here to enlarge & print 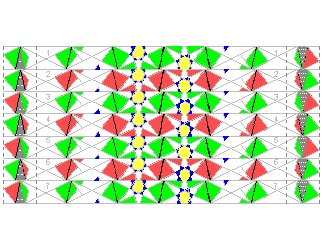 |
Variation Result click here to enlarge 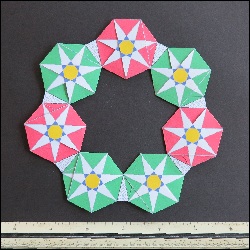 |
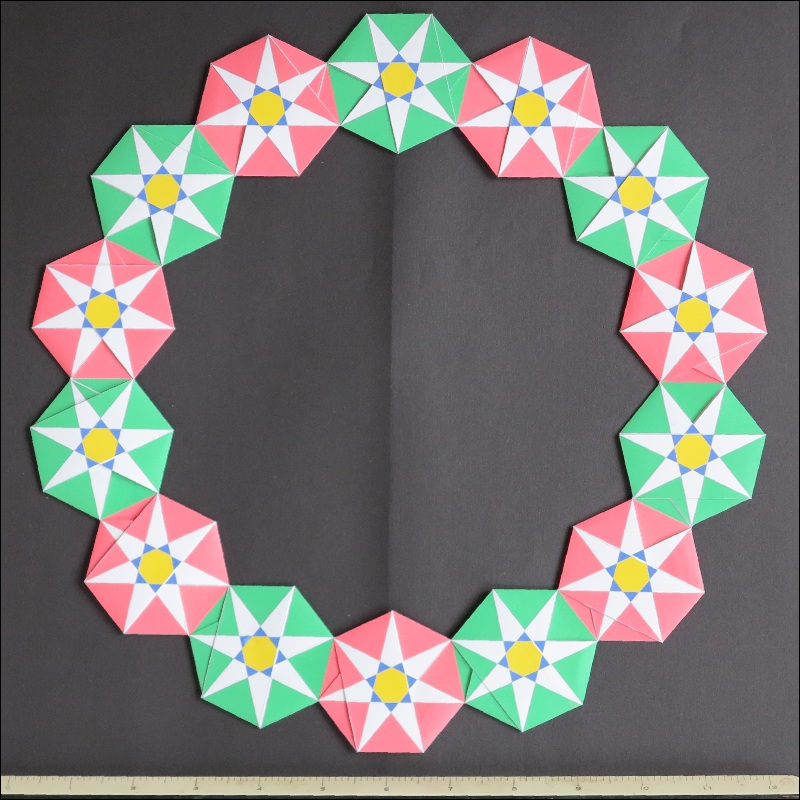
	Just like the pentagon case, it is also possible to make a ring made up of
       14 heptagon units.
|
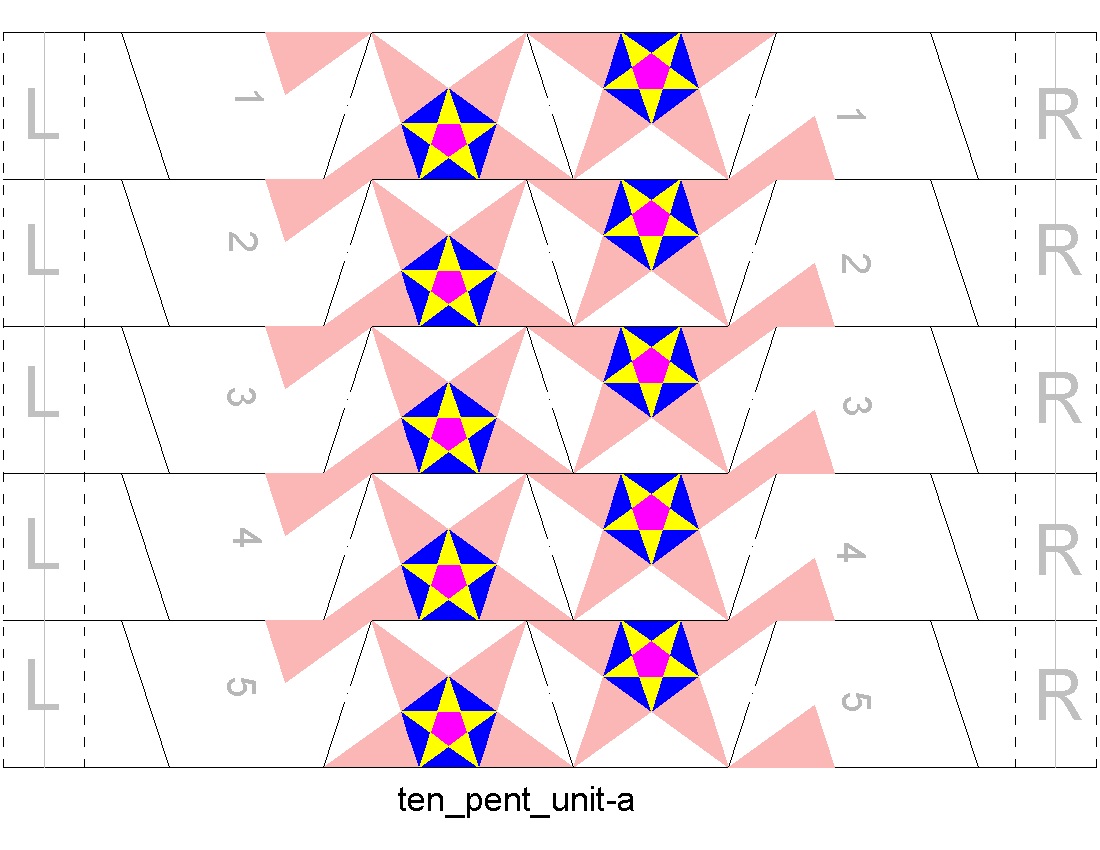
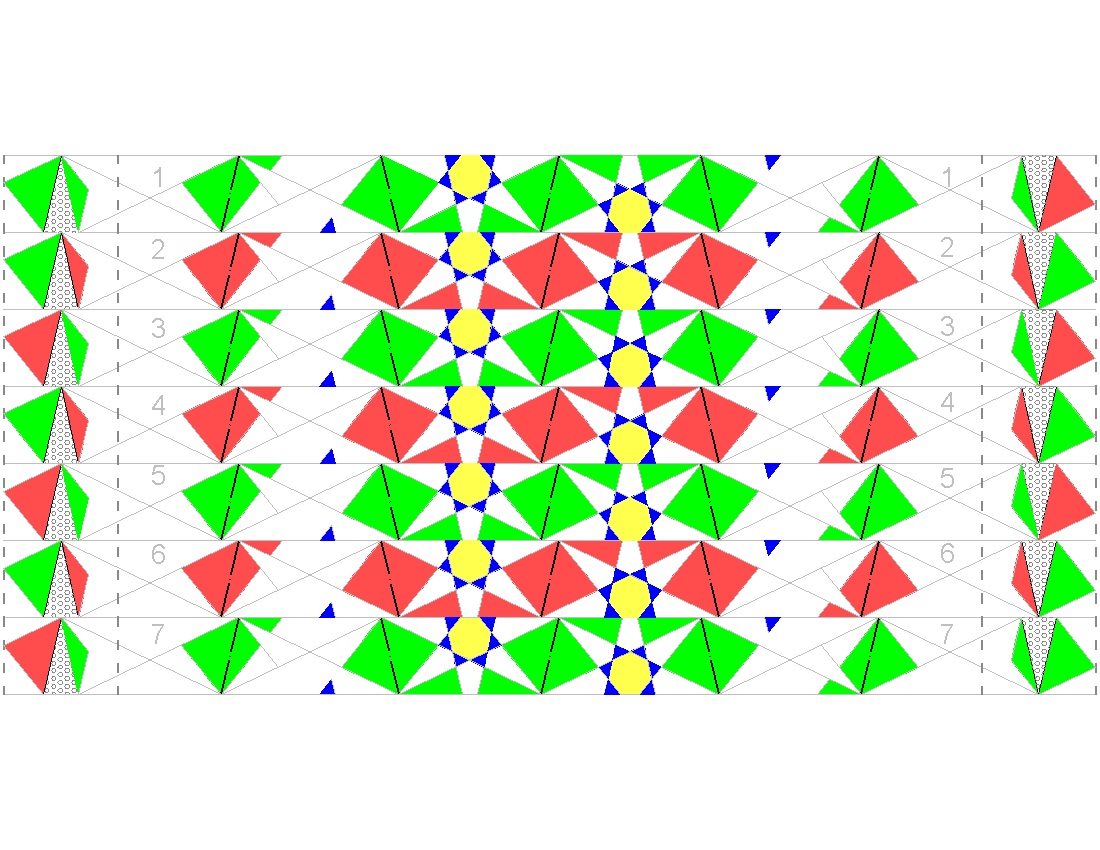
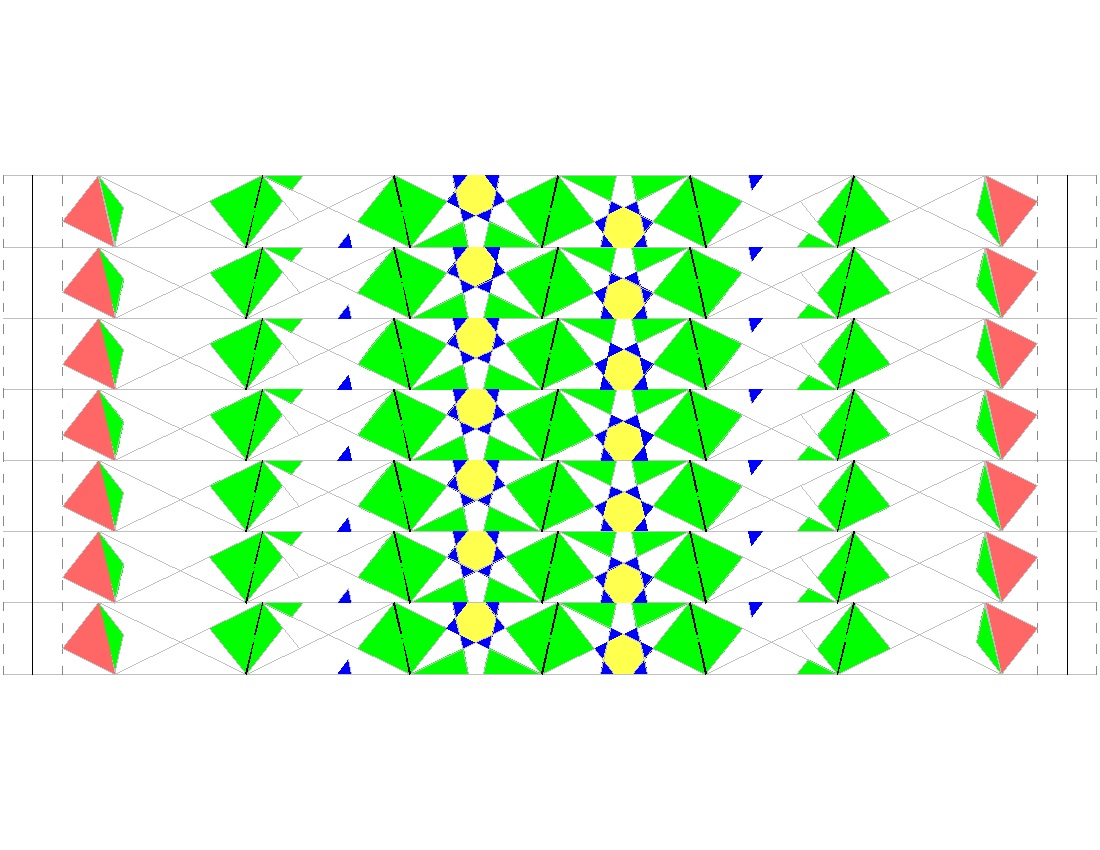
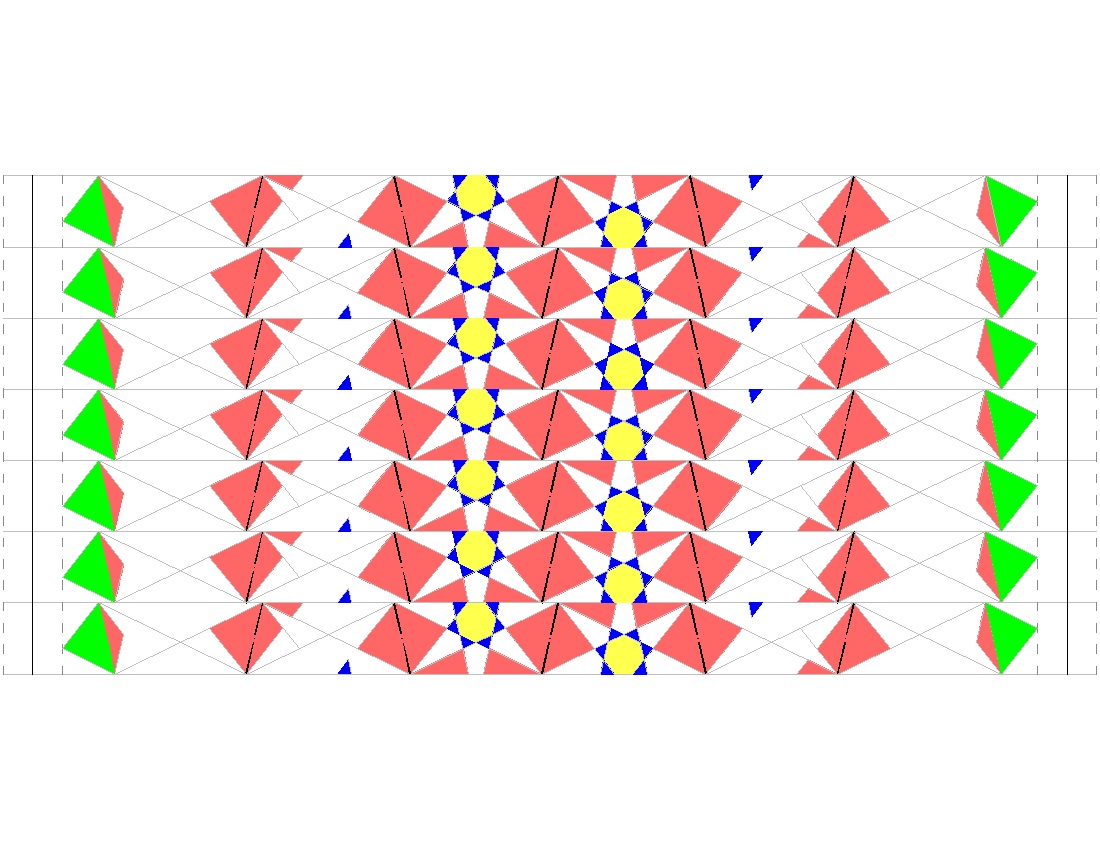
Paper Strings used #1 click here to enlarge Open PDF for print 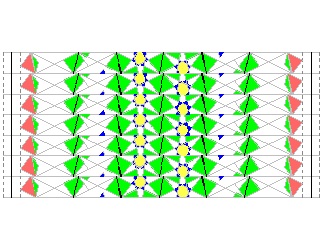 |
Paper Strings used #2 click here to enlarge Open PDF for print  |
      Basically the folding steps are similar to the 10 pentagon ring case.
     Start with one ring made up of #1 Paper Strip (Green)shown above.
     Then add #2 Paper strip (Red).
|
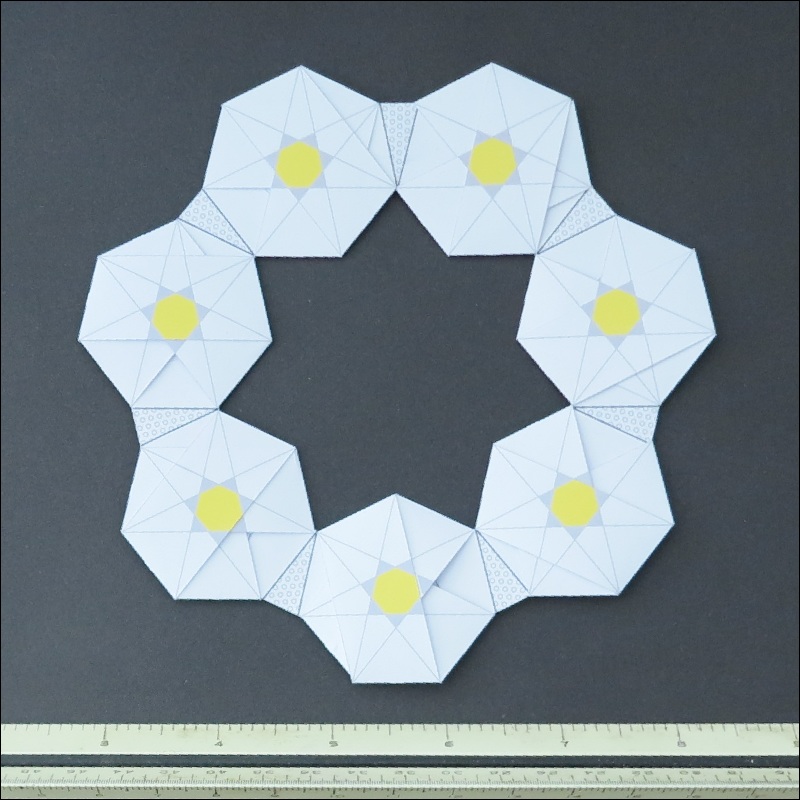
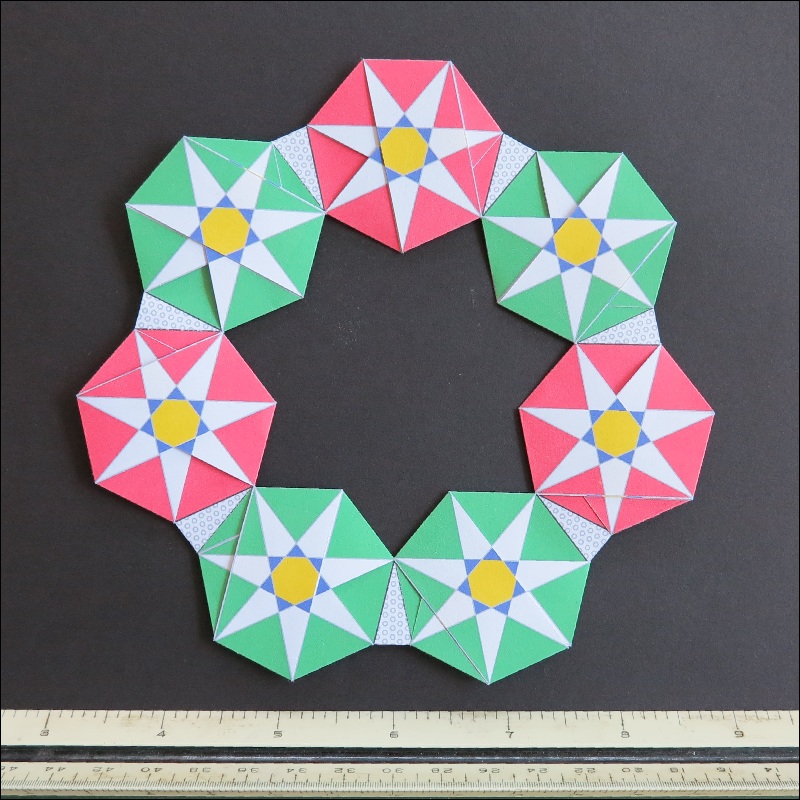
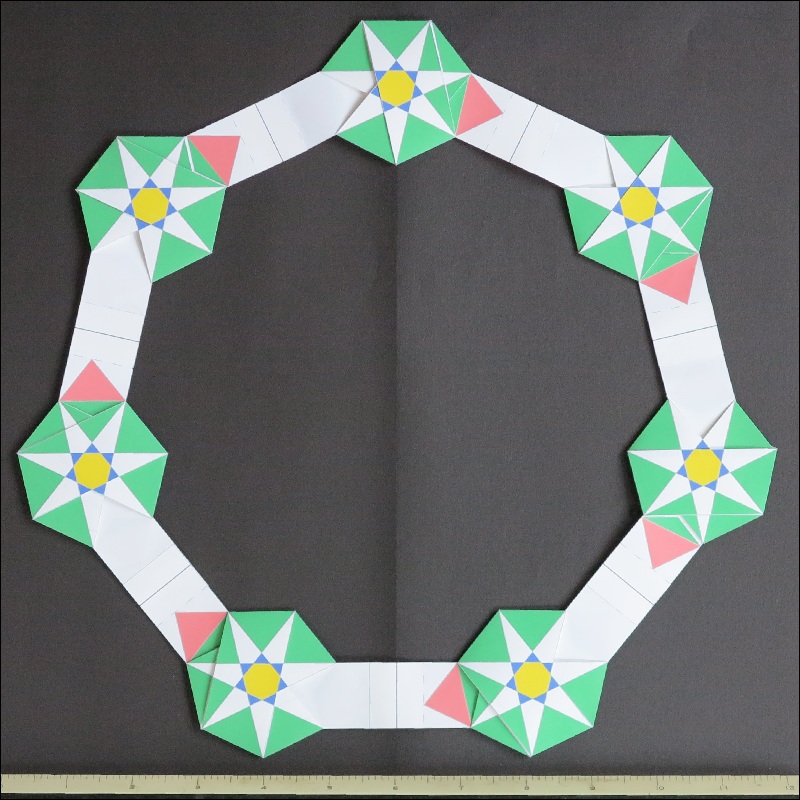
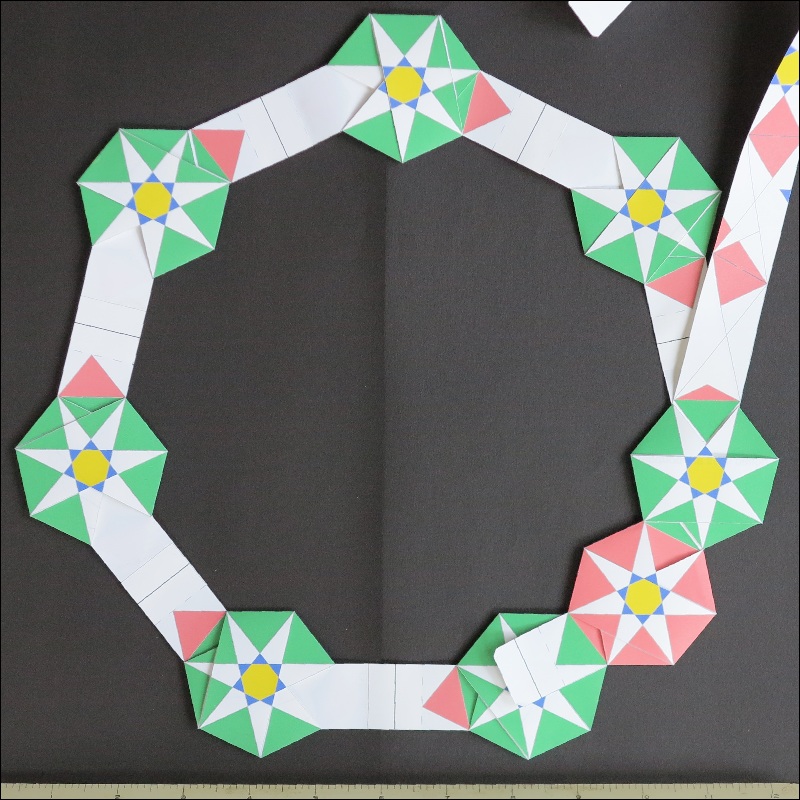
Green Heptagon Ring click here to enlarge 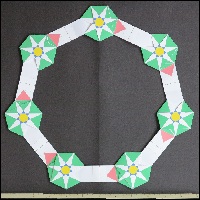 |
Start Red Heptagon click here to enlarge 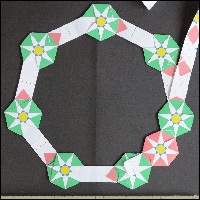 |
Final Look click here to enlarge 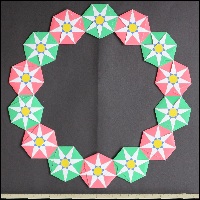 |
     The introduction of heptagon patterned templates, which are made up of
    regular heptagon grids, opens up a wide open area of beautiful patterns.
    Here are several examples ranging from basic to their variations.
|
Heptagon template #1 larger JPG image PDF 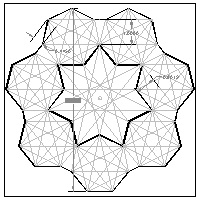 |
Heptagon template #2 larger JPG image PDF  |
Heptagon template #3 larger JPG image PDF  |
|
#1 example-a click here to enlarge 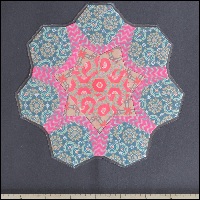 |
#1 example-b click here to enlarge 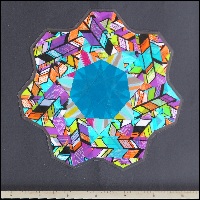 |
#1 example-c click here to enlarge 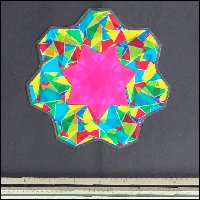 |
|
Template Ex-#2a click here to enlarge 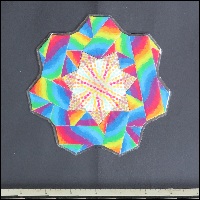 |
Template Ex-#2b click here to enlarge 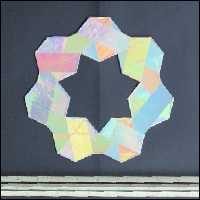 |
Template Ex-#2c click here to enlarge 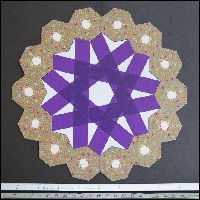 |
|
Template Ex-#3a click here to enlarge 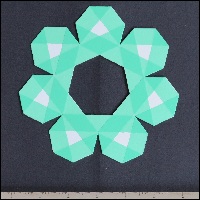 |
Template Ex-#3b click here to enlarge 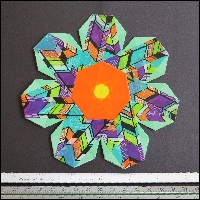 |
Template Ex-#2c click here to enlarge 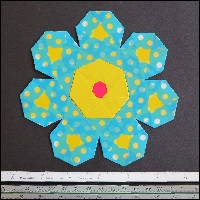 |
|
Template Ex-#3a click here to enlarge 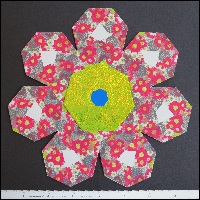 |
Template Ex-#4a click here to enlarge  |
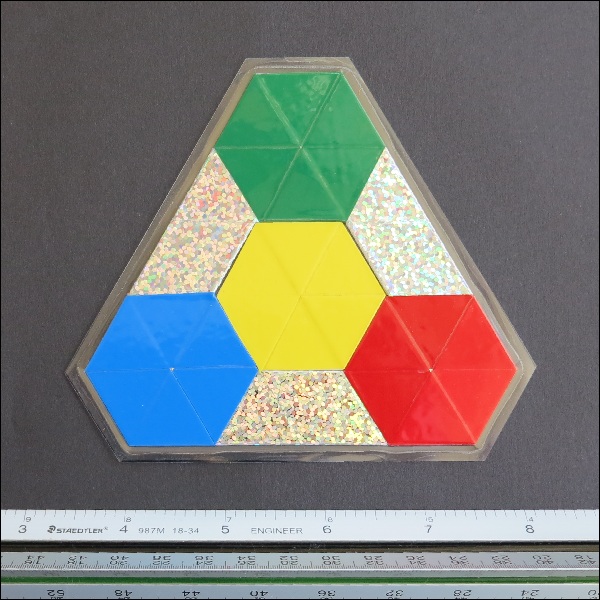
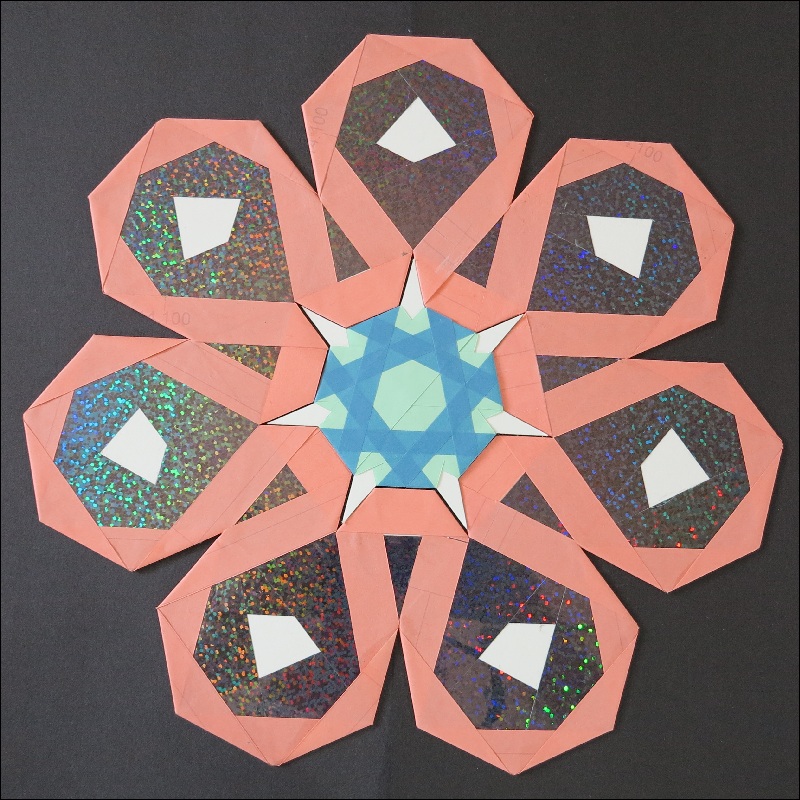
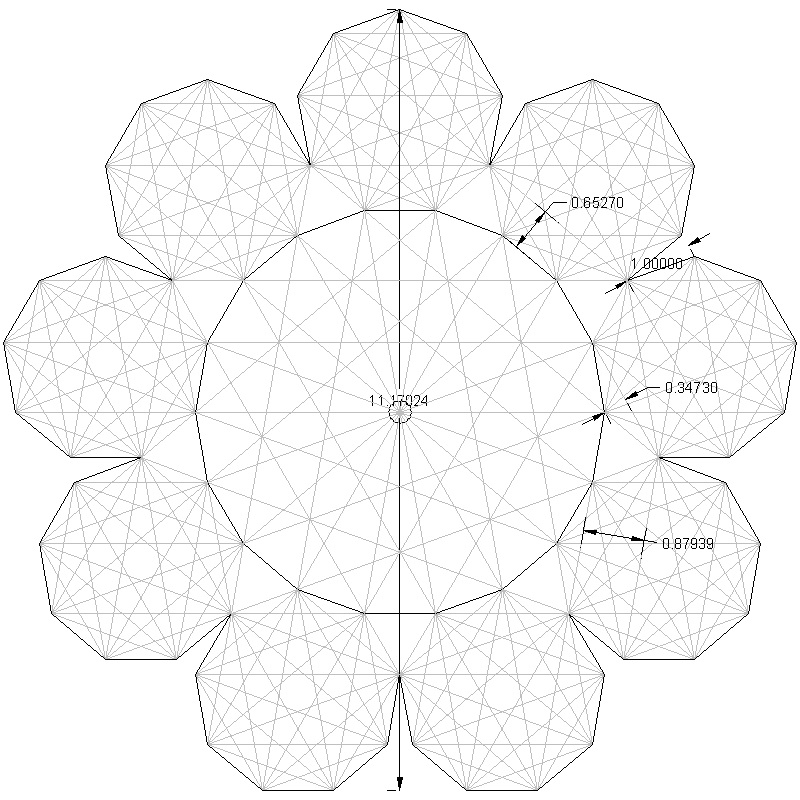
 We have shown that a ring of 7 heptagons can be created from a continuous strip of constant
width. Suppose we now have a ring maed iup of 7 regular heptagons as shown in two figures below.
They both are created usng 1 inch wide strip. Fig 7-0-a & b.

Next question is how we can fill up the vacant center area.  Or if the readers are only interested
in making a seven pointed star .One  answer is to use the Origami's "twist anf fold" techinique.

Here is the procedure.
|
Fig 7-0-a: Variation Result
click here to enlarge
|
Fig 7-0-b: Template Ex-#2b
click here to enlarge
|
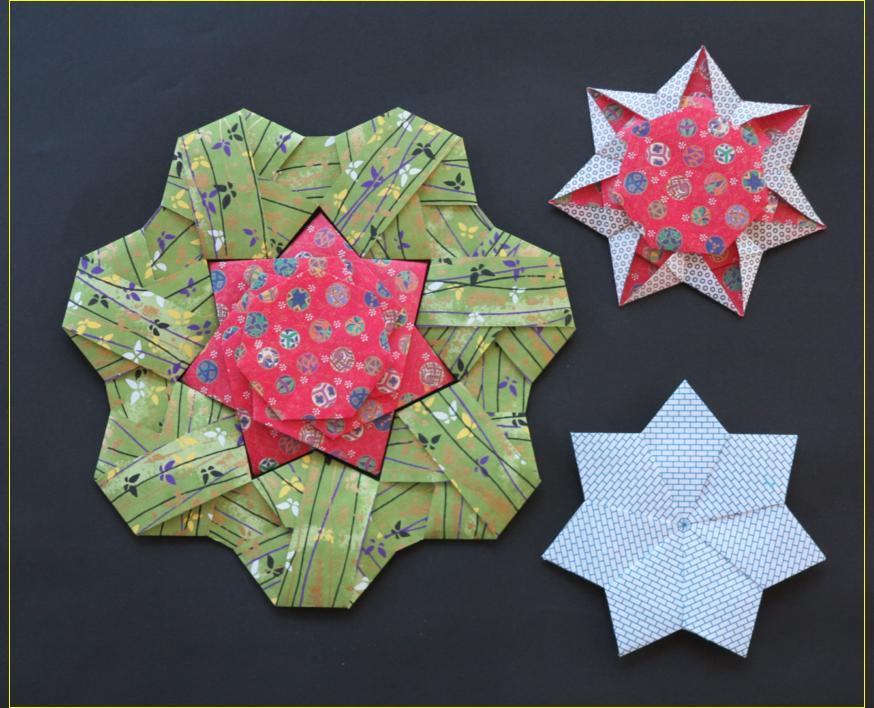
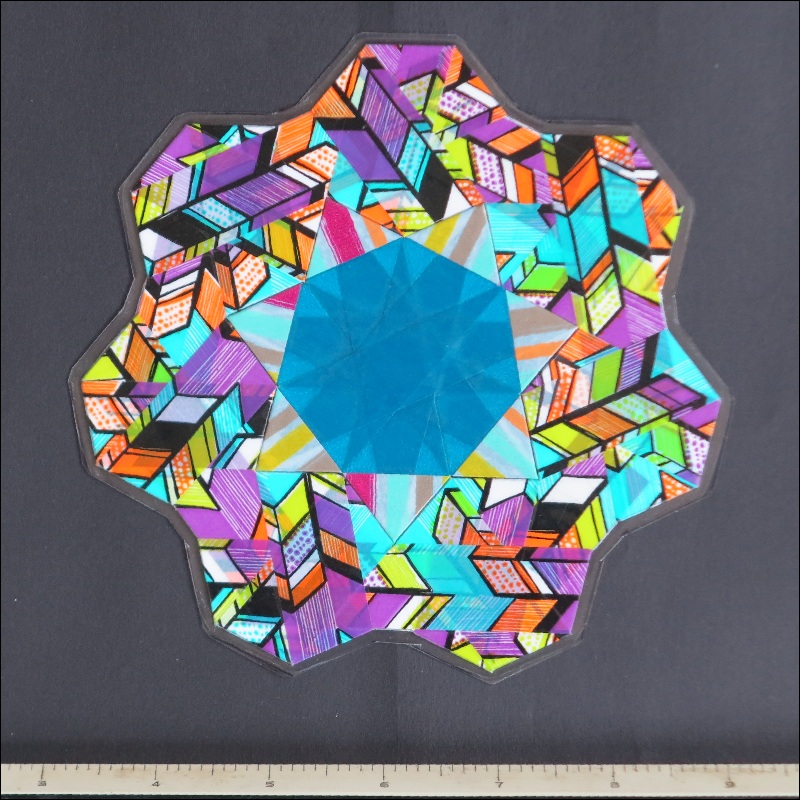
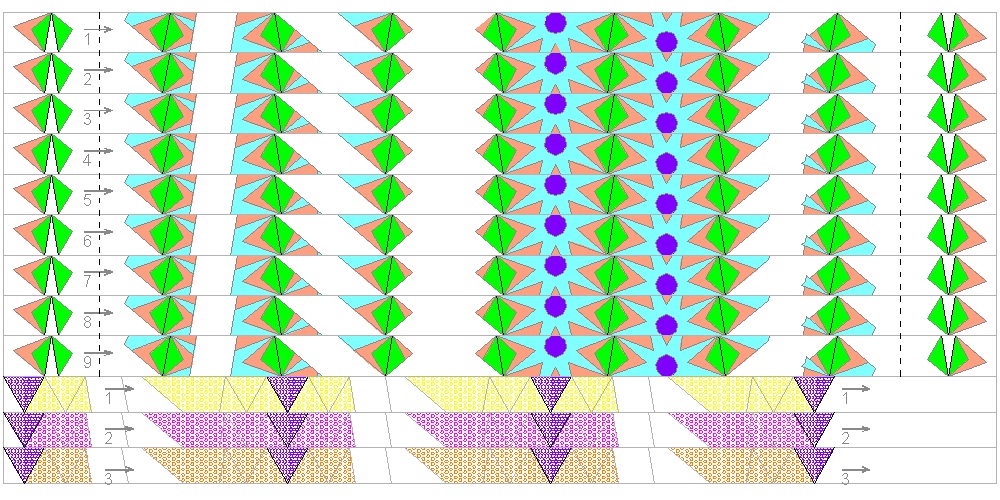
Step1: Print one of the image files (Fig 7-1 & 2), and after printing on one side, print the heptagon pattern
	shown in Fig 7-2 making sure that the center of the pictures is as close as possible
Step 2: Cut out the printed paper along the periphral lines of the heptagon. Fig 7-3
Fig 7-1: Sample image file #1
click here to enlarge
Open JPG for print
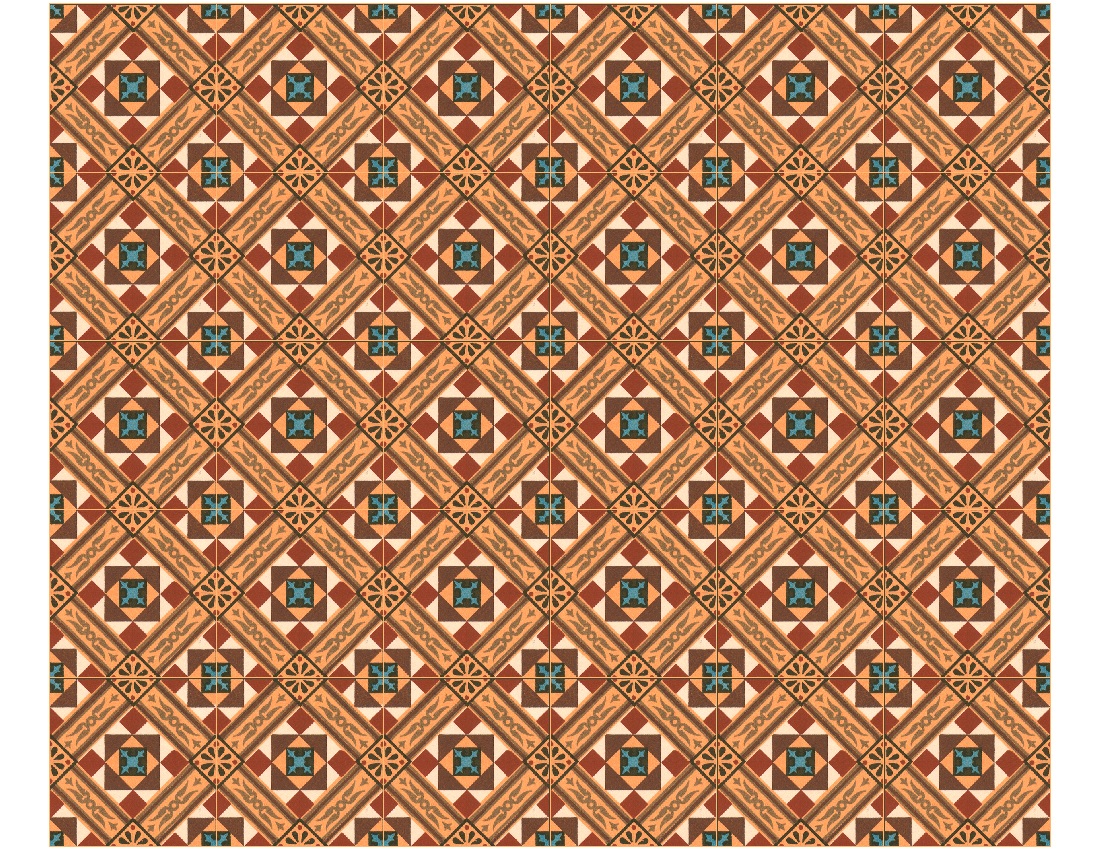 |
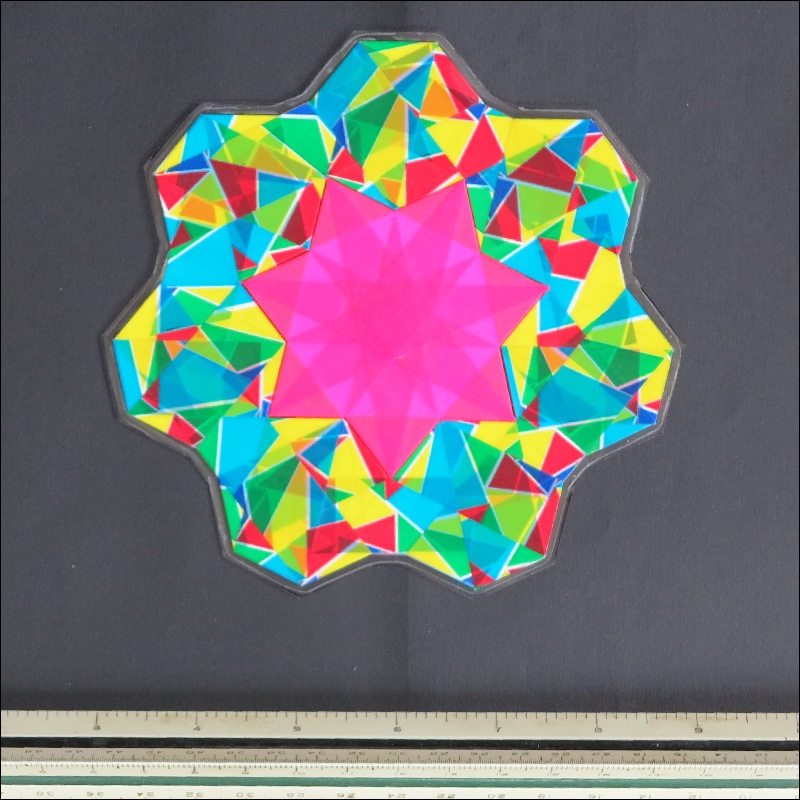
Fig 7-2: Sample image file #2
click here to enlarge
Open JPG for print
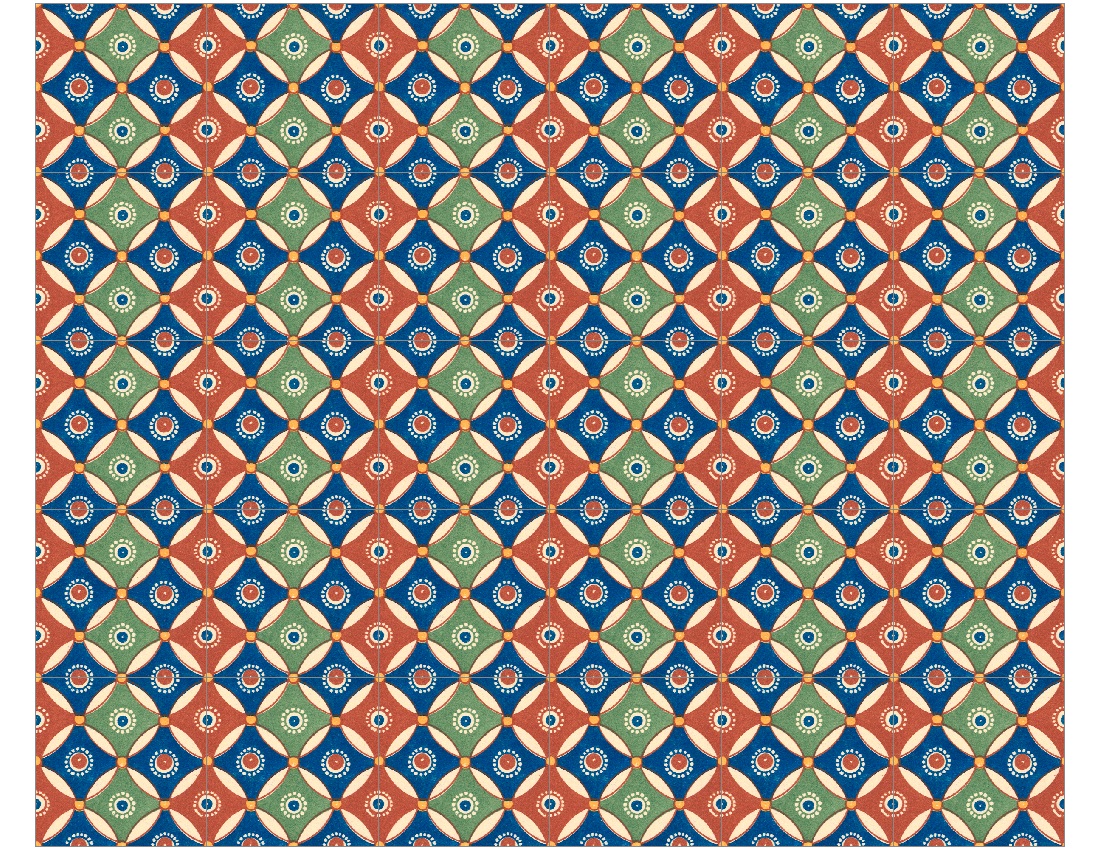 |
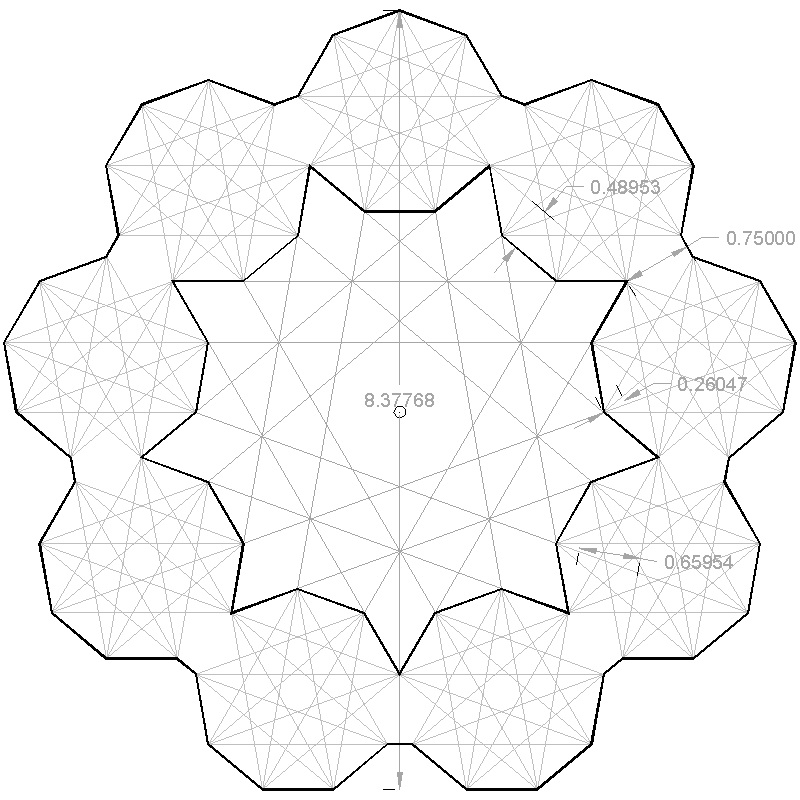
Fig 7-2: Folding diagram
click here to enlarge
Open JPG for print
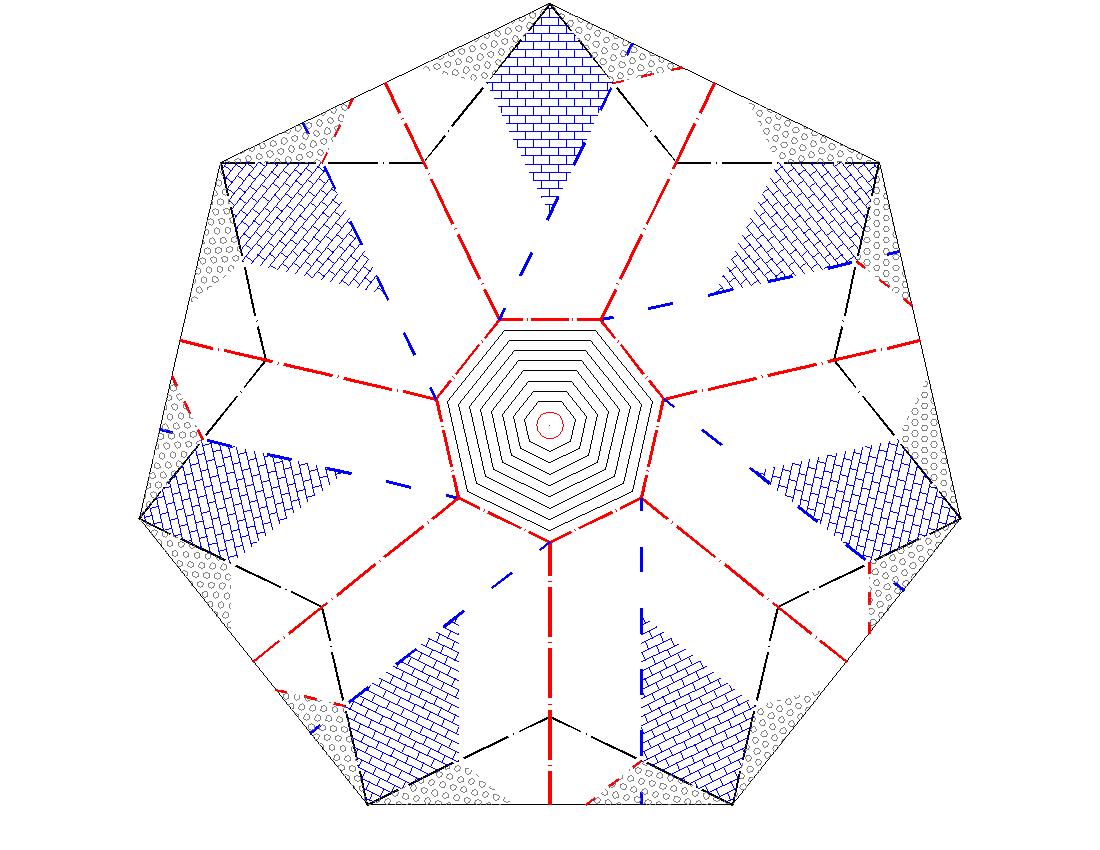 |
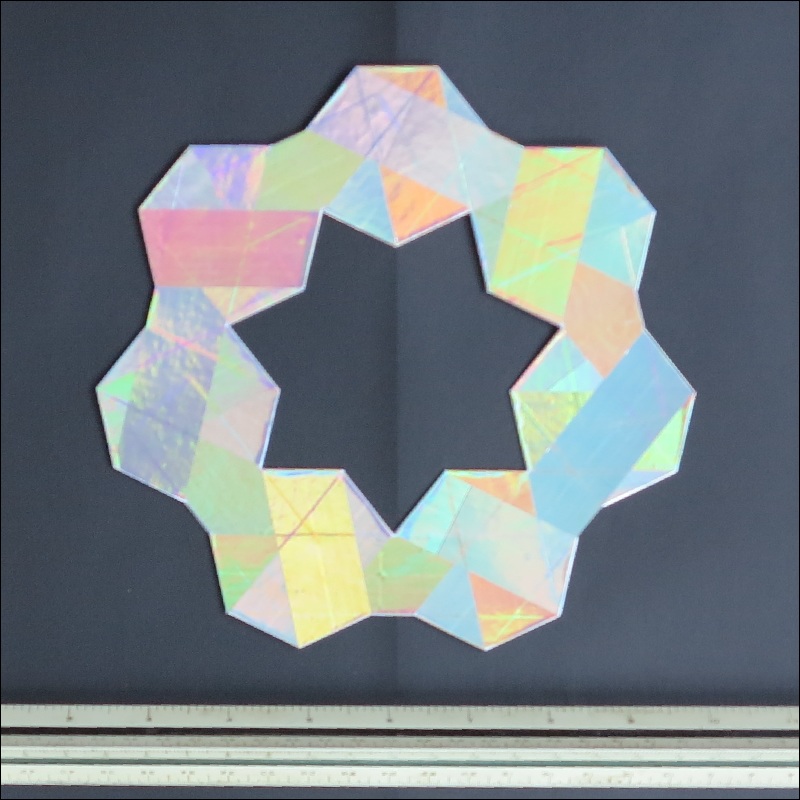
Fig 7-3: Cutout Heptagon
click here to enlarge
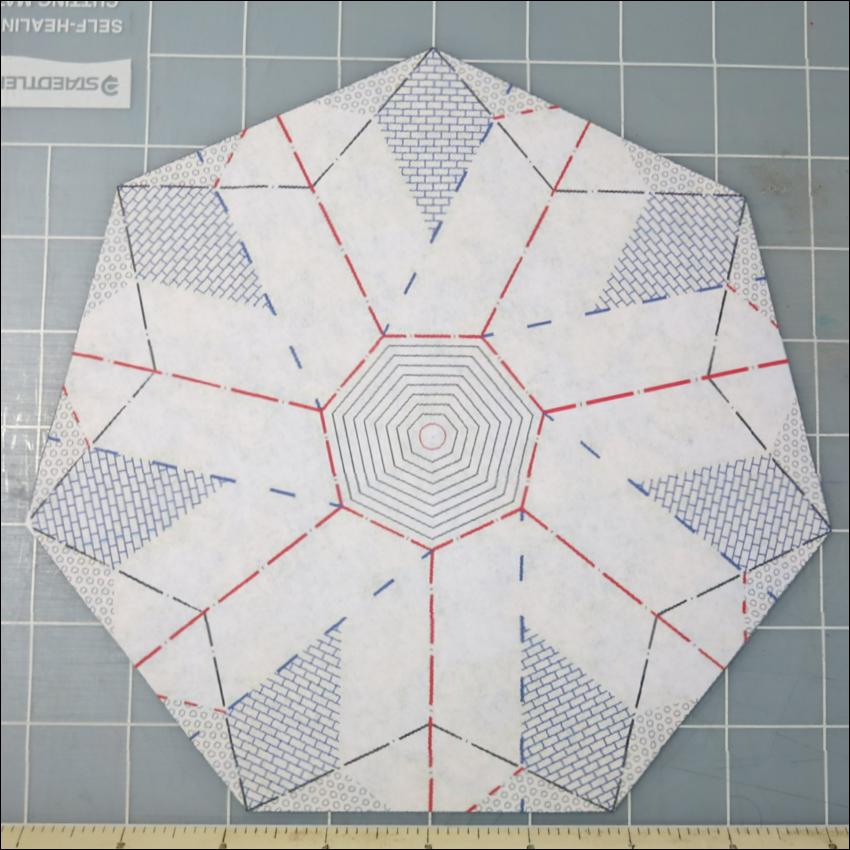 |
Step 3: Score all the red, blue and black broken lines.
Step 4: Only for red and blue lines going outward from the inner heptagon, apply the
	following.  Mountain fold for the "red" , and valley fold  for the blue, while keeping the
	inner heptagon flat. Fig 7-4
Fig 7-4: Initial Step
click here to enlarge
Open JPG for print
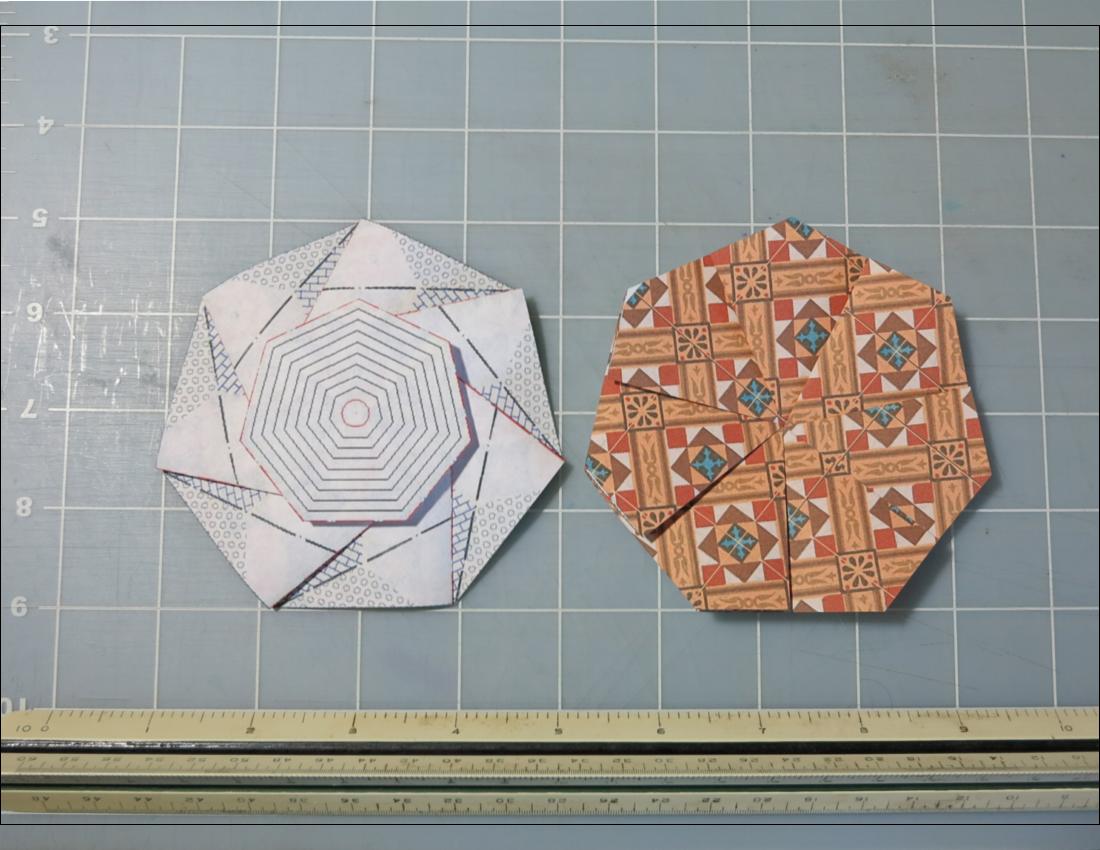 |
Fig 7-5-1: Cutout Heptagon
click here to enlarge
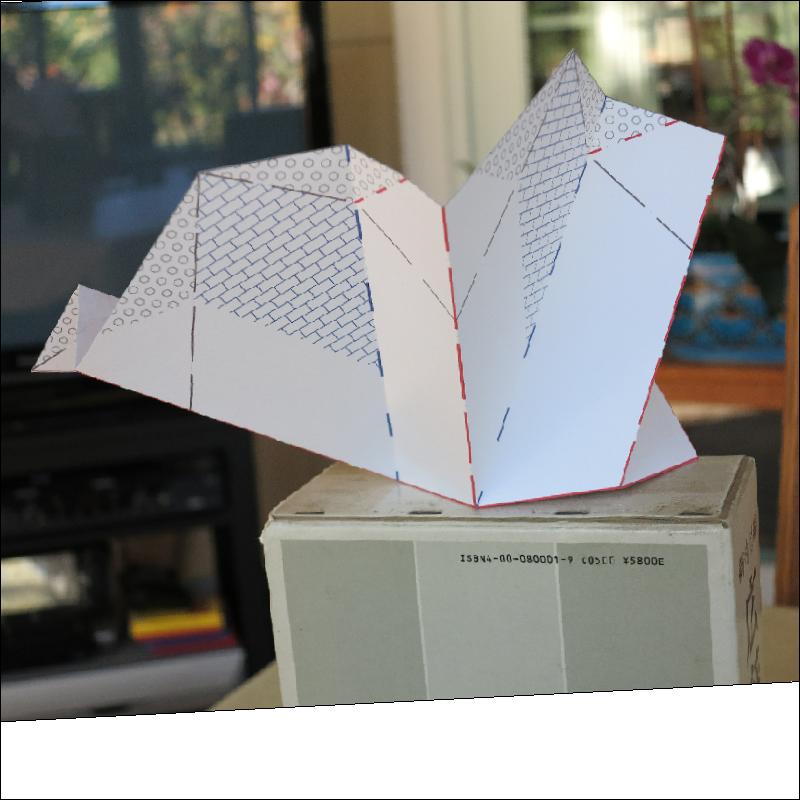 |
Fig 7-5-2: Initial Step
click here to enlarge
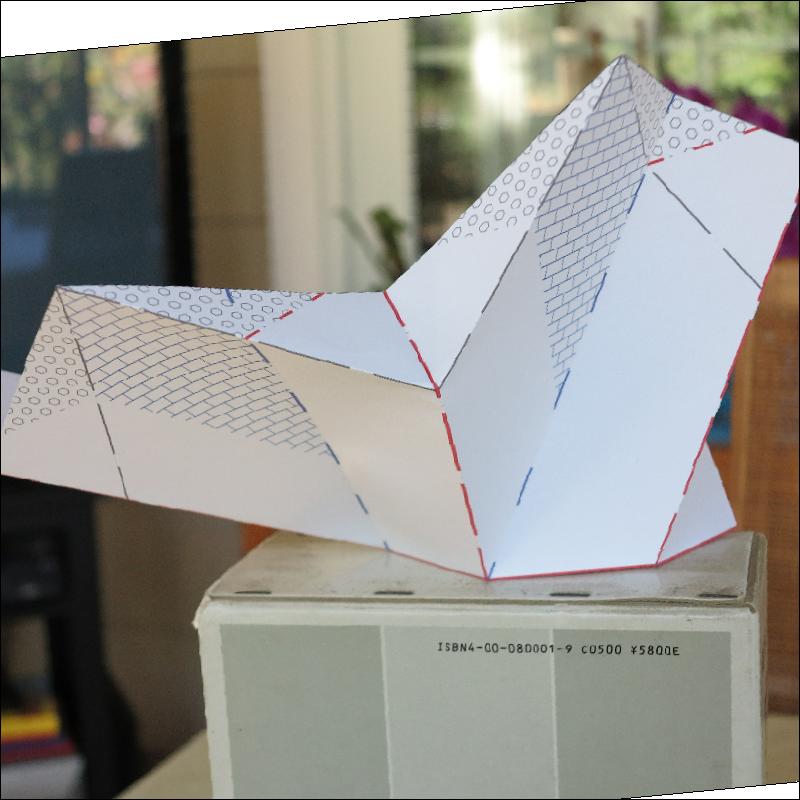 |
Fig 7-5-3: Cutout Heptagon
click here to enlarge
 |
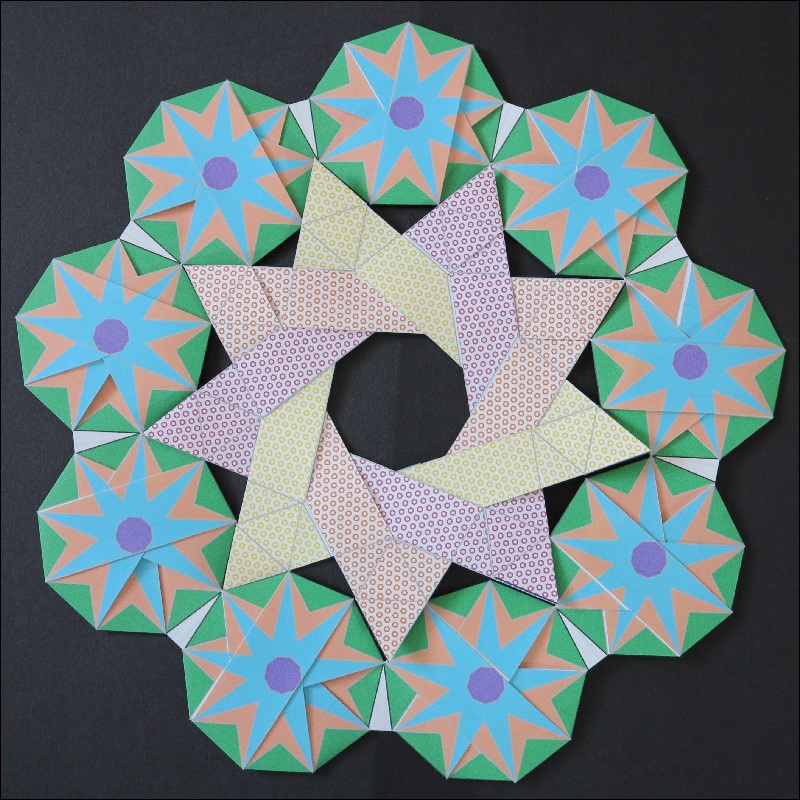
Step 5: Open the flap on the small heptagon side, then apply mountain fold to the "black" line.
	Fig 7-5-1 and 7-5-2.  When you let fingers go,  a star shape will form automatically bending
	at the red line on the outside . Fig 7-5-3 and fig 7-5-4.
	Repeat the same 6 more times for other edges.
	Result will look like Fig 7-5-5.
	 If "mountain" and "valley" folding are switched, the final pattern looks like Fig 7-5-6.
Final Look:  Fig 7-6: Heptagon Ring with 7 pointed star inside
Fig 7-6: Heptagon Ring with 7 pointed star inside
click here to enlarge
 |
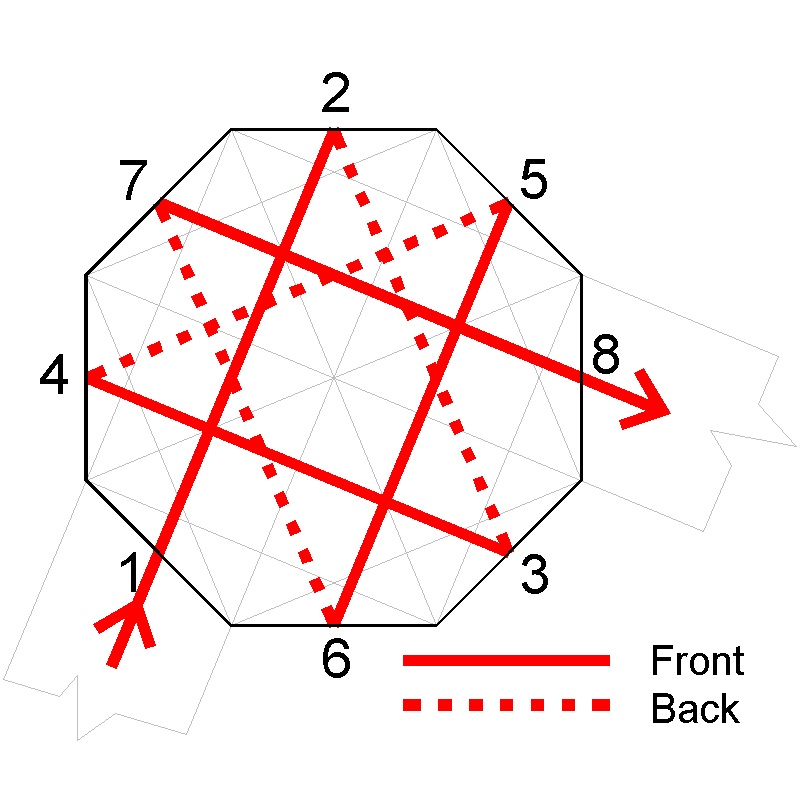
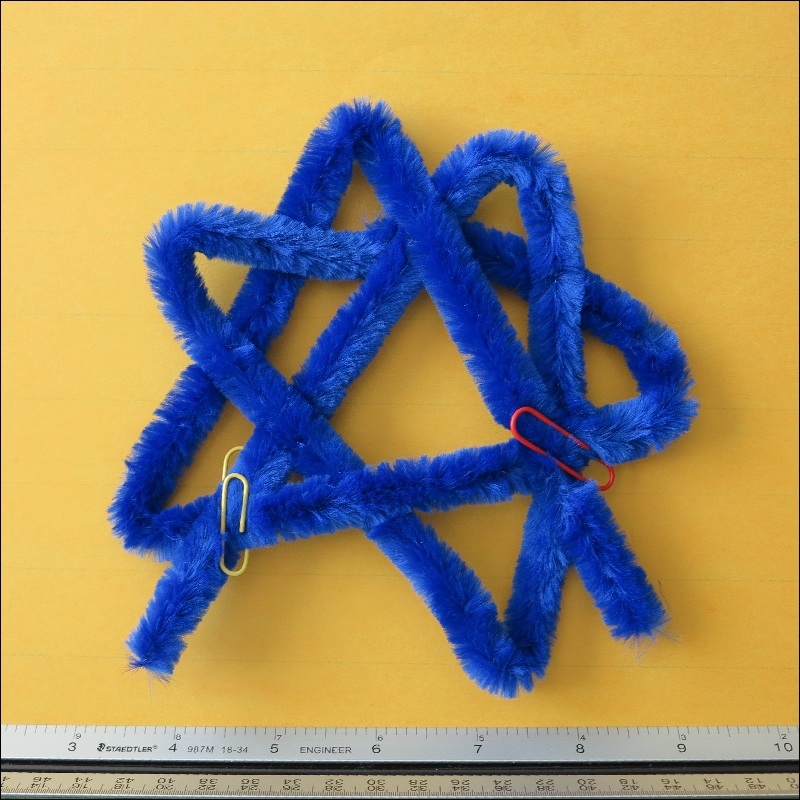
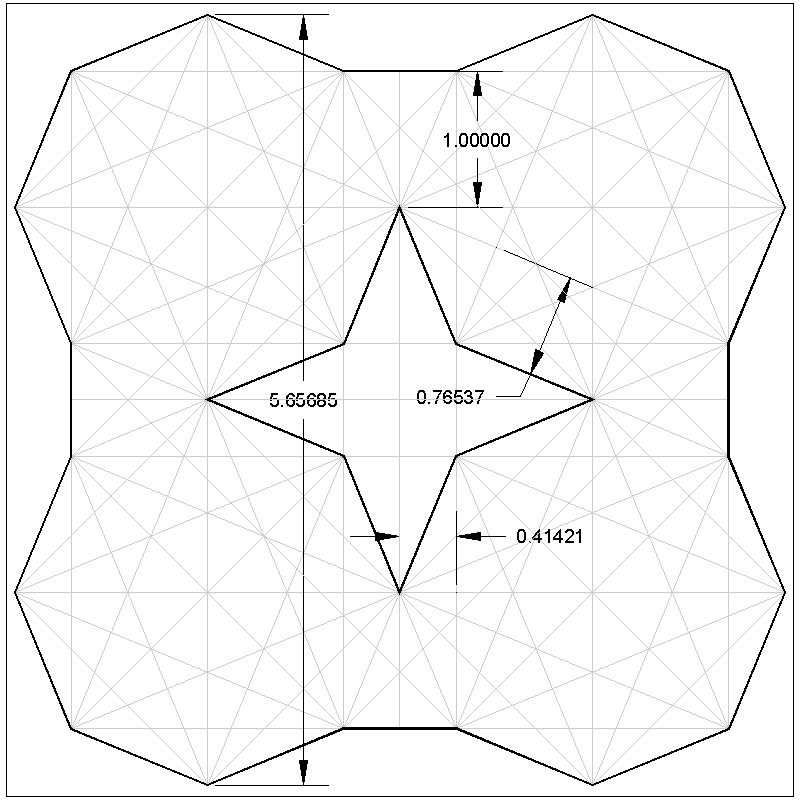
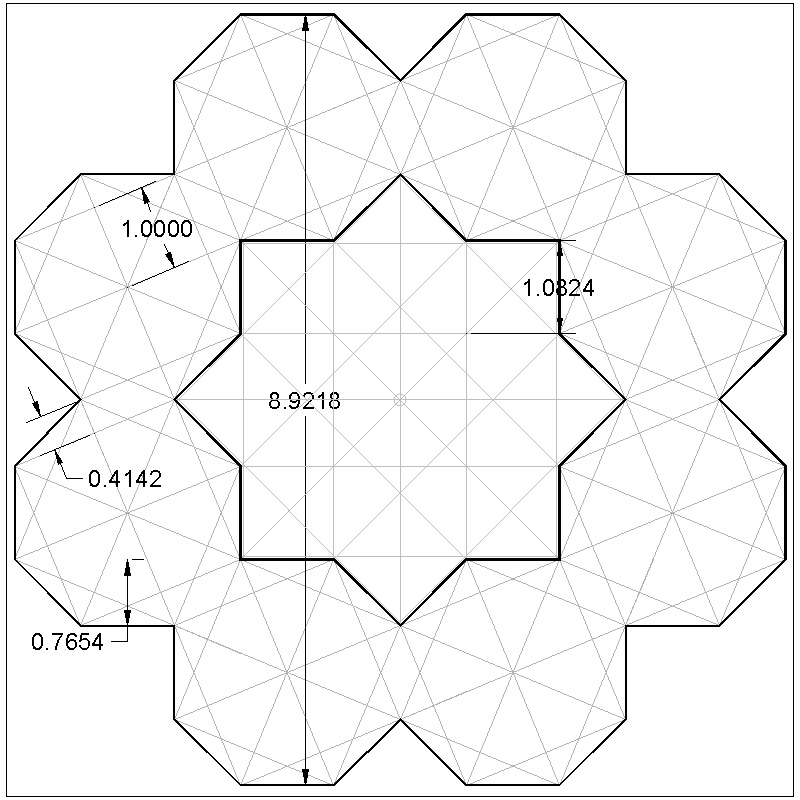
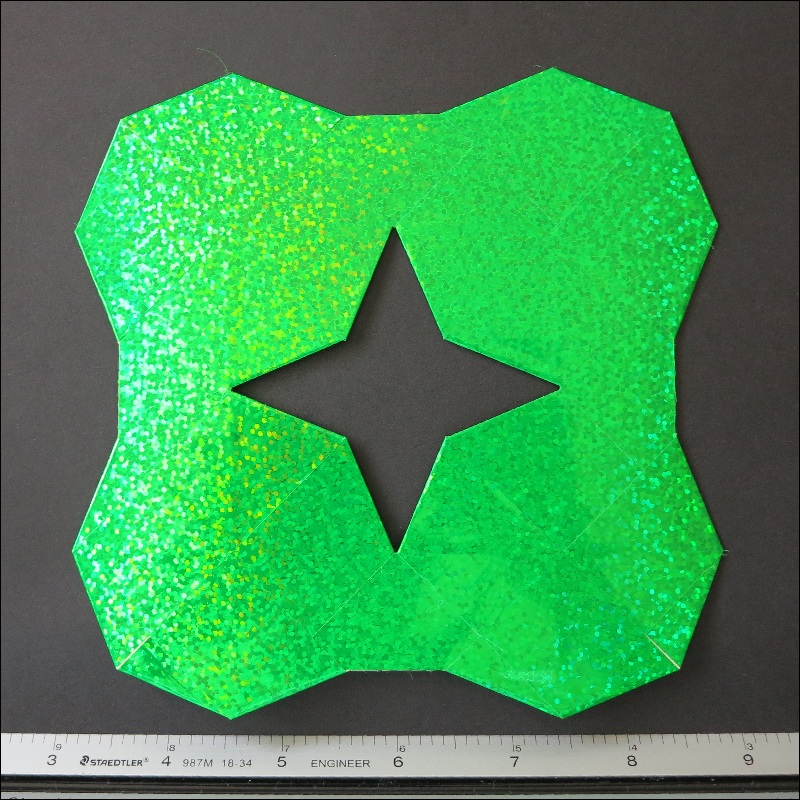
	In the regular octagon drawing below, the numbers (1- 8) shows the sequence
       of how the strip goes around the paper plane. Solid lines cover the front ,
       and dotted lines,the back side of the plane. The right hand side photo shows
       how this is reperesented by the pipe cleaner.
|
Regular Octagon click here to enlarge 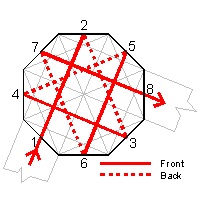 |
Octagon Knot click here to enlarge 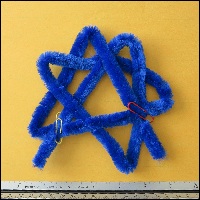 |
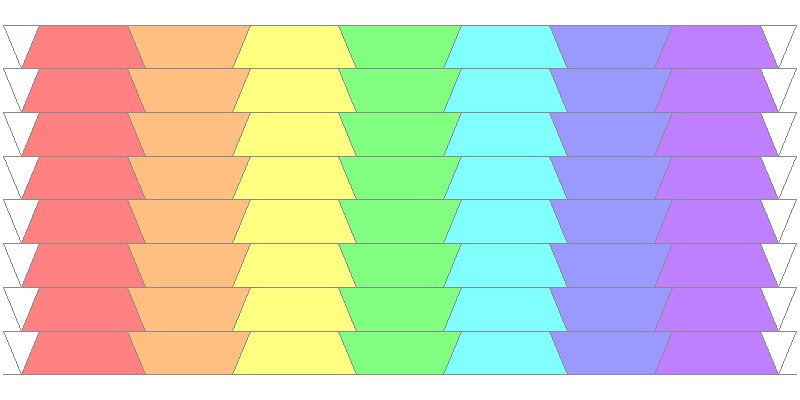
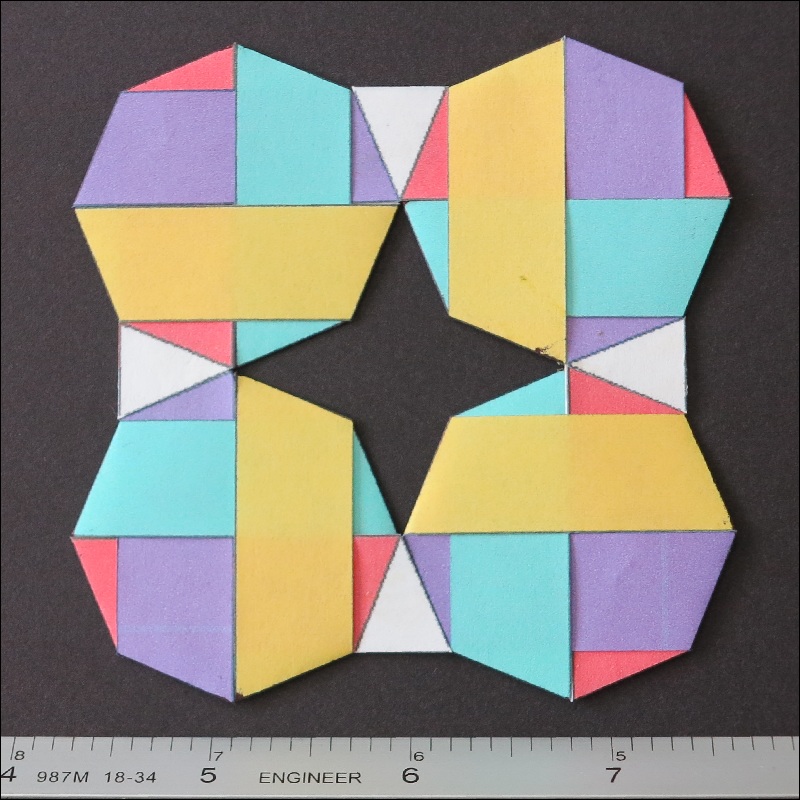
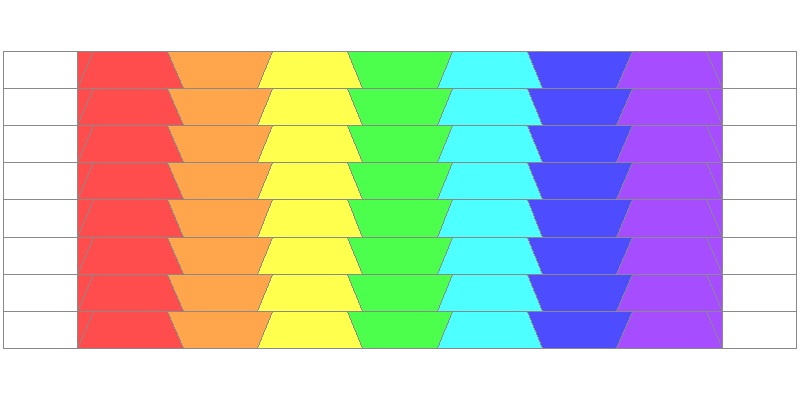
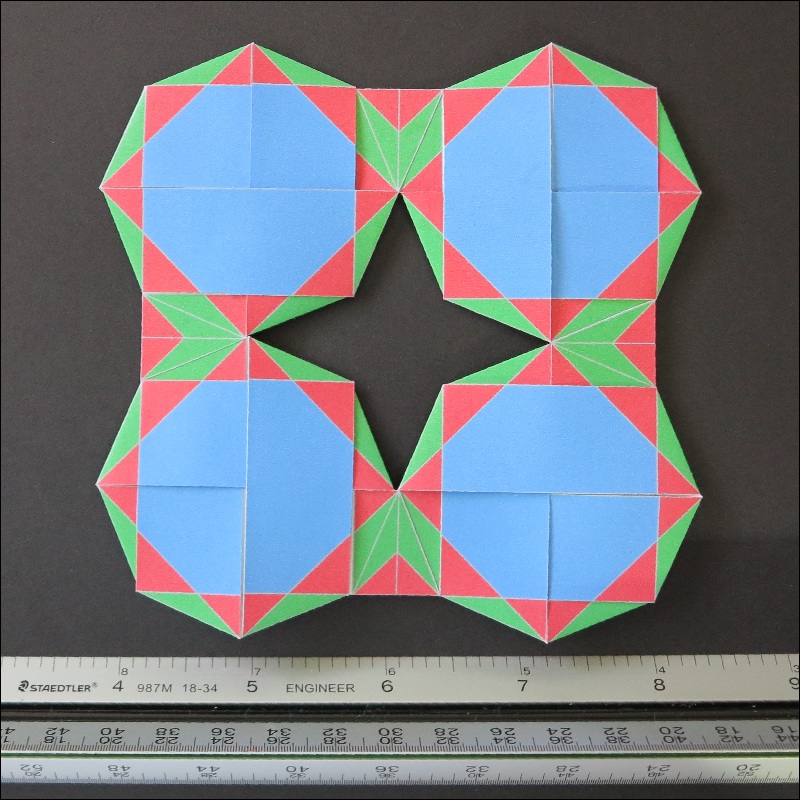
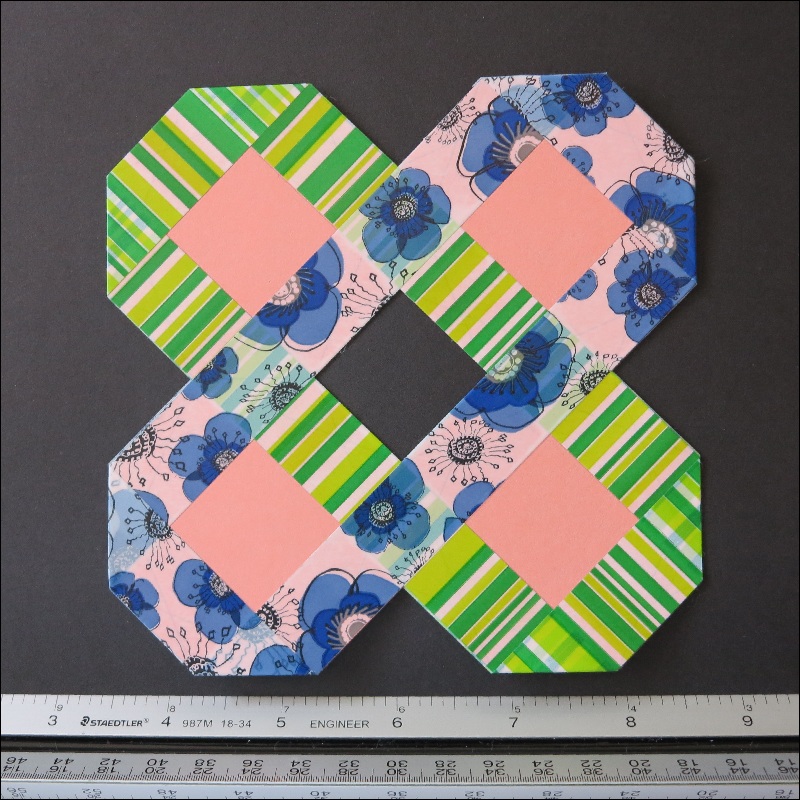
	      When the "Octagon_1" drawing below is printed out, and strips
              are glued together by the triangular shaped areas on both edges,
              (though there are 8 strips in the drawing, only 4 pieces are used)
              the result will be a square shaped ring made up of 4 octagons.
             (Surprise ! surprise !)  Both front and back views are shown.
              8 different colors are used here to make the folding sequence
              easier to be see.
|
Octagon_1 Strip click here to enlarge 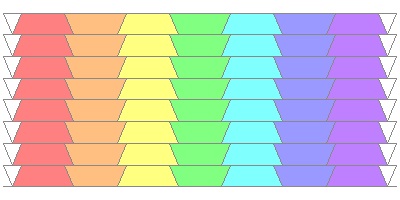 |
|
Octagon_1 Front click here to enlarge 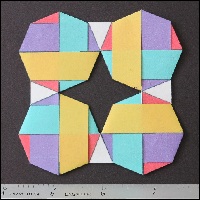 |
Octagon_1 Back click here to enlarge 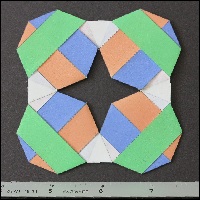 |
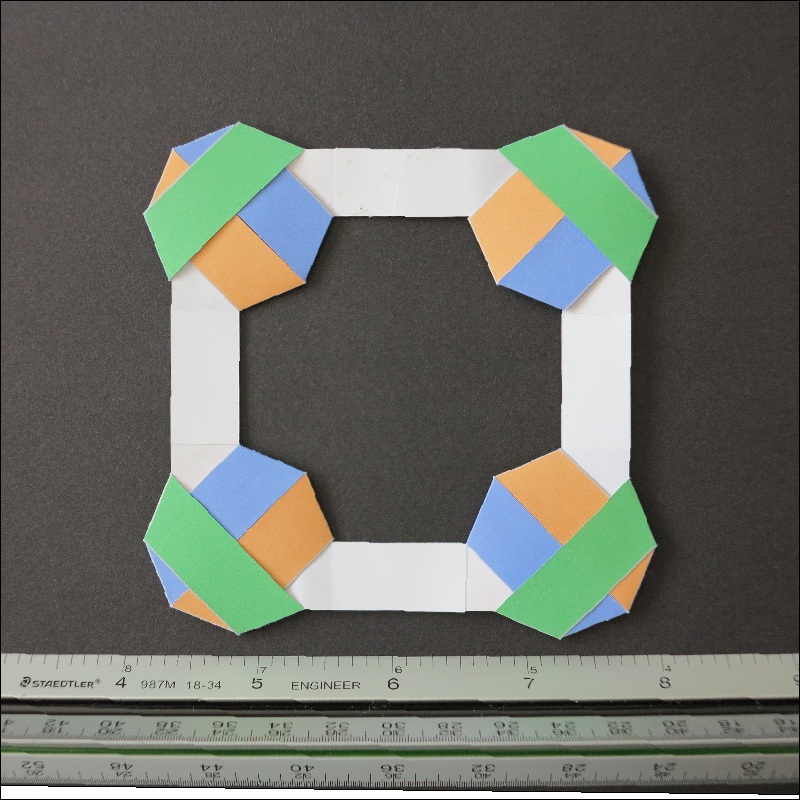
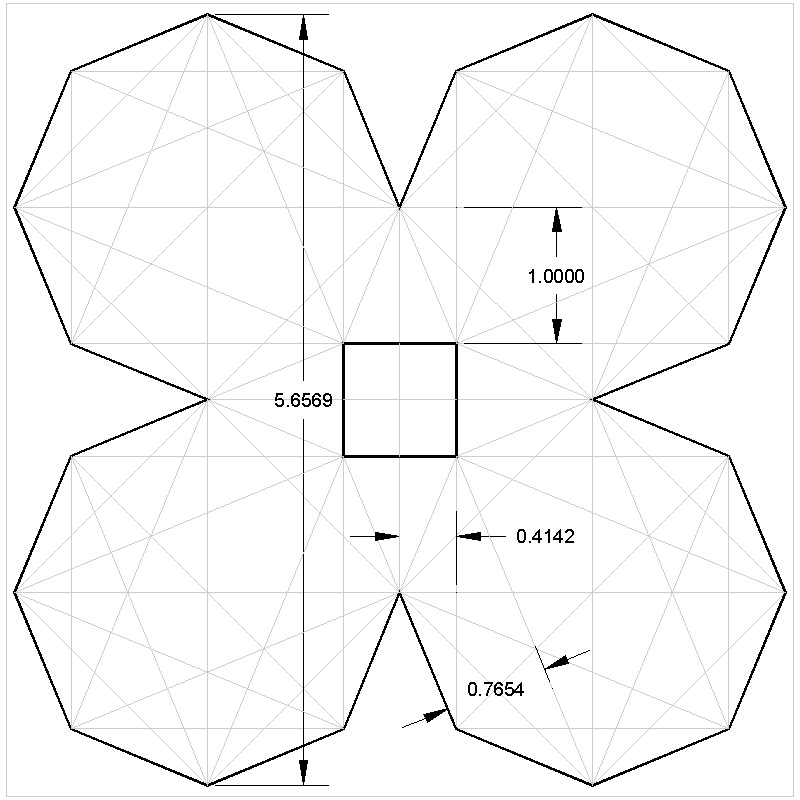
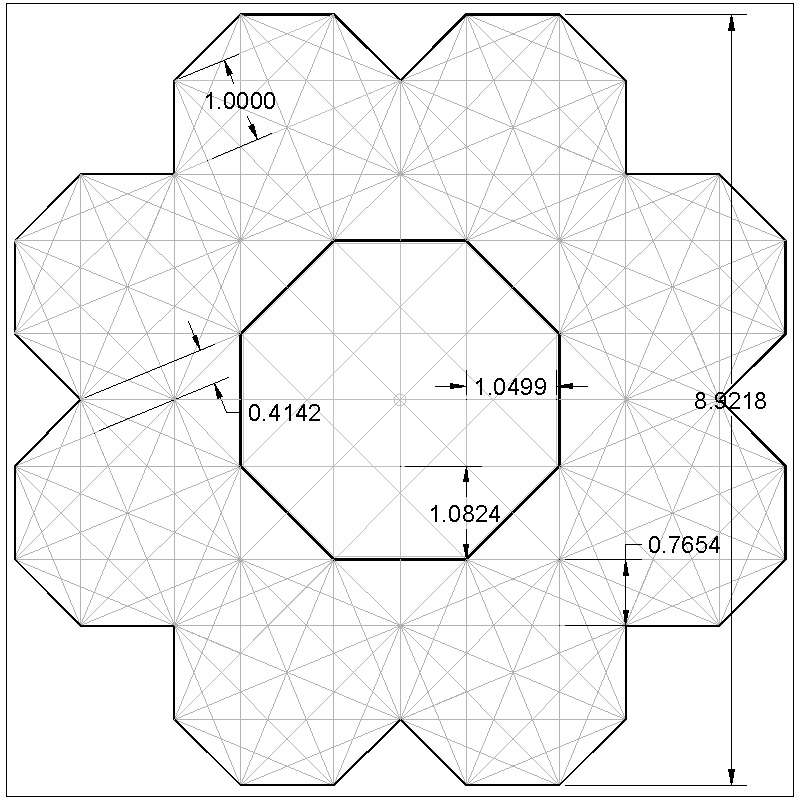
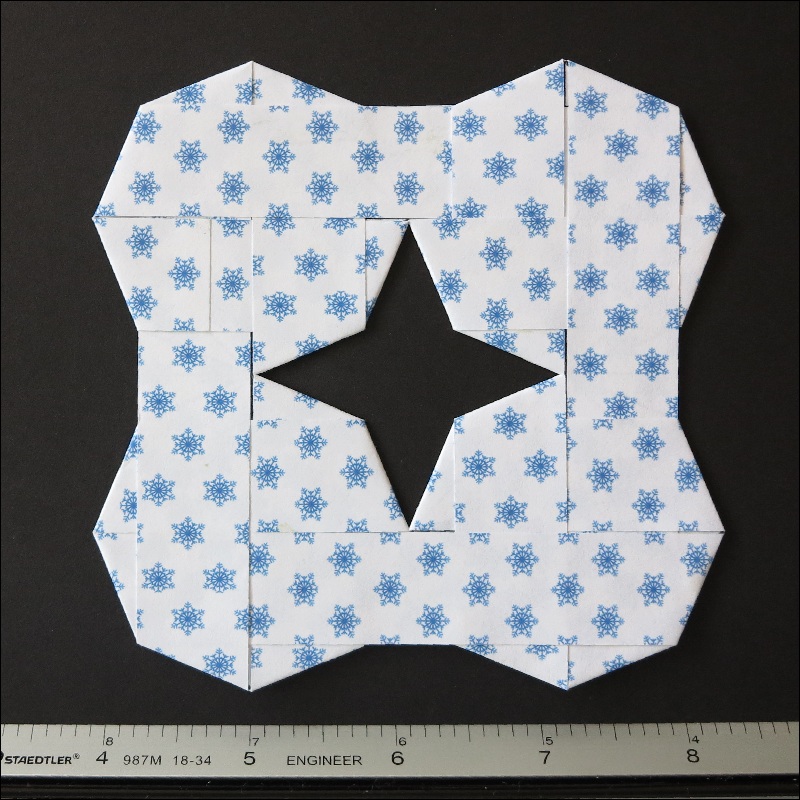
	      When the "Octagon_2" drawing below is printed out, and strips
              are glued together by the rectangular shaped areas on both edges,
              the result will be a square shaped ring made up of 4 octagons.
             (Again ?)  Both front and back views are shown.
              But this gives us a hint on how to make a ring of 8 octagons
              using exactly the same strings.
|
Octagon_2 Strip click here to enlarge 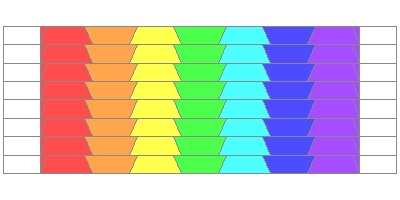 |
|
Octagon_2 Front click here to enlarge 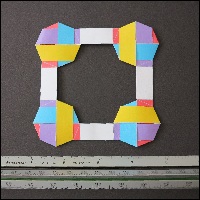 |
Octagon_2 Back click here to enlarge 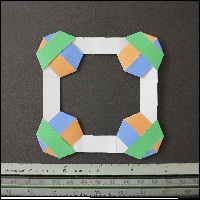 |
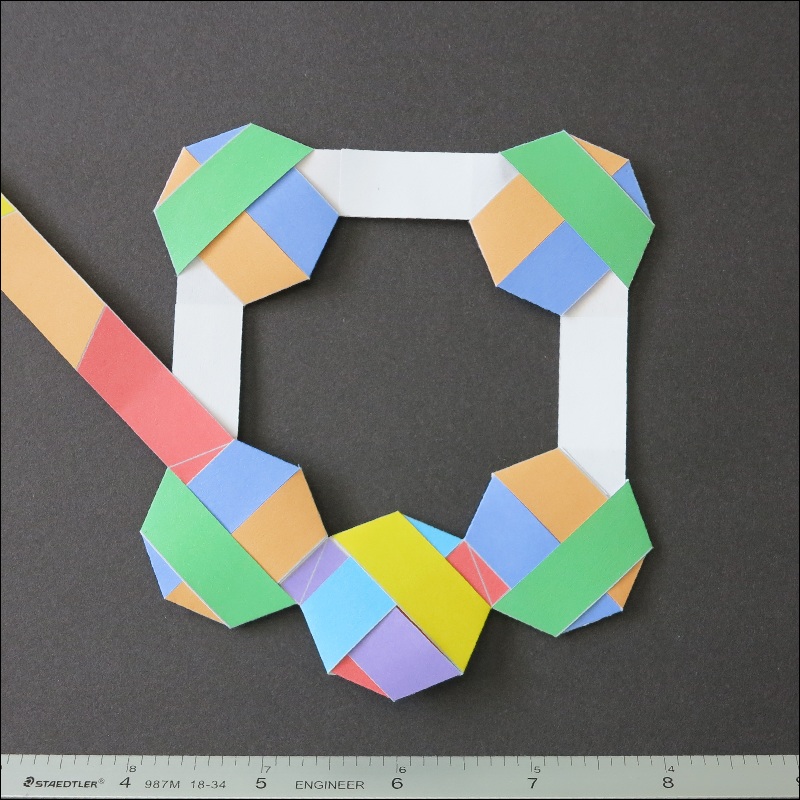
First, prepare 4 strips cut from octagon_2 drawing shown above.
Then connect two pieces together by glueing the end rectangular
area. Using this strip make an octagon in the vacant area between
two octagons (as shown in the first picture below).
Use the rear view as reference.
After the first step is done, connect the next strip,
and follow the similar process.
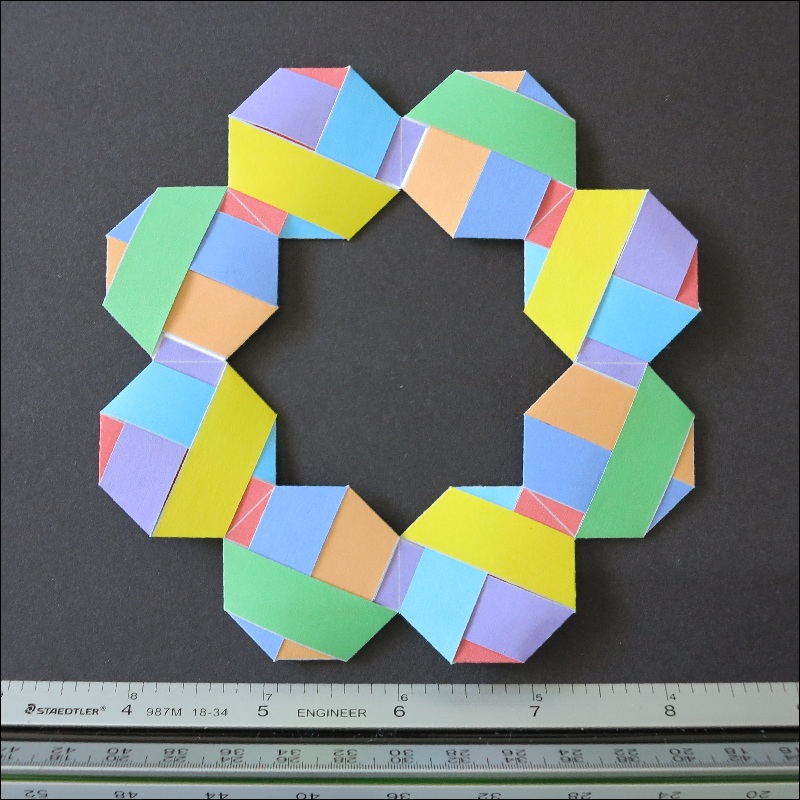
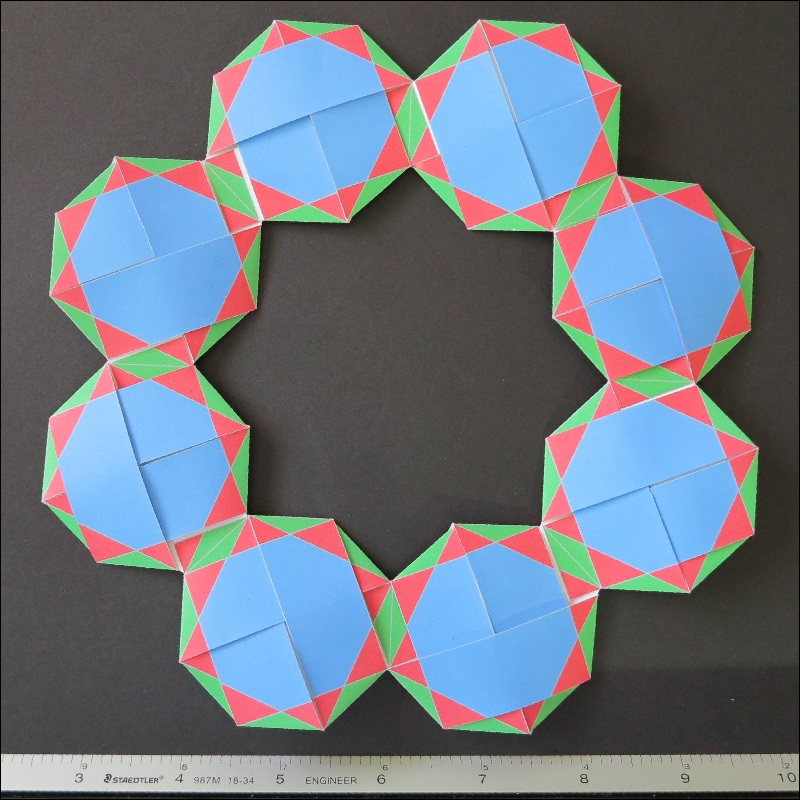
In the end the reader will end up with a ring of 8 octagons
as shown in the picture.
|
8 Octagon Start click here to enlarge 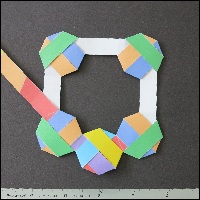 |
8 Octagon Start-Back click here to enlarge 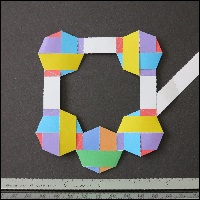 |
8 Octagon Final click here to enlarge 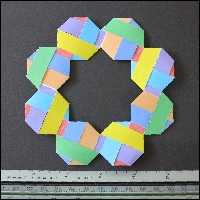 |
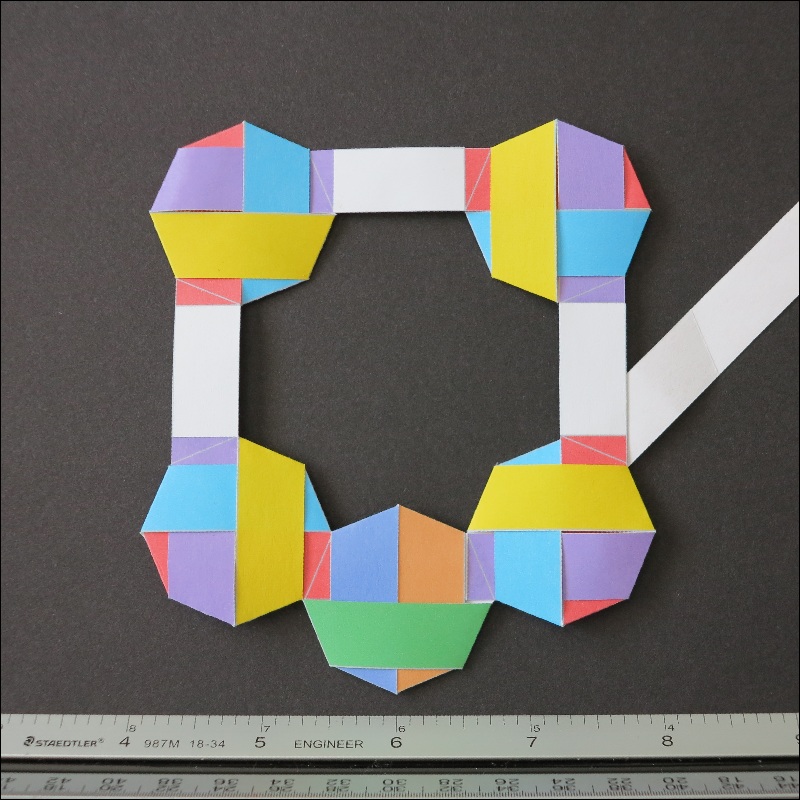
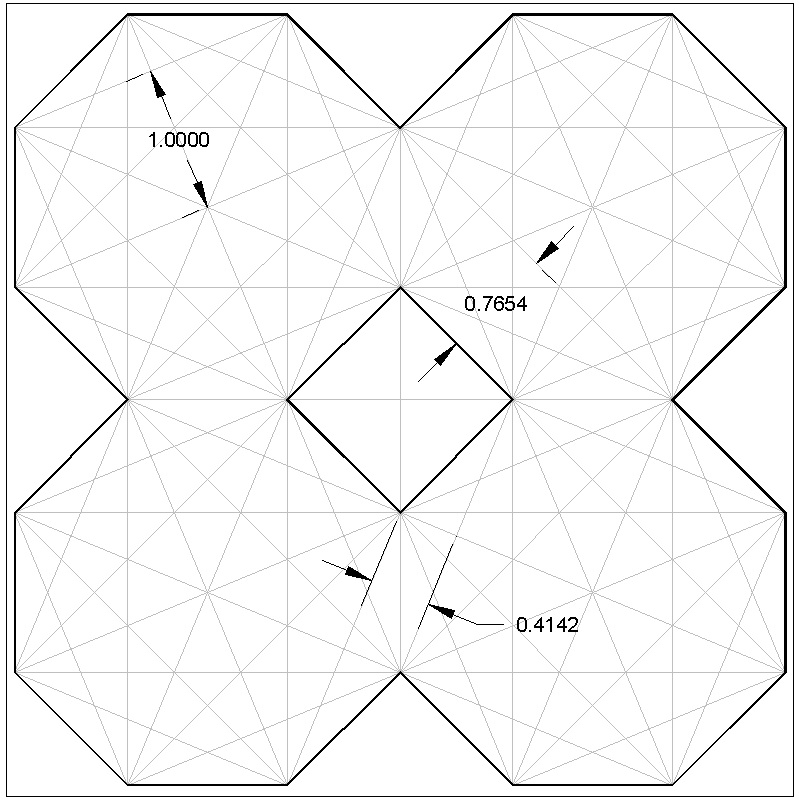
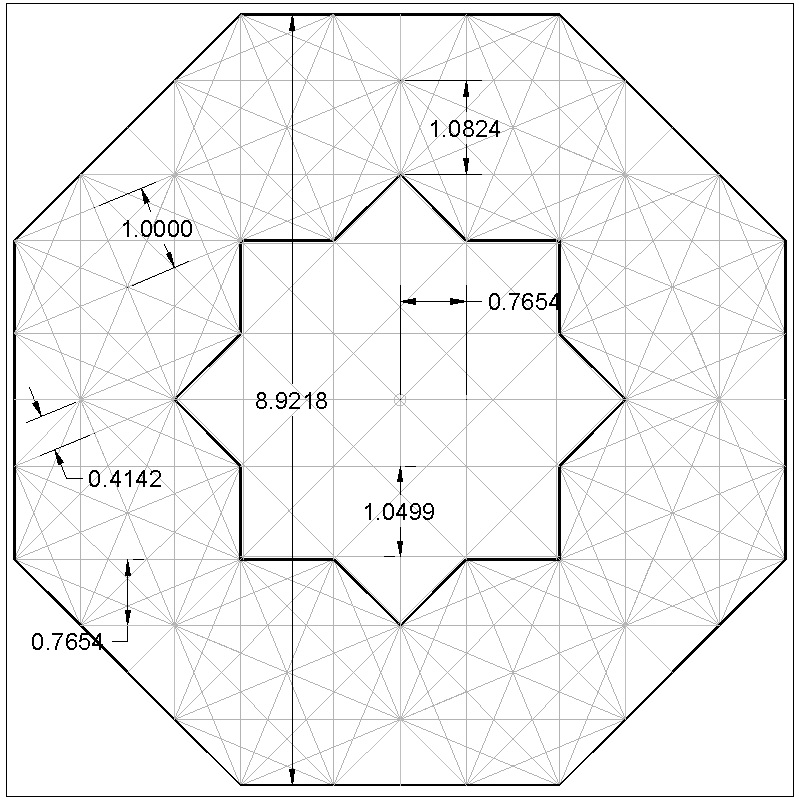
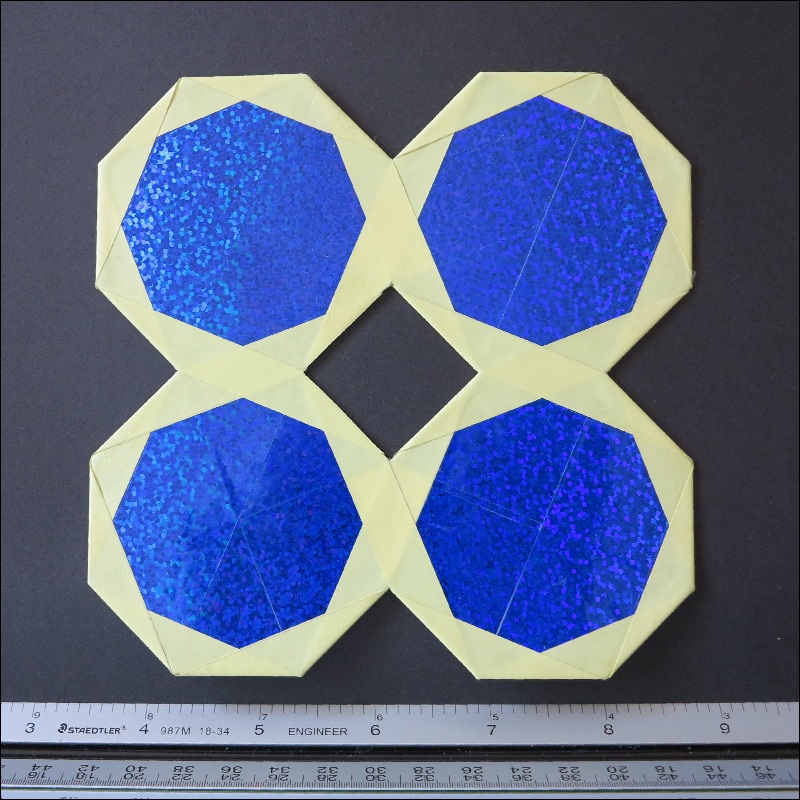
Now that we know how to make a ring of 8 ocatgons,
let us modify the string pattern in order to appreciate the
octagonal symmetry of this ring.
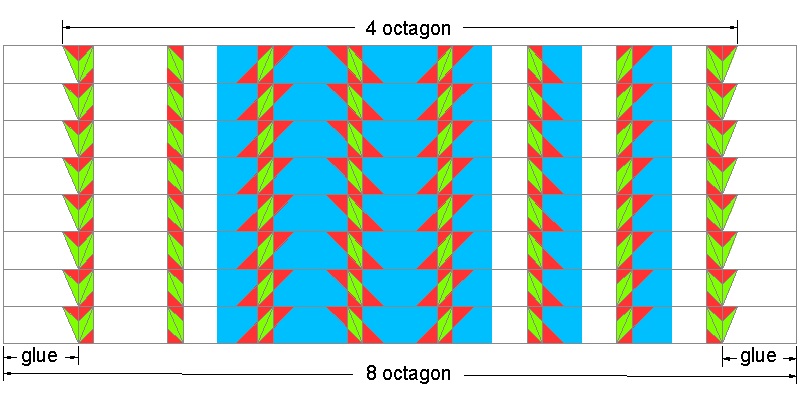
The drawing below allows the experimenter to make a ring
of either 4 or 8 octagons.
4-octagon ring requires only 4 pieces of strip.
The instruction is shown in the drawing.
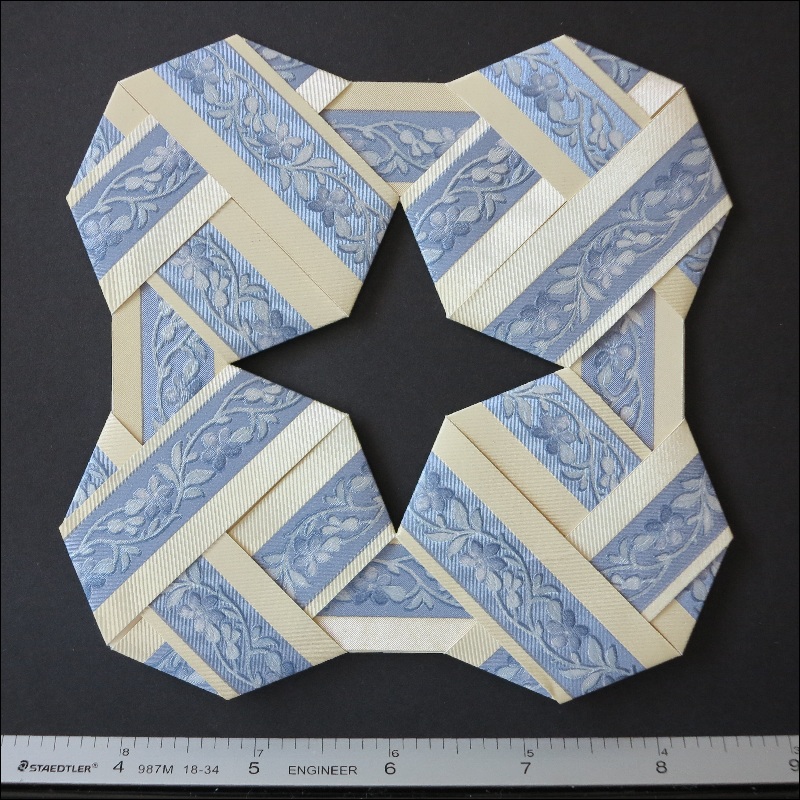
The resulting rings are shown.
Note: two separate continuous strips are used to make this ring.
Is it possible to use only one contionuous tape to make a
complete ocatgon ring made up of 8 octagons ?
The answer is Yes, but with some bend of rule.
See the Fifth Trial section.
|
8 Octagon Start click here to enlarge 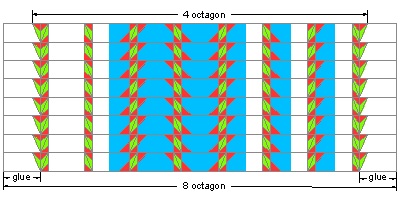 |
|
4 Octagon Case click here to enlarge 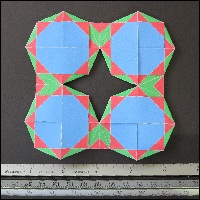 |
8 Octagon Case click here to enlarge 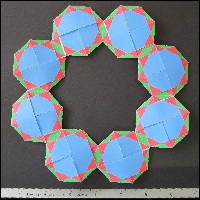 |
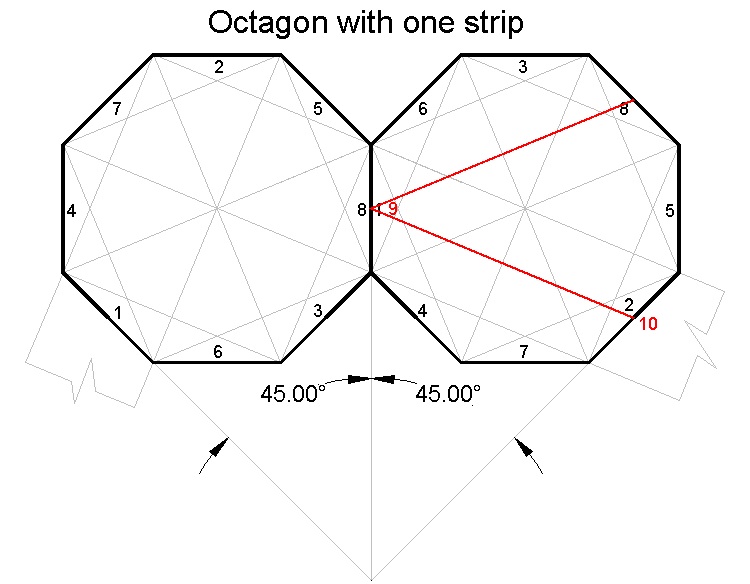
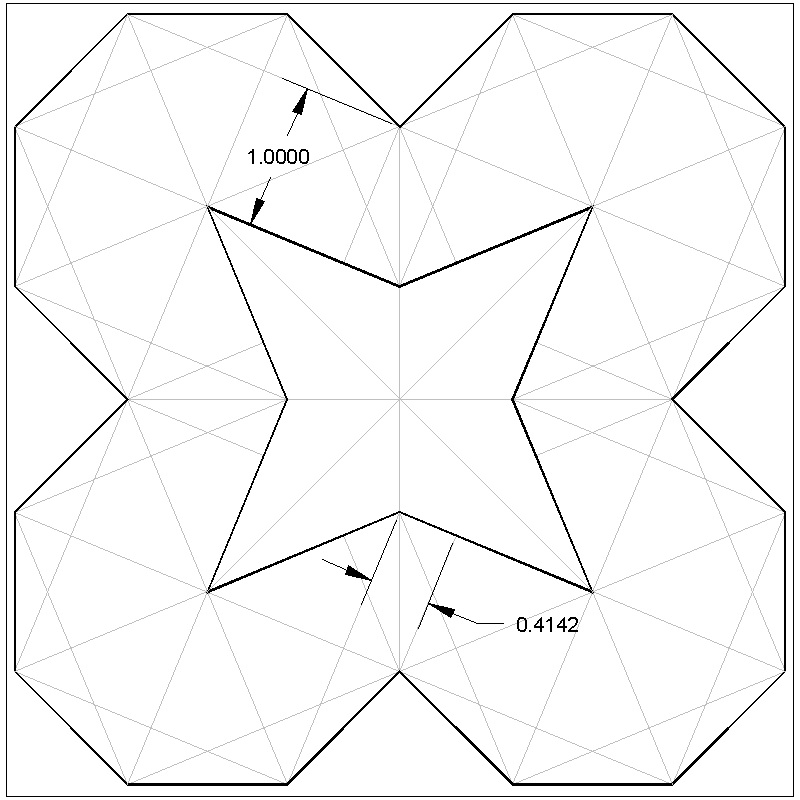
The first drawing below illustrates the idea of making a single
continuous paper strip to make a ring of 8 octagons.
The sequence number 9 and 10 are extras, and they are revisiting
the points 1 and 2.
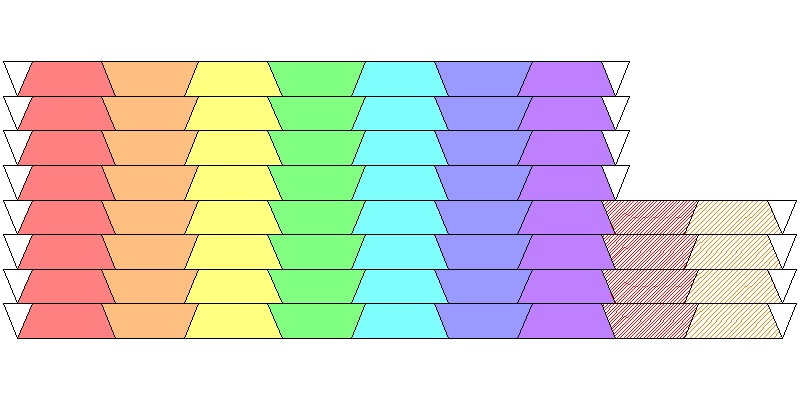
The bext drawing has 4 pieces of short strips, and
8 of longer ones.
By connecting longer strip to shorter one, repeating 4 times
the result will be a long one continuous paper strip.
But this method is more difficult than two pieces approach.
|
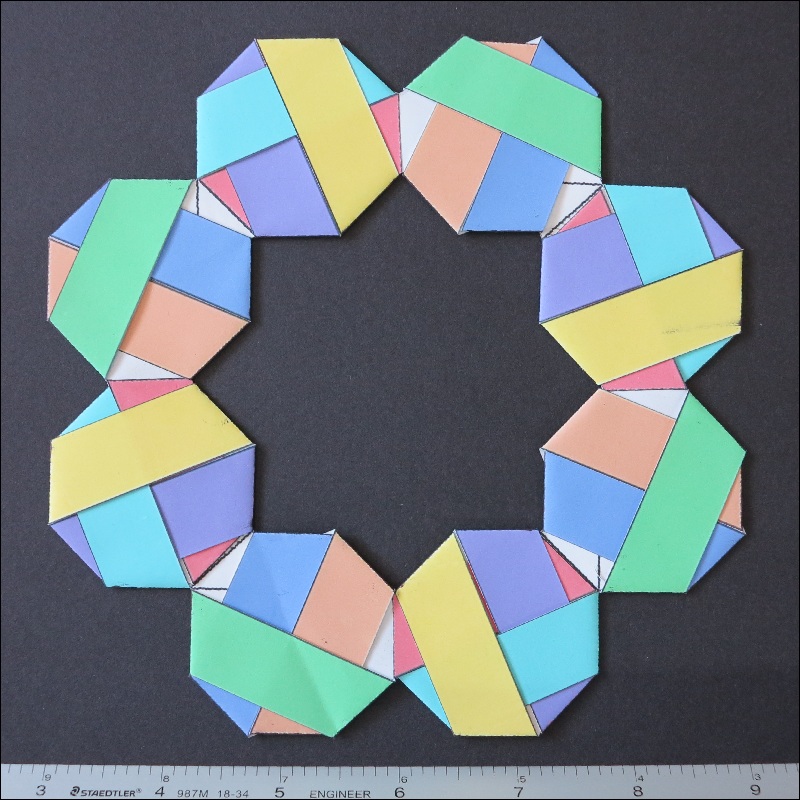
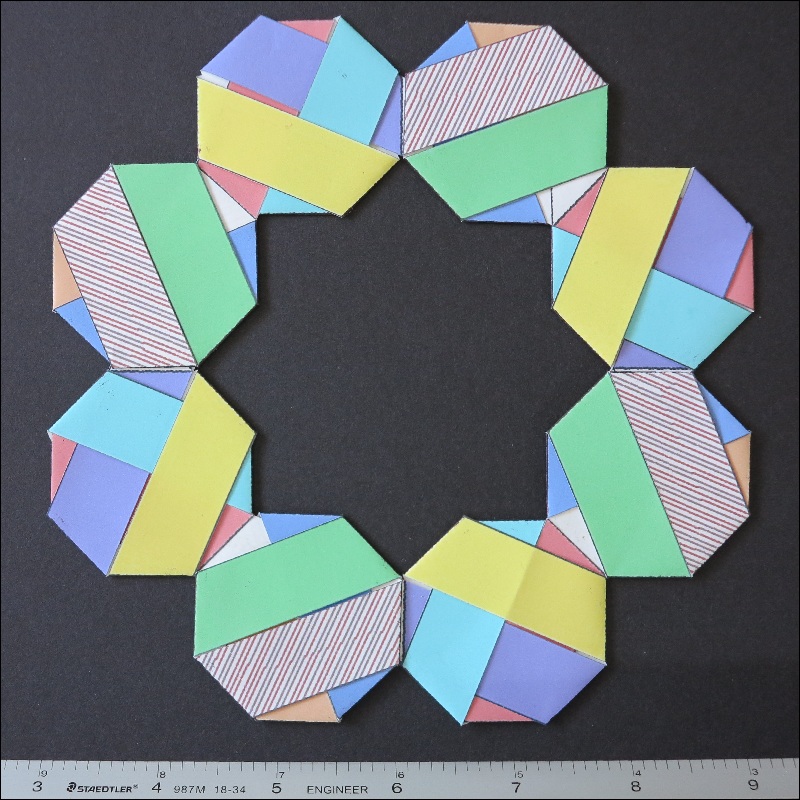
8 Octagon with a single strip click here to enlarge 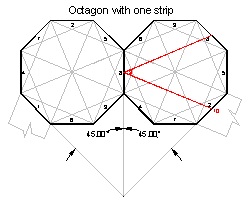 |
8 Octagon - single continuous strip click here to enlarge 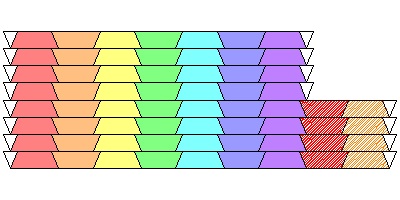 |
|
8 Octagon-single strip click here to enlarge 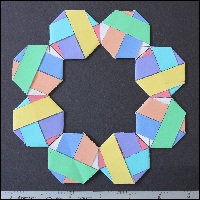 |
8 Octagon-single strip Back click here to enlarge 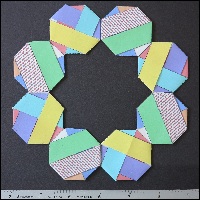 |
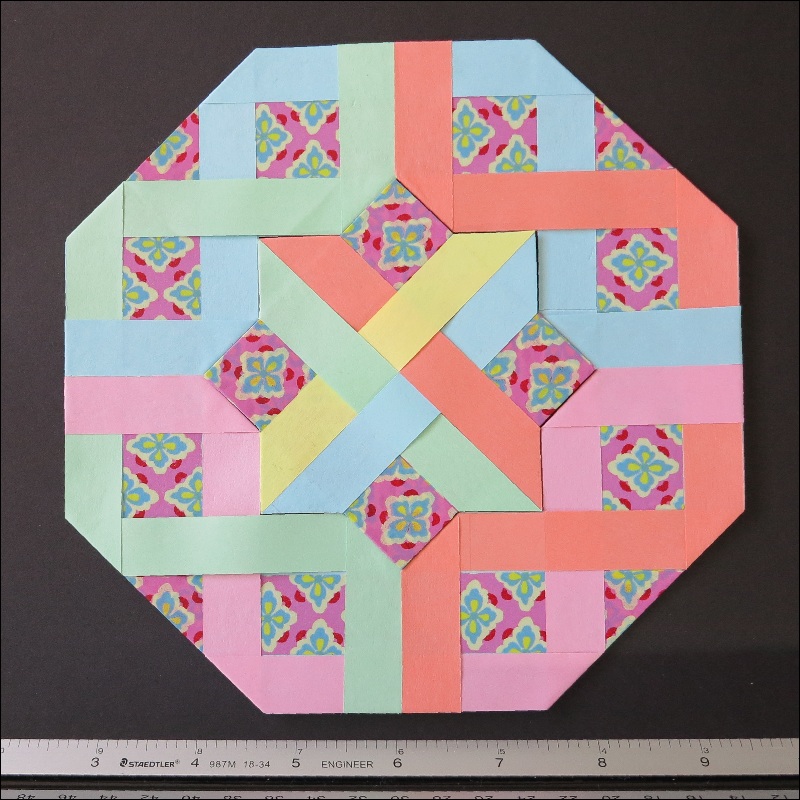
     The introduction of octagon patterned templates, which are made up of
    regular octagon grids, opens up a wide open area of beautiful patterns.
    Here are several examples ranging from basic to their variations.
|
Octagon template #1 larger JPG image 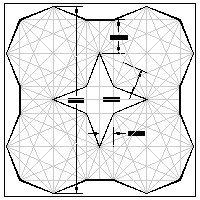 |
Octagon template #2 larger JPG image 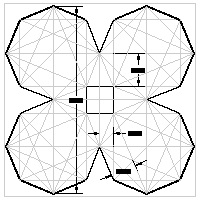 |
Octagon template #3 larger JPG image 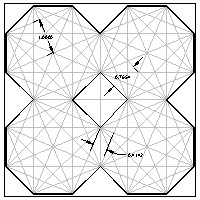 |
|
Octagon template #4 larger JPG image 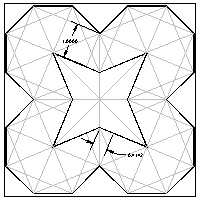 |
Octagon template #5 larger JPG image  |
Octagon template #6 larger JPG image  |
|
Octagon template #7 larger JPG image  |
|
#1 example-1 click here to enlarge 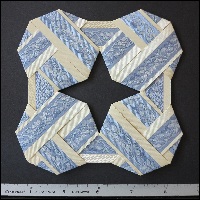 |
#1 example-2 click here to enlarge 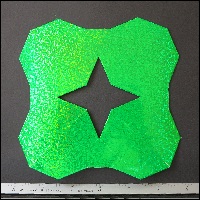 |
#1 example-3 click here to enlarge 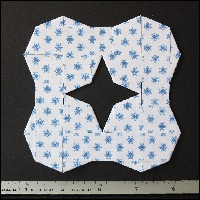 |
|
#3 example-1 click here to enlarge 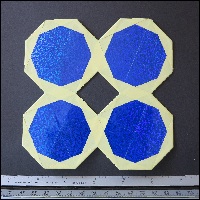 |
#3 example-2 click here to enlarge  |
#1 example-3 click here to enlarge |
|
#5 example-1 click here to enlarge 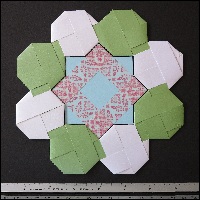 |
#5 example-2 click here to enlarge 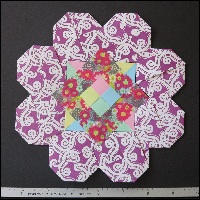 |
#7 example-1 click here to enlarge 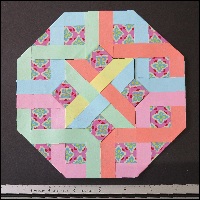 |
Thw following drawings can be used to weave a beautiful nonagon ring.
|
Nonagon Test Fold #1 click here to enlarge & print PDF image 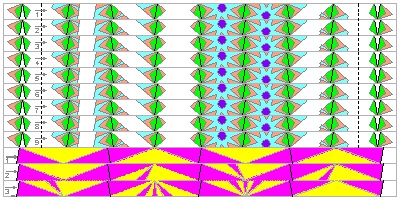 |
Test #1 Result click here to enlarge 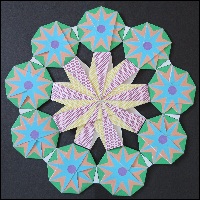 |
|
Nonagon Test Fold #2 click here to enlarge & print PDF image 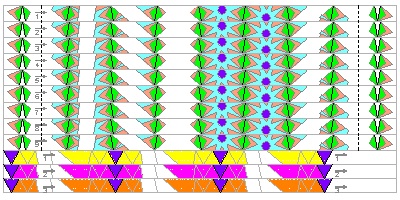 |
Test #2 Result click here to enlarge 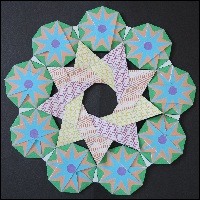 |
     The introduction of nonagon patterned templates, which are made up of
    regular nonagon grids, opens up a wide open area of beautiful patterns.
    Here are several examples ranging from basic to their variations.
|
Nonagon template #1 large JPG image PDF 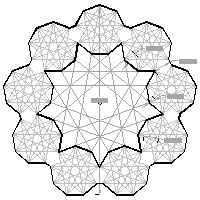 |
Nonagon template #2 large JPG image PDF 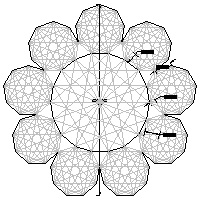 |
Nonagon template #3 large JPG image PDF 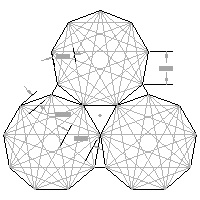 |
|
#1 example-1 click here to enlarge  |
#1 example-2 click here to enlarge  |
#1 example-3 click here to enlarge |
|
Nonagon Case #1 click here to enlarge 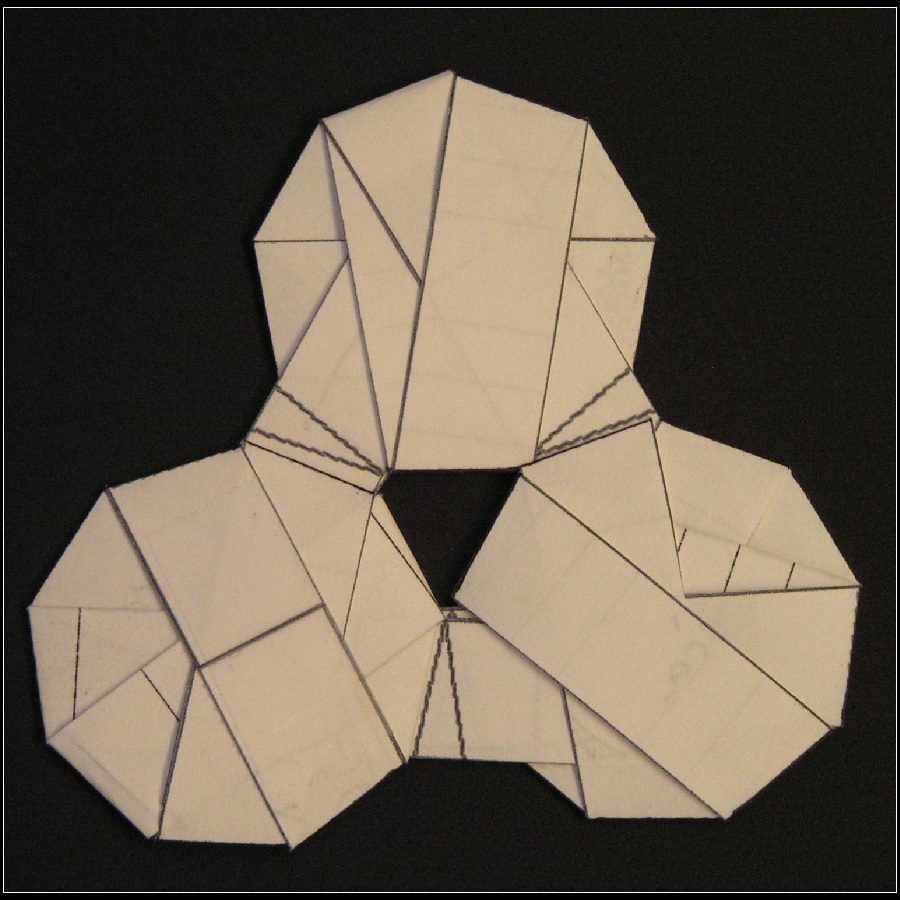 |
Nonagon Case #2 click here to enlarge 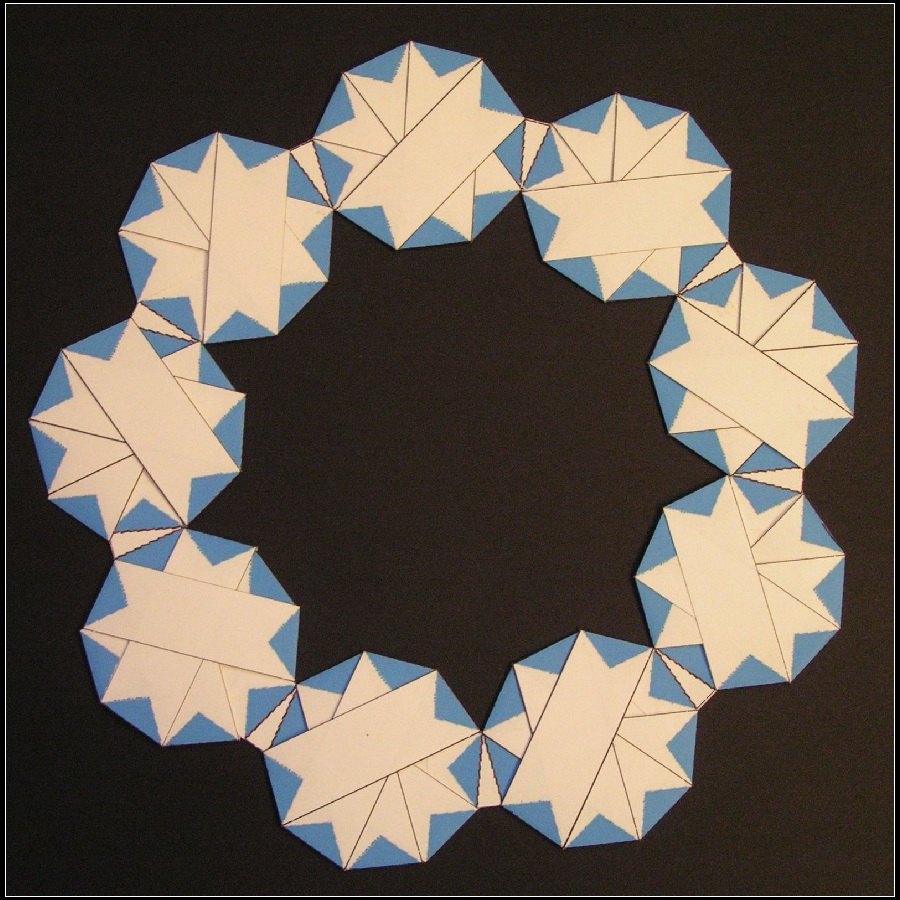 |
|
Decagon Case #1 click here to enlarge 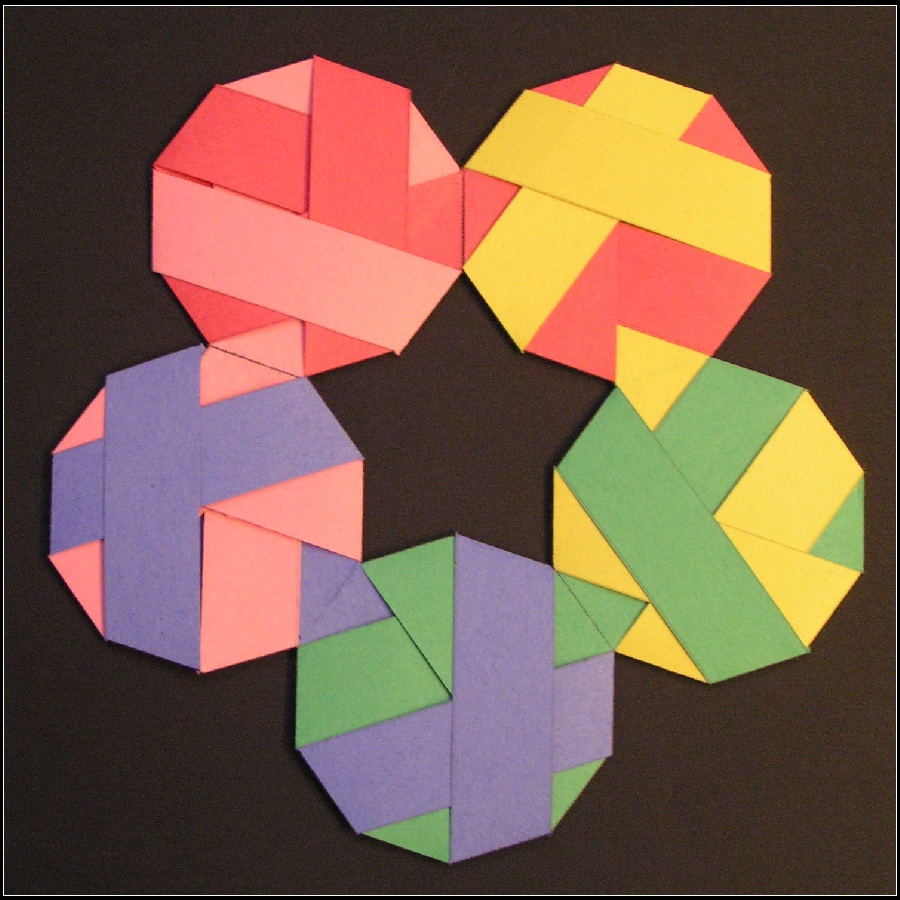 |
Decagon Case #2 click here to enlarge 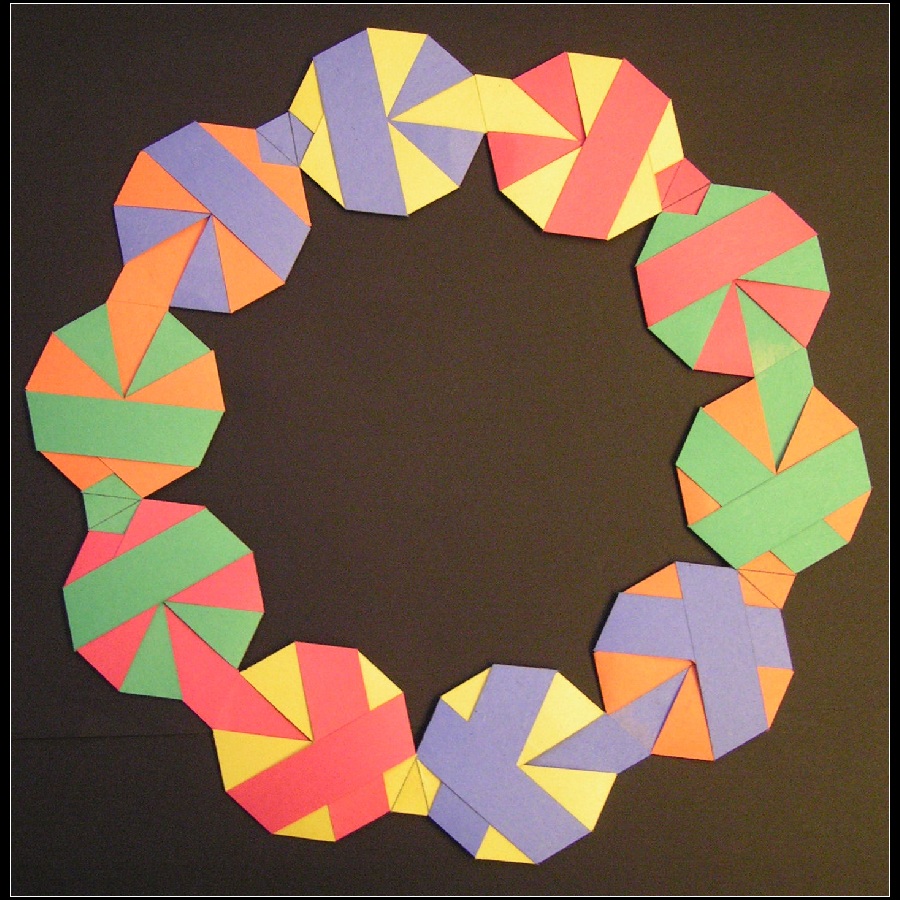 |
Books:
Internet resources:
All questions/complaints/suggestions should be sent to takayaiwamoto
Last Updated Jul 15 ,2016
Copyright 2006 Takaya Iwamoto All rights reserved.
